Hand bracelet at home. Simple and beautiful DIY bracelets
Handicraft has always been appreciated and dearly. Making a bracelet with your own hands is not difficult at all. The materials for making bracelets vary. These are wire, leather, and cords. Various beads: glass, metal, wood, natural stone.
The bracelet can be woven from beads, made from polymer clay, wood, and even from paper and a plastic bottle (by cutting strips from a bottle and braiding them with a cord, thread or cloth). There are a lot of options.
In order to make a bracelet with your own hands, you will need fittings, tools and your own imagination, or ready-made ideas.
Of the tools, you can limit yourself only to scissors and a sewing needle, if the manufacture of the bracelet does not require working with wire. Otherwise, you will need wire cutters and pliers to cut the wire and bend it. The wire will need to be folded in small curls. You cannot do this with ordinary pliers. We need narrow pliers, as in the photo (right).

In stores, you can find a lot of various accessories (wooden and plastic blanks, chains, beads, rings, locks, etc.), which allows you to make a bracelet with your own hands that is in no way inferior to the purchased one.
A few DIY bracelet ideas
You don't have to buy special materials for the bracelet. It can be made from improvised means. Here's an example: button bracelet.

- scissors
- rubber
- buttons

Measure the length of the elastic to the thickness of your wrist plus a few centimeters per seam. Cut with scissors. Place the ends of the elastic over each other and sew tightly with threads.

Now sew the buttons to the elastic in the usual way, positioning them as you wish. You can add other elements to the buttons.

Here's a bracelet made of buttons. Unusual and original.

An example of how you can do lace and chain bracelet.

- elastic cord
- chain
- clamps
- pliers
- sewing thread
Cut two pieces of elastic cord to the same length across your wrist, taking into account the length of the chain. Separate the required number of links from the chain.

Fold one cord in half and thread it through the outermost link of the chain. Then thread the ends of the cord through the loop and tighten.
Also thread the second cord on the other side of the chain.
Fold the ends of the cords overlap, brush with glue and wrap with threads.
Lubricate the inside of the clip with glue and place it on the connected ends of the cords. Squeeze the clamp with pliers. The clip should close on the inside of the bracelet.
You can make several of these bracelets from cords of different colors and wear them together.


Elements that are woven into the middle of the bracelet play an important role here. Metal rings of golden color look beautiful and stylish. Bracelets with elements with different colored stones will look feminine. Several bracelets can be woven and worn together as they are slim and delicate.
- 4 meters of cord for shamballa bracelet (or waxed cord)
- ring (or other decorative element)
- scissors
- duct tape

Cut 2 pieces of 50 centimeters from the cord. Fold one of them in half, thread it into the ring, then pass the ends of the cord through the loop formed and tighten. Also do with the second string on the other side of the ring.

Cut 2 cords, 1 meter each. For convenience, secure the top cord with adhesive tape. We start to weave the bracelet. Place a 1 meter cord under the one attached to one side of the ring. Its edges should be approximately the same. Pass the right end over the cord that is braided. Place the left end of the cord over the right end. Next, we take the left half of the cord, pass it under the braided cord and put it in a loop formed by the right cord. Pull on both cords. This is how the macrame knot is woven.

Slide it close to the ring and continue to weave such knots.

But start the next knot from the left end of the cord, then again from the right and alternate until you braid the desired length.


Now you need to carefully secure the ends of the cords. To do this, thread the end into the needle and insert it under the braid.


It is more convenient to use pliers to pull out the needle. Also "hide" the other end. Cut off the excess. Can be fixed with transparent glue. This side of the bracelet will be the wrong side.

Use the same method to twist the cord on the other side of the ring, making the same number of knots as the first time. Also secure the ends.
Now you need to make an adjustable "buckle". To do this, fold the cords of the two bracelet halves together.

For convenience, they can be tied around the edges with pieces of lace. Take the remaining cord and twist the ends of the bracelet with 5-6 knots.

Use a needle to secure the ends of the cord and trim off any excess. Do it from the wrong side.

Tie knots on the cords, retreating the desired distance and trim off the excess edges.

Place the bracelet on your wrist and pull on the ends.
The same macrame knots can be woven wide bracelet... To do this, you need a thick enough cord and a snap fastener.

Fold the cord in half, thread it through one half of the clasp. Thread the ends of the cord into the resulting loop and tighten. We pass the ends of the cord into the second half of the fastener, measure the desired length along the width of the wrist and once again wrap the ends of the fastener. We lead the ends to the first half of the fastener, we lead them into the fastener (make sure that all the cords are the same length) and now we begin to weave the macrame knots right at the base of the fastener.

We finish it to the end, cut off the excess, leaving the ends of the cord about half a centimeter. We bring them one by one to the fire to melt. Be careful. They will melt and so they can be fixed by gently pressing them to the weave so that it is as neat and invisible as possible.


To do copper wire bracelet, wrap it around your wrist and cut with wire cutters so that one end of the wire extends slightly along the length of the other.

Bend one end of the wire into a circle with pliers. String the beads onto the wire, positioning them as your imagination tells you. Bend the other end of the wire as well. The bracelet is ready. Give it a round shape at the wrist.

Can be done single ring bracelet.

Unbend the ring, put three small beads on it and bend the ring. Then unbend the second ring, also string three beads, connect with the first ring and bend. Do this until you get the desired length for the width of your wrist. Attach the clasp to the last ring.

Another great DIY bracelet idea. People around you may not guess what it is made of. When you open cans of Coca-Cola, beer, etc., metal "keys" remain. We will make a bracelet from them.

Cut two 2-inch pieces of leather or suede lace (you can use a narrow satin ribbon), fold them together and tie a knot.

Pass one cord into the upper hole of the "key" from the can, the second cord into the lower one. Leave about 5 centimeters from the tied knot to the first piece. Place the second "key" under the first one so that the holes overlap. Pass the top cord through the top hole. Bottom - to the bottom. Place the third "key" on the second so that it is located close to the first. Pass the upper cord over the first and third "keys" into the upper hole of the second. The bottom cord is also in the bottom hole of the second "key".

Then, under the third one, put the fourth "key" close to the second, pass the upper cord from below into the upper hole, the lower one - into the lower one. Apply the fifth to the third "key" on top of the fourth and also connect with a cord. Do this until you get the desired length. Wrap the cords around the edge of the last piece and tie a knot 5 centimeters back. Cut off the excess ends. Here is such a bracelet, which is tied on a double knot on the arm:

Popular bracelets on the memorial wire.

It is very easy to make such a bracelet with your own hands.

Measure out the required number of turns on the wire and cut off the unnecessary with wire cutters. Bend the end of the wire with pliers. String the beads. Bend the other end of the wire.

That's it, your bracelet is ready.

Here's an example how you can do chain bracelet... Measure the required chain length. Remove excess links. Attach the toggle clasp. To do this, unbend the extreme link, put the fastener ring on it and bend it back. Various elements can be attached to the chain links. For example, these are butterflies. The desired link will also bend, an element is put on it, the link is bent.

It will look feminine leather bracelet with flowers... To make it, you can use an old belt, cutting out of it a part without scuffs of the desired length along your wrist, plus a few centimeters for the fastener for which the buttons are used. For flowers, use leather of the same color. Cut the petals out of it. Gather flowers with a thread and a needle and sew or glue them to the base of the bracelet.

The bracelet can be made from beadsby gluing the pins into them on both sides and connecting the pins with single rings. At one end of the bracelet, a ring is attached to a pin, and a clasp is attached to it. At the other end, only a ring is attached to the pin, on which the bracelet will be fastened. You can use "caps" on both sides of each bead.

As you can see, making a bracelet with your own hands is easy and fun.
Useful Tips
To create a beautiful bracelet with your own hands, you need very little - a few tools, patience and a few simple tips.
DIY nut \u200b\u200bbracelet (master class). Option 1.

You will need:
Hex nuts
Jump rings (can be wire)
Long nose pliers
Satin cord
Lighter (if necessary)

1. Arrange the nuts the way you want your bracelet design to look.
2.Using long nose pliers, open the rings and begin to connect the nuts with them. You should have a pattern for the bracelet.
3. When you have connected all the nuts with rings in the order you want, get ready to make the bracelet directly. To do this, take a cord and cut off about 60 cm.
4. Fold the cord in half and cut it.

5. Now fold each half in half again and thread through the outer nuts.
6. Using a lighter, carefully melt the ends of the cord. You don't have to lean the fire against the cord, just bring it close.
7. Slide the ends of the cord through one nut and tie the ends.

DIY bracelet made of threads and nuts. Option 2.

You will need:
3 cotton threads
Small hex nuts (in this example, there are 18 pieces)

1. Prepare three strands and tie a knot at the end.
2. Start braiding.

3. When about 5 cm of the "braid" is braided, start threading one nut at each further turn.

4. When you have used the last nut, you need to continue to braid as you did at the beginning.
* Check the length of the bracelet on your wrist. The length should be such that you can wrap the thread around the wrist 2-3 times.

5. After braiding, tie a knot at the end and cut off any excess.


DIY leather bracelet. Option 1.

You will need:
Leather or leatherette
Waterproof paint
Brush
Scissors
Hole punching tool

1. Cut the leather or leatherette into strips - the length of each should exceed the size of the wrist by about 4-5 cm. In this example, the width of each strip is about 3-4 cm.
2.Use waterproof paint to paint geometric patterns or any other designs on the leather stripes.

3. When the drawing is ready, apply a second coat of paint and leave to dry.
4. Make a hole for the button where it is most convenient for you (measure on your wrist) and insert it.


DIY leather bracelet. Option 2.

You will need:
Piece of leather
Scissors
Superglue or leather glue
Clothes button (snap fastener)
1. From a piece of leather, cut an oval about 22 x 10 cm in size. Depending on the size of your wrist, you can make the oval longer or shorter.

2. Make a butterfly and secure it with a thread - just tie it with a thread, at the end of which then tie a knot.


3. Cut a small rectangle out of leather - about 4 x 1 cm.

4. Wrap this piece of thread and secure with superglue.

5. It remains to insert the clasp and you're done.


DIY zipper bracelet (photo). Option 1.

You will need:
Super glue
Clips for threads with jewelry rings
Tonkos
Scissors

1. Prepare some zippers and cut the sides of the fabric.
2. Measure the desired size on your wrist and cut off any excess, but make sure the zipper is still working.
3.Using thin-noses, attach the thread clips to the ends of each zipper, and using a jewelry ring, connect the clip and carabiner.
4. Make several of these bracelets in different colors and can be worn on the wrist, and you can do everything at once.
Beautiful zipper bracelet. Option 2.

1. Prepare 3 zipper halves of equal length. In this example, all halves are the same color, but you can choose different colors.
2. Use a clip to connect all three halves of the fasteners.

3. Start braiding the zipper into a braid.
4. When the braid is ready, secure the ends of the zippers with a clip.

Weaving a bracelet from a zipper. Option 3.

1. Prepare a denim zipper, measure to the desired length and cut off the excess.

2. Attach a thread clip with a jewelry ring or Velcro.
3. You can put on, unfasten and fasten the bracelet.

Making a zipper bracelet. Option 4.

1. Cut the fabric from the two long zippers. Choose the length of the zipper yourself - you can use a zipper that can be wrapped around your wrist several times.

2. Clip both zippers together at the ends. You can use either clamps or Velcro.
Sequin bracelet (for beginners)

You will need:
Sequins
Elastic cord (0.5mm)
Embroidery thread
Scissors
Needle or pin

1. Prepare about 30 cm of elastic cord and tie a double knot at the end of the cord.

2. Pull the elastic through the sequins. You can use sequins in any color and put them on the cord in any order.

3. Wrap the workpiece around your wrist to check the size. Also note that the bracelet will stretch as it has an elastic cord.
When you have put on the number of sequins you need, tie the ends of the cord in a knot and tighten. Make a double knot and cut off any excess.

4. Prepare your embroidery threads and cut several pieces approximately 5 cm long. Tie each piece to the elastic cord with a double knot.


DIY shambhala bracelet. Video 1.
How to weave a shambhala bracelet with your own hands. Video 2.
How to make a shambhala bracelet (photo instruction)

You will need:
Beads
Satin thread
Adhesive tape (scotch tape, electrical tape)
1. Prepare thread about 1.30-1.40 m long and fold it in half.
2. Cut off 2 more pieces of satin thread 50 cm long and place one of them between two strands of folded long thread (from point 1). Set aside the other thread.
3. We start working with three parallel strands.
Tie a knot at the bottom of the strand, which is in the middle (50 cm), and put a bead on this strand.

* To make it easier to work, you can fix the center thread with adhesive tape.
4. Begin to "knit" with loops as shown in the image. You need to make 5-6 loops and then add one bead again.


* You can add super glue occasionally to keep the structure well.


5. Connect the ends with additional thread (see image) and cut off excess thread.


DIY bead bracelets

You will need:
Beads (in this example, cubes)
Elastic thread (cord)
Super glue
1. Cut off a piece of thread to fit your wrist, making sure to leave plenty of headroom.

2. Prepare several strands of the same size. The width of the bracelet depends on the number of threads.
Navigation:
Continuing the theme of summer crafts, let's talk about how to make jewelry with your own hands. Bright bracelets, fashionable beads, unusual rings and other decorations for summer dresses will be interesting for girls to make with their own hands. Of course, mothers will help them in this exciting creative activity.
It is very easy to make bracelets from wooden ice cream sticks or medical spatulas... To do this, you must first soak them in water for a day so that they become flexible. To speed up this process, it is sometimes advised to "cook" them for 15 minutes, but after that the sticks may darken.

Now you need to get them out of the water and very carefully place them in a glass or cup of a suitable diameter so that the sticks take their shape. Leave them in this position to dry. Make sure the chopsticks are completely dry before removing them from the cups.

You should get these blanks for bracelets.

It remains to paint the bracelets with your own hands with paints, decorate with fabric, paper applique using decoupage technique, beads, buttons, etc.

Important! it is better to make a bracelet with a slightly smaller diameter than you need. when decorating a bracelet, in particular, when processing it with paint and glue, it may straighten a little and become larger.
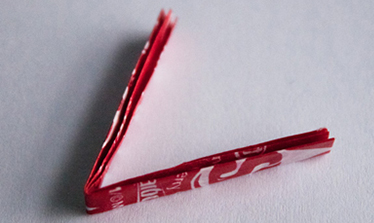
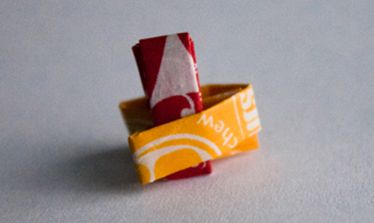
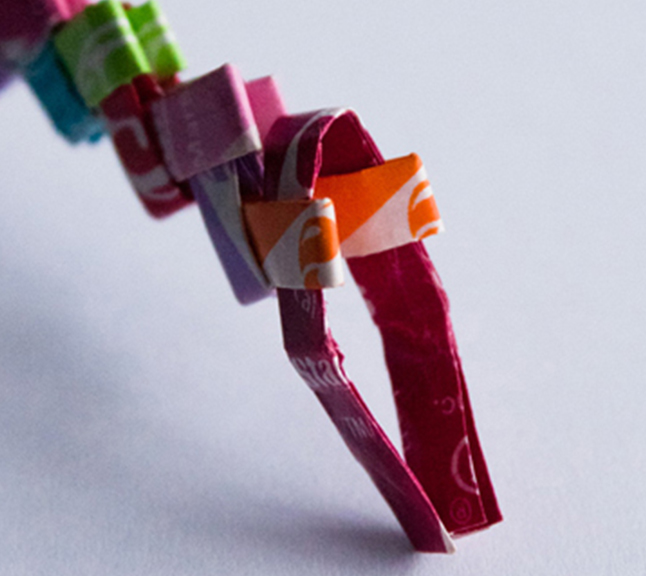
Origami paper bracelet
It is not difficult to make a bracelet with your own hands using the origami technique from candy wrappers. A detailed master class on making an origami bracelet. If you do not have the opportunity to collect so many candy wrappers, then you can make an origami bracelet out of colored paper.


We will tell you how you can make fashionable bracelets from plastic bottles. Let us remind you about this craft again.


To make these brightly colored floss bracelets, you will need:
- leather lace
- floss threads of different colors
- beautiful button
- scissors

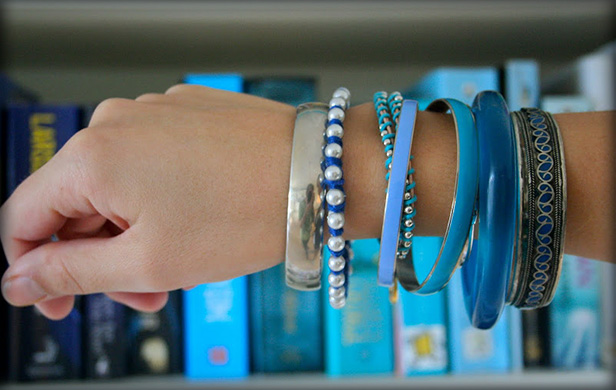
The easiest way to make an elegant beaded bracelet is to buy an inexpensive bracelet and cute beads in the jewelry department, and then “tie” the beads to the bracelet with colored yarn or threads.

Making such a piece of jewelry with your own hands is quick, simple and inexpensive, so you can afford to have bracelets of different colors, suitable for different outfits. This is what the finished product looks like on your hand.

You can use a handmade bracelet instead of a purchased bracelet.
Or you can "tie" purchased beads to a leather lace. This beaded bracelet looks very stylish. It can be wrapped around your wrist several times.

We looked at easy-to-make options for DIY bracelets that parents can make even with preschool children. Now let's move on to more complex master classes on how to make a bracelet.
Beaded bracelets
Now we will teach you how to weave bracelets from beads and beads in the simplest way available even to those who are just beginning to master the science of beading.
Do you know how to weave a regular pigtail? If the answer is yes, then you will quite cope with the task of making such a bracelet from small beads (beads) and a waxed cord. You just need to consistently weave the beads into a braid that is woven from a cord.


In the same way, you can weave a bracelet from thick rope and hexagonal nuts.

One of the most beautiful and stylish, in our opinion, beaded bracelets, which even beginners in beading will be able to make.


To make such a bracelet with our own hands, we need:
- any beads small size (4-6 mm). The number of beads depends on how long you want the bracelet to be. Decide in advance whether he will wrap your wrist one or more times.
- leather cord
- durable threads suitable color. The threads do not have to match the leather cord, they can be in a contrasting color. Prerequisite: the thread must be of such thickness that folded in half twice can pass through the hole in the bead.
- beautiful button for fastening
- a needle, scissors, a clip for attaching the bracelet during weaving
Work plan:
1. Measure the desired length of the leather cord. Keep in mind that the cord folds in half and that you need to leave extra length for the fastener.
2. Measure the thread of the desired length, thread it through the needle, and tie a knot. The thread must be double.
3. Fold the leather cord in half, attach the thread to it with a knot up, with the needle hanging down. Step back a small distance for the buttonhole of the clasp and make a knot by tying the lace and thread together. Make sure the fastening button goes through the loop before making the knot.

4. Clip the string to the piece of cardboard on both sides for easy handling. There is no need to attach the thread. Now we proceed directly to weaving the bracelet.

5. First, make some stitches without adding beads. Pull the thread OVER the right end of the lace, now back UNDER it, then ABOVE the left end of the lace and back UNDER it. The stitch is shaped like 8. Repeat this 5-6 times.
6. Now start adding beads between the two ends of the string. When the thread has come out FROM UNDER the left end of the cord, add a bead. Now pull the thread OVER and back UNDER the right end, again through the bead, then OVER and back UNDER the left end of the cord. Now add another bead and so on.


7. At the end, tie a button for fastening. The bracelet is ready.
Video lessons
Video lesson number 1
Video lesson number 2
Video lesson number 3
Video lesson number 4
Bead bracelets - inexpensive and affordable for anyone decoration that will complement a suit in any style. Beads are very diverse in shape and material from which they are made: glass and stone, plastic and wood, metal and bone - just to name it. And if you use various additions: accessories, ribbons, lace, leather, etc., then the possibilities to create something beautiful and very individual become almost endless. Humanity has been making and wearing bracelets since ancient times. But they did not immediately become an ornament. Their first purpose is amulets, protectors from influences hostile to man. Somewhere this is preserved even now, if the bracelet is made of natural stones. After all, their beneficial influence and energy are undeniable. But it is enough that you like the jewelry and improve your mood.
The most simple diy bead bracelets available for making even for a child. And many, probably, made them themselves, having reached their mother's reserves. You just need to string the beads on a string. In general, this option has a right to exist even if you are no longer a child. If the beads are very decorative, and the thread is elastic, then why not. Using fittings, departments with which can now be found even in small towns, you can complicate the design and add decorativeness. As a last resort, the range of online stores selling jewelry accessories is very extensive. And it's not a problem to find ribbons, lace, cord, chains at all.

Bracelet made of beads and ribbon has many variations. For the simplest, we don't need anything except a narrow thin synthetic tape and beads with a sufficiently large hole. Cut the end of the tape obliquely at an acute angle and burn it slightly over the flame of the lighter so that it does not get tousled. Do not overdo it - if you burn it too much, it will form build-ups that will thicken the edge. Stepping back from the edge of the ribbon opposite to the melted one at a distance of 15-20 cm, so that you can tie a bow later, tie a knot, then put a bead on the ribbon close to it, make a knot again and repeat this until the bracelet is finished. Finish the work with a knot. Trim both ends of the tape and melt them. Your bracelet is ready.

Another way is to sew the beads to the ribbon. The distance between them is equal to the diameter of the bead. Having strung a sufficient amount, we glue the tape on a thread. We've got a very nice piece of jewelry. Narrow lace can be used instead of a ribbon. And if you increase the distance between the beads three times, making three stitches, then the appearance of the jewelry will become even more decorative.
For the third option, in addition to beads and ribbons, we need accessories: hugs, pins, a carabiner and a round-nose tool. We will make roses from a narrow ribbon. We put on hugs on the beads with the help of pins and make a loop with round-nose pliers. From the seamy side, with invisible stitches, we sew roses to the beads, alternating them with each other. Attach the clasp to the outer beads. The result is a glamorous bracelet. Its only drawback is that the lower part of the flowers does not look very aesthetically pleasing. This can be easily fixed using bracelet connectors, which are also available from the hardware department - just circles with eyelets on both sides. Glue roses on them with a glue gun or instant glue is not difficult. At the same time, the assembly of such jewelry will be much easier, it will look better, and it will be more pleasant to wear it.

Beaded and bead bracelets can be quite simple if you string beads and beads on a thin silicone rubber band, alternating them with each other. More complex designs are made using weaving and require sufficient perseverance and skill. But it is not the gods who burn the pots; if you wish, you can learn everything, gradually complicating the products.
The sequence of actions can be seen in the diagrams. If the assembly is done on a silicone rubber band, then you will not need a fastener. Jewelry with a clasp looks more elegant. Do not forget to properly fasten the ends of the threads so that your product is not only beautiful, but also durable. You can hide the cut ends inside the beads if the hole diameter allows. If not, cut them short and lightly melt with a candle or lighter.

Very unusual and beads are obtained if we weave a net of small pink beads with the usual monastic weaving and sew an "air" diagonally onto this net. How this very air chain is made: take a thread or fishing line and string beads on it. With a crochet hook, knit a chain from the fishing line with free loops so that each loop of the chain contains 1-2 beads.
Together with beads, you can include larger decorative beads, pieces of crystals, shells, etc. in separate loops. For one bracelet, the chain length should be 5-7 meters. The hardest part is not to get confused. Attach the first loop of the chain with a pin to the pillow and, as you knit, wrap the "air" around the pillow so that the loops lie side by side without running over one another. You can secure yourself with pins. When sewing, unwind the chain gradually by removing the pins.

To sew, sew the end of the air chain to the corner bead, string three to four loops of the air chain with an accordion on the needle and attach them through 2-4 beads. That is, string loops on the needle that comes out of the bead and pull the line through 2-4 beads. At the exit point, re-type the air loops on the needle and pull the thread through the next beads. Move diagonally along the grid lines. Do not cast more than two stitches at the edge. After going around the edge, move in the opposite direction along the adjacent diagonal line. Large beads of irregular shape can be included in the "air", or you can sew them separately in any order or strung on a needle along with the loops of the air chain. When finished, attach the chain toggle clasp around the edges of the bracelet to the garment. You can simply make an air loop on one end of the bracelet with a needle and thread or fishing line, and attach a button or large bead of a suitable color on the other.
How to make a bead bracelet

How to make a bead bracelet and chains. We need the following materials: about a meter of chain, beads of two colors (you can take contrasting ones - black and red, or, on the contrary, choose a tonal combination), beads for the central row are slightly larger than for the extreme ones, silicone thread with a total length of about 3 m, scissors and three needles. We divide the chain into segments of 5 links.
We pull the thread into the needles so that it is doubled, and temporarily fix the ends of the thread. Further, according to the scheme: first we string a large red bead on the middle thread, then we thread the threads through the links of the chain: the extreme ones - through the first and fifth, the middle - through the third link. The next step is to string small red beads on the extreme threads, put on a piece of the chain, again a large bead on the middle thread and behind it a piece of the chain. After that, we string small black beads on the extreme threads, and behind them a chain. Thus, we alternate on the extreme threads after the large bead, either red or black. We finish with a chain and tie the threads of each row, carefully tightening them so that there are no gaps between the beads. We hide the ends of the threads in the holes of the beads.
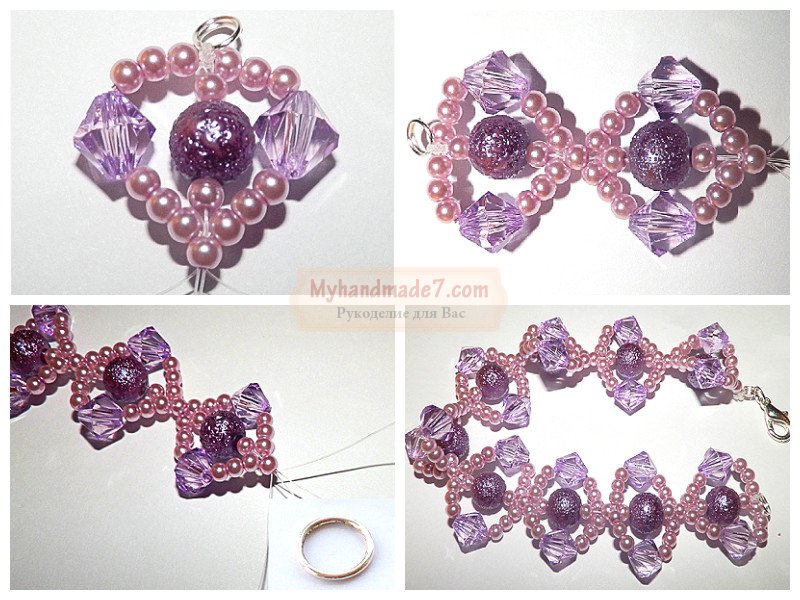
Bead bracelet master class

First, we will prepare the accessories: plastic purple beads with a textured surface with a diameter of 8 mm, artificial pearls with a diameter of 3 mm in a pink-lilac shade, faceted transparent beads-crystals of lilac color, silicone thread or fishing line, 2 ring-shaped connectors and a carabiner. Cut two pieces of thread about a meter long and tie them on a ring so that 4 free ends of the same length hang down.
Of these, two ends will be double middle thread and two will be single extreme. On the central double thread, string a pearl, a large bead and a pearl again. On each of the side threads we string successively 3 pearls, a faceted crystal and again three pearls. We connect all the threads together and pass them through one pearl. We repeat this sequence of operations again until the product is of the desired length. Having finished the work, we tie the bundle of threads to the ring, cut off the excess and slightly melt the remaining ends. We attach a carabiner to one of the rings.
Weaving bracelets from beads - an exciting and exciting experience. And if you also attract imagination and use various auxiliary materials, sometimes completely unexpected, then you can create original and unique products. See how beautiful and feminine jewelry is made by using lace and beads together. Of course, such a decoration cannot be created in five minutes, but the result is worth it. In addition, they are not so difficult to perform. We need lace: machine or handmade. It is up to you to choose a base made of synthetic or natural threads, but keep in mind that the fragment should consist of a whole number of motifs.
Synthetics can be melted along the edge to keep it from slipping, and cotton or linen may have to be swept in problem areas by hand or machine. You can knit the necessary base with a hook or on bobbins specially, then such problems will not arise. When the base and matching beads are ready, first place the beads over the base without sticking to find the best fit.
Only then sew them on. Part of small beads or rhinestones, if they are also used, can be glued with instant transparent glue or a glue gun. In the example, I selected white lace and imitation pearls. This bracelet can decorate a wedding dress. If you choose linen or cotton lace in natural colors, then wood, bone or ornamental stone beads will do. For a fastener, sew a button or bead on one edge, and make a loop on the other.

Leather goes well with beads. An elegant bracelet is made of beads and leather cords. Its production will not take long. This type of jewelry is unisex, it can be worn by representatives of both sexes, only the beads must be selected individually. Take about one and a half meters of leather cord, beads with a diameter of 8-10 mm, strong thread to match the cord or, conversely, contrasting. Fold the cord in half and tie in a knot at such a distance from the edge so that the prepared button passes through the resulting loop. Fasten the loop securely, for example, using a clip-clip on a sheet of thick cardboard. In order not to damage the skin, the loop can be previously wrapped with a cotton pad.

Tie the thread with a strong knot to the lower cord and 2-3 cm from the knot, just braid the cords so that the thread lies on top of the cord, bends around it and from underneath it lies on top of the second cord. It turns out like an eight from a thread. Then start stringing the beads. The thread tension should be sufficient, but not excessive. The thread must pass through the bead twice: first in the forward direction, then in the opposite direction. On one of the cords, you can make a locking loop around the cord each time. When all the beads are strung, fold the loose ends of the cord and the end of the string together and tie them in a knot. Pass one end through the button and tie a knot from both ends and thread. Cut off any excess. You can additionally secure the ends with glue. Such a bracelet can be made short for one turn around the arm, or made long so that you can wrap the arm 2-3 times.

Sometimes a schematic drawing is enough to get the job done. Bead Bracelet Patterns very easy to find on the internet. Browse the relevant topics in LiveJournal or on specialized resources. If, nevertheless, you have difficulties in the manufacture of a particular model, look video bead bracelets, which can also be found a huge variety on youtube. having mastered various techniques, you will be able to make exclusive jewelry. Headsets from a bracelet and or earrings look very good. And you won't have any problems with gifts for relatives and friends either.
Today there are no problems with the choice and purchase of jewelry, we do not mean expensive jewelry made of precious metals and stones, but ordinary costume jewelry. The choice is really large and the prices are quite affordable, but you still want something of your own, dissimilar and original. To obtain a piece of jewelry in a single copy, it is not at all necessary to contact an eminent designer, trust yourself, you have a lot of materials at home that you can use at no extra cost, showing only diligence and creativity, to make jewelry with your own hands. Today we will share ideas on how to make original and exquisite bracelets from scrap materials.
- Leather lace and hanger.
This is one of the simplest, which does not require any special skills and abilities, a way to make yourself a beautiful piece of jewelry. What you need, you can buy accessories in a special store (lace, fastener, hanger), you can find all at home. You can remove the clasp from old beads or decide to fix the bracelet with strings, a part of a key ring from a bag, keys, an earring or a brooch can act as a suspension (look carefully, you will definitely have a cute thing that you do not find use).

It is not necessary to use a leather lace, you can use different threads, ribbons, and ordinary strings and laces. The suspension is fixed with a free loop, with two or more laces on both sides, the bracelet is fastened or tied with a bow.
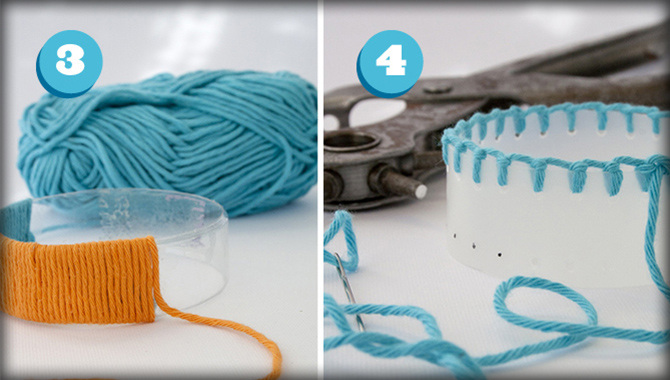
- Knitted bracelet.
Those who like to knit always have leftovers of yarn that can be used and made original bracelets, beads and earrings. We suggest that you tie a pre-prepared form (we will describe the method of its preparation in more detail below) and get a soft and unusual bracelet that will perfectly complement your wardrobe.


For those who are not friends with knitting needles and crocheting, you can use knitted parts of things you do not need, old stretched sweaters, scarves and hats. Show your imagination and get a whole collection of bright bracelets.
- Cute buttons.
With a little imagination and a minimum of skill, all you need to be able to do is thread the thread and needle and thread it through the button hole. Modern buttons have turned into small works of art, it often happens that looking at them in a store, we do not find them direct, but this does not prevent us from using them to make a bracelet.
(banner_adaptivadsense)


The only limitation on the selection of buttons, they must have through holes, be flat, shape, color and size range, at your discretion. We offer you options using simple, one-color buttons, where the meaning is reduced to openwork weaving, distinctive ethnic jewelry playing on the contrast of harsh threads and buttons, delicate bracelets made of designer, decorative fasteners.
- Beads and pins.
Pin bracelets are gaining popularity, and this is understandable, they look wonderful, they are made simply, and what is especially valuable they are not static, you can change the mood, color scheme and character of the bracelet every day by changing the pins. What do you need? Two elastic bands as the base of the bracelet, sets of pins and bright beads.


You can buy beads in bulk at an accessories store and add a home collection of unnecessary and outdated beads. Next, make blanks, string beads, pebbles and buttons, in random order on one side of the pin, having collected a sufficient number of components, begin to fix them on elastic bands, separating the pins with beads.
- Decoupage technique.

The decoupage technique is not a new idea, it has been actively used for a long time to decorate household items, furniture and jewelry, it is suitable for plastic, wood, and ceramic bases. All that is needed is to prepare the surface of the base, degrease it with an alcohol solution or liquid with acetone and prime it with diluted PVA glue (proportion of glue and water, one to one). The base for the bracelet can be a piece of a plastic bottle, an ice cream stick, or an old, simple plastic bracelet. Choose from napkins (use only a dyed top layer), newspaper and magazine clippings, or wallpaper scraps. Wait until the soil is completely dry and, having saturated the colored pieces with glue, gently apply them to the frame. It is advisable to finish the decoupage in one layer, so try to cover the entire area and not create wide seams and overlays. After gluing the colored patches, leave the bracelet to dry, wait until it dries completely, until the product stops sticking to your fingers, and cover the jewelry with colorless varnish.
- Thermoplastic for bracelet.
The stores sell sets of polycarprolactone, the so-called thermoplastic, from which you can easily make any part you need, both for home repairs and for the manufacture of decorative interior items, toys and jewelry, everyone who has ever worked with plasticine or dough can cope easily. The material is sold in the store in small, two hundred and fifty grams, portions, is inexpensive, which makes it accessible to everyone. Buy and create, nothing should limit your imagination.


The thermoplastic has a soft structure, is cut, wrinkled and molded like clay, environmentally friendly and non-toxic material, suitable for children and harmless to health. A product made of this material gains strength after drying, for reuse, it is heated in an oven at sixty to seventy degrees and softened. We offer you one of the options for making a beautiful handmade bracelet from thermoplastic. Prepare a metal or wood base and measure a strip of soft thermoplastic to its size. If you want to get a smooth bracelet, stick plastic on the base, wanting to get an unusual pattern or relief, apply it by pressing a vase with a convex pattern or draw it yourself, after which we form a bracelet. After the bracelet has dried, we paint it in any color with ordinary nail polish. The base can be left, in cases of its detachable form, it can be removed. The bracelet turns out to be light and strong, and what is important, not the same as everyone else's.
- Snake bracelet.


You have a broken zipper snake, trouble, you need to change, but do not rush to throw out the old one, it will still serve you. That you should weave an original and stylish bracelet from it, especially if you like original things.
- Chanel bracelet.


The famous Coco Chanel was the first who came up with the idea of \u200b\u200bthreading velvet lacing through the chain. Thus, necklaces and handles of bags were designed, you can also design a stylish retro bracelet that will add chic to your wrist.
- Bead placer.


Colored beads are sold in packages, the spectrum of colors is unlimited, beads of all colors and shades, matte and shiny. Weaving with beads soothes the nerves, and the products are pleasing to the eye, we offer you a photo of several ideas.
- Wood base.
Ordinary wooden ice cream sticks will be the ideal base for your bracelet, you just need to collect and brush them from chocolate, then boil them in boiling water for a quarter of an hour and when they soften and become flexible, place them inside the bend of a wide cup, leave to dry for at least a day. The dried wood takes the form of a bracelet.


The prepared wooden form can be used as a blank, decorated with threads, cloth or pasted over with balls and beads, or it can be painted with watercolors and varnished, it all depends on desire and imagination.
An ordinary plastic bottle can give the base of a rag bracelet, but if you use it, take care that the fabric or ribbons used in the design do not tear and do not give the plastic the opportunity to scratch your hand.


