DIY winter dress for the new year. Quickly sew a New Year's dress. Patterns of New Year's dresses
It is best to sew a dress with draperies from jersey, but if you need the model to keep its shape well, then you will need taffeta or brocade. A truly luxurious and fashionable option can be obtained from velvet, which has a characteristic texture and deep color.
DIY Christmas dress quickly
If it is difficult to call you a dressmaker, and you do not have much perseverance, then a little black dress will be the best way out of the situation. Such a model is ideal for a slim figure of a boyish type, and it will take only a couple of hours and 2 meters of black crepe-chiffon to make it. You can do-it-yourself Christmas dress quickly and just.First of all, cut out a couple of squares with a side of 0.9 m - these will be the front and back. Find the center of these parts (it should lie along the longitudinal thread) and set aside all the necessary lines from it, guided by the pattern. Decorate the front and back necklines.
Connect the sides and shoulder sections, process the edges of the dress. Using the remnants of the crepe-chiffon, process the neckline with a drawstring. ready!

Do not forget that the little black dress looks quite corny, which is why for the New Year it should be supplemented with beautiful shoes and spectacular accessories.
Sew a New Year's dress with your own hands
The Venetian dress looks bright and extravagant, and it is sewn extremely simply. For work, prepare 2 meters of bright jersey, for example, red.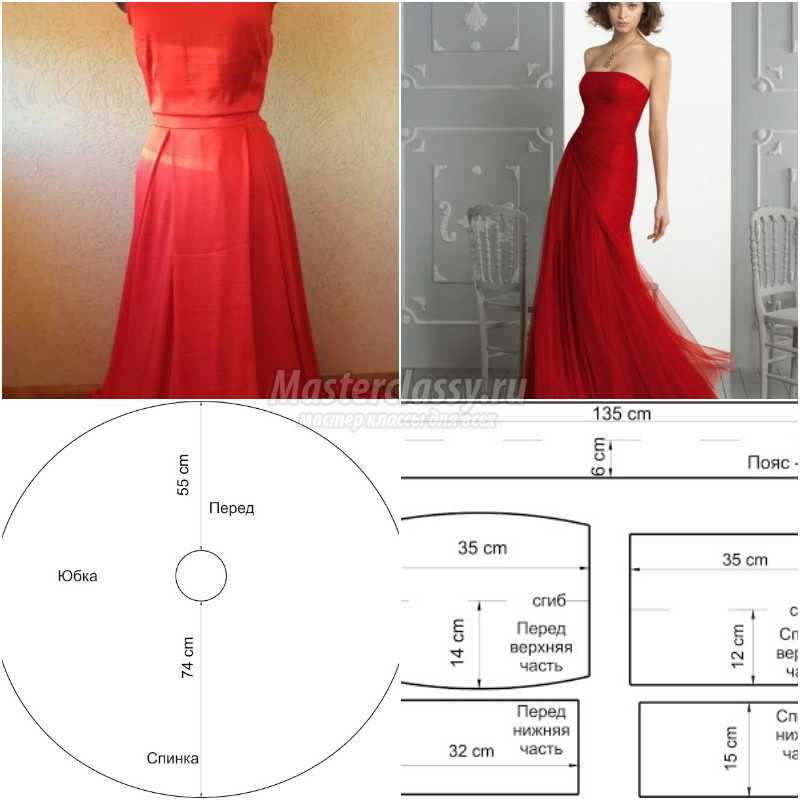
Cut out all the elements of the outfit from jersey, while you should certainly take into account the location of the shared thread. Sew two belt parts from the blanks. Sew the lower back and front sections on the sides. Do the same with the upper parts. Sew the waistband into the side seams under the bust.
Fold the bodice (top) along the fold line with the wrong side inward and press. Stitch the top to the bottom.
Pair the bodice with the skirt. If you wish, you can overlock the cuts of the product, however, this step is not necessary when working with knitwear.
Please note that the belt in this product can be tied in several ways - this will allow you to look different every time. Exquisite jewelry made of Murano glass will be an excellent accessory for such a Venetian outfit, but discreet shoes should be selected.
DIY Christmas dress without a pattern
A great option for meeting the New Year would be a dress in the Greek style - it looks just amazing and at the same time incredibly comfortable. In addition, you don't need to be a seamstress to make it.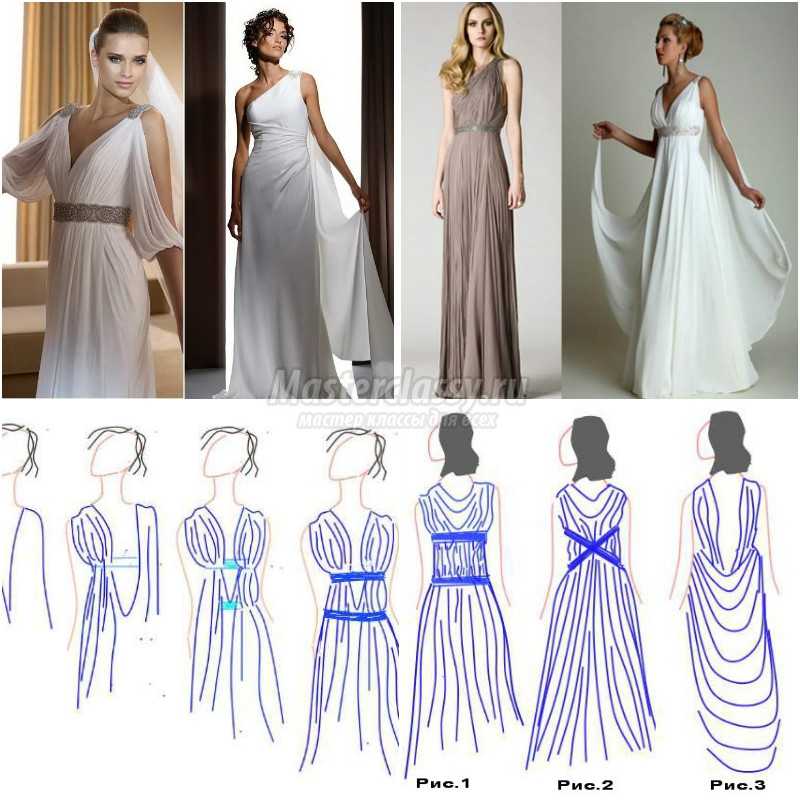
If you are looking for a stunning floor-length garment, then you should prepare a single piece of fabric that is slightly larger than your height from shoulder to heel, multiplied by two. Also, you cannot do without a ribbon or decorative braid of such length that it would be enough to twine around your waist and under the chest twice.
So, spread the fabric on a clean floor, find the middle on the cut and draw a line with chalk. This line will be located on your shoulders. The holes for the head will also be in the center, draw a perpendicular to the first line about 15 cm long (this is usually enough for the head to go through), cut through it with scissors.
Put the workpiece on your head and mark the required depth of the neckline with a chalk. The neckline can go up to the waist, it can end under the bust - in short, as you like best.
Remove the workpiece and spread it again on the floor, draw a line to the chalk mark and cut the cutout with scissors to the end. Gather the material with pins and then follow the instructions of the photo collage.
Tie the ribbon under the chest, and it should go under the fabric, and not over it. Lay the material in folds, take the pins and pin them to the ribbon, draping one chest after another. Do approximately the same manipulations with the tape at the waist.
So, it can be noted that the image of the Greek dress is almost ready, you can already see exactly how the fabric will lie. Now thread the needle and sew the folds to the ribbon, pulling out the pins one at a time. In principle, you can sew on all the folds, and then get the pins - there is not much difference. Also, you should not worry about the evenness of the stitches - all the same, a second one will be sewn on top of this ribbon, or a braid, well, this part should be sewn very carefully. So the front of the Greek drapery is ready.
As for the back, you don't have to bother much, repeating the steps with two ribbons and a cutout. However, no one forbids a little "play" with the drapery. You should find the very position of the material in which the fabric flows very beautifully, demonstrating to everyone the dignity of your figure. Assistants in this action will be "crabs" for the hair and pins - they will be needed to fix the folds.

When making draperies, you should not get carried away - remember that somewhere the dress should be buttoned and unbuttoned. We recommend that you sew one miniature button on the ends of the ribbons on the front side of the side. Accordingly, loops should be located at the ends of the back straps. It turns out that above the waist, the dress will not have seams on the sides, but it will be fastened with buttons or some other decorative fasteners.
Well, below you will find out in which she can shine at the matinee.
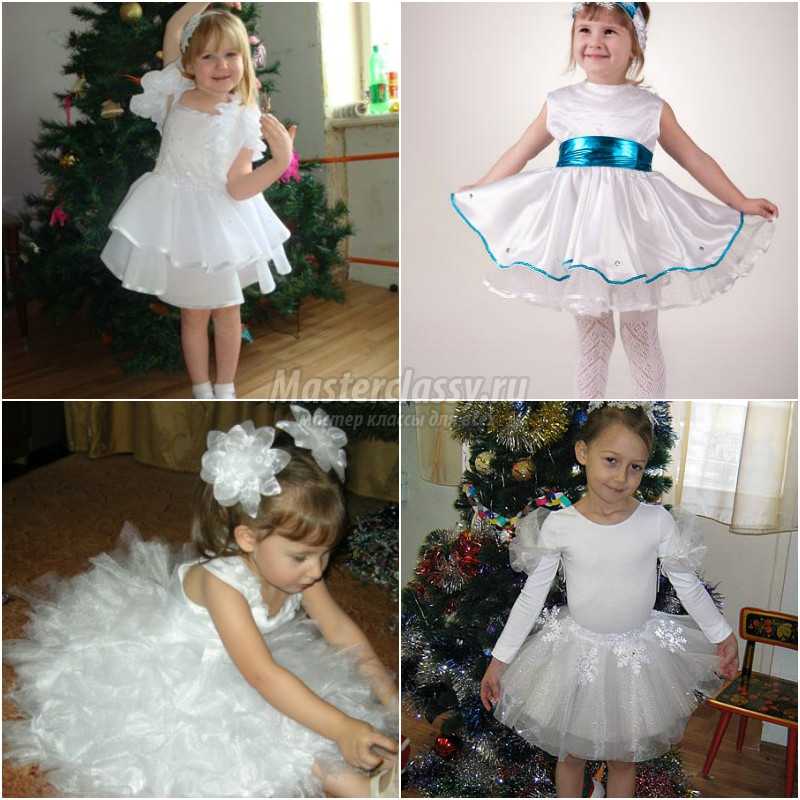
DIY Christmas dress "Snowflake"
Every mommy dreams of sewing, but the New Year's matinee will be a pleasant occasion. Of course, to create dresses Snowflakes for a New Year's party with their own hands will have to work hard, but your daughter will be the most beautiful at the holiday.For sewing do-it-yourself New Year's dress for a girl you need to take an unnecessary T-shirt, cut off its sleeves, cut their seams. Cut the T-shirt along the shoulders and sides - the front and back will come out.
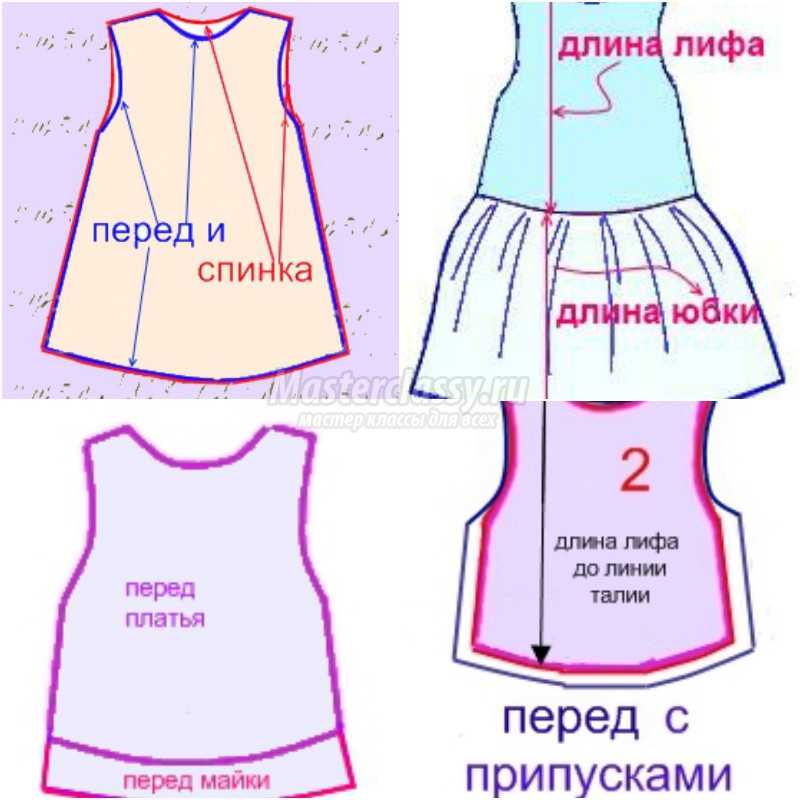
To take measurements, measure the girl from the cut of the shoulder to the waist line - the length of the front will come out. Measure your skirt from waist to knee. Transfer the resulting measurements to the front of the T-shirt, draw a new line with chalk - it should be slightly convex, cut along it in front, put this part on the back and draw the bottom cut, cut along the line.
Draw the finished details with a pencil on a drawing paper, add standard seam allowances on a drawing paper (allowances are not needed on the neckline and armholes). Draw new lines for the side, shoulder and bottom sections with a pencil. It remains only to cut out what you have drawn and the pattern is ready!
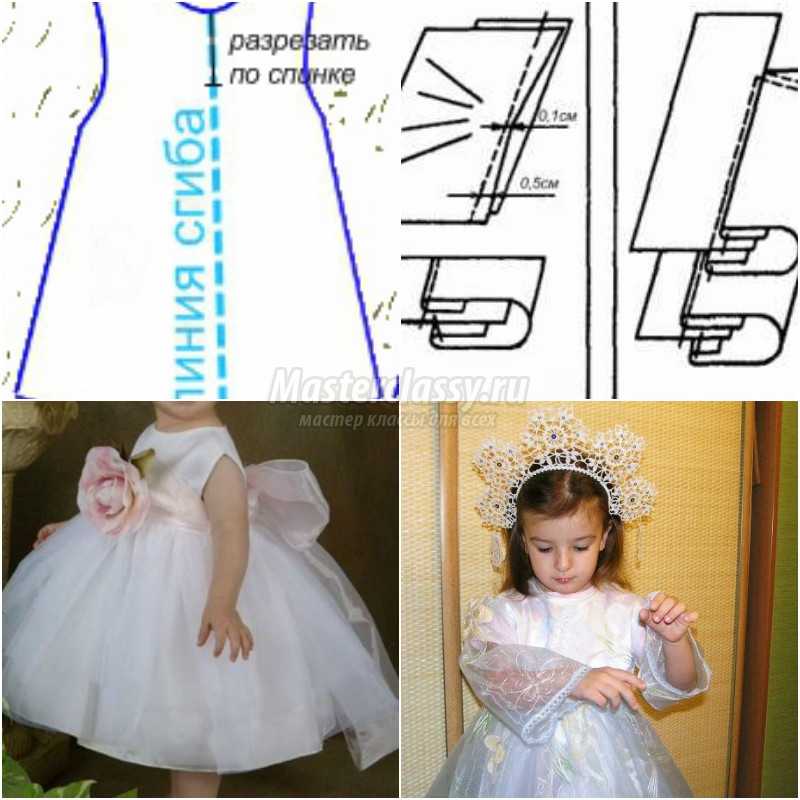
The next step will be to cut the skirt. You need to cut a satin strip 0.5 m wide and 2.5-2.8 m long. Cut out a piece of similar parameters from organza.
Now you need to move on to cutting the bodice - for this, lay the paper pattern of the front on the inside of the satin and circle it with a pencil. Side by side, do the same with the back. Cut out the satin details.
Fold the back in half lengthwise and cut a dozen centimeters from the neck for the fastener.
The rest of the material will come in handy for cutting strips, which will be equal in length to the length of the armholes and neck. These details should be used to frame the indicated areas.
To cut the belt, you should cut a strip of organza 15-20 cm wide and about 2 meters long.
The opening for the fastener should be trimmed with piping. To connect the shoulder seams, it is necessary to grind and overcast the shoulder sections, then iron them towards the front.
Trim the sections of the armholes, then do the same with the neckline, leave a couple of ends of the edging strip (about 20 cm) free for tying, they should be stitched with an overhead seam with 2 closed sections.
Sew the cuts of the skirt strips (satin and organza) and overcast, press the cuts. Zigzag stitch one of the edges of each strip. Connect two skirts together, turn them out on the front side, put the satin inside the organza. Set the maximum stitch length on the machine with the upper thread looping. Align the raw cuttings and secure them with pins.
At a distance of one and a half centimeters from the cuts, lay the first line with a machine, the second should be located at a distance of about 0.3 cm from the first. Do not bartack the edges of machine stitches.
Gather the cuts of the skirts - for this, the loose ends of the threads of all the stitches should be pulled together. The assemblies must be evenly distributed.
Connect the bodice with the skirt (the first should be turned inside out, the second with the front side). Put the bodice inside the skirt, while the seam of the skirt should connect to the middle of the back. Pin across the stitches. Stitch the skirt to the bodice - the stitch should follow the second line to create the ruffles. Neaten, and then press the cut towards the skirt.
Slices of the belt should be processed with an overlock, approximately in the middle, attach an artificial rose of white, pink or blue. Diy dress for a New Year's party ready!
You can find a description of sewing an elegant satin model for a girly.

So now you know how to sew a New Year's dress for a girl with your own hands how you can make an outfit for yourself. Holidays must certainly be met fully armed, which is why we recommend that you start sewing long before the last days of December.
On the front half of the dress, set aside from the waistline 24-27 cm up. Draw a horizontal line along the armhole of the dress.
Set aside 4 cm on the front. Draw the neckline of the dress along the pattern.
From the middle of the front of the dress along the waistline of the dress, set aside 3 cm.From the right side of the bust of the dress, draw a straight line to point 3.
Draw a relief line along the pattern from the left side of the bust of the dress.
Move the waist dart of the dress to the center of the front. From the tucked tuck of the dress, draw a line of the second relief along the pattern.
Cut off the front of the dress along the waist line.
Model the back of the dress as shown in Figure 2.
Additionally, build a draped dress detail. To do this, you need to measure the length along the waist line of the front of the dress. Delay this value along the line.
The length of the detail on the side is equal to the length of the dress on the side from the waist to the bottom.
Reshoot the flank of the part from the side of the dress. Extend the part down 20 cm. Cut out 2 single pieces for drapery, sew them along the bottom, turn them out and iron them. Then put the resulting detail on the front of the skirt of the dress and sweep on the sides. Then sew the skirt as a single layer.
Additionally, re-trim the dress top 3 cm wide in finished form. In addition, cut out: a belt loop for a draped part 10 cm wide (ready-made 5 cm) and 15 cm long (one end of the belt loop is applied to the waistband cut of the dress under the drapery detail, the other end is bent over the draped part and applied from above).
Cut out all the details of the dress from the lining fabric minus the trims.
Embossed seams are reinforced with bones.
OPTION 3  This little black dress embroidered with rhinestones will make you the star of any party! You can sew such a dress yourself if you follow our instructions.
Modeling patterns.
Since the model of the dress is very tight-fitting, the increase in the freedom of fitting can be omitted.
On the front of the dress, transfer the vertical bust dart to the middle of the front, model the neckline, transfer the dart along the waist of the dress to the side of the dress.
Cut the pattern of the front of the dress along the horizontal dotted lines and push it apart by 2-3 cm for assembly.
Make the length of the dress according to your own measurements. (Including the ruffles of the dress).
Modeling the frill of the dress additionally as shown in the dress pattern.
Modeling the detail embroidered with rhinestones as shown in the dress pattern 3.
This detail must be cut out additionally in 2 copies.
Strengthen one detail with thermal fabric, embroider with rhinestones or topstitch ready-made motifs.
Customize the collar of the dress additionally.
Modeling the back of the dress as shown in the dress pattern 4.
IMPORTANT! This dress is gathered at the side seams and is very tight-fitting. Therefore, fabrics should be chosen with elastic additives in the composition.
Additionally cut out the lining (without additives for assembly at the seams).
How to sew a dress.
Cut out from the main fabric:
In front of the dress - 2 children.
Back of the dress - 2 pcs.
Dress frill - 2 pcs.
Collar of the dress - 1 item. with fold + 2 pcs.
The central piece, embroidered with rhinestones - 2 pcs.
Cut out from the lining fabric:
In front of the dress - 1det. folded
The back of the dress - 2 children.
How to sew a dress.
On the sides of the front and back of the dress, lay stitching with a stitch length of 4 mm. Pull to the desired length along the pattern.
Along the middle seams of the front of the dress and the back of the dress, lay 4mm stitch lines. Pull off by pinching.
Sweep the side seams of the dress, stitch.
Sweep the middle seam of the front of the dress, sew.
Sew the lining of the dress along the side seams and along the middle seam of the back of the dress until the zipper slit.
Fold the main and lining dress face to face, sweep and stitch along the top seam.
Turn the dress right out, sweep clean at the top.
Reinforce the central part with thermal fabric. Fold up on the sides.
Place the detail on the dress, sweep, straighten the assembly of the dress.
Tuck the allowances on the sides on the second part.
Combine the details with each other, put the second detail on the seamy side of the dress on the lining, sweep away.
Stitch 2 pieces with one stitch to the edge.
Sew rhinestones and beads on the upper part by hand.
Sew the frill of the dress on the sides. Pull off the frills at the top.
Apply to the bottom of the dress from the main fabric, sweep, stitch.
Tuck the lining of the dress along the bottom and sweep it by hand, closing the allowances.
Tuck the bottom of the frill of the dress and stitch it up.
Place the part of the collar of the dress reinforced with thermal fabric on the central part and stitch it on.
Place the second collar detail on the first and sew along the top and sides.
Turn on the face, sweep clean.
Tuck up the bottom of the collar, baste, sew.
Embroider the collar with rhinestones or ready-made motifs by hand.
Sew loops and hooks along the middle seam of the back collar.
OPTION 4
This dress is a real treasure! Such a dress can be sewn from iridescent gold satin with elastic threads, from taffeta and any other dress material.
Modeling patterns. 


Since the dress is tight-fitting, the allowances for the freedom of fitting can be omitted at all or given the very minimum.
Transfer the darts on the front half of the dress and on the back of the dress, as shown in the dress pattern. Modeling relief seams along the lines of the darts. Cut the front of the dress and the back of the dress to the desired length of the skirt (without the flounce).
The flounce of the dress should be modeled separately. If it is not possible to cut a flounce of a dress without seams, you can make 2 seams that will match the side of the dress.
Additionally, cut out the belt of the dress.
How to cut out a dress.
From the main fabric you need to cut out:
Dress detail 1 - 1 item. folded
Dress detail 2 - 2 pcs.
Dress detail 3 - 2 pcs.
Dress detail 4 - 2 pcs.
Flounce of the dress - 1 piece. (or 2 children with a fold)
Dress belt - 2 pcs.
The details of the dressing on the top of the dress completely duplicate the pattern of the dress up to the waist.
Dress detailing 1 - 1 piece. folded
Turning children. dresses 2 - 2 pcs.
Turning children. dresses 3 - 2 pcs.
Turning children. dresses 4-2 pcs.
Details of dress trimming must be reinforced with thermal fabric.
From the lining fabric, you need to cut out:
Parts 1-4 minus facing.
In addition, you need to buy bones for the side seams of the dress and the reliefs of the back of the dress.
How to sew a dress.
Sweep and grind off the embossed seams of the dress and the side seams of the dress.
Side seam allowances, taking together stitch by 0.7 cm from the seam. The line is laid from the top of the bodice of the dress to the waist line of the dress.
Cut the bone to measure for threading into the formed drawstring. The length of the bone should be 1cm shorter than the drawstring. Insert the bone.
Restitch the drawstring along the top of the dress and along the waistline of the dress so that the bone does not fall out.
Sew a hidden zipper on the back of the dress.
At the bottom of the dress, sweep and stitch a shuttlecock.
Strengthen the trimming details of the top of the dress with thermal fabric.
Sweep dress piping with dress lining details.
Sweep the side and embossed seams on the lining of the dress.
Fold the lining with the dress face to face. Sweep and stitch over top and zip ties.
Turn the dress over the face, sweep cleanly along the top and iron it out.
Tuck the bottom of the lining and manually sweep with blind stitches, closing the sewing allowance for the flounce of the dress.
Tuck the flounce of the dress along the bottom and sew it by hand with blind stitches.
Sweep the belt of the dress and stitch it on all sides, leaving an area for turning inside out.
Turn the dress belt out, iron it.
Sew the open area by hand with blind stitches.
Put the belt on the dress along the seam and sew tightly to the dress with blind stitches.
Tie a bow on the front of the dress.
OPTION 5  This dress is for the young and the brave!
If you plan to sew a dress from an elastic fabric, then when building a dress pattern, make a minimum increase in the freedom of fitting (1.5 cm).
IMPORTANT! When modeling a dress, the front of the dress and the back of the dress must be completely re-captured on tracing paper.
Dress cutting must be done on fabric, laid out in one layer (except for the dress's flounce). You need to cut out 2 identical details of the flounce, one for the back of the dress, the second detail for the flounce of the front of the dress.
OPTION 6  This cute silk dress captivates, first of all, with its simplicity of modeling and execution.
How to design and sew a dress.
On the front half of the dress, move the bust dart to the side.
Shorten the dart by 2 cm. Model the neckline, setting aside 24 cm from the lower point of the front neckline.
Flare in front of the dress on the side by 4 cm.
The back of the dress is modeled in the same way.
Draw a horizontal line from the bottom point of the dress armhole. Cut off the top.
Move the waist dart in the center of the back of the dress.
Flare the back of the dress by 4-5 cm on the side.
Additionally, cut out 2 strips of fabric for the bow: one 65 cm long and 20 cm wide (finished 10 cm), the second 70 cm long and 15 cm wide (finished 7.5 cm).
OPTION 7  This dress is a real dream! The dress is made of elastic satin, and its accent is the unusual pleats along the skirt.
Do not give any allowances for freedom of fitting, since the model is very tight-fitting
Re-pattern the base of the front of the dress on tracing paper completely.
Draw modeling lines on the bodice of the dress.
Cut off the excess at the top of the dress.
Flare the skirt as shown on the dress pattern.
The more you flare the skirt, the more fluffy it will be towards the bottom.
Mark the squares on the seamy side of the dress pattern, as shown in the pattern.
The length of the dress depends on the side of the square that you specify. Remember that when we fold the folds, we reduce their length by 2 times.
On the pattern, the length of the dress skirt from the fold line will be 40 cm (3 squares 10 cm each (with folds laid) and 1/2 square along the bottom of the dress to align the bottom of the dress.
Model and mark the back of the dress in the same way.
The folds are not ironed, but only swept along the blue dotted lines to the cover of the dress, which is additionally cut out according to the same pattern.
Then the folds are fixed with horizontal lines 5 cm long each.
The lining of the dress is cut 4cm shorter than the dress.
How to cut out a dress.
It is necessary to cut out from elastic satin:
Front of the dress - 1 with a fold
Back of the dress - 2 pcs.
From lining fabric:
In front of the dress - 1det. bend
Back of the dress - 2 pcs.
Additionally, cut out a strip of fabric 8cm wide and 30cm long to make a rose.
IMPORTANT! The concealed zipper should not be long - only about 30cm and should end before the folds.
How to sew a dress.
On the front and back of the dress, use basting stitches to transfer the markings of the folds to the front side.
Do the same on the lining details.
On the front of the bodice of the dress, cover up the darts. Stitch.
Sweep and stitch darts on the back of the dress.
Sweep the dress along the side seams, stitch.
Sew the details of the lining of the dress in the same way.
Lay on the dress and lining face to face, sweep and stitch over the top of the bodice of the dress. Turn out, iron.
Sew a hidden zipper on the back of the dress.
Turn the dress over the face. Lay the folds according to the markings, stitching them to the lining of the dress with short horizontal seams (5 cm each).
Trim excess lining so that it is 3-4 cm shorter than the dress.
Tuck the bottom of the dress and sew it to the lining manually with blind stitches.
How to sew a rose
Roll a strip of fabric in half lengthwise and then twist in a spiral, starting from the center of the flower, fasten with stitches as the petals form.
Hide the edge of the strip under the bottom of the flower.
Sew a flower to a dress.
Decorate the bodice of the dress with ready-made motives.
OPTION 8  Want to be the star of the party? Then, without hesitation, sew this dress for yourself!
Let's give the minimum increase in freedom of fitting - 1.5 cm.
Re-pattern the front half of the dress and the back half of the dress on tracing paper and model the bodice and skirt, as shown in the drawings for patterns 1 and 2.
Additionally, you will need to cut out 2 strips of fabric for the bow: one 20cm wide (finished 10cm) and 80cm long, the second 30cm wide and 15cm long (finished 15cm) and 60cm long. The bow can be reduced at will.
OPTION 9  This adorable dress is made for noisy parties! And you should definitely sew this dress! After all, it is very simple to model it, the main thing is to make a little effort and you are a star!
Free-fit allowances are not given in this case.
The width of the mesh for the skirt should be calculated as follows: Thighs multiplied by three. The calculation given on the pattern is given for the volume of the hips 96cm.
The length of the mesh for the skirt is 80 cm (ready-made - 40 cm).
Mark the folds as shown in pattern 1.
Modeling the bodice of the front of the dress and the back of the dress as shown in patterns 2 and 3.
Additionally, you need to cut out the bottom of the dress from the lining fabric.
How to cut out a dress.
Cut out from the main fabric:
Middle bodice detail of the front of the dress - 2 pcs. with bend
Front flank of dress - 4 pcs.
Back side of dress - 4 pcs.
Middle detail of the back of the dress - 4 pieces.
Dress skirt - 1 piece
Cut out from the lining fabric:
The front of the skirt of the dress - 1 piece. folded
Back of the skirt of the dress - 2 pcs.
Additionally, cut out a belt 8-10 cm wide (ready-made - 4-5 cm), and 100 cm long. Flare the ends of the belt by 2-3 cm.
How to sew a dress.
Strengthen the details of the bodice of the front of the dress and the back of the dress with thermal fabric.
Sweep and grind the details of the front and back of the dress along the embossed seams. Stitch.
Only allowances for the side seams, taking together stitch at a distance of 0.7 cm from the connecting seam. Insert a bone into the formed drawstring, 1 cm shorter than the side seam without allowances.
Lay folds on the skirt of a dress made of main fabric, as shown in the pattern. Ideally, you should make a ball of folds.
The mesh is calculated for the volume of the hips, therefore, along the waist, each fold must be laid a little further than the intended line.
The same can be done along the bottom of the dress, then the shape of the skirt of the dress will look more like a ball.
To keep the folds well, make short bartacks on each that will hide under the layers of fabric.
If the above diagram does not suit your figure, you can create folds in a chaotic manner right on the mannequin.
Sweep the bottom of the dress and the top of the dress. Sweep a zipper over the back.
Try it on and, if necessary, make adjustments.
Sew in concealed zipper.
Sweep and grind the bodice details from the main fabric (dress lining) without reinforcing with thermal fabric.
Sweep and stitch the details of the skirt of the dress from the lining fabric.
Connect the top and bottom of the dress lining, sweeping and stitching along the waist seam.
Put the main product and the lining of the dress face to face.
Sweep and stitch along the top of the bodice of the dress.
Sweep and stitch the dress and lining along the bottom.
Turn the dress over the face through the open area, sweep clean at the seams.
Tuck over the zipper allowances and sew by hand with a blind stitch.
Additionally, sew a belt for the dress. To do this, you need to cut out 2 parts 4-5 cm wide and 100 cm long.
The ends of the dress belt are flared by 2-3 cm.
Put the details of the dress belt on top of each other face to face.
Sweep and grind on all sides, leaving an open area for turning out about 5 cm.
Turn the belt out, sweep clean, iron it.
Sew the open section of the belt by hand with a blind stitch.
The following models are designed on the basis calculated in the Cutter software.
You can download a demo version of this program.
OPTION 10  The dress is tight-fitting at the waist and narrowed at the bottom, made of non-stretching dress fabric. Front bolero with jacket collar and cuffs. The shoulders are slightly lowered. Asymmetric invisible zip fastening slid to the side seam. The lapel of the shelf is sewn to the fold of the lapel of the bolero. Back with reliefs from the armhole and a slit at the bottom. A corset with lace trim is worn under the dress.
Model processing technology
Sew a zipper into the left shelf relief up to the fold line. Stitch the edges of the relief cuts and the lapel with stitches, turn to the right side and sweep the edges. Unscrew the detachable part along the fold, sweep to the shelf and sweep open sections together. Sew on the side dart on the shelf and sew the relief on the shelf. Topstitching the bolero and lapel ledge with lining. Sew bolero armhole from shoulder to notch. Unscrew the bolero details to the front side. Stitch the armhole of the bolero from the notch down with a relief. Sew the right shelf to the bolero. Stitch back middle seam, shoulder darts and reliefs. Stitch back armhole with stitching. Stitch shoulder seams on top and lining. Sew the side seams by inserting the front and bolero sections between the back and back trims. Finish the collar and sew it into the neckline. Process the bottom of the product.
OPTION 11  Dress of the close-fitting silhouette with one sleeve, a cut in the middle, and a shoulder strap. Bodice with an asymmetrical hem in front, the back is lowered from the waist. Zip fastening on the back. The skirt is flared.
Since the dress has an asymmetrical shape, it is necessary to have 2 sets of bases and to build separately the right and left sides of the front and back. On the right and left shelves, transfer the shoulder dart to the side cut. Glue the right and left front edges together and apply model cut lines along the top and bottom of the front of the bodice. On the left back, mark the shoulder width equal to the front shoulder width from point P along the line, because back in this model without a dart and draw the armhole line from point P to P3. Draw model cut lines on the left and right backrest. Measure the length of the shoulder straps on the shelf and back. Cut the sleeve in the middle and widen the front and back of the sleeve. 

OPTION 12  Evening dress made of soft jersey, tailored exactly to the figure, with a large neckline, flowing ruffle, with a high side slit, with elongated sleeves gathered at the wrist. The evening dress is developed on the basis of a fitted silhouette dress with a single-seam sleeve without a dart.
To model this dress, you need two sets of patterns and increase the sleeve length by 10 cm.
On the shelves, transfer the shoulder dart to the side cut. Connect two shelves along the middle cut and apply model lines. Cut off the right side of the shelf. Mark the cut lines on the right side of the shelf.
Cut out the allowance for the dart and cut the right side of the shelf along the marked lines without bringing the cuts to the side cut by 0.5 cm. Spread the cuts at the same distance from each other, while closing the side dart. Circle the resulting pattern and cut it out.
On the back, close the shoulder dart, for this draw the shoulder line from point A2 to point P and draw the armhole from point P to point P3. Deepen the neckline of the back. Draw the shuttlecock in the form of a spiral. The length of the inner spiral is equal to the sum of the lengths of the neck cut and the shelf cut. The shuttle width at its widest point is 15 cm.
Gather the sleeve at the bottom along the seam seam. 


OPTION 13  Evening dress in brown chiffon with pink satin lining. Feminine drape upper. Strongly flattering cut. Bodice with an undercut in the middle of the distance from the chest line to the waist line. The skirt is full of sun. Sections of the armholes and necklines are finished with elastic tape. In the side seam, there is a hidden zipper. All cuts of the top and lining are sewn together at the same time, only the chiffon skirt at a distance of 10 cm from the bottom is sewn without lining.
On the basis of the dress of the adjacent silhouette, cut off the bodice along the outlined relief line. Close the dart from the shoulder on the shelf. On the shelf and back, outline the location of the neck and armhole cuts according to the model. Close waist darts on the lower parts of the shelf and back. These are the details of the fine lining. Chiffon details should be 1.5 times wider along the shoulder and bottom cuts, as well as along the side cuts of the lower parts of the shelf. 
Open flared skirts "full sun" on the fabric:
The radius of the notch at the waist is St / 3. Along the oblique thread, reduce the notch along the waist by 1.5 cm. From the waist, using auxiliary segments equal to the length of the skirt with an allowance for processing, draw the line of the bottom of the skirt.
Fabric consumption for a "full sun" flared skirt:
L = 2R + √ (2R) 2 - W2
where:
L - blade length
R - radius of the circle
R = St / 3 + skirt length with processing allowance
W - web width
OPTION 14  The evening dress is made of fine knitted fabric. In the front there is a deep cut of the neckline, reliefs from the armhole. The back bodice consists of three triangular pieces. At the end of the upper part of the bodice there is an air loop of 2 cm. The side parts of the bodice of the back end with ribbons that are passed through the loop of the upper part and tied. The back skirt consists of two parts.
Designed from a fitted silhouette dress, where all allowances have been reduced to zero for a snug fit. 
OPTION 15  The dress is close-fitting on the bust and widened from top to bottom in crepatlas. Folds are laid in front, in the folds of which ruffles are sewn. Finishing stitches are laid on the folds of the folds to the bottom. Pleats on the sleeves. Bugles are sewn along the bottom of the sleeves and between the folds, shimmering in the dim light.
The model is designed on the basis of a straight silhouette dress with one-seam sleeves. In the measurement "Arm length to the first joint of the thumb" (Dp1c), you must enter the length of the sleeve for this model, namely to the elbow. In the measurement Ozap, enter the value of the shoulder girth at the top of Ov. PB = 5, Popv = 20, Posap = 10 cm.
On the shelf, mark the lines for stitching in the ruff, cut the base along these lines and move the parts 2 cm apart. The dashed line marks the facing of the neck of the shelf and the back. 

Model processing technology
Finish the ruffles with a zigzag stitch with a double hem, preferably using a snail foot. Finish the end cuts with a hem seam. Neaten the edges of the front and back, except for the shoulder cuts, neck and armhole cuts. Fold the bottom of the shelf and stitch it at a distance of 2 cm from the fold, leaving 5 cm unstitched from the side sections.
Mark the fold lines of the folds on the shelf. Baste ruffles to the folds of the folds to a depth of 1 cm. Stitch the ruffles with a seam 0.5 cm from the fold of the fold and continue sewing to the bottom.
Baste the ruffles to the shelves and stitch them onto the shelves by placing a line in the ruffle stitching line. Overcast the neckline and overstitch the neckline of the shelf with it. Sew a seam on the facing 1 mm from the fold. Iron the piping to the wrong side, securing it along the shoulder cut. Sew and press on the back seam. Neaten the facing and overstitch the neck of the back with it, leaving the shoulder seam allowances unstitched. Stitch over the facing seam 1 mm from the fold.
Put the shoulder sections of the shelves together with the facing between the shoulder sections of the back and the facing of the neck of the back, stitch the shoulders and overcast from the side of the shelves. Press back neck seam to the wrong side. Stitch side cuts and iron. Fold back bottom and topstitch 2 cm from fold. Neaten the sleeves, except for the ridge cut. Create folds in the direction shown in the drawing. In the middle of the sleeves, lay folds and secure them with a zigzag stitch with 4-5 punctures in one place. Stitch bugles on sleeves. Sew side cuts of sleeves, hem sleeves. Sew the sleeves into the armholes and overcast the embroidered seams from the front and back.
OPTION 16  Soft crepe satin dress. The bodice is loose with one-piece sleeves. The collar is double so that the dress is kept on the shoulders, there is an openwork lace at the back. The skirt is slightly tapered towards the bottom. Wide belt with a bow tied twice.
The model is designed on the basis of a straight silhouette dress. The position of the body is 0, Pc = 0. The bust is closed from the shoulder and open from the waistline. The bases of the bodice, the front and back, are connected so that their middle cut is in one line. Distance | A4, H | equal to the length of the sleeve plus the width of the shoulder slope "Shp". The model is cut without middle and shoulder seams. 

OPTION 17  Fitted silhouette dress made of chiffon with lining. The bodice lining is duplicated. Side closure with invisible zipper. The length of the dress is from the short side to the mid-calf, with ankle-length. The figure-hugging cut makes it look slimmer.
The model is designed on the basis of an adjacent silhouette dress. Two sets of patterns are printed. On both halves of the shelves, darts from the shoulder are closed, and open from the side sections. The shelves and backs are connected vertically, then all the constructive lines necessary for the model are drawn, taking into account that the shoulder width of the bodice in a cut should be twice as wide as in the finished form. The skirt consists of two gussets, the shape and cutting method of which are shown in the drawing. 


OPTION 18  Strongly flattering cut. Detachable at the waist and under the bust. Draped top of the bodice. The lower part of the bodice is a snug fit. The shoulder is down, there is a deep cut in front. Flared skirt". Length 6 cm below the knee.
The model is designed on the basis of an adjacent silhouette dress. Mark the cut line on the shelf. Move the shoulder dart to the bottom edge of the upper shelf. Extend the shoulder by 5 cm and draw a new shape for the armhole. Mark the shape and depth of the cutout. Draw the lower part of the shelf horizontally, shortening it by the amount of the tuck. Mark the cut line on the back. Draw the shoulder line from point A2 to point P in a straight line and extend the shoulder by 5 cm and draw a new shape of the armhole. Mark the cut of the neckline and the middle cut of the back. Cut the lower part of the back horizontally by the depth of the dart. 

The flared skirt is built according to the calculations below:
FROM = St * 1.4 - the radius of curvature of the waist line.
TB = Dts / 2 - the distance from the waist to the hips.
TH = skirt length
TT1 = St + Fri
BB1 = Sat + PB
Where:
Dts - the length of the back to the waist.
St - waist half-girth.
Sat - half hips.
Fri - waist allowance.
PB - hip allowance.
OPTION 19  Dress made of fine knitted fabric with a satin effect. The top of the dress is straight cut. The skirt is two-layer, tight-fitting to the figure. Elastic tape is sewn at the top of the back with a zigzag stitching. The seam of the bodice and skirt is stitched with an elastic tape with a zigzag stitching.
The model is designed on the basis of a straight silhouette dress. It can be done without side seams on the bodice by connecting the sections. 
OPTION 20  A dress made of knitted fabric with a fitted silhouette, sleeveless, with a high shoulder line. Asymmetrical neckline. A strap on one shoulder, a thick gather on the other.
The model is designed on the basis of a fitted silhouette dress without any allowance for free fitting. Connect the drawing of the right and left shelves along the half-line and cut the drawing from one highest point of the chest to the other and cut out the middle part from dart to dart. Close the right dart from the shoulder by turning the cut out part of the drawing around the highest point of the right chest. Connect the highest point of the neck with point A7 on the left side of the drawing with a convex line. Design the neck according to the model. Tighten your shoulders to the desired strap width. 
OPTION 21  Silvery crepe satin dress, fitted silhouette, lined with a black frill sewn to the bottom. The flying yoke is assembled under the lintel.
The model is designed on the basis of an adjacent silhouette dress. The shoulder dart has been moved to the middle cut of the shelf.
Sewing a long dress according to this design, but without a frill at the bottom, you will get a wonderful evening dress. 
Model processing technology
Glue the straps and the lower parts of the trim strips with non-woven material. Stitch the lintel along the side cuts and turn to the right side. Stitch the middle section of the yoke to the front side. Stitch the dart on the yoke to the front side, after inserting a jumper from the wrong side into the seam. Fold over and stitch the bottom of the flying yoke.
Collect the top of the trim strips. Stitch the planks along the upper side cut. Unscrew the planks to the front side and secure with a stitch along the bottom and side cuts. Sew in the straps between the shelf yoke and the flying yoke at a distance of 4 cm from each other. Fasten the lower cut of the lintel to the seam of the yoke dart from the front side. Neaten the shelf and lining to it.
Stitch the yoke to the front by inserting it between the shelf and lining. Neaten back cuts and lining to it. Stitch back center seam and press press. Stitch darts on the back. Stitch the upper section of the back with lining. Insert elastic between back and lining and topstitch with zigzag stitch.
Stitch back straps and turn to right side. Stitch the front straps along the outer cut by inserting the back straps into the neckline. Stitch the front straps along the inner cut to the stitching seams of the yoke and turn to the right side. Sew the front straps to the front of the yokes.
Stitch the side sections of the front and back together with the lining to the waist, and then separately the sections of the dress and the lining. Tuck the front straps from the seamy side and topstitch them near the stitching seam. Process the frill, stitch it to the bottom of the lining. Hem the bottom of the product.
If the model seemed to you unpretentious, then you are mistaken)) See what you can create from this pattern: 
OPTION 22
Dress made of thin knitted fabric, tight-fitting to the figure. Parts of the bodice are intertwined, the straps on the back are twisted. On the side and back cuts from the seamy side, an elastic tape (elastic band) is stitched with a zigzag stitch.
The model is developed on the basis of a dress of an adjacent silhouette with a preliminary increase in the values of vertical measurements of the figure, namely: chest height - Bg, front length to the waist - Dt.p, back length to waist - Dt.s, oblique shoulder height - Bp.k, length sides - DB, all 1.3 times. Allowances for freedom of fitting Pg, Fri, Pb are equal to zero. Connect the upper and lower parts of the bodice by turning the upper part, as indicated by the arrow.
Bodice processing technology
Seam straight upper cuts and lower cuts from notch to notch of both bodice parts with a seam in a hem with a closed cut. Sew the right side of the bodice along the bottom cut to the notches. Pass the left side of the bodice through the hole in the right part of the bodice after sewing and stitch it down to the notches. Stitch the bodice to the shelf.
OPTION 23  Dress in crepe satin or chiffon with lining, tight-fitting figure. Concealed zip fastening in the back. The top of the dress is finished with a bias tape made of the main fabric. The model is developed on the basis of a dress of an adjacent silhouette, the groove on the chest from the shoulder cut is re-cut into the side cut.
OPTION 24.
A very beautiful model of a tunic, sewn as easy as shelling pears. Suitable for cocktail dresses, for pregnant women and luxury women. 

OPTION 25.
The pattern is the basis for a dress for ladies with appetizing shapes + 2 patterns for cocktail dresses and a lot of ideas, including evening dresses!
Watch and 

OPTION 27.
Corset dress!
Watch . 

OPTION 28.<
In this magnificent dress you will be the queen of any evening!
Watch . 

OPTION 29.
Luxurious satin dress!
Watch . 

OPTION 31.
Evening satin dresses!
Watch . 
OPTION 32.
Strapless dresses!
Watch . 

OPTION 33.
The sexiest and easiest dress to sew!
Watch and. 

OPTION 36.
Dress with drapery at the neck!
Watch . 

Fashionable review of evening dresses from leading fashion houses! Season 2011-2012!
Many women choose a dress as an outfit for the New Year. In our opinion, no suit or insanely stylish trousers combined with a blouse will accentuate your femininity and sexuality like a dress! So what kind of dress can you wear for the New Year? 


Fashionable dress for New Year 2012 - fabric
Having decided on the model, be no less serious about the choice of material from which your festive masterpiece is woven. It can be silk, satin, etc., but the undisputed leader of fashion shows are velvet dresses: luxurious, flowing, a bit like a surface of water. 


Fashionable dress for New Year 2012 - color
The mega fashionable palette today is headed by the alluring and mesmerizing color of silver and gold, as well as all shades of gray, beige, sand, bright red and deep purple and, of course, stylish black and chic white have not sunk into oblivion. 


Cocktail Dress
Are you the owner of chic, slender legs, and you certainly want to demonstrate your pride to others? Then you should opt for a sexy, short cocktail dress - this timeless classic that can be presented in a new way by playing with the material a little. For example, a short lace dress will create a unique seductive, light look. Also, designers offer us luxurious dresses embroidered with crystals (Givenchy collection, Donna Karan).
The long-awaited New Year holidays are rapidly approaching, the main of which, for most of the inhabitants of our country, is the New Year. For the most important night of the year, we all prepare in advance, carefully thinking over our wardrobe, hairstyle, makeup, festive table menu. And, of course, every woman dreams of being the most beautiful for the new year! And what could be more beautiful than a dress made for the new year with your own hands? Feel free to start sewing this wonderful dress, and our instructions will help you do it easily.
So, the coming year of the Snake corresponds to such colors as black, blue (cyan) and green. We invite you to sew a dark green Empire-style dress for the new year. The bodice of the dress is embroidered with sequins and rhinestones, and the sun skirt adds playfulness.
Dress for New Year
This model is very easy to model and sew. Sew this dress for the new year and you're guaranteed to be in the spotlight! In addition, it is not so difficult to sew it. We will help you with this - with patterns and detailed instructions.
The dress pattern is modeled by. Make an increase in the freedom of fitting when constructing the pattern-base of the dress, make 1.5 cm.
Dress for new year pattern
Sew the bodice of the dress from the lining fabric.
Fold the bodice lining with the top of the dress face to face, sweep, stitch.
Unscrew the lining to the wrong side, sweep clean and iron through a damp cloth.
Pull up the lining over the zipper and sew by hand to the zipper tapes.
Tuck the bottom of the dress and sew on a typewriter. The dress for the new year is ready! Happy New Year!
In terms of their importance and solemnity, New Year's dresses stand out among the myriad of festive models. New Year is an unusual, mysterious, promising holiday with its own rules, secrets and conventions. It is not enough just to be beautiful this evening; you should be exceptional, attractive, intriguing.
Dresses for the New Year 2020 can be strict and frivolous, modest and luxurious, short and long. It is important to choose a model according to the figure, mood, to create with its help a kind of New Year's aura. In the decoration of the dress, sequins and sequins are actively used, fabric, mysteriously shimmering with tints of color, softly falling or perky sticking out - everything is in the hands of a fashion designer and a lucky woman who has a beautifully sewn masterpiece.
Gallery of short dresses
Let's first look at the variations of short dresses. Bold neckline, open shoulders, discreet shine of silver, fitted silhouette - models ideal for young girls. Often, such dresses are sewn according to precisely calculated patterns, using the advantages of the fabric - the direction of the pattern, coupon elements, fringe, creating images of New Year's stars, cheerful snowflakes in the moonlight.


No less attractive are the novelties presented in the photo from modern multi-colored shiny materials. Products of the same style, but in different colors, look completely different. The length of bright, rich, shiny outfits for the youth age category is up to mid-thigh. 
The magic and mystery surrounding everything connected with the arrival of the New Year is reflected in unusual models. A sharp, deliberate shoulder, a curly cut of the bottom with a strict silhouette and a somewhat cosmic theme of the drawing evokes thoughts of travel to the stellar expanses. 
An amazing combination of dark fabric and light contours of floral ornament, wide lace, creating a silhouette, playing with a pattern to emphasize a deliberately wide shoulder line, the fragility of a girl's waist and a free skirt that does not hinder movement.
Classic evening dress
Older girls, young women prefer long dresses, to the floor, even if this is not provided for by the rules of the event. A feminine evening gown is composed of simple, familiar elements - open shoulders, a deep neckline, solid fabric, soft-fitting hips and godet wedges, creating the effect of a mermaid tail.

The fabric makes the dress
The holiday is impossible without the noble brilliance of satin, which enhances the impression of joyful solemnity. High slots, slits visually lengthen the ladies' legs. Plain soft fabric is an ideal background for embroidery with silver or gold thread, which can be placed on the bodice, on the hem or on the entire surface of the product.

Luxurious velvet outfits are an essential part of the New Year's celebration. Dark green pile suits brunettes and blondes, and royal blue is perfect in combination with red strands. In fact, velvet is good in any frame and in the most varied combinations. Long, floor-length, truly New Year's velvet dresses are always beautiful, and the neckline, bows, braid, silver details give them a special solemnity. 
Images created by outfits
Well, what a New Year without the Snow Maiden! This look is recognizable in many evening dresses. Light dresses, embroidered with silver and gold, ruffles, capes are necessary to create a familiar look. The New Year's fairy tale assumes fur of unexpected, incredible colors, lace inserts, long lace sleeves, transparent, materials that barely hide the figure. The girls in stylish ball gowns in the photo came from a good fairy tale, brought a snowy wind of the finest fabrics, sparkling gold embroidery, the charm of real princesses.
Almost all models are characterized by the now fashionable expansion of the skirt, both in short and in elongated styles. The dresses, intended for the only New Year's ball of the year, are luxurious, shine and shimmer with all kinds of decorations, and are richly embroidered. For memorable, winning models, they choose light, flying, flowing fabrics - silk, organza, satin. For a slender, beautiful figure, the cut does not matter, full ladies should be careful with shiny materials, it is better to choose matte, not catchy tones. Problematic figures are successfully decorated with capes, complex cut, vertical trim.


How to win the favor of the hostess of the year 2019
They say that the owner of the coming year, 2019, will be the Yellow Earth Pig. According to the calendar of the ancient Chinese, the Year of the Pig begins only on February 16, so there is time to thoroughly prepare for her meeting, traditionally choosing an outfit to her taste already on our European Christmas Eve. A pig is a very domestic creature that appreciates coziness and comfort.
Dress color for the Year of the Pig
The main tonality of the "Pig" palette is all shades of sand and dead leaves. Colors and shades of brown, beige, yellow, all pastel colors and unexpected blotches of bright, juicy burgundy, blue, green to her liking. Do not get too carried away with the pure red color, the Yellow Pig does not like it, but there are options - orange, orange, all shades of burgundy ...
Comfortable, not restricting movements, well-tailored outfit will make the most inconspicuous shy woman attractive, guarantee the affection of the most capricious Yellow Earth Pig and provide the whole year with good luck and good mood.

In a trend, outfits are sparkling and iridescent, a golden ornament and a complex cut. 


Yellow, gold, orange tones of the fabric are ideal for creating a light, joyful look in any age category. The evening dress code dictates open shoulders, floor length, and short dresses are good for a friendly party.
Sewing a dress is a long process that requires sewing skills, patience and attention to detail. And if you are still a beginner and do not know how to sew a simple outfit for every day or a festive one for going out, our photo and video tutorials will help you learn how to approach this issue correctly.
We sew a simple beautiful outfit in stages
I propose to move on to a lesson that will help you understand the next question " how to sew a dress with your own hands"(For beginners, patterns and a step-by-step description of the entire process).
Straight black sheath dress for girl
I would like to note that the most rated, so to speak, classic cocktail dress is a semi-fitted dress (with a pencil skirt at the bottom). It is suitable for any occasion. You can wear it to the office during the day, and add a wide belt to go to an after-work party.
Material - preferably black, but you can choose a cage, velvet. But remember that velvet will make for a more solemn version. Stylists advise having a removable element (peplum or stylish collar) available to help refresh the look. The peplum can be sewn separately from the same material, so no one dares to reproach you for walking with a removable peplum, and buy a collar in a jewelry store.
In general, a little black dress must be in every woman's wardrobe, and if you have not yet become the owner of such a designer creation, immediately drop everything and start creating it.
Reinforce the piping with thermal fabric. Lay on the neckline of the dress face to face. Sweep, grind. Unscrew the trim on the seamy side of the dress, sweep the case cleanly, iron it.
Hem the sleeves of the sheath dress. Hem the bottom of the sheath dress.
So, how to sew a dress case with your own hands (patterns for beginners).
Baste and stitch darts. Press them to the middle. Sweep the darts on the back, topstitch, iron to the middle of the back.
Sweep and grind side seams. Sew a hidden zipper on the back. Cut out a piping for the neckline and armholes 3 cm wide. Hem the bottom of the product.
Educational videos for fashionistas-needlewomen
On YouTube, novice needlewomen can find a huge number of video tutorials that show in detail the whole process of sewing things. For example, a series of lessons from the master Olga Nikishicheva, fell in love with the viewers of the first channel, and we can watch them and be inspired. And there are a lot of such good masters, so feel free to choose exactly the one you like.
A simple long dress for fat ladies at home
For a woman with curvaceous forms, floor-length garments should be sewn individually according to the figure, because such a chic lady should be decorated with no less chic outfits.
Ladies often prefer the bat model, but stylists advise choosing a "tulip", "case" or "pencil".
Nice jersey with three-quarter sleeves
Knitted apparel is sewn very easily, as it does not require undercuts. With a collar collar and fringe, you can come up with a boho outfit.
For pregnant women with a high waist
Expectant mothers during pregnancy have a lot of free time, which allows them to create, create, create.
How to sew a gorgeous dress for yourself (step by step instructions)
Every fashionista dreams of sewing an exquisite dress on her own, as in the picture. It can be the same for mom and daughter, for example, in a flower in which you will be the most beautiful.
A fluffy wedding dress that is sewn quickly and easily
Not every bride can afford an expensive outfit for one day, so if you are serious about it, get ready to spend a lot of time, but the result will meet all your expectations.
It is worth remembering that it is advisable to use an atlas as a basis (it is satin that turns out to be truly chic). Decorating the top can be made of neoprene, chiffon, guipure. If you opted for a strapless, off-shoulder model with a corset (always lined), the bottom should be sun or half sun.
Vintage retro will allow you to use less material, while Greek Empire style will look good on any figure.
How simple and easy it is to create a prom dress
The prom is one of the most long-awaited events for every girl, so I want to choose the most beautiful platyushka, but in the store it is not always possible to find exactly that festive lace that I have dreamed up in my head.
Fashionable evening with an open back
A smart, flared to the bottom made of lace A-line (or trapezoid) with an open back will allow the lady to be the center of attention at any event.
Elsa's outfit from "Frozen" for a teenage girl (12 years old)
After the release of the cartoon "Frozen", girls from all over the world literally fell in love with Elsa and her image with a train. Therefore, more and more often they sew it for a little daughter for the new year. For a children's New Year's party in the garden, it is ideal.
What interesting things can you think of for a teenage girl (12 years old)
A tulle cloud can be created for a child literally overnight.
Ballroom for dancing with your own hands
For a stylish "barbie" who is fond of ballroom dancing, you can come up with a dress with a fluffy skirt with a petticoat. A fabric bow and elasticated gloves can be a stylish adornment to complement the look.
Figure skating robe
For performances, elastic, thin materials are most often chosen that do not hinder movement and look good in movement. A flashlight, a bell with a shuttlecock are classics of the genre.
We create without using a pattern
In one evening, you can recreate an outfit by hand with one seam in a few minutes, even without a sewing machine. This science is not difficult to master, since it does not require skill and knowledge, but it is worth remembering small nuances that significantly save time.
Summer scarf from true masters
Craftsmen can make a beach dress for the summer even with the help of ordinary thin shawls. You will be surprised how many interesting patterns you can create with simple kerchiefs.
Hoodie for the hot season
Women's fashionable kimono with one-piece sleeves is created for sunny days. You literally don't feel this kind of razletayka on yourself, and most importantly, such a one-piece product is sewn with several stitches.
Loose fit wrap
Such a product looks like a man's white robe, but on a woman's figure it looks special, and all thanks to the flying fabric.
Shirt + some fancy = chic outfit for the day
An ordinary shirt makes it possible to create more original clothes when there is nothing at hand except the shirt of a loved one.