Make a flower out of chupa chups. How to make a bouquet of Chupa Chups. Photo gallery of ready-made sweet gifts for friends and family
How to make bouquets from Chupa Chups with your own hands (master class)
Flowers and sweets are the most banal gifts. But it is about them that we will talk today. Even more - our task is to make an original gift out of these ordinary pleasant things. It will be based on flowers from Chupa Chups - the legendary lollipops. By the way, there are some fun facts associated with these sweets. Having burst into the world in the middle of the last century exclusively as a children's treat (a saving stick solved the problem of soiled, sticky hands in children), Chupa-Chups became a real favorite of the public of all ages. It is also interesting that the lollipop logo was designed by none other than Salvador Dali, and the original name Chupa Chups was translated as a goal. Modern children, and adults too, are not averse to indulging in delicious sweets, so often as a basis for bouquets. And it's time to learn how to make a bouquet of Chupa Chups with your own hands!
What we need:
- Chupa Chups themselves: calculate the quantity from the size of the desired bouquet. Show your imagination - choose lollipops in one color or make a bright bouquet of different flavors and wrappers, respectively;
- corrugated paper of different colors;
- strong wire;
- fancy wrapping paper;
- scissors, glue;
- satin ribbons.

Let's get creative:
- We take corrugated paper, cut out circles from it (these are future flower petals). Paper can be taken in one color or several colors - to your taste and discretion.
- Next, take 2 or 3 circles, put them on top of each other, pierce in the center and insert Chupa-Chups.
- We glue the lower half of Chupa-Chups so that our paper petals keep their shape well - it turns out a flower with a sweet candy heart.
- The next step is to make the stem of the flower. We insert the wire into the hollow tube of the candy. As you understand, the wire should not be thicker than the cavity of the Chupa-Chups stick.
- We give a “natural” look to our stem: we wrap the wire with green corrugated paper. It is advisable to tighten the “neck” of the lollipop more tightly. There you can also tie a bow from a thin satin ribbon.
- Actually, flower sweets are ready. Now you can collect the bouquet. We fold our flowers in a spiral, wrap them with beautiful paper, tie them with a ribbon. All! Delicious candy chupa chups is ready!
On a note
However, you can completely go the easy way and just buy. Modern masters are able to create masterpieces that cause amazement even among phlegmatic skeptics. And what can we say about children and impressionable girls! Below you will see examples of the work of our florists.

So, to begin with, I will write what we need:
1) lollipops (35-45 pieces)
2) wrapping paper (1−1.3 m)
3) packing tape (about 3 meters)
4) foam ball (mine was about 12 cm in diameter)
5) pot (diameter 11-12 cm)
6) pot decoration
7) scissors ()
8) inspiration :-)
We cut the wrapping paper into squares (my squares turned out to be about 10 by 10 cm). We make as many squares as there are lollipops. We make an incision in the center of each square for threading a cap through it. We put the packaging on the chupik and fold it as shown in the picture (twice in half). When the package is folded, we tie a knot with a beautiful ribbon to secure the package on the lollipop stick. 
We take a foam ball and, starting from the center of the ball to its “equator”, we stick packed lollipops in a checkerboard pattern. I stuck the chupiki to the middle of the lollipop stick. 
When all the chupiks are already stuck in the ball, we immerse it in a pot. The ball fits snugly there and holds tightly, I didn’t even have to glue it (if you have it hanging out, then I advise you to either pick up a pot narrower or glue the ball to the pot on the transparent Moment Crystal glue). 
In my case, the pot did not match the color of the sky blue chupa chups and packaging, so I decided to decorate it too.
I bought self-adhesive foil, cut it into pot-sized rectangles and pasted them one by one. The pot is smooth plastic, so everything stuck very neatly. It turned out to be such an elegant and fun gift!
P.S. maybe someone will be wondering how much it all cost me.
Here is the calculation:
BUT, I used two sheets of foil out of seven in the set; of packing tapes I spent only one blue tape from the set; a foam ball costs differently in different stores, for example, two balls cost about 250 rubles in a city, and one ball costs about 100 rubles in a needlework store. 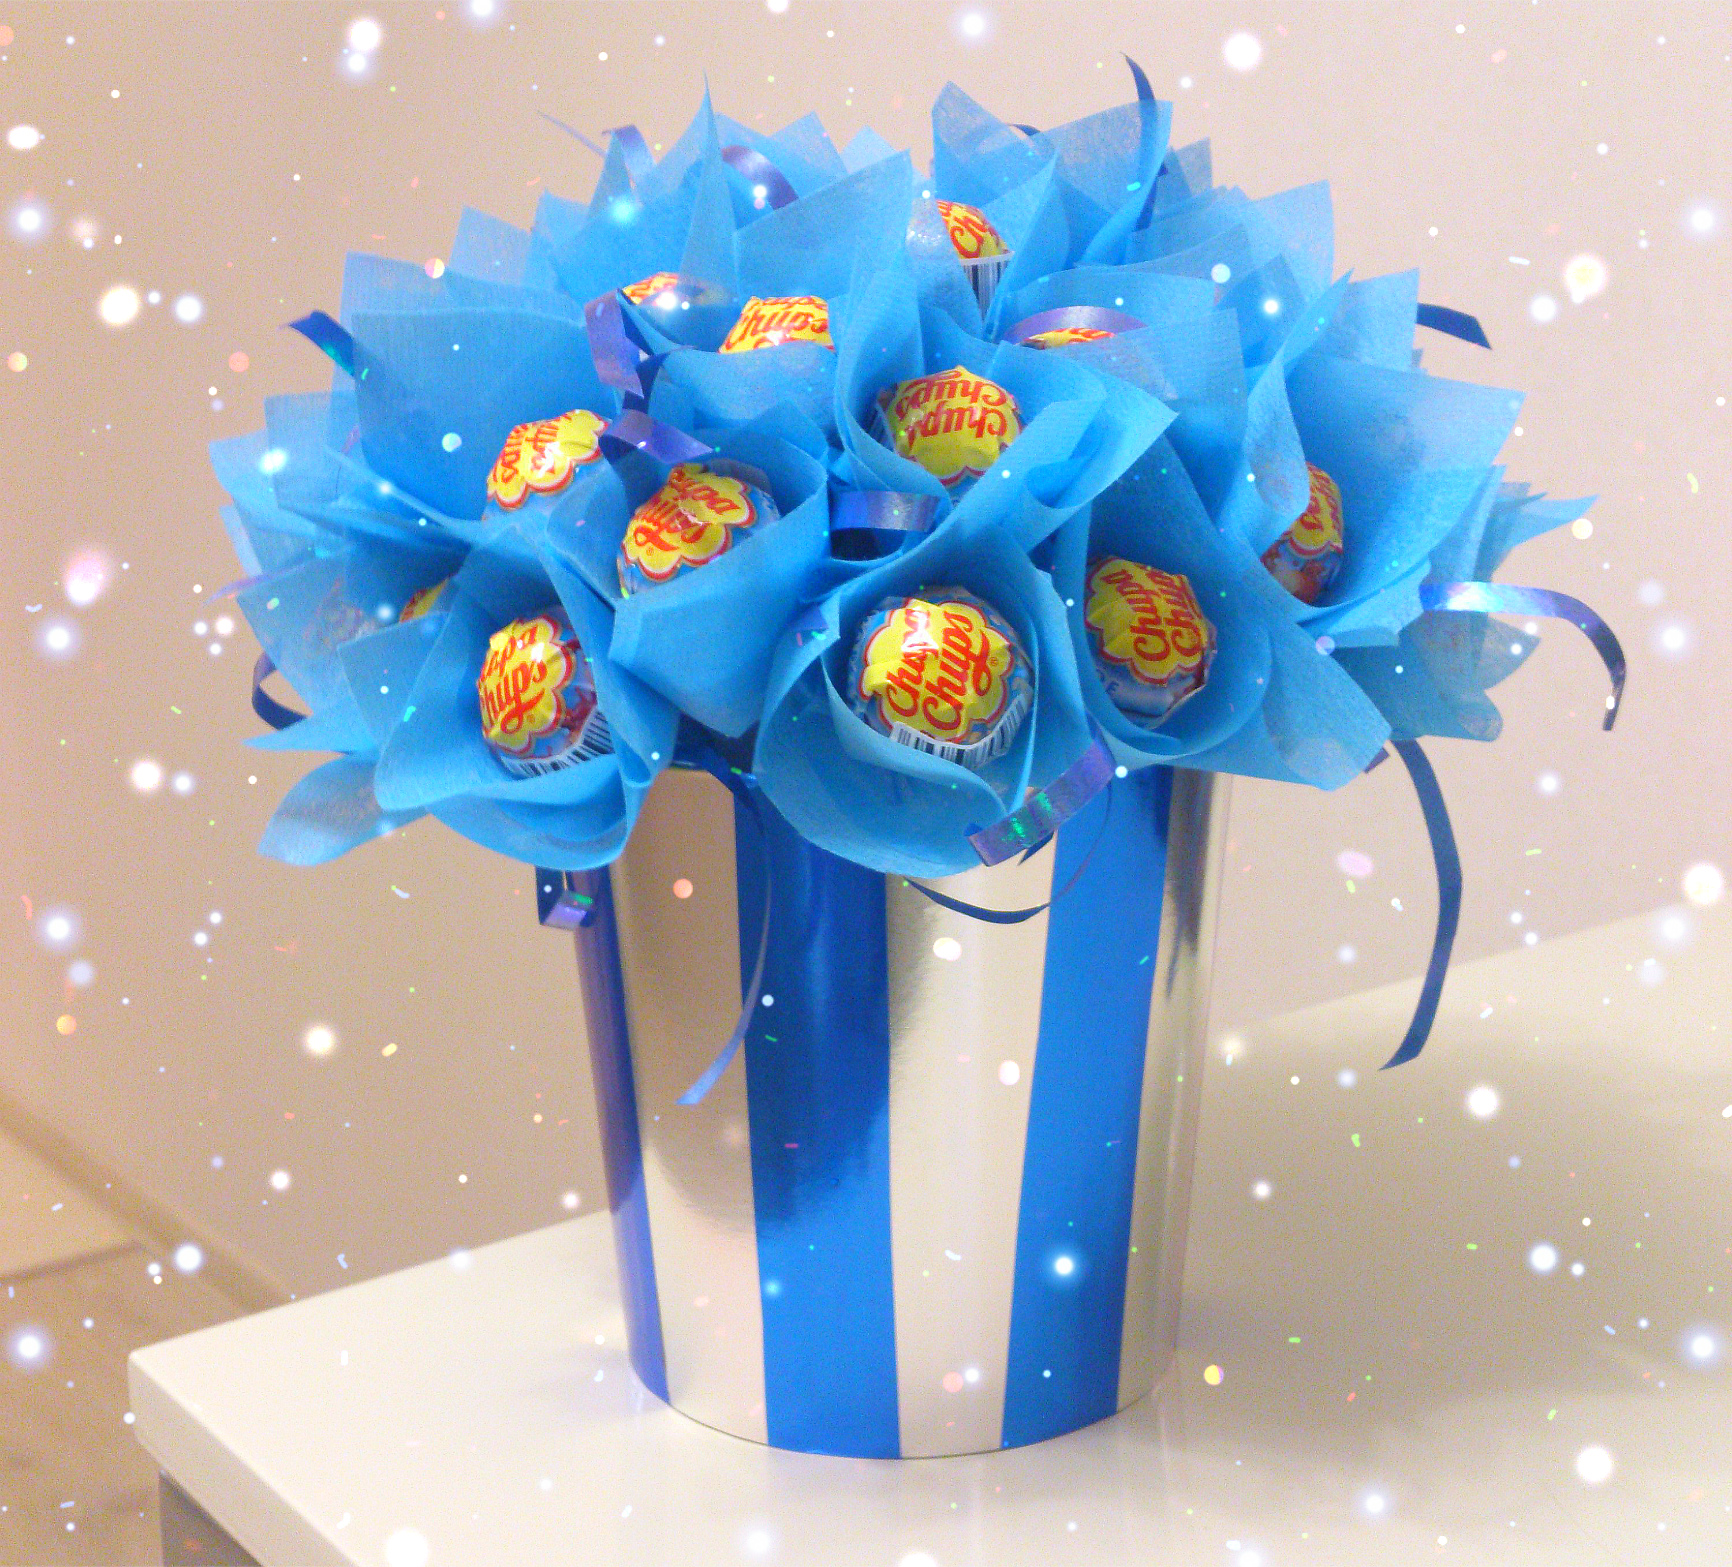
A bouquet of sweets is now a common type of gift, everyone likes it, both children, girls, and women ... And since March 8 is coming soon, let's try to make a bouquet of sweets and corrugated paper with our own hands. But I want to share with you the secrets of making a special bouquet, with not quite ordinary sweets, but with lollipops - fruity caramels on a stick. Even for beginners, it will be easy to make such a bouquet of lollipops with your own hands. Step-by-step photos and detailed instructions will help you figure it all out.
Bouquet of chupa chups. Master Class.
We will need:
- sweets "Chupa Chups", 9 pcs.;
- pink corrugated paper;
- green corrugated paper;
- wire at least 30 cm long (9 pcs), or wooden sticks (diameter must be 3 mm);
- beautiful packaging film for flowers;
- thin white ribbons for decoration.

In order to make a beautiful bouquet of sweets with your own hands, you need to start with petals for our flowers. We will make petals for flowers resembling "Roses" from bright pink paper, usually it is sold half a meter long, folded several dozen times. We cut off the top of the paper with a width of 5-6 cm.

Then we cut out two fused petals from this rectangle, the paper should be cut off at the edges so that the rest of the petals do not go with a ribbon, but only 2 pcs.

As for the lollipops, we insert the wire into the core of the sticks, so the candies are perfectly fixed. If the diameter is chosen correctly, no additional devices will be needed, if you feel that it is weak, secure it with tape.

Using the same adhesive tape, we attach two pairs of petals to the candy. (2 cm to the stick, the rest around the lollipop, so it keeps more securely)

Next, we cut the paper from the main skein again, only now its width is 7-8 cm. In this rectangle, who visually and who with a pen or pencil, draw an even petal, then carefully cut it out with scissors, along with all layers of paper.


For each petal, gently bend the upper part in the opposite direction. This can be done with your fingertips or by placing the petal on your hand so that its upper part lies on your index finger, and by rubbing the paper with your other hand, it gradually bends smoothly.

Then we glue each petal in a circle with tape. Glue as many of them as you want so that the flower is lush. (About 5-6 pieces)

From a skein of green paper, cut off a part 2 cm wide. Then we wind this tape on the wire, from the bottom up. Where the bud begins, we fix it with tape.


We cut off another part from the green skein, 3-4 cm wide. We cut off several triangles from above in a zigzag manner, as if we were making grass.

In a circle, we fix one such piece with tape, at the base of the bud. It hides everything superfluous and makes the flower completely ready.


Having done the same work with all lollipops, we get excellent candy flowers for a bouquet.

We fasten all the flowers with a ribbon or tape in the legs (about 5 cm, from the bottom). We wrap the flowers with the remaining green paper (several triangles can be put between the buds, it will be brighter and more natural). Then, on top of corrugated paper, we wrap the bouquet with our beautiful film. Add twisted white ribbons to the flowers and get a beautiful bouquet. Now you know how to make a DIY lollipop bouquet for beginners. You can see his photo below.

The work is painstaking, but not difficult, but the host of the celebration will be very pleased.
Also, an original gift can be,.
They have long been deservedly popular - a universal gift - beautiful, practical, tasty. Ordering such a composition from specialists is not a cheap pleasure, but it is quite realistic to try to make a bouquet of lollipops with your own hands. Why from these lollipops? This option is suitable even for children's creativity, because the design of the lollipop gives us immediately the stem, the base, and the middle for the flower. To make a gift, you can use any means at hand - acrylic paints, corrugated paper, fabric, ribbons, lace. If the candy wrapper is not too spectacular, you can tint it in golden or another color that matches the tone. Or slightly toned and petals. The main thing is to start, and inspiration and ideas will definitely come.
Bouquet of lollipops - master class
Tools and materials

Step-by-step instruction

Candy Flower Arrangement
Tools and materials

Step-by-step instruction

Giving gifts is no less pleasant than receiving them. Candy flowers in a vase can be given to mom, grandmother, daughter, sister, and girlfriend. Of course, this is not the only way to make such a gift. You can cut out several multi-colored circles and put them on a lollipop stick. By cutting out each petal separately, you can even make a rose from a lollipop. The stem, if necessary, is extended with a tube. It is good to decorate such a bouquet with a butterfly, a postcard with a congratulatory inscription. New ideas for a bouquet of lollipops will be prompted by a photo.
All children love tasty souvenirs. Both the content and the idea are equally important here. For the little ones, a simple lollipop can be an ideal treat - lollipop, which is presented in an unusual way in the form of an original craft. Today you will learn some interesting ideas - how to turn it into an original gift.
I present to you master classes - do-it-yourself crafts from lollipops with unique photographs. 10 ways to decorate a lollipop, surprise and give in an original way!
Crafts from Chupa-Chups do-it-yourself
butterflies
If you have ready-made color drawings of butterflies, then you only need to cut them out and stick them on cardboard. No pretty drawings? It's okay, just paint the butterflies with watercolors or gouache.
Glue the lollipops with double-sided tape and you get a butterfly with a cartoon head.

Winged heart from lollipop
If you are going to treat your baby with candy on February 14, then arrange it in the form of a cute valentine. Cut out wings from white cardboard, a heart from red cardboard, fasten a funny bow on a stick.

Attach all parts with double sided tape.

And glue candy in the center. It turns out a delicious original Valentine's card.

Ghost
You can make a ghost candy out of ordinary paper napkins. To do this, take three white napkins.

Unfold two of them into a square and fold one on top of the other so that the corners do not touch. Place a candy on a stick in the center.

Wrap the candy in the middle and wrap the paper robe around the stick with a napkin cord.

It turns out a ghost with thin arms and in magnificent clothes. Draw the eyes and mouth with a marker.

The kid will never guess what is hidden inside the scary hero. This candy will be more to the liking of the boys.
Original crafts from lollipops for girls
It's all about the hat
But this souvenir will be appreciated by girls. Just take a candy with a painted face and put a hair tie on it. It turns out a cartoon character in a hat. In fact, these are two gifts in one: a delicious lollipop and a hair ornament.

You can make an elastic band yourself from ribbons using the kanzashi technique.

Pleated dress
To make such a dress, you need to take a sheet of white paper and fold it like an accordion. The width of the strip should not exceed 1 cm. Then a cut 4 cm long is made from the top in the center, and the two parts are folded to the sides.

In the middle, glue the candy for the stick, and decorate the dress with paper flowers. It is better to use a candy on which a face is already drawn.

chrysalis
To make a doll dress, take a three-layer paper napkin with a beautiful pattern.

Place the candy in the center of the napkin and fold it into a triangle.

Form the handles and skirt.

You can also make a puffy dress for a doll in another way.

When your daughter plays enough with such an unusual toy, then she can just eat it.
candy flower
Cut out 4 flowers from a yellow cleaning cloth and make a hole in the center.

String blanks on a stick and fix them with a piece of cloth.

It turns out a flower with a middle-candy.
 Chupa Chups flower
 Bride
The lollipop dress can be made in another way. Take white cardboard and draw several circles of different diameters on it.

Cut out the circles and fold them several times to make waves.

Put the blanks on the stick in this way: on top - small circles, on the bottom - the largest.

It turns out the bride in a magnificent white dress.

How to decorate lollipop for boys
These ideas should be liked first of all by the boys.
Automobile
Take a set of colored cardboard and cut out the following details from it: a green body, 2 black wheels, 2 blue windows and 1 yellow headlight.

Glue all the details with double-sided tape and fix the candy on a stick on top of the trunk.

lollipop rocket
From purple cardboard, cut out the main part of the rocket with portholes, and from black cardboard, make the three lower parts.

Glue all the details with tape and fix the candy in the windows.

Here is such a transport that will deliver the desired candy to the sweet tooth. 
crafts
bear
Print out a fabulous image of a bear, which can be found on the Internet (in the "Children's coloring" section). The image must be full-page.

Using this stencil, cut out 2 symmetrical pieces from brown cardboard.

One - the back - remains unchanged, but with the front part you need to work a little. Draw ears, muzzle and paws with a black marker, and simply cut out the nose. Get a hole.

Insert a candy into this hole and glue both parts together. Attach a bow to the bear. The original cardboard toy is ready. And inside the baby is waiting for a sweet surprise.

cute lollipop bunny
To make a bunny from a candy on a stick, you will need napkins, PVA glue and a marker.
Get 2 white paper towels.

Cut one of them in half and wrap around the lollipop so that the stick is on top.
From the second half of the napkin, twist the flagellum and fix the edges of the paper around the stick with it.

Tear the second napkin into 4 parts and twist the balls - these will be the paws. Twist the tail from the remains of the flagellum.

Glue the paws to the candy, fix the tail. Draw a muzzle with a black marker.
Fluffy white bunny is ready!

Another option is lollipop animals.
This idea is no less easy to implement. Draw any animals on white cardboard. For example, a bunny and a bear. Only the paws must be drawn separately from the body.

Decorate the drawings with paints and felt-tip pens.

Cut out the toy and glue the paws so that each animal holds the candy in front.

Candy craft deer
In the coloring section of the Internet, look for an image of a deer head. Print it out in full.

Using a stencil, cut out the head from orange cardboard, and the horns from black.

Draw the animal's face with a black marker, glue on the horns and cut out a hole for the nose.

Insert a round lollipop into the hole and secure with tape.
The deer on a stick is ready.


If you make a lot of different fairy-tale characters from lollipops, then you can arrange a theatrical performance, the reward for which will be a delicious candy.
Christmas deer
The deer is a symbol of Christmas and New Year. It is not at all difficult to make such crafts from lollipop with your own hands.

It is necessary to prepare cardboard, pencils and ribbons for decoration.


We circle the candy with a simple pencil.

We draw a deer.


We cut out our workpiece.


Well, that's all, our craft is ready, it remains only to decorate with a ribbon.


