Crocheted rugs from rags. Crochet rugs from old things: how to make? Video: Crocheting a rug
Rugs or rugs have been an integral part of any interior for centuries. Contemporary textile artists have significantly expanded the range of materials and ideas, thanks to which this handicraft came into fashion again and became popular... A skilful combination of shades and textures can turn even the simplest rug into a noticeable interior detail. You can create these in different ways, but the most popular is crocheting.
How to crochet a rug correctly
Selection of yarn and patterns for knitting
Anything can become a material for making a rug. The Internet offers a variety of materials, from purchased items to recycled materials. The choice of material, pattern and weaving method depends on the place for which you are going to weave the rug. So, for example, it is pleasant to stand on a warm and cozy woolen rug by the bed with bare feet, and a plastic rug is useful for a corridor.

Recycling is in vogue today, so don't throw away your knitted sweaters - they'll come in handy for your needlework.
Crocheted rugs from old things with diagrams and descriptions of actions
Our grandmothers often knitted rugs from old things, scraps of fabric and everything that came to hand. It was considered a "poor job" for people who could not afford to buy a ready-made carpet. But today craftswomen from the countries with the most developed economies vying to compete in ways to reuse materials.
Thin knitwear is perfect for knitting a rug. Take some T-shirts and cut them into yarn as shown in the diagram. A special technique will help you to get a solid thread from one T-shirt without knots.


Prepare balls of different colors, buy a thick hook and get to work. The lessons will help you master the simplest circular knitting patterns.

The rug can be knitted in one circle, as shown in the diagram. The alternation of aerial chains and columns will benefit from bright combinations of yarns.


Simple crochet patterns will help you create the perfect circle for your rug. If you do not adhere to special color canons, you can create a variegated rug.


But if you show your design skills and conjure with shades, you can weave a beautiful circle with a contrasting color transition.

If, in addition to old T-shirts, you also have a supply of not very necessary threads, you can knit the rug using a different technique. A knitted ring must be tied with threads, as shown in the diagram.


It is difficult for beginner knitters to master knitting a large rug. That is why you should adopt the idea of crocheting blankets and rugs from motives.


Tie several circles of different diameters and arrange them into one piece. If you wish, you can choose shades that are in harmony with the decoration of the apartment, or you can simply play on the contrast and make the rug a bright spot in the interior.

Knitted cord floor rugs look voluminous and neat, so it's hard to guess that they are crocheted and crocheted with your own hands. Elastic synthetic cords look great in openwork patterns. At the same time, they do not deform or curl over time, are machine washed and do not cause a lot of trouble for the owners.

For work, you need a polyester cord with a core, which is very popular with craftswomen. The palette of shades is so rich that yarn manufacturers can envy such a variety. 100% synthetic, these cords are nevertheless pleasant to the touch, they knit practical and beautiful rugs for bedrooms, kitchens and children's rooms... From the name it is clear that this is a kind of "cord in a cord", due to which the products from this material are embossed and emphasize the pattern of any complexity.

Not only rugs are knitted from polyester material, but also bags and even weave decorations. —Crocheted flowers — it is quite possible to weave from a cord, if you get acquainted with the basic techniques of work.

On a small rug (about 1 m in diameter) you will need 700-800 m of cord. The weight of the finished product will be about 3 kg. These are approximate figures, much depends on the complexity of the pattern and the size of the finished carpet. The hook must be chosen strong, with a number of at least 5, since the weight of the product is significant, and a fragile tool simply cannot withstand it.

Operating procedure:
- for the first loop, wind several layers of cord around your finger and start tying the resulting amigurumi ring (this is what it is called) with a simple single crochet;
- follow the template, fully adhering to one of the presented schemes.


The amigurumi ring is the basic element from which beginners begin to master other toys.
Ribbon yarn is popular today among craftswomen who love to create with their own hands not only things, but also interior items. Bulky yarn allows you to create beautiful things using the original weaving technique.

Ribbon yarn is easy to use and has a varied range of shades in both pastel and classic palettes. The thread itself is beautiful and expensive, so knitting too large carpets from it hits the wallet noticeably. But, thanks to its beautiful color, it does not require special weaving techniques, and a small bedside rug made of ribbon yarn will delight you for a long time.


For a rug with a diameter of 60 cm, you will need 700-800 g of yarn and a hook with a diameter of 10-15 mm.
Operating procedure:
- start knitting from the middle - wrap a ring of yarn around your finger and tie with columns;
- continue knitting according to the pattern, making all the necessary additions to the loops.
This material will make excellent crocheted chair rugs. Even the scheme for work can not be changed. Enough measure the diameter of a chair or stool and after the circle of the desired size is knitted, just continue working without adding loops. Then your cape will receive bumpers with which you can fix it on the chair.

From high-quality yarn, you can master with openwork motifs.
A bathroom rug must meet not only aesthetic tastes, but also safety rules. The material should not promote the growth of fungus in a humid environment, it should be easy to wash and dry quickly. All these parameters correspond to rugs made of cords. But there is one more nuance - leaving the bathroom, you can slip on a knitted rug, which means that it must have an additional base.

You can buy a silicone mesh at a hardware store. It is almost transparent, so you can safely attach a ready-made rug to it. To wash the product in the machine, the net will need to be removed.

Crochet rug videos
- Cord crocheted rugs can be found on the popular Knit Together channel. Many options with an indication of the yardage and yarn consumption, as well as step-by-step instructions for making a pattern according to the scheme.
- The author of the video tells how knitted Japanese rugs are created and introduces the basic scheme of a simple crochet pattern. The main idea of such handicraft is the correct selection and arrangement of bright colors.
- A helpful video on environmental friendliness demonstrates how to crochet bag rugs. Crocheted bright rugs in the corridor will cheer you up from the first minutes of your stay in the house.
How did you like the idea of creating interior details with your own hands? Share your feedback, we will be grateful.
Throughout their lives, our grandmothers-needlewomen have accumulated such a baggage of knowledge and skills that any author of the site of crazy pens and handmade will envy. Of course, they are not familiar with the newfangled tendencies in sewing, decor and design, but as far as classic “home” things are concerned, there is no equal for them here. They will sew, knit, weave, repair and embroider everything that is necessary for themselves and their beloved grandchildren. So, I recently received a round rug made by my grandmother's hands as a gift. Immediately I wanted to learn how to knit the same rugs myself. I asked for a visit to my grandmother and within half an hour I mastered crocheting. The homemade one, which was written about in the last article, had to be slightly modified. In practice, the sharp head of the hook is not at all suitable for knitting - I rounded it off using sandpaper.
So, to learn how to knit a rug, we need:
- Large diameter crochet hook;
- Cut shreds of cotton fabric (long stripes) or braid.
It is very easy to knit a rug from what you find in your home, avoiding wasting money. To do this, look for clothes that are not wearable (preferably old undershirts or a dressing gown). Cut strips 2-3 centimeters wide, then join them into a long rope of shreds. Roll into a ball. And now the material for work is ready!
You can also choose a different version of the source material. To do this, purchase braid from a fabric and accessories store and use it as scraps for a homemade rug. There are pros and cons to using braid. If we compare it with knitting from shreds, then when choosing a braid, you yourself can choose the colors to your taste or to match the interior, at the same time, there will be no need to knit balls of shreds, which will significantly save your time. The downside is that you will have to spend money on the purchase of braid. To weave at least a medium-sized rug, you will need 200 meters of braid. If you choose the second option, then give preference to inexpensive, but at the same time high-quality and beautiful braid.

We begin to crochet the points:
1. It is necessary to impose a chain of air loops;
2. Tie the first and last loop with a connecting loop;
3. Make a lifting loop (one more loop as in point # 1), passing the thread through the center of the circle> grab the thread with the crochet and pull it back through the center outward> make a loop and start tying the loops in a circle. Then, inserting a hook into each loop, we continue to knit the loops according to the principle described below.
The way to start crocheting is shown in the picture.

Knitting a perfect circle involves constantly counting loops, rows and additions, but I want to offer a simplified version of typing loops. It all consists in tying the loops in a circle, adding two to every second loop. Thus, alternate the loops according to the principle of "one-two" and so on in a circle. You can clearly see the process by watching the video "how to knit a rug."

You are unlikely to be able to knit a guaranteed perfectly round rug, since it can curl and eventually turn into a hat (as I had in my first experience of knitting a rug). The flatness of the surface of the rug depends on the number of added loops and their density, as well as the correctly selected hook diameter. The hook is selected individually depending on the size of the flaps (braid). If you fail, don't despair! Try again and then you will surely start everything.
Every time you finish a circle, straighten and straighten your knitting. Follow my example and start with threads, and then move on to shreds of clothing.
If your edge of the rug turns out to be wavy when knitting, then it is better to dissolve a couple of rows and start over, but at the same time a new row of loops should be knitted into each loop one by one, omitting the principle of "one-two" when knitting. Most likely, a new row will begin to bend the edge of the rug, then the next row should be knitted according to the "one-two" principle (start adding loops one by two). I ran into this situation when I was tying the last purple strip of the rug. The described recipe helped me solve this problem. I will summarize the work done:
- The diameter of the rug is 74 centimeters;
- Thickness 3 centimeters;
- The braid used up a little more than 250 meters.

Old things, accumulating in our wardrobes and dressers, cause a lot of inconvenience. Homemade rugs from old things are an interesting highlight in a modern interior. We will reveal the secrets of making them with our own hands, we will paint everything step by step, we will give a master class, supported by a photo of finished products.
Inspired by the idea of creating a rug from old things, go through your wardrobe and take away everything you don't need. Next, prepare your clothes:
- Cut off parts that may still be useful - buttons, buttons, zippers.
- Trim necklines, thick seams, pockets, and other irregularities.
- Cut into strips. Their width depends on the thickness of the material. The thinner it is, the wider the tape.
- Cut the ribbons in a spiral pattern to lengthen them. For smoothness, round off the right angles.
- Roll up the balls, sorting the strips by color. It is more convenient to combine shades this way.
Advice. Before cutting the strips, pull the flap cut from the old jersey horizontally and then vertically. When stretching, you can see in which case the fabric is twisted to the front side. In this direction and cut the ribbons.
Soft fluffy rug made of rags "Grass"
Such a rug is very pleasant to the touch, it is pleasant to step on it with your feet, you can sit on it. The best material for him is boring T-shirts or long-unused Lycra items. Whichever you choose, you need to prepare 20 x 120 mm strips. Next, we will consider the process step by step:
- We buy a base - painting or plastering mesh. If there is a special carpet mesh, then it will work, only the edges must be protected from unraveling with masking tape.

"Grass" rug
- Cut out the desired size and place the base on a non-slip surface.
- We retreat from the edge 1 cm. Insert the crochet hook, hook it up with the flap and pull it through the hole to the middle.
- We tie a strip to a knot. We continue the process until the mesh is completely filled.
- We apply glue cushioning material on the edge of the rug on both sides in succession and iron it several times with a heated iron.
The rug is ready. Using this technique, you can create patterns, match stripes by color, or arrange colorful stripes in any order. In any case, you get an exclusive model. Make sure of this by looking at photos of finished products.
Attention! When choosing a crochet hook, make sure that its diameter is 2 times the thickness of the patchwork thread.
Crochet rug making workshop
The hook is able to create beautiful things from unnecessary things, including all kinds of rugs. They are laid on stools, laid on the floor near the sofa or by the door, made sofa pillows from them, used as a stand for hot dishes. It's easier to knit a rug shaped like a scarf. Let's start with him.
Scarf rug
So that nothing distracts from the creative process, we will prepare everything in advance:
- hook number 10;
- old things.
Now you can start:

Crochet round rug
To make it, we use the usual circle pattern. A rug of this shape is not much more difficult to knit than a rectangular one:
- make a loop;
- we knit air loops out of it - 6 pcs;
- we tie the resulting half-columns;
- we lift - 1 air loop;
- we continue to work on the formation of the circle, performing double crochets.
An approximate scheme for adding loops:
- 1 row - knit 2 single crochets from each loop;
- divide the circle into 6 equal parts;
- knitting the last stitch of each segment, add 1 double crochet.
- finish the circle by knitting to the desired size.
The rug is made without the use of a hook. After cutting the strips, take 3 of them and pin off the ends with a pin. Then braids are weaved from them.

If there is not enough length of one of the tapes, then the next one is attached to it, and so that the connections do not join, they are hemmed in a checkerboard pattern. Before reaching 200-250 mm to the edge, the pigtails are narrowed so that the ends of the rug are even. To achieve this goal, it is necessary to gradually reduce the width of the belts. Thus, at the end, the width becomes 2 times smaller than the original.
The pigtail is sewn around the first loop and twisted like a spiral. Having fastened the blanks to each other, a rug is obtained.
Interesting idea: patchwork square rug
A beautiful warm rug consists of squares. To implement this idea, you need to be able to handle a sewing machine. In addition to it, you will need:
- dense flannel flaps of 0.8 m in different colors;
- threads;
- disk knife;
- ruler;
- scissors.

In the finished form, the product will have dimensions of 86 x 110 cm.Further, we take several steps:
- We cut out the quadrangles, for which we fold the flap in half, inside out.
- Cut out 63 squares with a side of 180 mm using scissors or a circular knife. If you expand them, you will get twice as many, but you do not need to do this yet.
- We lay out the blanks according to any chosen scheme.
- We sew a seam along one side of the shape. We repeat the same action with 3 sets of squares.
- Initially sewn 2 pairs of squares are connected so that their edges are oriented in one direction. Thus, we make an assembly of 6 squares, and then add a figure to row 7.
- We continue the process until we get 9 rows of 7 squares, sewn together with the orientation of the edges in one direction. On the opposite side, the surface is flat.
- We collect all the elements of the rug, for which:
- 2 strips of 7 squares sewn together are connected along the long side with a seam outward with a seam allowance of 2.5 cm;
- we attach the next row, and continue until we get 9 long, sewn together rows, consisting of 7 elements each;
- overdue the entire rug around the edges, leaving an allowance of 2.5 cm;
- we make a fringe by making cuts at the edges with a distance of two and a half cm without damaging the seams;
- we wash the product and let it dry.
These are the masterpieces you can create with your own hands at no cost and with a minimum of effort.
Old rug: video
DIY rugs: photo


When visiting your grandmother, you probably saw her small hand-made rugs. Our ancestors did not throw away old things, they gave them a second life. Having learned how to weave a patchwork rug without a crochet, you can create it yourself. It will become not only a decoration for your home, but also a very practical thing to use.
There are large enough crochet hooks on the market, but such a rug can be made without tools.
Round rug
The simplest version of a scrapped rug is a round one. To make it you will need:
- Old fabric items;
- Scissors;
- Needle;
- Threads.
If you just want to recycle old things by creating a door mat for shoes, feel free to use any fabric. If you have ideas to fit this product into the interior, carefully select the color and texture of the fabric.

Start by cutting the fabric into long pieces.
If the fabric is loose, it is best to sew each strip and turn it inside out, leaving a seam inside. This is a rather laborious task, but a garment made of processed fabric looks neater and will last longer.
From the obtained pieces of fabric, you need to weave a braid. The tighter it is, the harder the resulting rug will be, respectively, if you want a soft rug, then do not intertwine the braid too much.
Secure the ends of the shreds with a pin.

And start weaving.
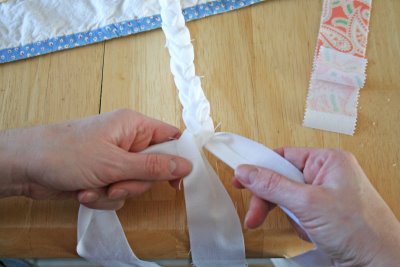
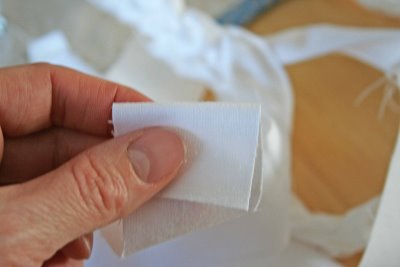
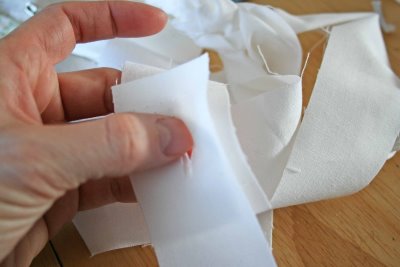
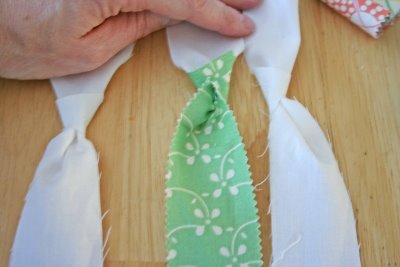
Having reached the end of the ropes, you need to lengthen them. If you tie a knot, it will turn out rough and ugly. There are two options - to carefully sew a new end or make cuts at the ends of the patches and stretch an additional string through the working end and push its tail into the cut. Tighten gently and you have a long string with no knots or stitching. The whole process is clearly visible in the photo:


You need to braid the braid that is long enough.

Do not process its ends yet, but just grab them with a pin so that they do not bloom. If in the process of making the rug you want it to be larger, simply attach new pieces of fabric and braid the braid until you get the desired diameter of the finished rug.


You can intertwine the pigtail with a ribbon instead of thread. To do this, weave it with zigzag stitches either into the side of the carpet, or into a working pigtail thread. Pull up on the tape and it will connect the pieces together.
For more strength, it is better to completely weave or stitch the edge row of the rug with a thread, then the product will definitely not fall apart.

The round rug is ready!

Bathroom decoration
A comfortable and practical bathroom rug you can make with your own hands. To do this, you will need:
- Old towels;
- Ruler and tailor's chalk;
- Sewing machine;
- Tailor's scissors.
The manufacturing process of such a rug differs little from that described above. First, cut the towels into long strips 4-5 cm wide.

Connect the first three pieces with a sewing machine. It is also necessary to build up the "working thread" using this sewing tool.

When weaving braids, the raw edges must be folded inward.

During the assembly process, you need to flash the rows on the machine.

The bath mat is ready! It is very soft and pleasant to the touch, absorbs moisture well and can be washed.
Woven models
Patch rugs can be woven using a base. It looks like a small loom. Make a wood frame to match the size of your rug. It can be rectangular or square, it all depends on your idea. On the frame, you need to stuff carnations at a distance of 2-2.5 cm from each other.
For these purposes, you can use a furniture board or an old table. It is not difficult to make a machine, but it will serve you for a long time.

On them, strengthen the warp threads made from pieces of fabric. On the leftmost warp thread, reinforce the working thread. It is best to sew it on. Weave the rug by running the string over one warp thread and under the other. You can use more complex techniques and weave with two working threads at once. In the process of weaving, the fabric must be constantly pushed upward so that it is denser.
Hand-made things have always been appreciated. A carpet can transform any room, making it cozy and unique. How to knit a rug with your own hands? There are many different ideas that will help you make a rug with your own hands from scrap materials. Varying with the size of the product, you can get not only rugs, but also capes for chairs or armchairs
In order to knit a carpet with your own hands, you do not need special skill, just stock up on the necessary materials and patience.

Carpet can transform any room, making it cozy and unique
Recently, home decor and interior elements made in the hand-made style are gaining popularity. You can knit a rug from cord, thick thread, or old unnecessary items. There are many options.
For beginner craftsmen, there are various video instructions on how to knit a rug with your own hands or how to crochet a rug. You can view them in magazines and books on needlework, or on specialized sites.

Knitted rug
Rugs made of sea pebbles, moss or small pom-poms also look original. Carpets crocheted from a cord have an aesthetic appearance.
Today, popular materials are:
- For small rugs that can be thrown under your feet by the bed, half-woolen yarn or acrylic will do.
- Many people use regular clotheslines or cords to tie a rug that will fit perfectly at the front door. Such products have a dense texture and perfectly remove dirt and street sand from shoes.
- Plastic thread is a great alternative to store-bought bathroom rugs.
- From old things you will get versatile rugs that can be put in different places of the apartment.

For small rugs that can be thrown under your feet by the bed, half-woolen yarn or acrylic is suitable.
Crocheted rug looks very original. For knitting you need the following tools and materials:
- scissors;
- old unnecessary things from jersey;
- hook.

Small knitted rug
In some cases, you may need a mesh for the base of the product. As a result of small manipulations and actions, it will be possible to make an excellent bedside rug or rug for the bathroom.

Crocheted carpet looks very original
On a note! Choosing a color scheme for a future piece of furniture, you can add your own flavor to the overall style of the apartment and complement it with an exclusive item.
If in the process of knitting any things there are skeins of yarn, you can knit a boring multi-colored rug from them, which will cheer up even on gray autumn days. A few hours of free time watching your favorite movie - and a cozy rug is ready!

For the needlework process, you will need shreds, scissors and the hook itself
Crochet rug
How can you knit a rug with a regular crochet hook? Thick yarn or regular scraps of fabric will come in handy. Old unnecessary things are taken as the main working material.
For the needlework process, you will need shreds, scissors and the hook itself.

Crochet rug
You need to rip the selected thing at the seams and cut it into strips. It is better to start cutting from the corner, while the width of the strips should be within 2 cm. You can increase their width if the finished product should be more massive. It all depends on the preferences of everyone. In the process, you must try to cut the fabric in such a way that the strips are as long as possible. Experienced needlewomen are advised to choose the width of the strips depending on the thickness of the fabric. Accordingly, the thicker the fabric, the thinner the width of the tape should be.
After the material is prepared, you should carefully tie all the resulting strips into one large tape, which must be wound into a ball.
For a multi-colored rug, stripes of different colors alternate. The more colors you get, the more fun the finished product will be. Before tying the carpet, you need to decide on the room where it will lie. The product should be in harmony with the color scheme of the room.
For knitting, you need a crochet hook (no. 7 or more), dial the required number of air loops. Thus, the width of the future carpet will be obtained. Further, the knitting process is carried out with single crochets. This is the easiest way. Interesting options for rugs are obtained if you change the colors of the glomeruli every 2-3 rows.

For knitting you need a crochet hook (# 7 or more)
Advice! For beginner needlewomen, it is best to choose a square-shaped rug - this is the easiest option.
Then you can try crocheting a round rug to the floor. If you have any difficulties in the process of work, you can watch video tutorials on how to crochet a carpet.

Knitted rug
How to make a carpet on the floor using a regular cord?
Today, the option of knitting rugs is becoming popular, when a polyester cord is taken as the main material. The fact is that such a cord is made on the basis of synthetic fibers, due to which it has a number of significant advantages over other materials:
- does not deform during operation or after washing;
- will last a long time;
- does not absorb moisture;
- does not absorb dust.
The finished products from this material look very elegant.

Polyester cord carpet
How to crochet a polyester cord rug? This question can often be heard from needlewomen.
Knitting patterns and patterns can be found in any book on crocheting openwork napkins. In order to determine the length of the cord, it should be borne in mind that to knit a product with a diameter of 1 m, you will need about 800 m of cord. If the carpet will accommodate a large number of volumetric elements, then much more material will be required.
On the Internet, you can find a huge number of videos, where it will be described in detail and shown how to knit a carpet from a cord.
You can knit such a carpet using different shapes, such as a circle, semicircle or oval. It all depends on the future location of the finished product. In order for the finished product to be in the shape of a semicircle, it is enough to "cut" the finished weaving pattern. Knitting will not go in a circle, but in straight and return rows.

Knitting patterns and patterns can be found in any book on crocheting openwork napkins
Original pom-pom rugs
Rugs made of pompons are very successful. They bring coziness and comfort to the house. In order to knit a carpet from such elements, you will need the following materials:
- thick woolen threads for knitting;
- mesh base for the future product;
- scissors.

Pom-pom rug
You can use a variety of mesh backing to form your carpet, but a plastic canvas is the best choice. This is a mesh with rather large holes. Meshes are available in a variety of sizes and shapes. Such a plastic canvas does not crumble when cut, does not dissolve. The future base can be given any shape.
Pompons for the future rug can be made in different colors or even in different sizes, it all depends on everyone's taste preferences.

The scheme of making a rug from pompons
Pom poms can be made in many ways.
- One of the most famous and old methods is with cardboard circles. You will need 2 circles of the same size with holes in the middle. To get a pompom, you need to wind the knitting threads in circles, and then carefully cut the threads along the sides. Move the cardboard "donuts" apart and connect the middle with a thread. Remove the cardboard and fluff the finished pompom. In order to make it lush, you can fold the threads when winding in half or three times. The more yarn is wrapped around the cardboard, the fluffier the finished pompom will be.
- If you need to make small pom-poms, you can use a regular table fork. You need to wind the yarn across the cloves and tie in the middle of the skein. Remove the yarn from the fork and cut gently at the sides.
- You can not use materials at hand, but make pom-poms on your fingers. To do this, wind the threads around your fingers (use 2, 3 or 4 fingers), then remove the yarn from your hand and put it gently on the surface. Tie the resulting skein across with a thread, cut the yarn on the sides and fluff it up.

If you need to make small pom-poms, you can use a regular table fork.
When the working materials are ready, you can start making the rug. To do this, you need to snap each element to the grid. If pom-poms of different colors have been prepared, the color scheme should be followed.
If you wish, you can sew on or tie the purl base to make the new rug look beautiful on both sides. In the absence of a mesh, any dense fabric is taken as a basis.
An ordinary hoop is the basis for a future rug
At home, you can knit a round rug using materials at hand for work, such as a regular hoop (hula hoop) and unnecessary things.
Long strips are cut from unnecessary T-shirts or other things (old towels), which are subsequently connected into rings. To weave such a product, it is better to use a fabric that does not stretch too much, otherwise the finished rug will not keep the required shape.