Piggy bank - a house with your own hands made of papier mache. How to make a papier mache toy house: a master class on making a papier mache winter house
Amazing things can sometimes be done with improvised means, with a little bit of effort and imagination. For example, a fabulous house from an old box for a gnome or a doll. We will do it using the technique.
For work, you will need the following materials:
- any box, you can take a container from milk or juice;
- roll of toilet paper;
- newspapers or sheets of paper;
- some thick cardboard;
- PVA glue;
- water-based paints and varnish;
- scissors;
- brushes;
- eggshell;
- cereal;
- stained glass paints;
- molar tape.
House from a box for a doll gnome - papier mache:
First you need to prepare the box, cut off all unnecessary from it. Cardboard sashes do not need to be thrown away, they will be useful for the construction of steps, windows and doors.
 Next, we make a roof, for this we roll up a cone from a sheet of paper, try it on a box and fix it with glue, it is better to take a thicker paper, or several newspaper sheets, otherwise the roof will be deformed during operation.
 We make a second funnel from a small sheet and glue it at the very top at an angle to the first, it turns out a kind of gnome's cap.

 Next, from the same paper we form the roof slopes, bending them up a little.
 For temporary fixing of elements, for example, while the glue sets, you can use molar tape. I made the roof so that it fits tightly on the house, in the future, the product can be used as a box for storing small things or a cache.
 When the main elements are ready, you can start pasting them with toilet paper. To do this, apply PVA to the base with a wide brush, apply pieces of paper and form small folds, then cover it again with glue on top. Thus, an imitation of a plastered wall is obtained. If one layer of paper is not enough, you can do more. I ended up with three layers.
To start further work without damaging the "plaster", the house must be dried. In the oven in ventilation mode, 10-15 minutes will be enough for this, at a temperature of no more than 100 g. C. While the house is drying, it is necessary to ensure that it does not deform.
 We cut out windows, doors and a base for installing a house from pieces of cardboard, then glue the blanks on the same PVA glue.


To make a frame for doors and windows, we twist toilet paper into flagella and dip it in PVA diluted with water, then glue it around the windows and doors. We also make the layout for the windows from flagella, but smaller in size.
 To simulate protruding brickwork, I used an egg shell. She carefully broke it into pieces, in the form of bricks, and glued it onto a thick layer of PVA.
 Green bushes spreading along the wall of the house can be made from cereals. To do this, apply glue on the wall of the house with a dense layer, cover it with cereals on top. Branches and stems can be made from the same flagella as frames for windows and doors.


 When all the elements are attached and the glue is dry, we start painting. I used regular gouache. To make the windows look more believable, I filled them with stained-glass paint, if there is none, then you can simply paint it with blue paint and cover with any transparent, glossy varnish.
 We fix the result with a matte water-based varnish. I also painted the inside of the house and the roof with gouache and covered it with two layers of varnish.
A fairy-tale house from a box for a gnome using papier mache technique is ready!
A mass of papier-mâché.
We will use this mass for rough work, creating the basis for future products (dolls). It turns out that the best binder for this Mass is a regular flour (with the addition of starch) paste!
I did a lot of experiments and I ask you to take your word for it - there is nothing better than a paste.
You can generally keep silent about accessibility - there is always a spoonful of flour of any quality.
If you knead the mass on a paste (and not on glues), it dries more easily and soaks up the cellulose more easily - the mass becomes more homogeneous and dries faster. Taking into account the thickness of the layer to be dried, this is an important factor.
The second and only filler component will be cellulose.
We will get it from the most ordinary toilet paper. Of course, you can just soak toilet paper in a paste and sculpt papier-mâché from it. But this is very inconvenient. Firstly, paper, although it exfoliates well in ordinary water, is much worse in paste. Because of this, it can be impregnated unevenly and will shrink unevenly when dry. Excess moisture also interferes with work - the mass will be too soft and wet.
It is much more convenient to have stocks of chopped dry fibers with you, which can always be kneaded by adding glue
erase any density and as much as needed.
Here we will prepare such crumbs.


1. Place the rolls of toilet paper in a suitable saucepan, fill with water and set on fire.  2. Stirring occasionally, we help to turn the paper into a homogeneous gruel.
3. When there are no lumps left, pour the gruel into a colander. It is not worth waiting until it cools down - it is easier to slowly rinse under running cold water, at the same time to cool the gruel. Do not try to rinse everything at once. Do it in batches.
4. After rinsing, pour the mixture into a suitable container. It is not worth waiting until all the water has drained - this will not happen in the foreseeable future;). Here's what you should get: 
5. Next, carefully squeeze the water out of this mass with your hands.

6. Having squeezed out the water, it is necessary to grind the resulting pieces. We just break the squeezed mass into small pieces with our hands. 
This is necessary in order to place them in the kitchen chopper.
I bought the shredder the cheapest one on sale - the power (the price depends on it) does not play a special role.
7. Well, in fact, grind these pieces.
 We spread the resulting crumbs on a spread newspaper and dry them for future use.
If the mass of papier-mâché is needed now, then the grains at this stage are sufficiently dehydrated, albeit raw. You can add a little paste to it and mix the mass.
Note:
a) You need to grind wrung out, but not
dried mass. Else chopper
any power will not be able to with it
handle (try to cut
book!).
b) Paste for better strength
it is possible (but not necessary) to add
a little carpentry or casein
glue. Approximately 1:10. Not worth it anymore.
A source
http://www.papiermache.ru/receptura-i-tehnologija.htm
Each of us tried to save up coins or bills. Of course, you need a piggy bank for this. And how wonderful it is when it is not only a place to store money, but also a wonderful interior decor. At the same time, it is not at all necessary to buy it, because everything can be done by hand.
To make a cute house, we need toilet paper, paste, a box of the right size, a piece of cardboard, glue stick, acrylic paints and varnish.
First you need to make a blank house. To do this, take a box and glue it on a sheet of thick paper. This is done in order to subsequently make the base.

It is very important to think in advance how exactly your house will look like before you start making it. If you want, you can print the picture and do the work while looking at it. So, we make all sorts of elements from pieces of cardboard. In our case, these are balconies, a veranda with a door and, of course, a roof. Cut out strips of cardboard and attach them in a semicircle with glue or tape. Do not forget that the balcony must have a floor. Similarly, we make a veranda and a roof over it.

We make a roof from a large sheet of cardboard. Do not forget that we are making a piggy bank, which means that there must be a hole through which money will be hidden. You can make it absolutely anywhere. To do this, fold a sheet of paper several times and fix it in the chosen place. You can also make a drain pipe from a rolled sheet of paper that is secured with tape.

Now we have a blank, which we will glue with a mass for papier-mâché. Tear off a piece of paper and moisten in paste. Cooking the latter is easy enough. To do this, take five parts of water. Boil four of them, and stir 2-3 tablespoons of flour in the fifth. Its amount depends on what kind of thickness you need the paste. If desired, you can replace it with PVA glue, which should be pre-diluted with water in a 1: 1 ratio.
In a separate cup, we make a thick gruel from pieces of toilet paper and paste. We take in small portions, squeeze out and begin to line our house. At the same time, do not forget about creating windows, frames for them, all kinds of bulges, and so on.

After you have pasted over the whole house, let it dry a little, but only until the mass is no longer sticky, but still soft. Using a stack or any material at hand, create a relief. It can be a brick, imitation boards or tiles. It all depends on your imagination. After that, dry the house thoroughly for 2-3 days.

Now we have to paint. To do this, you can use ready-made acrylic paints or dilute the gouache with PVA glue. Use the foundation first. For the house it will be gray, and for the base it will be black and green.
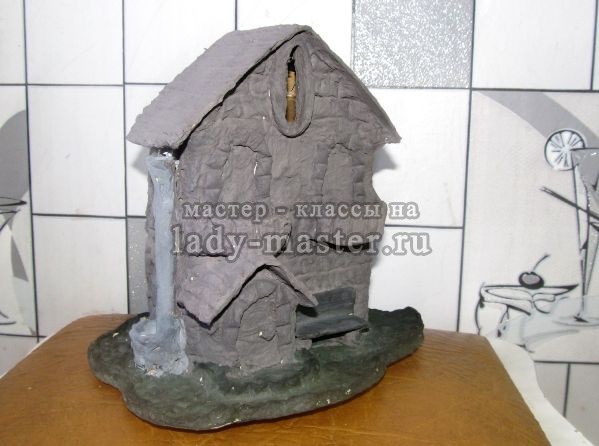
After the first layer has dried, you need to emphasize the relief. To do this, create the color of the paint darker or, on the contrary, lighter than the base. With your fingertips, apply it only to the convex parts of the house. Due to this, the entire texture will be revealed.

At this stage, you can stop and varnish everything. But if you want to create a craft that will not differ from the purchased one, you can additionally walk with strokes of gold powder. Due to this, with a skillful combination of colors, the piggy bank will radically change its appearance and acquire great attractiveness.

Torn paper - this is how papier-mâché stands for papier-mâché from the French language. The technique originated in ancient China, which is considered the birthplace of paper. The approximate dating of the most ancient product is the 3rd century BC. After this kind of crafts began to be made in Persia and Japan, and only by the 17th century, papier-mâché in the interior began to be used in Europe.
You can do anything with papier-mâché, you just need a little imagination and a little patience.

The stone framing in this photo is made of papier-mâché.

At first glance, the figure seems to be made of non-ferrous metal, in fact, there is paper inside
Decorative elements of the interior, bowls, vases, photo frames and much more are made from a mixture of paper and glue.

The papier-mâché technique uses a “paper dough” consisting of glue and soft paper
The most common techniques for making papier-mâché products are:
There are no special questions with the first and last options, but preparing a mixture for paper products requires more careful consideration.

The waving technique allows you to create thin and durable things
Papier-mâché mass recipes
How many masters, so many options for preparing a mass of papier-mâché. Below are the most popular entries that many needlewomen liked. Store ready-made mixtures in sealed plastic bags or plastic containers. This will help keep the material moist. Containers must be placed in the refrigerator.

Loose paper can be prepared in advance, but glue must be added immediately before work
First option
We will need:
- about 60 grams of dark toilet paper;
- dry chalk;
- potato starch;
- clay, but it can be excluded;
- PVA glue;
- glue Bustilat.

Source materials
Unwound paper is placed in a bowl with water to swell, after which it is wrung out and interrupted until flakes.

Chopped mass
At this stage, the weight of the mass should be 280 g. Then add office glue (50 ml) and 3 tablespoons of Bustilat, knead with a mixer. Put 3 small tablespoons of clay and starch and mix again until smooth. Bring the papier-mâché mass to readiness by kneading with the addition of dry ingredients.

The finished mass can be stored for quite a long time, depending on the humidity.
Second option
The porcelain mass of papier-mâché is not the cheapest to perform, but it is distinguished by its quality and light translucency. Used to make dolls or kitchen utensils.
It requires high quality toilet paper (white), cold-pressed flax oil (1 tablespoon), wallpaper glue (2 tablespoons).

The mass according to this recipe comes out more plastic
Best papier mache ideas
The use of papier-mâché in the interior, the ideas of which are easy to come up with on your own or to spy on the notes liked by numerous network users. Products made using this technique are lightweight, but strong enough. Use it to create a delightful Easter bunny or even wall decor.

Things made using the papier-mâché technique are quite durable, lightweight, and most importantly, unique
Papier-mâché vases
A correctly selected vase can decorate any room design and become its highlight. DIY papier-mâché decor allows you to bring any idea to life. Such things will be carriers of the positive energy of the creator.

You can't tell right away that this vase is made of paper.
To create it you will need:
- newsprint paper;
- packing paper;
- glue;
- stationery knife;
- not a natural brush;
- primer or acrylic paint;
- topcoat paint;
- decorative elements;
- petrolatum.

For work, you need an old vase as a base.
Before pasting the form with cut pieces of paper, it must be treated with petroleum jelly so that it can be easily removed. Scraps are glued in layers, alternating layers of newspapers and thicker paper. They need to be made at least six. Let the workpiece dry completely.

The newspaper is cut into small pieces and glued in several layers

We cut and take out the vase from the newspaper shell
After drying, the vase is opened with a white primer, sanded and then covered with a layer of paint that has been chosen. At the last stage, the decor is attached.

Be sure to break the vase with a primer

Twine can be used as a decor.
Wall decoration
The most common do-it-yourself papier-mâché wall decor is brick or stone. To make them, you can use recipe number 2 for preparing the mass. And also, you need a form made of glass or plastic. You can also adapt the cardboard packaging for juice, which is covered with a bag.

The cardboard is torn into pieces and poured with boiling water. The cooled mass is thoroughly crushed and dried
The finished mixture is distributed in shape, making a brick. Allow to grab and spread on paper until completely dry. If papier-mâché bricks in the interior of the house are supposed to be used on curved surfaces or corners, then they need to be fixed slightly damp to the wall. Completely dry workpieces do not bend, but they can be sanded with ease.

The paper pulp is mixed with glue and laid in molds. Dried bricks are fixed on the wall
Bricks glued to the surface are rubbed and primed. After that, you can start painting in the desired color or several shades. At the last stage, everything is opened with varnish so that the decorative elements can be wiped with a damp cloth.

The final stage is painting
And also, wall decor with papier technique can be used to make elements in the form of an ornament or volumetric flowers. For experienced craftsmen, there are options for making three-dimensional paintings that will be an excellent addition to the design.
African motives
Papier-mâché wall décor includes the making of the once popular ritual masks. Such souvenirs will be an excellent addition to the African style, which provides for the presence of animal prints and an abundance of ornaments.

Before work, you need to draw a sketch of the future face or take a ready-made mask you like as a sample
To make them come in handy:
- a lot of papier-mâché;
- food trays of the right size;
- primer;
- paints.
A mass is applied to the base, covering the entire tray with an even layer. Further, with the help of simple manipulations, the nose, lips, eyeballs and eyebrows are formed. The workpiece must dry well.

A thick layer of mass can dry up to two days
Then the mask is primed and polished. And the final stage is painting. A loop is attached at the back, for which you can hang the product. The work has been completed.

Before painting, the mask must be cleaned with sandpaper and, ideally, covered with a thin layer of wood putty
Such masks are made in any required size and with different facial expressions. As hair, you can use natural threads and wooden beads strung on them.

Funny rabbits in papier-mâché technique

Decorative utensils for decorating the kitchen or living room
To make mass for papier-mâché, not only toilet paper is used. Ordinary egg trays can also be a good basis. They are crushed and soaked in water, and the rest of the technology is repeated. You can not take a lot of materials and limit yourself to glue and paper pulp. Make papier-mâché décor for your home with fun!
Video: master class on making 3D paintings for the interior
Photo: 50 DIY ideas


Whiskers - striped pets, cats and cats love all kinds of shelters for lying and cozy houses. That is why pet stores sell whole complexes of cat beds with walls and a roof.
But it is not always worth shelling out for exotic beds for cats, there is a very interesting solution to create a house for a cat of almost any desired shape using the papier-mâché technique.
Papier-mache or torn paper has been known in needlework for a long time. Anyone can make this paper mixture for modeling, the main thing is to stock up on a sufficient amount of paper. The way to create such a house is not quick, but not very complicated. And what opportunities open up for creation!
The above example will allow you to make a house in the form of a rounded hollow mound, and then, having understood the principle, you can design for a four-legged pet, even a castle, or even an elf's hut.
Prepare for work:
- several blankets;
- food or construction film for wrapping, simple thin bags are also suitable;
- Scotch;
- newspapers, tissue paper;
- a piece of thick cardboard for the bottom;
- PVA glue;
- brushes for glue and paint;
- material for finishing the interior of the volume;
- paint, varnish.
In order to get a hollow volume, we use blankets. We form a semblance of a pillow from them, squeeze and bandage very tightly, thus obtaining the dimensions and outlines of the future cat's dwelling. We wrap food or construction film for wrapping over the blankets and wrap it with tape.

We try to do everything in such a way as to get the smoothest and most even surface, because this is how the interior of the house will look like. On one side of our tamped blanket pillow, use an indelible marker to draw the outlines of the entrance to the house.
In our case, newspapers or tissue paper are used for papier-mâché. You can also use sculpting pulp, which is obtained by shredding paper and kneading it with glue.
We coat each sheet of newspaper with PVA glue and straighten it on a blank of blankets. We glue the newspaper in several layers, over the entire surface of the "pillow", except for the flat bottom and the painted entrance to the house. After gluing 3 - 4 layers, leave the product to dry for several hours.

In total, in order for the finished item to turn out to be strong and not to be deformed later, there should be 20-30 newspaper layers. After gluing the paper, leave the semi-finished product to dry for a day or more. The surface should "stiffen".

Then we raise the hemisphere, and take out the base from the blankets. If there are prominent corners of paper, irregularities on the inner or outer surface, we grind them with sandpaper. Next, you need to make the interior design of the house, since after gluing the bottom, it will no longer be very convenient to do this.


The walls and roof inside can be painted with acrylic paint, as shown in the photo, but you can do otherwise. Cut the cotton material into fragments and, using the same PVA, firmly glue on the inner side of the hemisphere and the cardboard bottom.
After one more drying, we connect the house to the bottom. We apply a hemisphere to a piece of cardboard, trace along the contour. Then we cut out the bottom strictly along the line. With small fragments of newspapers and the same PVA we glue the bottom with the top from the outside along the joint.
From the inside, you can glue additional pieces of fabric also along the seam. Allow the workpiece to dry thoroughly again. The use of textiles and PVA glue is a more convenient option, such a finish will not have a pungent odor and will quickly become suitable for a cat.

The outside can also be upholstered in fabric or dyed and varnished. After the final drying, all that remains is to put a soft pillow inside the house and start the tenant.

Using papier-mâché technology, you can make unusual shapes of cat houses. For example, by gluing a large bucket or a plastic cylinder, you can get the shape of a tower.


If you paste over a large inflatable ball, not forgetting that you need to leave a flat bottom for stability, we get a spherical dwelling.

For those who have enough space in their home and want to use their creativity, there are futuristic ideas for a big cat house in the shape of a big blob, a hut, a gnome house or whatever.

