Homemade New Year's house: how to do it yourself from cardboard, paper tubes, boxes, gingerbread - instructions and MK. DIY Christmas house made of cardboard
Master class "New Year's glowing house"
Perevodova Olga Vasilievna, teacher-defectologist of the Municipal State Preschool Educational Institution "Kindergarten No. 92" of compensating type in Dzerzhinsk, Nizhny Novgorod RegionPurpose: The luminous house can be used by teachers, parents to decorate the interior of the room for the New Year, and it can also be used in various dramatization games to create a fabulous situation.
Target: development of artistic and creative abilities of teachers and parents, drawing attention to the creative design of the interior of the premises for the holiday.
I bring to your attention a master class on making a New Year's glowing house out of a box.
Necessary materials:
box
adhesive tape
cotton pads or synthetic winterizer
a piece of transparent cloth or paper
colored and white cardboard
Scotch
glue ("Moment Crystal" transparent)
scissors
stationery knife
electric Christmas garland

House making process:
Open the box lid, fasten it with tape.

Cover the box (except for the roof) with self-adhesive tape on all sides.

Glue cotton pads on the cornice of the house (under the roof).

Make a ceiling by pasting a cardboard of the appropriate size with self-adhesive tape.

Cut out cardboard window templates. With their help, on 3 sides of the future house, outline the location of the windows. On the 4th side there will be a hole for the garland.

Carefully cut out the windows along the lines using a clerical knife. You can use a ruler to keep the knife from going to the side.

Cut out blanks from transparent fabric (tulle) (1 cm larger than windows) - these are “curtains”. Stick them on the windows.

Cut strips from cardboard or self-adhesive film for the frame of each window (0.5 cm - a strip for the middle of the frame, 1 cm - for the edge). Glue the strips directly onto the tulle.

Cut strips 1 cm wide from white cardboard or self-adhesive foil. To glue over the window frames with them is a "platband".

Finish the roof. Glue it over with cotton pads in a checkerboard pattern from bottom to top (if desired, cotton pads can be replaced with padding polyester).


Insert an electric Christmas tree garland into the house through the hole in the back. Using tape, it can be attached to the inside of the ceiling so that the light diverges more evenly.

Here's what the house turned out to be.


To create a winter composition using a luminous house, I needed Christmas trees, cones, a Snow Maiden doll on a sled, and birds.


I look at my glowing New Year's house, how it pleases the eye and cheers up!
I recommend not to turn on the garland for a long time in order to comply with fire safety rules.
Today we will tell you how to make a New Year's house out of cardboard with your own hands. In this we can have a step-by-step master class, a diagram and a template that can be downloaded (see below).
Tools and materials Time: 4 hours Difficulty: 7/10
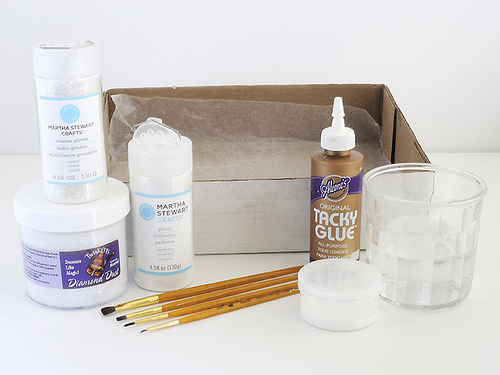
- 1 sheet of design cardboard of a suitable size for the house (you can use cardboard of two colors: one color for the walls, the other for the roof and decoration of windows and doors) and another sheet for the base on which the house will stand;
- a piece of transparent film to simulate glass in windows;
- a template for a New Year's house made of cardboard (you can draw it yourself or download a drawing);
- scissors;
- glue;
- white small sequins;
- flat and round brush;
- artificial snow.

Now on sale you can even find ready-made kits for making these pretty jewelry, but it is much more fun to do everything yourself from start to finish, attracting kids to help who will definitely like this activity.
Step-by-step master class
Step 1
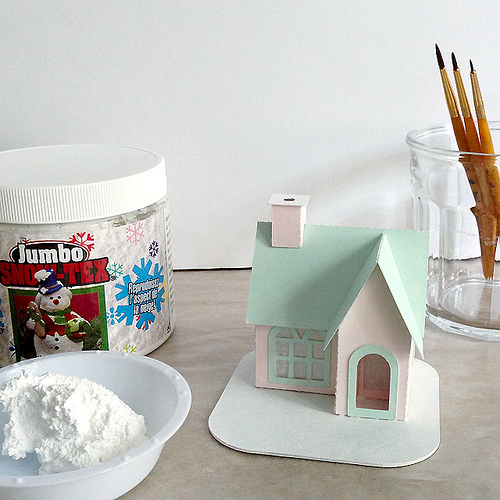
Draw or print out a template and cut out a blank for a house (walls, roof and chimney) from cardboard.

Step 2
We bend the cardboard blank along the fold lines and glue it together. To make the window shutters and doors look more voluminous, it is better not just to draw them on the walls, but to cut out additional parts of the required shape from cardboard and stick them on. From the inside, we glue the window openings with a film that imitates glass.
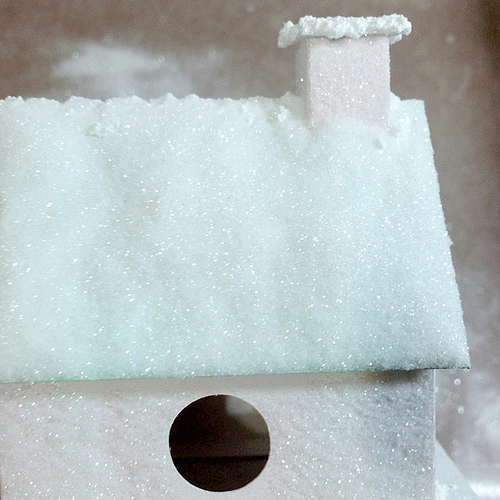
Step 3
Let's start applying snow. A jar of artificial snow can be purchased at any craft store. In places where we will have snowdrifts, apply a little glue and spread snow on top of it with a round brush, giving a realistic volume. Remember what the roofs of houses look like in winter, and this will help you in your work.


Step 4
When the work with the snow is completed, let the product dry thoroughly, after which we proceed to create a shining icy frost on the walls of the house. To do this, in turn, use a flat brush to completely smear each wall with glue and evenly sprinkle with a thin layer of white glitter. Blow off the excess shiny powder.

Our fabulous house decoration is almost ready. It remains to decorate the shutters and doors to your taste, as well as glue the craft to the cardboard base.
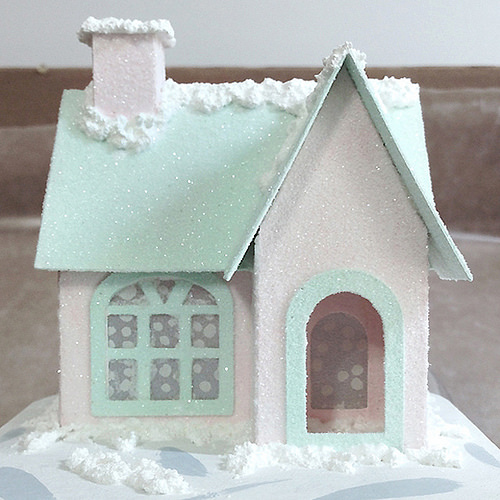
Alternatively, you do not need to glue the house, but simply put it on top of the base, additionally decorated with homemade trees. And in the evenings inside, try lighting a battery-powered LED candle. It looks amazing and really looks like a fairy tale!
The closer one of the most beloved by both adults and children New Year's holiday approaches us, the more relevant master classes devoted to this topic become, among which we today want to highlight the creation of crafts in a separate article do-it-yourself Santa Claus house.

DIY Christmas crafts Santa Claus house
We decorate the window.
Quite easily, quickly and simply, you can make do-it-yourself winter house of Santa Claus in the form of a window. The tradition of decorating windows for the New Year holidays is far from new; even as a child, each of us carefully cut openwork snowflakes from white paper or paper napkins and glued them to the window, creating the illusion of snow going outside the window. This option will also look very original and unusual on your window, looking at which it will seem to you that in the distance you can see the real apartments of the main fabulous winter hero.
In order to make such a decor, you will need:
A thick sheet of white paper (not cardboard);
Simple pencil;
Scissors;
Stationery knife.
Work description.
1. Let's start by transferring to a sheet of white paper the scheme of a winter still life suggested below. This can be done in several ways. Just print a picture on a printer, redraw it manually with a simple pencil, transfer a sketch using a capillary, or redraw it by attaching the drawing itself to the window during the day, and a blank sheet on top of it. This method of copying is probably known to each of you from early childhood.
House of Santa Claus do it yourself - scheme

2. After our sketch will be made on the desired basis, we take scissors and carefully cut it out along the outer contour.
3. Next, a very delicate and painstaking work begins, we need to cut out individual elements in the inner parts of the picture, it is best to use a thin office knife for this. To do this, we place the workpiece on a flat, stable surface, for example, a table, and be sure to put something under it that we don’t mind cutting - it could be a kitchen cutting board or an old unnecessary book. After the workplace has been prepared, proceed to carefully cutting out each smallest detail.
4. We only need to glue the finished openwork work with a winter landscape to the glass of the window from the inside. This can be done using small pieces of scotch tape, PVA glue or ordinary toilet soap. The composition can be supplemented with garlands made of thin thread or fishing line and cotton wool, reminiscent of falling snow. Especially such a decor will look original if, in fact, there is no snow behind it, and the weather is not very reminiscent of winter.
We suggest considering how such a decoration looks on the window in the proposed photos below.


House of Santa Claus with your own hands made of cardboard
The second option is a volumetric construction based on cardboard, which can become a worthy decoration of the New Year's interior, and it can also be used as an unusual packaging for New Year's gifts, for sure the kids will really like the idea of bright houses with sweets, cookies, gingerbread and other sweets inside. Also, a similar figurine can be made in a small size and then it will turn into an unusual Christmas tree toy.
Before starting work, we will need to prepare:
White cardboard;
Scissors;
Ruler;
Simple pencil;
PVA glue;
Ruler;
Colored paints or markers.
Do-it-yourself New Year's house of Santa Claus - work description
1. On the back side of the cardboard, using a simple pencil and a ruler, we transfer the scheme of the future house, presented to your attention below. At the same time, the structure can be absolutely any size, from tiny to huge as far as the material used in the work allows.

3. After that, along the dotted lines outlined in the diagram, we bend the workpiece in the right places.
4. Now you can proceed to gluing the structure, it is best to use PVA glue for these purposes, however, in the absence of such, ordinary paper glue and even double-sided narrow tape will do. It is better to apply the glue with a brush, a little, but at the same time thoroughly smearing the necessary parts of the structure. If there is too much glue, the cardboard can wrinkle, deform and thereby completely spoil the appearance of the craft. First we glue the main part and then glue the roof.
5. Let the glue dry completely, after which we move on to decorating the house, this can be done using colored paints or felt-tip pens, decorating it the way you want. You can also use colored paper applique technique or a more complex and sophisticated decoupage technique. Colored confetti, shimmering glitter powder, Christmas tree tinsel and other similar materials will help to complement the brightness and fabulousness of the work.
House made of felt.
A very original and unusual work is obtained if it is sewn from pieces of felt. Such a toy can decorate a Christmas tree as a New Year's decor or become a little interesting on the occasion of a holiday, even a small felt house is suitable for a festive table setting. In addition, such a product is sewn very easily, quickly and simply, for this you do not need to have any special knowledge and the field of cutting and sewing and to have special equipment in the form of a sewing machine, all you need is a needle and thread.

To begin with, we will select materials and tools:
White or beige sheet felt;
Sintepon or any other artificial filler;
Sewing needle;
A sheet of paper and a simple pencil;
Bobbin threads in white;
Ordinary scissors;
Curly scissors with a zigzag blade;
White satin ribbons of different widths;
Small buttons;
Small decorative Christmas wreaths.
Work description.
1. Let's start by sketching our future home on a sheet of white paper. We draw a building by hand in the shape we like, it can be oblong or square, with a wide or narrow roof, large or small.
2. Next, we cut the resulting sketch along the contour with ordinary scissors and get a pattern-template for our future product. We put it on the felt, which was previously folded in two layers, and draw around the contour with a simple pencil. On a white fabric, the gray lead will be clearly visible, so you should not press hard on the pencil, it is enough to complete a few light strokes.
3. Now we cut out the details of the house-craft with simple scissors, the main parts should turn out to be two absolutely identical, we also cut out the door.
4. After that, carefully trim the front and back parts of the house connected to each other along the edge with curly scissors to give them an original look.
5. Then, armed with a sewing needle with a white strong thread, we sew the previously cut door to the front of the craft and immediately supplement it with a small button, which in our case performs the decorative function of the door handle.
6. Sew the two halves of the toy using a regular needle-forward stitch. We try to make the stitches small, thick and the same. In the process of work, we leave a small hole through which we fill the craft-house with padding polyester, and sew it up completely.
7. Sew on the top of the roof a small loop formed from a satin ribbon, for which then our toy can be hung on a branch of a Christmas tree.
8. Decorate the toy with a small decorative Christmas wreath, it can also be sewn on or glued on with a few drops of hot glue from a heat gun.
That's all the work on creating a felt toy-house for Santa Claus is over!
What other options can be sewn like , we invite you to consider below in our small photo selection.


House of Santa Claus with your own hands from pasta
The next version of a fabulous New Year's house, we suggest you make from a rather unusual material. To decorate it, you will need many pasta of different shapes and sizes. Taking a look at the finished work performed in this technique, it is even difficult to immediately imagine that this venture is based on ordinary pasta - it looks so original, and it is not difficult to make it, how exactly - read below.

For work we need:
Thick cardboard;
Scissors;
Ruler and pencil;
Hot glue gun;
Various pasta;
Silver or gold paint in an aerosol can.
Work description.
1. Let's start by making the base of the house. We will make it from thick cardboard, we will not dwell on this moment in detail, since the process of its creation is described above in our second master class. In addition, you can cut the base - house of Santa Claus with your own hands made of polystyrene or made on the basis of wood - that's up to you.
2. After the main part of the craft is ready, you can start decorating it, here we need pasta of various shapes and sizes, glue them with a glue gun, trying to fill all the empty space as much as possible. Moreover, you can spread pasta chaotically or in the form of a certain ornament, this is what you like best. It should be noted that this work is quite painstaking and long, but it is worth it, the craft turns out to be incredibly beautiful.
3. After the entire space of the base is tightly closed with pasta, you can proceed to painting the house. To do this, take a silver or golden paint in an aerosol can and thoroughly sprinkle the entire craft with it. It is better to do this outdoors or in a well-ventilated area so that corrosive paint fumes do not lead to poisoning, especially for small children.
4. After the first coat of paint is completely dry, we apply the second one, and also let it dry. Additionally, you can cover the work with transparent acrylic varnish, this will give it a beautiful glossy shine.
Once all layers of paint and varnish are completely dry, the work can be considered finished.
We hope you liked our interesting and unusual ideas for creating fabulous crafts-houses for Santa Claus, and you will definitely bring some of them to life with your kids. As a result, you will have a great time together and be able to decorate your home with original New Year's attributes!
You will need:
White cardboard
Sequins
Ruler
Latex primer (optional)
Glue stick
Scissors
Stationery knife
Decorations (tinsel, bells, balls).

1. First, download the template by THIS link or you can draw a house of similar sizes yourself.
2. Cut out all the pieces from paper and glue them to the white cardboard using glue stick or double-sided tape.
3. Cut the pieces out of the cardboard. Use a utility knife to cut out doors, windows, and other details.

4. Along the fold lines, fold all the elements and glue everything together.
5. If you wish, you can apply a primer to the paper house so that it does not deform.
6. Paint your house and after the paint has dried, start decorating it.
The house can be hung on the tree with a string attached to the roof so that it hangs straight, or you can simply put it on a flat surface to decorate the house.
Craft "House of paper tubes" with your own hands

You will need:
Thin paper (can be plain paper)
Scissors
Pencil
Decorations.

1. Roll each sheet (or identical pieces of sheets) into a tube. Better to use a pencil - it's easier to curl.
2. Draw windows and doors on paper or cardboard and cut out.
3. Glue the tubes together as shown in the image (to make a hut).
4. Glue the windows and the door to the hut.
5. Decorate the house to your liking.
Another option:


House of Santa Claus do it yourself (master class)

You will need:
Cardboard box or
Scissors
Sandpaper
Stationery knife
Brushes
Polyurethane foam and a gun (optional).
1. Prepare a cardboard box and make a house out of it. You will need to cut into pieces and glue them.
2. Use a utility knife to cut out the windows and the door. You can draw them in advance with a simple pencil.

3. Color the house or you can decorate it polyurethane foam. To do this, apply foam in strips so that each strip is 1.5 cm wide. During drying, the foam will swell, so it is better to leave 3-4 mm between the strips.
4. After you have covered the house with foam, let it sit for 30 minutes to allow the foam to dry.


We make a stand for the house.
Cut a rectangle out of cardboard, which should be larger than the base of the house.
Glue the house to the stand and decorate the stand around the perimeter with foam.

* The use of foam is optional. To simulate snow, you can use cotton wool, which should be glued with PVA glue.
* You can also cut out snow slides, snowdrifts, a snowman or a Christmas tree from paper or white cardboard and glue them to the base by bending the bottom and applying glue to it.

If you used foam, then after it dries, trim off the excess parts with a clerical knife and sandpaper.

Color in all the details you want.

DIY cardboard house: dwelling of a gnome

You will need:
Toilet paper cylinders
White paper
Colored paper
Black felt-tip pen
Glue stick
Hot glue or PVA glue
Sequins in different colors (including white).
1. Cut one toilet paper cylinder in half and the second and third so that you have two long and two short pieces. So you will have houses of different sizes.

2. Cut the white paper into strips 15 cm long and 2-3 cm wider than the height of the cylinder that you will wrap with this strip.

3. Cut out windows and doors from colored paper. Use a felt-tip pen to draw door handles and window details.
4.Use a glue stick to glue windows and doors to the white stripes.
5. Place the strips around the appropriate cylinders and secure them with adhesive. Fold the excess paper into the cylinder.

6. From colored paper, make several cones of different colors, glue the ends of the cones, and glue the cones themselves with PVA glue to the cylinder-houses.
* You can add a little glue to each roof of the house and sprinkle glitter on it, which will simulate the fallen snow.


DIY paper house: paper New Year's village

You will need:
Corrugated cardboard (cardboard from regular packaging)
Stationery knife
Scissors
Ruler
Pencil
White acrylic paint and paintbrush
LED garland.

1. Prepare cardboard and with a pencil draw on it several houses connected to each other. You can use a ruler. You will end up with a small village. Cut a village out of cardboard.


2. Bend the cut out part with an accordion along the lines that connect the houses. To make even folds, place a ruler over the fold line and fold the cardboard.


3. Draw and cut out a Christmas tree on cardboard. Trace the tree over another piece of cardboard and cut out a second tree. Make a half-cut on one tree at the top and half-cut on the other tree at the bottom, and cut the two pieces together to create a 3-D tree.


4. Apply white paint to roofs and trees to simulate snow.
5. Place the village and tree on a white cloth or felt and place an LED string next to it.
House with your own hands (photo)

Paper or white cardboard that you can print on.
* You can draw a similar drawing yourself and cut it out.
Scissors
Stationery knife
Glue stick
Battery powered candles.
1. Print and cut out a drawing of the house. Cut out the windows and doors with a clerical knife.
2. To make the roof, cut a 15x9 cm rectangle. Fold in the middle.
3. Assemble and glue the house and glue the roof to it.
* You can make several houses to make a small village.
* You can also cut green cardboard Christmas trees.
4. Put a candle with batteries inside the house.
* You can decorate the house to your liking. Use felt-tip pens, glitter with glue, cotton wool (snow), etc.
DIY house out of the box

You will need:
Box (from cereals, pasta, for example)
Ruler
Pencil
Scissors
PVA glue
Clothespin or masking tape (if necessary).

1. Open the box completely and place it on the table.

2. Along the unfolded box, draw a straight line 2.5 cm below the middle.

3. Make cuts from the original fold lines of the box to the line you drew (see image). The white dots indicate the places where the cuts need to be made.

4. Cut off those parts of the box where the X is written.

5. Turn the box over and apply glue to a small fold (see image).

6. Fold the box with the pattern on the inside and secure with glue.


7. Fold opposite narrow sides to form a roof. Each piece must be folded in half (see image).

8. Cut the wide sides so that they can be glued to the part of the roof that was formed in step 7. You need to cut with a margin in order to bend and glue this stock.


Hello dear readers! By the New Year, shop counters are traditionally filled with themed decorations - Christmas balls, garlands, tinsel, snow balls, miniature decorative houses.
Moreover, a number of goods sold in the relevant departments can be made independently without much difficulty and cost. We considered how to make balls from a rope, but today we will make such a small winter house:

What is needed to implement the idea.
You need to prepare: thick cardboard or sheets of expanded polystyrene (sold in packages in hardware stores, it's simply an accordion backing for a laminate, the material is excellently cut and glued), glue moment gel, scissors, a stationery knife, a ruler, a pencil, cotton wool, rhinestones, 7 cm rope, PVA glue, two 3 cm pieces of thin wire, 2 wooden skewers, a can of silver paint.
ATTENTION: for the manufacture of a miniature house, you can use thick cardboard, in this master class we replaced cardboard with sheets of expanded polystyrene, but you can easily use ordinary cardboard!
The templates below will help you navigate, redraw them onto plain paper, cut them out, apply them to the expanded polystyrene sheets - outline them with a pencil, cut them out with a clerical knife, under a ruler. You should get the following parts: floor 1 pc, side walls 2 pcs, end and rear parts 1 pc each, roof slopes 2 pcs. 


On the back of the house we cut out a window, glue the house with transparent glue, for this we glue the side walls to the “floor” part, then the end and rear parts, and finally the roof slopes.


Let's prepare the rest of the decorative details.
Porch.
The photo below shows the details that need to be prepared, cut them out and glue them together.


Then we prepare the sills, the number of parts will depend on the height of the steps, in this example we cut out one wide rectangular layer, three narrow strips, glue all the parts, forming steps, then we apply the sills sideways to the expanded polystyrene sheet, circle, and cut out two identical side walls, which then we glue to their rightful place.

Cut out a rectangular piece - a door. We glue the door, sills and porch visor to the house, on the sides on the first step we glue two wooden skewers, which must also be glued to the bottom of the visor. 

Chimney.
We cut out a rectangular template, form a chimney from it, apply it to one of the slopes on the roof (from the side), put a mark on the chimney template at the level of the roof slope. We cut off the chimney template according to the left mark, glue it, apply it to the expanded polystyrene sheet and circle it with a pencil, cut it out, cut all the parts with a clerical knife, which we then glue together in the form of a chimney. We glue the resulting chimney to one of the roof slopes. The whole process of making a chimney is shown in the photo below.


Bench.
We cut out the necessary parts from expanded polystyrene or cardboard, depending on what material you decided to use for the manufacture of your decorative house craft. We form handles for the bench from the wire. We glue the parts together, namely the back of the bench, seat, legs and handrails.


Ladder.
We cut out the details of the future miniature staircase - two long side strips and 5 rungs. We glue all the parts together.


Sled.
We cut out the necessary details (see the photo below). We glue the runners of the sleigh, glue the details "for sitting" to them, and finally glue the rope.


The photo below shows the details that need to be prepared for pasting the space around the window (like shutters). We cut out a square of expanded polystyrene, retreat from the edge inward on each side by 7 mm, draw an inner square, which we cut out with a clerical knife and a ruler. Cut the resulting frame in the corners, and glue the parts around the window.


Painting.
The house, as well as all the above-described details, must be painted. Making a winter house will look even more impressive if you use several shades of paint, for example, white and silver. In this example, one paint color was used, namely silver, since the main subtone of the material used obviously looks very impressive, after painting the product resembles ice sparkling in the sun.
ATTENTION: if you took polystyrene foam as a basis, then when painting, do not overdo it with the amount of paint, it must be applied in thin layers from a long distance, otherwise the chemical composition of the paint will simply corrode a cute, small winter house.

Create a snowy effect.
We take a shallow container, pour PVA glue into it, split the cotton wool into thin small layers, immerse them in glue, squeeze out excess adhesive, and glue them to the roof surface. According to this scheme, we cover the entire surface of the roof, including the chimney, in addition, you can "snow" the corners of the house, a bench, a ladder, a sled. We leave the product to dry for about 24 hours.


Miniature pots with snow balls.
The front entrance to the house can be decorated with pots with "snow balls". We cut the woolen threads into pieces 1 cm long (15-20 pieces will be enough), take a large bead, wrap it in foil, soak all the threads for 5 minutes in PVA glue, and put them on the bead in foil, forming an openwork vase. We leave it to dry, near the heating battery the product will dry out in about 4 hours. Such pots must be prepared 2 pieces. We remove the dried pots from the beads, carefully separating the foil, paint them from the spray can of the bulletproof machine, glue the hanging ropes on the sides. Then we form balls from cotton wool to the size of the pots, lightly coat them with PVA glue and put them in miniature pots. On the sides of the door, with an awl, we create punctures, where we insert small pieces of toothpicks, fixing them with glue with a moment, and already on them we hang the pots with snow balls.


Street lamp.
Of course, it will not glow, but it will play a decorative role. We take the lid from a transparent box with a shine-sand for nails, paint it with silver paint and glue it to the end of the veranda.
Rhinestones will play the role of snowflakes shining in the sun, so we glue them wherever there is impromptu snow - a roof, a bench, a step-ladder, a porch, sills, side walls of a house, snow balls in pots. In addition, we select the rhinestone larger than the others and glue it on the door, it will play the role of a door handle.


As a result of all efforts, a chic winter house craft is obtained, which will significantly transform a fireplace or bookshelf, a festive table or the space under the New Year tree. 


See what stunning cities collectors collect, often custom-made and truly exclusive:
Dear readers, did you like the winter house craft? We are waiting for your feedback in the comments, and we also remind you that on the Décorol website there is an opportunity to receive notifications about new articles, you can subscribe!