How to make paper tulips. Paper tulips: DIY artificial beauty
The most popular spring flower is the tulip. You can make tulips from crepe paper, corrugated paper, make origami - this craft will be very useful for a women's holiday or birthday. We offer a simple lesson on how to make a paper tulip.
Paper tulips: master class
Paper crafts like a tulip can be classified as simple, but quite spectacular. For work you will need a sheet of thick paper, scissors and a pencil. Now let's look at step-by-step instructions on how to make paper tulips:
1. For work, prepare a sheet of paper measuring 20x28cm. Choose the color of your choice, preferably close to the real color of the tulip. There is only one requirement for paper - it must be strong enough.
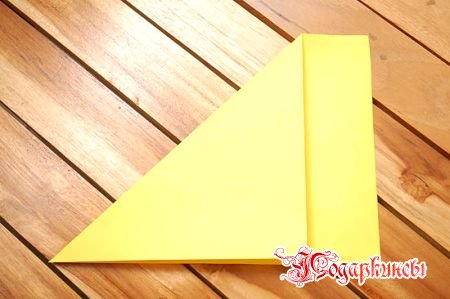
2. Fold a triangle out of paper. A strip of paper that has gone beyond the edges of the triangle should be cut off and set aside. We will use it a little later.
3. Now consider how to fold a paper tulip. First you need to expand the triangle, then fold it again, but in the other direction. The result should be a square with diagonals.

4. To fold the paper tulip bud, fold the folds properly again. Turn the paper over so that its center is facing up.

5. Fold the paper in half. We wrap one corner to the fold line. Thus, a new triangle was obtained. We do this procedure with another angle.

6. Tulip and other similar paper crafts require constant contact with the material, the folds should be clearly visible. Here is what should be the result:

7. We connect the sides of the tulip and align them well.
8. Turn the triangle with the base up.

9. The wings of the paper on top must be folded so that they meet at the corners.

10. Turn over the other side and do the same.

11. Turn one wing of the paper to the right. On the other hand, we duplicate.
12. Gently tuck the end of one winglet into the other.

13. On the other hand, we do the same. We iron everything well. At this stage, the workpiece is already beginning to look like a tulip head, only slightly flattened.

14. Now let's look at how to make a voluminous paper tulip from this blank. Hold the folded wings with your index finger and press down with your thumb.

15. Now the important point. There is a hole in the center of the paper, it should be hit sharply. Then the design will be filled with air, you can use a pencil.
By the way, they can also be made in different ways.
Spring has come and I wanted to pick up interesting and beautiful options for creating paper tulips with children. Moreover, there are a lot of simple techniques with ready-made schemes and templates.
And how to make such beauty, I talk in this article.
Do-it-yourself origami paper tulips: 4 step-by-step instructions
Origami is a very popular technique. It conquers in that it allows you to create a lot of different crafts without using scissors and glue. It also develops fine motor skills, finger sensitivity and attentiveness.
Flowers can also be made using this technique. And they can be completely different. I have prepared 4 schemes for you, following which you can fold a tulip.

So, for work you need a piece of paper. Its shape should be square.
If you are doing such a craft for the first time, then I advise you to take a large sheet format so that you can make a test version and understand the scheme.

Using double-sided sheets, you can make a whole bouquet of bright flowers.

If you could not figure out the scheme, even though it is detailed, then watch the video, in which the craftswoman creates a flower. She shows each step in detail and slowly, I think you will definitely succeed.
Now let's move on to easier options. For example, a panel of such paper tulips looks very spring-like.

They are made very simply. Therefore, immediately prepare squares of the desired colors with sides of 3 centimeters.

Another easy option for younger kids. Under the supervision of their parents, they will definitely be able to repeat this simple scheme. A flower made according to this scheme looks good in applications where cardboard is taken as the basis.

The fourth scheme is given so that you can make this kind of craft.

Paper tulips are voluminous and look unusual.

For a good fix, take glue. Of course, you can do without it, but we want to attach our buds to the surface. Therefore, I advise you to glue both ends. Also, if the ends hold well, then the convex front side will not hang out.

I want to introduce you to the technique of modular origami. Its meaning is that at first many identical parts are made according to one scheme, and then they are inserted into each other, creating the necessary shape.

This type of origami is not for everyone, because it involves painstaking small work. But I know that some masters create entire paintings using this technique.
How to make paper tulips with your own hands easily and quickly?
There are a lot of options for creating such a tulip. I picked up easy options for this article, but despite this, the products are very worthy. Especially if you approach creativity with imagination and stock up in advance with different cuts of wallpaper or backgrounds for creativity.
For example, such flowers are created very simply.

Manufacturing process:
1. You need to cut out the details according to this template.

2. First, one large part is taken, we glue a rod to its lower part, it can also be made of paper.
3. Paste the second part on top. So we beautifully hid the tip of the stem.

4. Glue the remaining parts on top of each other.

How do you like the idea? This application is also suitable for children in kindergartens.
Another option for a simple craft that your kids will definitely like with its brightness.

Manufacturing process:
1. Take a square sheet of double-sided paper. Find its diagonals and middle, as we do in origami.

2. We make cuts along the perpendiculars to the middle of the side.

3. And bend the upper ends, forming a petal.

4. We do this four times, because the square has four corners, so the tulip has four petals.

5. We roll up tubes from a green strip, take a strip length of 10 centimeters. Fix the edge with glue so that the tube does not turn around.

6. Cut one end into five parts and unbend.

7. Glue the upper parts of the stem to the bud. PVA glue will do the job perfectly.

Here are the flowers. It remains to insert them into a vase. Here, her role is played by a bee made from a toilet paper sleeve.
You can use a paper towel or foil roll.

If you use additional materials, you get a more original craft. For example, in this version, fluffy wire was taken as stems.

For one bud, you need to cut out four parts. You can draw them by hand or use the template I have provided below. All parts are bent to the front side in the middle. And then the wrong sides are glued together for all four parts.

The diagram shows this process in detail.
Now see how to hide the end of the wire. It can be glued before you finish forming the bud, or you can do it after, if you leave an unglued space at the bottom.

That's all, you can give a bouquet.
The following flowers look very gentle. They are glued at the edges, and the bud looks like it has not opened yet.

Manufacturing process:
1. For this craft, three parts are needed: 1 blank with six leaves, the second with four and a circle that forms the middle.

2. A flower is assembled from a circle, then a part with four petals is strung on the wire.
3. And the detail that has six of them closes these layers.
The more you twist the edges of the extreme part, the more closed the bud will be.
I also suggest getting acquainted with an unusual option for creating tulips, which is shown in the video.
How do you like the idea? These tulips are not quite the usual shape, but I think that your kids will also be happy with this craft.
Master class of corrugated paper flowers with sweets
Corrugated paper allows you to create very realistic products. It easily takes different forms, stretches and twists. Now there is a whole direction for working with it, but most often it is used in creating gift flowers from sweets.
Today I have prepared a very clear master class for you so that you can make such a cute bouquet for your loved ones.

For one tulip you need six parts.
Sweets take any tasty and round.
1. Everyone did that the petals will stretch in width, so they become concave and better cover the candy.
2. For the stem, take the wire, then we wrap it with a thin strip of green corrugated paper.

3. The candy is attached to the wire with hot glue, and the tatem is already wrapped with petals.
4. We also fix them with glue. The more petals you make, the more closed the bud will be.
Corrugated paper holds its shape well, so it can be curved. You will need this to make the leaves.
You can also make such a postcard with your own hands. Where the main composition is also made of flowers with sweets.

To prevent the ends of the candy wrapper from peeking out of the bud, glue the upper end with tape to the candy.
You will need:
- wire,
- delicious sweets,
- hot glue,
- sheets of white and yellow paper
- pencil
- scissors
- corrugated paper in green, pink and purple colors.

1. We fix the candy on the wire, because here we have few leaves and they may not hold the treat inside.
2. We begin to wrap it with petals.
3. Then we cut off a thin long strip of green corrugated paper and begin to carefully wrap the wire so that there are no gaps.
4. The edges should always be fixed with glue.
5. Leaves are added during the stem winding process.

6. For beauty, twist the tips of the leaves a little with your fingers.
7. Our flowers are ready, we are doing the decoration. We draw a basket of the form that is shown in the photo. To do this, we need a pencil and a yellow sheet of paper.

8. Glue this cut-out part around the perimeter to the white base sheet. We do not smear the middle with glue so that a pocket remains. Inside you can put sazal or cobweb. You can do without it.

9. Trying on flowers. If they turned out to be too high, then simply bend the rod.

Now it remains to find the decor. To do this, use sequins, braid or lace. In general, any finish will do.
Step by step we make a three-dimensional application from colored paper
It is always more difficult to make voluminous applications than flat ones. But they look more effective and more interesting. Today I will show an interesting option for quickly creating a voluminous tulip bud with my own hands. Based on this technique, you can make a lot of interesting crafts that will not even be similar to each other.

Manufacturing process:
1. So, for this envelope, you need to cut out five identical parts. Remember, we have already cut out these above in the article.

2. We find the middle of each part and draw a finger over it well.

3. Now we fasten the two edges of two different parts with a stapler. And so we repeat for the remaining three blanks. One bud is ready.

4. We take a baking napkin, bend its edges and glue it to the base sheet.
5. On it we fix the leaves, which have an elongated shape and are also folded along the middle.
6. And already attach a bud to the leaves.

You can use the same technology to make a very simple application.

Or such a bud with a twist. Due to its structure, it can easily fit into any fold. It will also be able to curl up if you decide to close the application.

Or it can become a self-sufficient element in a valentine or.

You can even create several buds of different sizes and colors.

For all voluminous crafts, it is better to take double-sided paper. So the white edge will not be visible if your edges do not match.
Such paper is available in all stationery stores and in departments for creativity.
My daughter will love this undersized tulip. I don't think it will be difficult to make it.


By the way, it is subtly noted here that from below, most of the leaves of these flowers, regardless of color, have a pale yellow base.
Patterns and patterns for cutting for children
And, of course, in order for all crafts to turn out neat and even, it is better to stock up on a template in advance. I have found the most common options in creativity so that you do not waste time looking.
So, this tulip can be made if you simply print the template on paper or translate it manually.

For this flower you need at least three parts. Each of them is folded inward in half so that the front part is concave. And glue all the wrong sides, aligning the edges.

An interesting idea of tulips, it can also be repeated.

This version of the scheme is suitable for her.

Now I will show you how to cut a flat part correctly.
1. Fold a rectangular piece of paper in half.
2. Find the fold and draw a contour on one side.
4. You cut the bent part along the lines with scissors and unfold the workpiece.

For applications, you can use this template.

To create volume, you need to bend the side parts of the parts cut according to the bottom diagram. A cool idea that allows you not to use the origami technique for those for whom it is difficult to comprehend.

These are basic schemes and templates, but based on them, you can create an unlimited number of crafts.
All ideas are very simple and beautiful, I am sure that you will find a suitable option for yourself! Bookmark the article so that you can always quickly find it and draw a tulip pattern.
Spring is a real miracle! Nature wakes up and fills the world with the sun, picturesque colors, flowering and a handsome tulip. That is why the tulip is associated with this magical time of the year. But what to do if there is another season outside the window, and you would like to let a drop of spring into the house?
Spring is a real miracle! Nature wakes up and fills the world with the sun, picturesque colors, flowering and a handsome tulip. That is why the tulip is associated with this magical time of the year. But what to do if there is another season outside the window, and you would like to let a drop of spring into the house? You can not wait for this wonderful time, but make paper tulips with your own hands. For this, nothing special is required, of course, except for inspiration and creative mood!

DIY paper tulips are an interesting, creative activity for children and their parents that can keep the whole family busy. Sit comfortably, now we will tell you how to make a paper tulip or even a whole bouquet of flowers with your own hands. So, let's begin.
Muse is such a fastidious lady that it is worth letting in even a drop of doubt, and everything will disappear without a trace. Therefore, "seize" the moment and do not fall into the traps of mind games.
Materials:
We take a regular (or corrugated, that is, whatever the “muse” wishes), but always a thick sheet of A4 colored paper and note the dimensions - 20cm by 28cm. Note. If this is not done, but simply add up what is, i.e. A4, then the tulip will come out too big and awkward, checked.
Tulip color. There is such a thing as the "language of color". For example, red - love, strength of feelings, etc. In other words, if you need to express feelings or your mood, then it is better to take the appropriate tone.
Next, fold it into a triangle.

The rest is cut off (it can be used for the stem). It turns out a square folded diagonally into a triangle.

We unfold the square and again turn it along another diagonal (folds in the shape of an X sign).

The folds should be deep enough. Turn the square over so that the center is at the top, like a pyramid.


After checking the folds, repeat the same with the other side of the workpiece.

We fold, as shown in the photo above.

Align the sides of the triangle.

Turn the corner down.

We turn the corners from the base of the triangle to its top.

On the reverse side, repeat the same.

There are four triangles. Take one and turn right.


Another turn left.
Next, insert the vertex one into the other.
Fold and smooth out the folds. We repeat the same on the other side. The blank should resemble a tulip bud.
We take an unfinished tulip, supporting the peaks rolled into each other so that they do not open.

At the base of the flower, where the stem will be, you need to make a hole. We apply a cotton blow to the center of the base so that it is filled with air. If the blow did not work out, then you need to blow sharply into the hole.

We open the petals of the bud.


Video: handmade tulip master class
The same technique for creating a tulip from paper as described above, but from plain paper - white. If suddenly at some of the steps you had a hitch - peep a master class in a short video and it will immediately become clear to you how to make a tulip out of paper with your own hands.
This paper flower master class will give the joy of creativity not only to children, but also to adults. We are all children, regardless of age, status and position in society. And in this case, you can get into that feeling of children's enthusiasm and joy, which, although not one hundred percent, but at least very close to the real feeling of childhood. Remember that joy of the first creativity, novelty. Joy not only for your successes that you could, but also, first of all, because you gave a piece of yourself and gave pleasure to the recipient of the gift. And it's doubly nice!
Such a bouquet will be a charming gift by March 8 for a grandmother, mother or any other woman. Discard doubts about the choice of flower, because. tulip is a symbol of love and happiness, it will be appropriate in any setting.
We often lack warmth and gratitude. Let's break the "shackles" of the adult world for a moment and become who we really are - the children of our universe.
Origami art for children and adults. A detailed tutorial on making a paper tulip with step-by-step instructions and a video. Assembly diagram is not needed - everything is easy
5/5 (2)
One of the most common origami figurines is it's a tulip. This pretty paper flower is pretty easy to make. It will not be difficult for a child to master it. You can make a whole bunch of colorful tulips and give them to your mother or grandmother. Such a surprise from your child will bring a lot of smiles and give everyone a great mood.
Instructions for making a paper tulip
To make a paper tulip you need:
- colored paper
- scissors
- for the stalk, you can use a green straw for a cocktail, or twist a tube of green paper
- We bend a sheet of paper diagonally:

- Cut off the remaining rectangle with scissors:

- Let's open our triangle. Got a square. Now fold it diagonally again, but this time on a different one. When we reveal our work, we will see the cross:

- Turn over the sheet. Now the work will look like a pyramid. Next, fold our square in half (we bend the paper in the direction from the table towards us).
- Unfold 90̊ and fold in half again. Expand - we should see four lines (something like an asterisk):

- Next, we form a triangle. To do this, you need to lightly press on the center of the square to get a pyramid. Now the left and right sections of the pyramid need to be filled inward and ironed all the folds with your fingers. We get two triangles, as if lying on top of each other:

- We unfold the triangle at a right angle to ourselves. Next, bend the left and right corners of the upper triangle to the top of the right angle:

- Now turn the work over and similarly bend the corners of the lower triangle. As a result, we should get a rhombus:

- Now grab the top left triangle and fold it towards the center. We turn the work over and bend the opposite triangle in the same way to the center.

- Attention! Now you need to insert the left corner inside the right one as shown in the picture. Then do the same with the bottom triangle. We carefully straighten everything with our fingers:

- Well, now the fun begins. At the bottom of the rhombus, you need to make a small hole (you can use scissors or a knitting needle) and blow into it. Our bud will crack down. Fold the petals outward. Here is such a wonderful tulip should come out:

- It remains only to insert the stem. It can be twisted from green paper (it is more convenient to wind the paper onto a knitting needle and secure the edges with paper glue) or use a green cocktail tube.
Video instruction on how to make a paper tulip.
For a better understanding of the process, watch the video instruction. The author of the video will teach you how to carefully work out the folds and in what directions you need to fold the paper so as not to get confused. It also shows how to form a tulip stem.
How to play with paper tulips.
Making paper flowers is not only a useful, entertaining and educational activity for a child (and not only for a child). Subsequently, they can come up with very interesting games.
 One of these games once invented by my little daughter. We made paper tulips with her by March 8, we wanted to please our grandmothers with crafts. When the number of flowers was already more than ten, Dianochka said: “Mom, we have a whole flower bed! Let's make a real flower bed." And they did. They poured sand into shoeboxes, stuck our flowers in there and placed them in the nursery. Diana was just happy. She spent a week stomping around the boxes, straightening the flowers and even watering them. Well, we invited grandmothers to visit to admire our front garden.
Origami art is a wonderful way to bond with your child. Joint creativity has a positive effect on the child's psyche, develops new skills, cheers up, gives a lot of positive emotions. The paper tulip is just one example of origami. There are many interesting figures that you can easily learn with your baby. The figurines of animals will be very interesting for him: a dog, a frog, a bunny, an elephant and many others. Good luck with your crafts!
In contact with
A tulip is a spring flower associated with femininity and tenderness, but, unfortunately, the life of a bouquet of live tulips is short-lived. If you want these fragile flowers to delight with their beauty all the time and become an interior decoration or an excellent gift for a loved one, then you can make crafts from flowers with your own hands.
The word origami in translation into Russian means "folded paper". This type of decorative art originated in ancient China many years ago, with its help you can make a variety of figurines. It is still very popular, because origami is not only an interesting, but also a useful activity, thanks to which logical thinking, patience and perseverance develop, and it is also a great way to relieve stress.
There are so many ways and methods to create origami figurines:

A few origami rules for beginners:
- Thin sheets of paper should be chosen as they are easier to work with.
- You need to start with the manufacture of light figures. And after you fill your hand, you can begin to perform more complex products.
- The places of the folds must be carefully worked out with a ruler, finger or fingernail.
- Do not deviate from the scheme, do the work in stages.
- Choose a comfortable place of work for yourself and do not rush - do everything carefully and thoughtfully.
Tulip step by step
Before making an origami paper tulip, you need to take:
- Office paper in red, yellow, orange and pink. For a flower bud, you need 1 leaf.
- Green office paper. To make a stem with a leaf, 1 leaf is needed.
Then you can start folding a tulip bud from red paper:

Then proceed to the manufacture of the bud:

Corrugated Paper Craft
A delicate bouquet of tulips with sweets hidden inside can be a wonderful present for your loved one. To make flowers you need:
- Corrugated or crepe paper. You can use napkins.
- Candies.
- Tape.
- Scotch.
- Wire and pliers.
 Take pink corrugated paper and cut it into strips of 20x2 cm. Twist each strip in the center for one turn and fold it in half. Then attach the candy to the wire using tape. Tape the petals to the base of the bud with tape. First of all, wind one part of the stripes, laying them on top of each other, and then the other. The result is a tulip with three petals. Wind the next petals in the same way. Then wrap the base of the flower and the stem with teip tape. Cut out leaves from green paper and tape them to the stem using tape.
Thus, you can make the desired number of tulips from corrugated paper, and then wrap the bouquet with teip tape.
And can you do luxurious paper bouquet of tulips in a different way. To create crafts you need to stock up:
- colored corrugated paper;
- teip tape;
- glue gun;
- wooden skewers;
- scissors;
- pattern paper and pliers.
First you need to print out the templates for the parts of the tulip, and then transfer them to corrugated paper and cut them out.
To create one tulip you need: 6 oval-shaped lilac petals, 1 yellow center circle, 2 green leaves and black corrugated fringe.
 Using a glue gun on the upper end of the wire, fix the yellow center, piercing it in the center. Then wrap the black fringe around the stem - these will be the stamens of the flower. By stretching individual parts of the paper and forming folds, give the desired shape to the petals. In turn, glue the lilac petals to the base, giving them the shape of a bud. Wrap the stem of the flower with teip tape and glue the leaves.
That's all, the tulip is ready. You can make several more of the same copies and form a beautiful one out of them.
Thus, using paper you can make a luxurious bouquet of tulips in different techniques. One has only to show a little imagination and use the step-by-step instructions.
Attention, only TODAY!