Beautiful Christmas cards how to make. Postcard with a snowflake. Original Christmas card
What could be better than a handmade New Year or Christmas card? This gift is made with love and wholeheartedly. Homemade greeting cards are always original, unique and carry a special warmth. And most importantly - they give joy not only to those who receive them, but also to those who create them.
It takes very little to make New Year's or Christmas cards. You will only need colored paper of various textures, scissors, glue and decorative elements for decoration: ribbons, buttons, beads, beads and more. And several of our master classes will help you easily and quickly create New Year's cards, delighting your family and friends with unique creations.


We will need: cardboard or any thick paper, 2 satin ribbons 2 meters long and 0.5 cm wide, lace fabric, Moment transparent glue, ballpoint or gel colored pens, beads, bugles, bright bead or button.

Step one. We cut out a rectangle measuring 10 by 15 cm from cardboard - this is a postcard blank. Other sizes can be taken upon request. We cut out decorative elements from lace and decorate the card, as shown in the photo. Gently glue the lace elements using a spot application of a small amount of glue. Next, with a colored pen, we write a congratulatory inscription in the corner. Then we move on to making a Christmas wreath. We take two multi-colored ribbons and tie them together from one end.

Step two. We fold a part of the green ribbon in half so that its ends are arranged crosswise - this is how a loop is formed. We make a loop from a beige ribbon. We pass these two loops one into the other and press well. As a result of this, a new green loop is obtained, we form and thread a new beige loop into it, after which another beige loop appears. Thus, forming loops and threading them into the resulting ones, weave a wreath about 20 cm long, after which we glue its ends. Such a Christmas wreath can be woven from three or four multi-colored ribbons with any of the existing braid options and it will become even more elegant.

Step three. We glue the wreath to the card and start decorating it. We glue a lace bow on the wreath, and on the card - snowflakes cut out of lace fabric. We decorate the wreath with glass beads, and glue a bright button or a large bead on the bow.

Step four. We add the final touch to the festive background - with the help of a needle we glue small white beads as snow. We decorate the reverse side of the card with lace snowflakes and write warm words of congratulations on Christmas. Christmas card is ready. In the process of creativity, you can change the size, number of decorations, add new details, so that the result is an original and bright congratulation.
New Year's card in scrapbooking technique

We will need: scrap paper, thick colored paper, PVA glue, a pencil, elements for decorating the Christmas tree.


Operating procedure:
- We cut out a single or double base from scrap paper with a fold according to your desire. Dimensions can be taken arbitrary.
- We determine the size of the Christmas tree and, depending on its size, cut rectangles from colored paper, starting from the largest (lower part of the Christmas tree) to the smallest (upper part). Each rectangle should be slightly smaller than the previous one in length, as shown in the photo.
- Using a pencil, we roll each rectangle lengthwise into a tube and fix it with glue to maintain its shape.
- We connect all the tubes with glue, adhering to the shape of the Christmas tree. Next, glue the resulting Christmas tree on the front side of the postcard and decorate it. Design can be very diverse. Rivets, beads, bows, sequins, sequins or other decorations are attached using double-sided tape or glue.

We will need: scrap paper, green paper strips and glue.
Operating procedure:
We make the base of the postcard with a fold and decorate its inner part with the symbol of the New Year. We make the Christmas tree from strips of paper folded like an accordion, and we make tiers from strips of different widths. At the bottom we have the widest stripes. The closer to the top, the narrower the stripes become. The depth of the fold of the accordion is also different. We bend the bottom strip into an accordion with the largest "step". With each tier, the depth of the bend decreases. Such New Year's cards are very simple in execution, which even a schoolboy can do.


We will need: buttons, glue, thick paper and various decorations.
Operating procedure:
We decorate New Year's cards with the help of buttons of different shapes, colors and sizes left after sewing. We sort them by color and glue them to the base. From the buttons you can lay out any New Year or Christmas attributes: a Christmas tree, a snowman, a snowflake, a deer, a Christmas wreath - in a word, everything that your imagination tells you.

We will need: colored cardboard, glue and colored paper.
Operating procedure:
We make simple and very cute New Year's cards together with the children. We cut out various geometric shapes from colored paper: circles of various diameters, rectangles, squares and triangles of various sizes. We make compositions from ready-made elements and glue them on a base cut out of colored cardboard. You can make a snowman with a bird, Santa Claus or Snow Maiden, as shown in the photo, or come up with your own stories.
New Year's card with a three-dimensional Christmas tree made of tea bags - master class
For such an original and cute postcard, you only need colored cardboard for the base, glue and colored tea bags. In the absence of such bags, you can take colored paper. We carry out the Christmas tree, strictly following the scheme, and glue the green beauty on the base, decorating with sequins.


More Christmas and New Year Card Ideas
From colored paper circles, you can create a bright and cheerful congratulation for friends on one of the main characters of the New Year holidays - Santa Claus.

An interesting version of the postcard with Christmas trees - the main attribute of the New Year. A very simple master class is attached to the photo, according to which New Year's greetings to friends can be made in just a couple of hours.


This simple and cute Christmas card is sure to delight your loved ones. A master class with step-by-step photos will help you make a Christmas wreath from colored paper.

The original idea is to make New Year's greetings in the form of Christmas balls with warm words for each family member and hang them on the Christmas tree. Such congratulatory balls are decorated with figurines of Christmas trees, snowflakes, serpentine, rhinestones and sparkles.

To make an unusual and elegant postcard using the quilling technique, a minimum of materials, a little skill and a small amount of time are required.

Amazing and simply fabulous New Year's stories can be created from ordinary millet and rice.

Make your own unforgettable postcard, breathe a piece of your soul into your creation and give a holiday to your friends and family.
The easiest way to congratulate your loved ones on a bright holiday is to do it yourself for them postcards "Merry Christmas!". Creativity will captivate not only experienced craftswomen, but also children who, in the process of working on a postcard, will be able to learn about the traditions of the celebration in different countries, learn new winter rhymes.
DIY Merry Christmas Cards
To do postcards "Merry Christmas!" do it yourself, you can use only paper and not resort to additional decorative elements. Even cards with 3D figures are not at all as complicated as you might think at first glance. The best decoration for a postcard dedicated to such a bright religious holiday will be an angel.
For the base, you should choose white or cream cardboard. Since the card itself will look very modest, decorated in a minimalist style, it is best to choose special scrapbook paper with surface embossing for the base. We also need thick colored paper or thin cardboard, we should choose a material with a beautiful delicate pattern.
In the process of work, we will need not only scissors, but also a scalpel or a sharp stationery knife to cut the angel along the contour on a cardboard base. It is also necessary to prepare an angel template cut out on thick cardboard in advance. You can find a template on the Internet or draw it yourself.
The cardboard for the base should be bent in half, then we will only work with the front half. Inside the card itself, you can write a congratulatory poem.
The cardboard template of the angel must be placed in the center of the front bar, it is desirable that both halves of the angel be located symmetrically from the center line. If necessary, you can draw a thin line with a simple pencil in the center, then focus on it when cutting out the outline of the angel. When you cut out the outline, you should leave the central part intact so that only the wings of the angel can be bent.
Merry Christmas Cards must be gentle, touching, it is better to give up bright colors and catchy decorative elements. The template along the contour must be cut with a scalpel, you must be especially careful when cutting out a halo to make it oval, of the correct shape.
When you cut out the template on the front of the postcard, be sure to put a wooden board under the cardboard so that you do not damage the work surface with a sharp knife.
The cut out wings should be slightly bent so that the outline stands out on the base. Now you need to cut out the same angel figure according to the template, but this time using bright paper. The edges of the paper angel can be carved using curly scissors or a hole punch. In the center of the cardboard angel on the base, you need to glue a strip of double-sided tape, glue a colored paper angel on it. Now you have it with a 3D angel figurine.

Postcards Merry Christmas and Happy New Year
Considering new cards Merry Christmas, you may notice that the same symbols are often used to decorate them as for New Year's greetings. Many ideas are borrowed from Western needlewomen, and, as you know, in Europe and America, Christmas is celebrated on a grand scale, and the symbols of the New Year familiar to us - a Christmas tree, Christmas balls, fir wreaths, snowmen and snowflakes, boots and mittens - are associated with Europeans and Americans with Christmas holidays. Therefore, they are most often depicted on foreign greeting cards.

If you want to tell your child about the traditions of celebrating this Orthodox holiday in your family, you can do it together. Talking about the Star of Bethlehem, you can make a cardboard star to decorate the Christmas tree. You can decorate the star with burlap, jute rope, decorative snowflakes and glitter.

It is the star that can become an ornament Merry Christmas and Happy New Year greeting cards. We did not choose the simplest ideas for creativity, you can handle a simple application yourself, but a voluminous postcard in the Pop-up style will surely interest you, and you will want to repeat the presented master class.
DIY Merry Christmas card the voluminous one is carried out in several stages: the inner part with the star is made separately, the outer shell of the postcard, its front bar is decorated separately.

Let's start by completing the inner part, where the star will be depicted. The sheet should be bent in half, without unfolding, cut out an asterisk according to the template. Along the fold line, draw a half of a star with a pencil and cut it along the contour with sharp scissors. Now you can unfold the workpiece and make two more folds along the edges from the sprocket. On each side of the edge of the postcard, 7.5 cm should be noted.

The edges of the star should be beautifully decorated, for this you can use self-adhesive tape. It can be glued along the contour of the star from the side where the convex fold line runs in the middle of the star. We will see this side of the star when we open the card. On the sides of the star, you can glue decorative snowflakes, stars, Christmas tree multi-colored balls. The finished inner part can be glued to the second sheet of cardboard, having previously decorated its front bar with a congratulatory inscription.
If earlier to buy a beautiful postcard in the store was enough for a good congratulation, today another popular trend is to make DIY Christmas cards, moreover, adhering to a certain style. The best option for this is a combination of a beautiful cover with an application, a voluminous figure or improvised materials with inner content, warm, sincere words of congratulations on this, such a special family holiday.
DIY cards for Christmas
Themes and stories for DIY cards for Christmas for a very long time, not only the image of angels, burning candles, branches of winter trees and stars, but also scenes of festive festivities, carols, fortune-telling, in a word, everything that we associate this wonderful holiday with, have become. For example, today vintage is very popular, especially made using the scrapbooking technique. And it’s not at all necessary to look for exactly the same cardboard that our great-grandmothers and great-grandfathers congratulated each other on, because all of them are available online today. All you have to do is find an image of a postcard from the Victorian era, the beginning of the 20th century in Russia, or maybe Soviet holiday images, print them in color and stick them on the base, adding a little neat decor.
However, not only vintage images have fans, because you want your craft to be unusual, created according to the author's design. Take advantage of ideas from exhibitions do-it-yourself Christmas cards, at the competition, thematic sections of sites, that's where a huge storehouse of everything interesting. Moreover, if you want to do such work with the children, it will be easy for you to choose a task based on the age and abilities of the kids. Great ideas - images of Christmas candles using various appliqué techniques. A very beautiful and elegant technique - made in it will always attract attention. And it is not so difficult to perform it, you just need to buy special strips and carefully roll them into a roll. After fixing, such an element is given the desired shape with fingers and placed on the base in the desired order.

Also, the image that will always be associated with the bright Christmas of Christ is a gentle angel. Such a postcard will always please any of your relatives and friends, young and old. The applique can be a fabric, it can be embroidered with threads on the surface of the cardboard, it can be voluminous, with additional details, such as beads, snowflakes, sparkles, and so on. The ideal background for an angel will be gentle, pastel colors, a classic font, an image of flowers, and so on.

Do-it-yourself voluminous Christmas card
We can get no less ideas on English-language sites, because Christmas is an international holiday, very beloved in many countries of the world. For most of these common or do-it-yourself voluminous Christmas cards the pace of the holiday is revealed in the usual symbols - a Christmas tree and gifts, Santa Claus and deer, which are carrying his sleigh, boots and stockings on the fireplace, in which something sweet is supposed to be put, and so on.
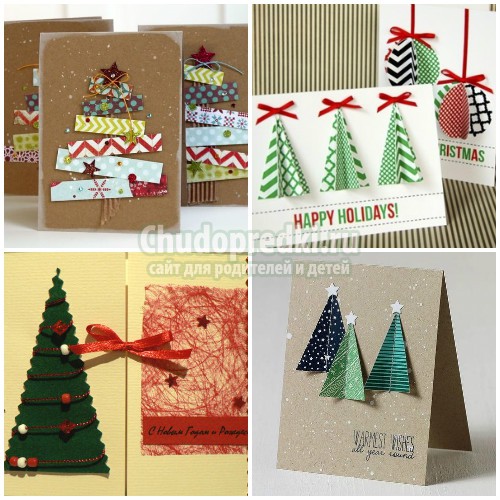
The first part of the examples is devoted to various images of the Christmas tree. This is the most versatile way to make a decorative applique, the meaning of which will be clear to anyone, even if you make DIY Christmas card in English. For the image of a Christmas tree, you should take scrapbooking paper with different patterns and coupons, a special adhesive tape with an ornament, fabric (felt is best), thick textured cardboard, and so on.

Pay attention to one of the examples of a greeting card, which is located above. On it, with the help of pleating (bending thin paper), a three-dimensional effect of a Christmas tree is obtained when the postcard swings open. This is done quite simply - several strips of paper are folded like an accordion, while their length is different, from short at the top to the longest at the bottom. They are folded in half and glued at the fold, as shown in the photo, and then their parts closest to each other are glued. A very interesting idea using the miniature evergreen wreath that we are used to seeing as front door decor. It is necessary to make an exact copy of it on a reduced scale and glue it to the base.

Funny stories and funny pictures are always a great reason to make a gift for your friends, who will surely be able to appreciate your efforts. The beauty of such ideas is that anyone can repeat them, while coming up with it from scratch, if you are not an artist or designer, is quite difficult. Here, in one example, Santa is stuck in the fireplace, it is very easy to repeat, especially since all the details and their correct location are in front of you. A cute image of a deer singing Christmas hymns will become a real hit among all the souvenirs of this Christmas, your friend will definitely not forget such a postcard and will not throw it away after the holiday, but will take care of it.
If you like our site, express your "thank you"
by clicking the buttons below.
Handmade gifts will give a storm of unforgettable emotions. It is not necessary to buy expensive ones, the main thing is to invest your soul and love in them. Christmas cards can be called "magic" gifts.
Christmas cards with an angel are the personification of warmth, tenderness and purity. Creativity is very multifaceted, so you can use completely unpredictable materials in your crafts.
To create such a wonderful present you will need:
- 3 coffee filters;
- white cardboard triangle 9 cm high;
- mugs with a diameter of 2.5 cm;
- white thread;
- glue;
- gold thin ribbon;
- toothpick.
Below you can see the stages of creating a Christmas card with an angel:

- Glue a toothpick to the back of the triangle. A quarter of it should be visible.
- Put coffee filters on the triangle.
- Stick two circles on a toothpick. It must be within them. These bonded balls are the head of an angel.
- Put a coffee filter on top.
- Tie a thread around the neck of an angel.
- Fold the third filter in half and tie in the middle. Attach the resulting wings to the back of the angel.
- The head of an angel can be decorated with a gold ribbon. It will serve as a pretty headband. If desired, you can draw the face of a cute angel.
This craft will fit very well into the atmosphere of Christmas. The angel is a symbol of purity, peace and goodness. Everyone will be happy with such an unusual handmade gift.
Christmas card in English
Christmas is a truly magical holiday. Sitting at the festive table, everyone wishes each other all the very best. Of course, I want to send congratulations to those who are not currently in the circle of friends or family. Then there is a desire to send a greeting card.
You can write a Christmas card in English.
Here are some congratulatory phrases:
- May this Christmas be bright and cheerful! - May this Christmas be bright and cheerful!
- May this season of joy open doors to new opportunities!
Merry Christmas! - May this winter open doors to new opportunities for you! Merry Christmas! - My best wishes for a healthy and happy! - My best wishes for health and happiness!
A Christmas card written in English is a very unusual gift. The main thing is that the person you want to give it to knows English. Otherwise, such a present will not be entirely appropriate. Often such presents are sent as a gift to their friends from other countries. Congratulatory notes must be written correctly, so if you yourself do not know English well, then you should not take risks.
In the technique of quilling
Using the quilling technique, you can create a very unusual Christmas card for the competition. At first glance, it may seem that doing such a job is quite difficult, but it is not. It is enough to try to create at least one postcard using the quilling technique to see how easy it is to make such a beautiful and unusual craft with your own hands.
To create a gift, you will need materials such as:
- cardboard;
- strips for quilling;
- scissors;
- toothpick;
- glue.
In order to make a Christmas quilling card, you must follow the following steps:
- Take a thin strip of paper and fasten the tip into the slot of a toothpick.
- The toothpick should be taken in the right hand, and the tape in the left.
- The toothpick is rotated clockwise. The spiral is held from above and below.
- The end must be fixed with glue.
A tight spiral is the basis of quilling.
- Put a little glue on the end of the tape and attach it to the spiral.
- The spiral needs to be untwisted a little so that it becomes "free".
- Next, you need to make an element such as an "arrow". To do this, click on three sides of the spiral to form a triangle.
- For a Christmas card, you will need 6 arrows.
- It is necessary to make such an element as a "heart". Fold the tape in half. Screw the right end counterclockwise and the left end clockwise. For a postcard you will need 6 "hearts".
- Next, you need to make the element "eye". Pinch the coil on both sides and then release.
- You will need 6 "eyes" and 12 pieces of "tight spiral" of blue paper.
- For the basis of this postcard, black cardboard is best suited.
- Fold a sheet of cardboard in half.
- Glue a tight spiral in the center.
- Around it is necessary to attach "arrows".
- Glue hearts between the "arrows".
- Add an element such as "eye".
- Trim the edge of the card with curly scissors.
- Glue the inscription "Merry Christmas".
If desired, you can add the craft "snow". It can be done with white gouache.
Scrapbooking technique
Scrapbooking is a very unusual technique for creating holiday cards. It allows you to create an unusual and original craft with your own hands. Even a child can use this technique, as it is quite simple.
To create a Snowy Winter postcard, you will need two types of napkins from which paper will be made.
Here are the steps to create a Christmas card:
- In the foreground, you need to place a postcard with bullfinches.
- Attach a label to write on.
- Attach a button with the image of Santa Claus to the front side.
The postcard is ready. You can give it to your dear and beloved person. Scrapbooking allows you to create wonderful DIY works in a short time. This saves both time and money. Such small presents will delight everyone with their simplicity and accessibility.
Volumetric Christmas card
Volumetric crafts are very popular lately. They look intricate and unusual. It seems that it is very difficult to create a three-dimensional postcard, but it is not. It is enough to carefully follow the instructions, and there will be no problems with creating voluminous postcards.
In order to make a volumetric postcard with a Christmas tree, you will need:
- scissors;
- glue;
- cardboard for the base of the postcard;
- green cardboard for the Christmas tree;
- sequins, beads and a hole punch;
- fluff and cotton.
It is important to follow the following steps:
- Cut 5 strips from green cardstock. They should be of different lengths and widths. They must be folded with an accordion.
- Cut out cardstock and fold it up. Glue a large strip to the bottom of the fold, stick the strips further, closer to the top - less and less.
- Cut out snowflakes and glue them to the base and Christmas tree.
The gift is ready. This postcard will be a pleasant surprise. Such a sign of attention will cause very pleasant emotions.
Do not forget to please your family and friends with small surprises. A handmade gift is considered to be quite budgetary, but at the same time very pleasant, and most importantly, with all my heart. Such a present will leave very good memories of yourself.
Photo Ideas

Hi all! The other day I was visited by a fantasy, and I came up with some original Christmas cards made of paper and other materials that you can quickly and easily do with your own hands for a competition or just for kindergarten and school.
Very soon the New Year, followed by the Nativity of Christ and the Baptism of the Lord. For all the holidays, you need to have time to prepare postcards, so I decided to give you a few ideas right now. These crafts for Christmas can be bought, but it is best to do it yourself.
Today, postcards will be exclusively from colored paper, cardboard and improvised means.
In order to make a DIY Christmas card, you will need:
- White cardboard.
- A small piece of narrow tape.
- Green corrugated cardboard.
- Glue with scissors.
- Pencil or compass.
If you do not have any materials, they can be replaced, do not worry. For example, change the corrugated cardboard to a regular one or print a sheet of white paper with a green pattern. No ribbon, not a problem either, attach a few beads or buttons in its place.
DIY Christmas card from paper
- We take white cardboard, fold it in the middle, run our hand along the fold, so you smooth out all the folds, the card will turn out beautiful and even.
- Draw a circle in the center of the card. It can be done with a compass or a regular pencil. I circled a regular mug with a pencil.
- We cut squares from a white sheet and green cardboard. I did not measure them, I cut them as my heart desired.
- Now we grease the circle on the card with glue, you can use pva, you can hot.
- We fasten the squares in a circle. Look carefully, you need to do this in an overlap.
- In the center we place an angel. After the glue dries, circle the angel with a pencil.
- From a green segment of a narrow satin ribbon forging a bow, we fasten it to glue.
 A decorative paper Christmas card with an angel is ready, it is not at all difficult to make it with your own hands, as a result it turns out to be voluminous, of course, not 3d, but still very beautiful. And here is a template for this angel. I suggest you print and cut it out. If you do not have such an opportunity, attach a regular sheet to the monitor and barely touching, circle the drawing along the contour.
 Friends, a children's handmade Merry Christmas card is ready.
DIY Merry Christmas card with an angel
Do-it-yourself Christmas card, for a school competition
I continue the same theme of Christmas and suggest that you familiarize yourself with the new voluminous postcard. I propose to make her for a school competition, she is beautiful, decorative and wishes everyone a Merry Christmas.
For a children's card Merry Christmas, you will need materials:
- White cardboard.
- A small piece of old wallpaper.
- Drawing of an angel.
- Pencil, scissors and glue.
- Yellow, green and white beads.
This Christmas card looks very beautiful, original, and besides, it is voluminous. Friends, if you don’t have beads, but you really liked the idea, I suggest shifting it to threads. You just need to cut them very finely and repeat my step-by-step description, which I will now provide you with.
How to make a DIY Christmas card
- We proceed with white cardboard in the same way as in the previous version. Do not forget to iron it with your hand, remove all the folds at the fold.
- Draw a circle in the center of the card and use small scissors to cut it out.
- From wallpaper or other multi-colored paper, cut out a rectangle, cut off the edges of it and stick it on the front side of the children's card.

- Wait for it to dry completely, cut out the circle. You should have a through hole. Look at my photos all the time, they will help you avoid mistakes.
- Glue an angel in the center of the circle. I provide a template to help you.

- Now we take glue, grease the angel's clothes with it, put small white beads on top. If you have sticky hands, use a needle or other object to place the beads correctly.
- In the same way, we make the hair of an angel and greenery.

A voluminous postcard for Christmas is ready, it remains to sign it with beautiful verses and wishes. In my opinion, this decorative postcard is ready for a school competition and claims a prize for originality, besides, there is no similar one on the Internet, I came up with it myself.
Friends, I hope you liked my fantasy, and you will use it, make Christmas cards with your own hands, perhaps for a contest or just like that, because such beautiful and original works should please the addressee. Merry Christmas to you friends.
Nina Kuzmenko was with you.