Copper ring with a "whirlpool" with your own hands. How to make your own wedding rings How to make your own ring
Dear visitors of the site "Handmade and Creative", I welcome you and want to introduce you to an interesting master class on creating an attractive, and at the same time very easy to create a ring. In order to make a ring with my own hands, I tried to describe in detail each stage of the work. Also in the master class are illustrations, so you can easily navigate during the process of creating a product.
Required materials and tools:
- a few beads (in this master class, amethyst beads were used);
- wire, the size must match the size of the hole of the bead. In this case, two types of wire d-22 and d-18 were used;
- pliers with a thin nose;
- wire cutters;
- pliers;
- a special metal mold to create the correct shape of the ring, if there is none, you can use any rounded metal object, for example, a thin pipe or a stool leg.
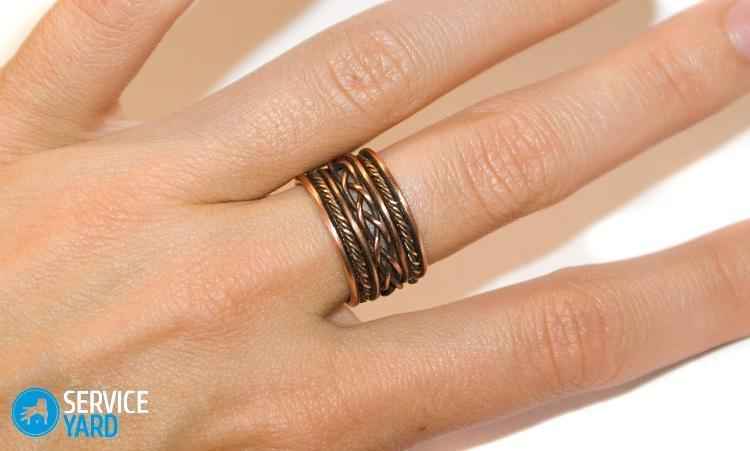
ring shape
To create the shape of the ring, we will use a wire whose diameter is d-18. With wire cutters, cut the wire about 3 lengths around the circumference of the finger. We begin to wrap the wire around the rounded base of the ring, in this case it is an ordinary wooden object.


We string beads
We bring out the ends in the center of the ring and string a bead on each end. A master class on how to make a ring with your own hands is at the equator, hold on tight;)

We continue
Now we turn each wire through the bottom of the ring and bring them out in opposite directions from each other. With the help of pliers, we pass the pieces of wire through the center of the ring again and fix them.


Using a different wire
Now let's use the second piece of wire, the diameter of which is d-22. In this case, from this wire we will make the side spirals of the ring as a pattern. We determine what size the spirals will be, and crosswise turn the wire through the base of each bead, thereby drawing the ends of the wire asymmetrically to each other. In the photo, the length of each end of the wire is about 2.5 cm (1 inch), thus the spirals will not be very large.
Related article: DIY gift bag

Spiral ring as a pattern
When we have prepared the wire for the spirals, use a pair of fine-nosed pliers to grab the end of the wire and fold it to the base of the ring. We try to make the spiral dense, so press the wire as hard as possible. With the second piece of wire, repeat the same action. As a result, we get two side spirals.

Making jewelry is a long and painstaking process that requires several years of training, knowledge of physics, chemistry and the availability of expensive special equipment. We know this and spend hours looking for the desired jewelry in stores. Many even develop a sketch on their own and turn to a jewelry workshop so that the master makes a dream jewelry for them.
Times are changing, and now everyone can be a jewelry master. In order to make a real silver ring with our own design, we turned to a jewelry school ARGENTARIUM and made sure that it is not only interesting and exciting, but also really easy.
(Total 26 photos)
 Before starting work, we were shown decorations made by instructors and students of the school. There are many options for decorations, and all this can be done with your own hands.
 Despite such a variety of possibilities, we still wanted the ring. We decided that, if you like it, we will return a little later for the pendant.
 The first surprise: it turned out that it was not necessary to melt the silver in order to give it the desired shape. The decoration is made of plastic Precious Metal Clay (PMC) silver, which was invented by the specialists of the Japanese company Mitsubishi Materials Corporation. Made from a mixture of tiny particles of silver, water and a non-toxic plasticizer, PMC is as easy to work with as regular plasticine.
 The whole process is simple and straightforward: you need to come up with a piece of jewelry, make it, burn it in an oven (the water and the plasticizer will burn out, and the silver particles will firmly sinter with each other), and at the end you will get a 999-carat silver product. Modern alchemy at its finest! Before starting work, the head of the school, Evgenia, showed us what tools we can use to create exactly the decoration we want.
Surprise two: most of the tools for work can be found at hand: any texture can be “printed”, and to cut the desired shape, an awl or blade will do.
 Various dies for making imprints and imprints on silver mass before firing.
 To create volumetric products, you can use liquid silver in a syringe. Silver paste is squeezed onto the cork base with a syringe. During the firing process, this base burns off, and you get a hollow silver bead, similar to those that were created by silversmiths hundreds of years ago and were called "filigree".
 There are thin plates-leaves of plastic silver, from which you can fold any figure, for example, origami. Isn't it a miracle to build yourself a crane or a boat of pure silver?
 And you can use dried leaves as a blank for future decoration. If the leaf is covered with liquid silver, burned, the leaf will burn, and you will get a unique pendant or pendant that completely repeats all natural curves and textures, which are simply impossible to make on your own.
 In jewelry, there is nowhere without precious stones. Multi-colored inserts can be added to the design of any jewelry: cubic zircons (cZ) or other laboratory stones that can withstand high temperatures.
 Of course, it was very tempting to make a unique pendant for ourselves, but we came for the ring and decided to make it anyway.
 Before you start working with ductile silver, you need to correctly calculate the size of the ring, because during the firing process, the mass shrinks by 16%.
Lubricate the board with a special compound so that the silver does not stick, and go!
 Roll out the RMS into a pancake of the calculated size. Cards glued in several pieces on the sides of the blank allow us to adjust the thickness of the future ring and roll out the silver in an even layer. A simple life hack, proven by practice 🙂
 PMC silver can be cut, rolled, textured and shaped into any shape. Surprise three: it is especially pleasant that ductile silver forgives any mistakes - after drying, it is easily restored with water and again takes on a working state. You have the opportunity to remake the decoration before firing, if you don’t like something in the original blank, or add additional elements.
 We created a floral ring using a rubber stamp.

 After we have obtained the desired impression and closed the ring, it must be dried.
 Roasting can be done in a variety of ways. Professionals use a jewelry muffle furnace, and for beginners, a more budgetary “home” option is suitable - a ceramic burner of a special design that runs on dry alcohol.
 We fired the ring in a muffle furnace. With the right temperature and time conditions, the water is completely evaporated, the organic plasticizer burns out, and the silver particles fuse with each other, forming a solid metal at the outlet, retaining the entire design, down to fingerprints.
 After 25 minutes, our ring was “baked” 🙂
 Now we remove the oxide film - a white coating that appears on the surface of the product during combustion. Then, with the help of jewelry tools, we bring the decoration to mind.
 The fourth surprise: after firing with metal, you can do anything you like. Drill, saw, grind, enamel, blacken and, of course, polish to a mirror finish!
 Using a steel brush, we clean off the oxide film.
 Sanding with sandpaper.
 A black special solution - among jewelers it is called "sulfuric liver", and another remedy is available to mere mortals - sulfuric ointment, which is sold in any pharmacy. By the way, the blackening of jewelry is also a whole art. Blackening emphasizes the structure and ornament of the decoration: depending on the technique, the result can be so different that a separate master class was devoted to this matter.
 We polish the ring with an agate tool to give it a shine.
 And here it is - the ring of dreams! Made by own design and by hand!
If you wish, you can learn to knit, sew, weave beads and burn pots. It seems that the creation of jewelry is something beyond ordinary human capabilities, somewhere at the intersection of alchemy and magic. In fact, everyone can take a master class and make their own jewelry. The technology turns out to be surprisingly simple, especially when a good master explains it. Our teacher Evgenia was able to interest even skeptical students. It seems that now half of the group will definitely return for a pendant for their author's collection.
Perhaps we are too 🙂 And for the first visit to any master class, we give our readers a 10% discount using the promo code BIGJEWEL (you need to enter it in the class registration form).
All girls love jewelry, and the more the better. But you must admit, sometimes the stores do not have what we want - everything is boring and monotonous. Do you want something unusual and original, for example, a ring? Then you turned to the address for help. In this article, we will show you how to make a ring at home. Such handmade jewelry is much more pleasant to wear, as the soul was invested in it. Every home has a lot of unnecessary things that can come in handy at work. We will consider each method in detail. Stay with us and you will learn how to make a ring with your own hands from long-forgotten materials. So, let's begin!
What are rings made from?
If you decide to do something extraordinary, then use the most unpredictable materials, it is from them that creative and unique decorations are obtained. Check out a few ideas:
- Review your box of long-forgotten buttons. With a little digging, you can find original buttons of interesting shape and design.
- Almost every house has wire. This is a great helper in creating the basis for the ring. Any wire is suitable for work, regardless of thickness and color.
- Every girl has beads and beads. Take a close look at the jewelry box. Every girl, for sure, has once torn favorite beads or a bracelet. Using them for their intended purpose, you will get a bright ring.
- Never throw away old broken rings. They will serve as an excellent basis for a new ring with your own hands.
- You can make a stylish ring out of old coins, and not only.
- A satin ribbon will help in creating a feminine and delicate look.
We have listed the main materials for making a ring with our own hands, and this, believe me, is not the whole list. To create a ring, you can use almost anything that you like, you just have to turn on your imagination to make something exclusive.
How to make a beautiful ring? — Getting ready for creative work
How to make a ring with your own hands at home, using only improvised materials? Yes Easy!
Before starting work with selected materials:
- First, decide which ring you want.
- Now we need to determine the size of the future ring. To do this, you need to take a strip of paper and wrap it around the finger on which you plan to wear the ring.
Important! If you already have a ring for this finger, then use its size in making a new ring - this is the easiest way.
- Now, using a pen or pencil, make a mark at the intersection of one edge with the other.
- Cut off the excess paper and get the desired size for the ring.
Important! You can simply measure the strip - this will be the size of the new ring. The same strip can be used as a template for measuring cooked materials.
wire ring
Next, we will tell you how to make a ring with your own hands using wire. Wire is the most common material for making rings with your own hands. Remember how in childhood we twisted wire roses and wore them as the most expensive decoration? Copper wire is quite affordable and durable and at the same time multifunctional. It can be used for any type of weaving: pigtail, heart and many other shapes.
Important! If you do not have experience in weaving wire rings, then first practice on simple elements, and then you can start creating a complex composition.
This is one of the easiest ways that any needlewoman can handle. To make a wire ring, you will need the following materials and tools:
- An interesting button or natural stone.
- Soft wire.
- Wire cutters.
- Round nose pliers.
- A piece of tube in the shape of a cone.
The procedure for making a wire ring:
- First you need to fix the stone on the wire. If using a bead, then just thread the wire through it.
Important! The stone can be painted using a spray can of paint. To do this, you need to put a pebble on a sheet of paper and direct the sprayer at it. After complete drying, turn the stone over and process it on the other side in the same way.
- After - using wire cutters, bend the wire back, attach it to the conical tube.
- We wrap the entire conical tube with wire several times.
- Next - firmly squeeze all the turns of the wire, and bend its ends up and down.
- We remove the finished workpiece with the tube and the ends of the wire, fix the turns on the sides from the central stone or bead.
- We wrap the entire ring with the ends of the wire, about 3-5 times.
Important! Make sure that the coils fit snugly against each other.
- At the end of the work, cut off the excess wire using round-nosed pliers, fasten all connected turns to give a flat shape.
Important! Remember that aluminum breaks quickly, so if you took just such a wire, you need to be extremely careful and attentive when creating turns of various shapes.
Pin ring
Do not believe that you can make a ring out of pins with your own hands? You are very wrong. This material can be advantageously used in such an interesting lesson. How? Then we will tell you everything.
For work we need:
- Pins.
- Beads.
- Elastic thin band.
- Chain with small links.
So, let's start creating an 80s style ring using pins:
- First, take a pin and string beads on it. The number of beads is up to you.
- Thread two thin elastic bands through both ends of the pin.
- Now we take the next pin and use the same method to put it on an elastic band, only its head should look in the opposite direction.
- Doing the same manipulations, we alternate the pins in turn until the desired circle is obtained.
- At the end of the work, we tighten the elastic band and fix it, hiding all the knots.
Satin ribbon ring
Before starting work, it is necessary to prepare the following materials and tools:
- Satin ribbon of medium width.
- Thick wire for the base of the ring.
- Pliers.
- Scissors.
- Wire cutters.
- Needle with thread.
- Glue gun.
- Glue.
The following is a step-by-step process for making a ribbon ring:
- First of all, we measure the required length of wire, and cut off the excess with wire cutters.
Important! In order for the future ring to be strong enough, we recommend making several turns with a tape. You can multiply the girth of the finger by 3 and get the required piece of satin ribbon.
- Now just wrap the finger with wire using pliers. Thus, we get the basis of the future ring.
Important! In this case, you can take a dimensional cone, as it is much faster and more convenient.
- We take a satin ribbon and use a glue gun to discreetly fasten it to the edges of the wire. We begin to wrap the entire ring with tape.
Important! It is necessary to ensure that the tape, when wrapping around the circle, fits snugly enough to the wire.
- When the tape is wound around the ring, cut off the excess material, and then fix the end with glue.
- Next, cut off a piece from the tape, about 10-15 cm and burn the ends with fire.
Important! To prevent the edges of the tape from fraying, you can heat the scissors with fire before cutting.
- We form a bow from the ribbon, and fix the middle with stitches.
- Glue the bow to the base (where the end of the ribbon is glued).
coin ring
It is possible to make a ring from a coin, but this is a rather complicated and time-consuming process. For help, you can ask a person who has the skills to work on the processing of metal products.
In order to start making a ring with your own hands using a coin, you need to prepare the following materials:
- Drill.
- Fine grit sandpaper.
- Coin.
- A small piece of metal.
- A hammer.
- Soft fabric.
- Steel spoon.
- Emery roller.
- Polishing wheel.
- Clip for decoration.
Now let's get to work:
- At the first stage, we take a coin, put it on its edge and place it on a metal base.
- We press the base with a teaspoon.
- Then we do the hard work. We take a hammer and knock on a teaspoon until the coin becomes flat.
Important! Constantly monitor the process of flattening the teaspoon. Try to strike the coin with the same force for the most even edge.
- Then, with a drill, we make a hole in the very center of the coin. When you drill through, the coin will be securely fixed.
- Now we grind the edge of the coin with sandpaper until the surface shines.
- Next, using a drill, we increase the hole of the circle. We constantly change the drill to a larger one until the required circle for the future product is obtained.
Important! When you decide on the size of the jewelry, constantly try it on so that in the end the ring does not turn out to be too big.
- Use an emery roller to polish the inside of the ring.
Important! If desired, the ring can be engraved, but for this you need to contact a specialist.
Button ring
If you do not have a suitable ring base, then you can buy it at a jewelry store. Various materials can be attached to such a base: a button, a stone, plastic, a shell and other materials. In this case, we will tell you how to make an original ring from long-forgotten buttons and a piece of fabric.
For work, we need the following materials and tools:
- Round piece of black felt (diameter 5 cm).
- Bright buttons.
- Superglue or glue gun.
- Ring base.
- Jewelry pliers.
- Scissors.

Let's get to work:
- If there are loops on the button, then remove them with pliers.
- Next, glue the buttons on a piece of felt according to the scheme: from the center to the edge of the circle.
Important! The buttons must be darkly fastened to the felt in such a way that the result is a round shape.
- After the glue has completely dried, cut off the excess felt from the sides with a straight or zigzag line.
- We coat the base well with glue.
- We glue the previously made fabric with buttons onto the base.
- We are waiting for the complete drying of the finished ring and rejoice at the new thing.
The ring with your own hands at home is ready!
beaded ring
You probably made different beaded rings as a child? Its large assortment gives you the opportunity to express your imagination. It all depends on your desire and experience. Beads can be taken in various designs: glued, strung on a fishing line or sewn on. Of course, the jewelry will not look presentable, but with the help of beads and beads you can create a pretty beautiful ring.
To get started, we need:
- Thin wire.
- Beads (at your discretion).
- Beads.
- Glue.
- Wire cutters.
- Pliers.
Let's start making a ring of beads and beads:
- First you need to measure the size of the future ring. To do this, multiply the girth of the finger by 3 or 4 and add 2 cm.
- The resulting length is cut off from the copper wire.
- Next, we string beads onto the wire.
Important! Please note that 1 cm should remain at each end of the wire. The edges of the wire must be soldered with glue so that the beads do not crumble.
- We wrap the wire with beads around the finger or use a dimensional cone. We bend the remaining ends - we will need them later to secure the ring.
- Now let's start making the ring. We take the wire and cut three pieces 2-3 cm long.
- We string two beads on each piece. We bend the ends of the wire so that the beads do not roll.
- After that, we bend all three parts in half, that a depression has formed in the center, spread the beads along the ends of the wire.
- In the recess we place the previously prepared base by threading parts of the wire through it.
Important! Do not forget that the bent edges of the wire should be located only near the ring.
- Now we bend the pieces of wire so that the beads are located tightly to each other.
- We twist all the ends of the wire so that the beads are on top.
- With the ends that were previously bent, we finally fix the ring.
Important! When making a beaded ring, you can use various options: weaving in one or more rows, combining beads with other materials. Don't be afraid to experiment and you'll be fine!
leather ring
Agree, not every girl wears a leather ring, but this does not mean at all that you need to give up such an interesting idea. We will tell you the easiest and most affordable option.
The list of materials needed to create a leather ring:
- Leather lace in any color.
- Wire.
- Pliers.
- Ring base.
Important! The base can be of different thicknesses, since after the entire manufacturing process it will be possible to adjust the size by simply moving the wire spiral.
Let's take a closer look at all the steps:
- First, we wind the wire on the base, make several turns, stretching the irregularities.
- After - cut off the ends of the wire, and so that they do not prick, we bend into loops.
- Now we take a leather lace and begin to weave in the form of a spiral along the entire base of the ring, passing the end of the skin from above above the wire, then from below, constantly alternating. We repeat this procedure in the opposite direction.
- We continue to weave until the entire base of the ring is wrapped with a leather cord.
- After all the procedures, we cut the lace and hide the tip under the loop.
chain ring
What can be used to make a finger ring? Have you thought about the chain? But in vain. From the chain you can make a beautiful and delicate ring. Almost everyone has a broken chain that can no longer be repaired, but it's a pity to throw it away.
In order to get started, you need to prepare the following materials:
- Pliers or tweezers.
- Chain.
- Small clip rings.
So, we begin work on making a ring from a chain:
- Take a chain and wrap it around your finger. In this way we will determine the size of the ring and cut off the correct length of the chain.
- Carefully cut off the excess.
- Using a ring with a clip, we fix both ends with pliers.
Now you know how to make a ring with your own hands from improvised materials. Agree, it's not that difficult. Having familiarized yourself with the basic methods for creating a ring, you can easily make a stylish and original ring. Use your creativity in the right direction, and you will definitely succeed!
Jewelry is the weakness of any girl. But what is sold in stores is sometimes so boring and unoriginal that you want something new and unusual, for example, some beautiful and unusual ring. Make it with your own hands! There is nothing difficult in this.
What can rings be made from?
If you decide to create something original, then use the most incredible and unexpected materials, it is from them that unique and creative gizmos are obtained. Here are some ideas:
- If you have a box with old ones (ask your mom, she definitely has one), then rummage through it, maybe you will find something original there.
- Be sure to find the wire, it will serve as an excellent basis for the ringlet. Its thickness can be different, it all depends on your wishes.
- Beads, beads. What girl doesn't love this? If you suddenly have old broken beads that are a pity to throw away, be sure to use them.
- Old broken rings. If it so happened that the ring fell off the ring and got lost somewhere, then do not throw away the “bare” ring, it will serve as an excellent basis for a new amazing ring.
- Coins. If you have old coins, they can make great jewelry. More on this will be written below.
- Ribbons. They can be used too.
But, in general, if your fantasy works well, then you can make something amazing out of any even unnecessary thing. And such a decoration will be exclusive, as it is made by your own hands.
By the way, I would like to say that in order to facilitate your task, it would be useful to acquire a cone for measuring rings, it will be an excellent stencil. But if there is none, no big deal.
How to make a beautiful ring?

How to make a ring from practically improvised materials with your own hands? First you need to measure your finger so as not to be mistaken with the size. Doing this is easy. Take paper, pencil and scissors. Cut a strip of paper about 5-7 centimeters long.
Wrap this strip around the finger on which you plan to put your ring on. Mark with a pencil where one edge meets the other. Cut off all excess. If necessary, measure the resulting strip, this will be the girth of your finger. You can also use this strip as a template to measure materials.
Now we offer several options for beautiful rings.
Ring "Bow" from a ribbon
You will need:
- satin ribbon (not more than 0.5 centimeters wide);
- thick wire for the base;
- scissors;
- pliers;
- wire cutters;
- thread and needle;
- glue.
Here's what to do:
- First measure the required length of wire. For the strength of the future ring, it is better to make several turns, so multiply the girth of the finger by 3 and add half a centimeter. Measure this length on the wire, cut off the excess with wire cutters.
- Now start wrapping your finger (or a dimensional cone, it will be more convenient) with a wire using pliers. You've got the base.
- Now take the satin ribbon. Where the ends of the wire meet, glue the edge of the ribbon. Start wrapping tape around the base. Make sure that it fits snugly on the wire. When you wrap the entire base, cut off the excess, fix the end with glue.
- Cut a piece 10-15 centimeters long from the tape, the edges can be singeed or burned so that they do not spread (you can heat the scissors before cutting).
- Tie a bow, secure the middle with a couple of stitches.
- Glue the bow to the base (to the place where the end of the ribbon that you wrapped the wire is attached).
- Ready!
coin ring

The original ring can be made from a coin, but it is quite difficult, so it is better to ask someone for help (preferably someone who has the skills of working with metals and its processing). Here's what you'll need:
- drill;
- fine-grained sandpaper;
- a coin (for example, two-ruble);
- a piece of metal;
- a hammer;
- the cloth;
- tea spoon;
- emery roller;
- polishing wheel.
Getting Started:
- Take a coin, put it on its edge and place it on a metal base. Press it down with a teaspoon. Now you have to work hard. Take a hammer and tap on the teaspoon to flatten the coin. It is important to constantly control the process, as well as hit with approximately the same force so that the edge is as even as possible.
- Then you need to make a hole in the center of the coin with a drill. As soon as the drill goes through, stop. The coin is fixed, you will be comfortable.
- Now sand the edge with sandpaper using a roller to make the surface shine.
- Now use a larger drill to enlarge the hole. Then change the drill to an even larger one. Constantly control the process and try on the ring so that in the end it is not too big for you.
- Polish the inner surface with an emery roller.
- Ready. Of course, it’s easy to write this, but in reality everything is much more complicated, so it’s better to ask someone to help you (husband, for example).
Ring of beads and beads

You can make a beautiful ring of beads and beads. Here's what you need for this:
- wire (beads will need to be strung on it, so the thickness should not be too large);
- beads;
- glue;
- beads;
- wire cutters;
- pliers.
Here's how it's done:
- Multiply the girth of your finger by 3 or 4 (depending on the number of turns), add two centimeters. Measure and cut the appropriate piece of wire.
- String beads on the wire. One centimeter should remain at each end. In these places, it is better to fix the beads with glue so that nothing later crumbles.
- Wind the beaded wire around your finger or measuring cone. Bend the remaining ends slightly, they will be needed to secure the ring.
- Let's start making the ring. Take the wire, cut three pieces 2-3 centimeters long (depending on the size of the bead).
- String two beads on each piece. Bend the ends immediately (only the tips) with pliers so that the beads do not fall.
- Next, bend all three pieces in half so that a depression forms in the middle, distribute the beads at the ends. Place the base in this recess by threading pieces of wire through it. In this case, the bent ends of the base wire should be located directly near the ring.
- Now bend the pieces of wire so that the beads are next to each other. Twist all ends so that the beads remain at the top.
- Secure the ring with the bent ends of the base by bending them over the wires of the ring.
- Ready.
Button ring
