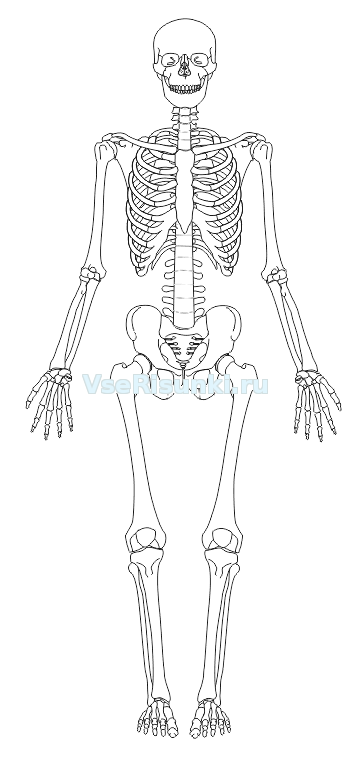
Human skeleton structure. Plastic anatomy human skeleton
How to draw a human skeleton? It is not as difficult as it seems at first glance. Using this algorithm, even a novice artist will cope with this task. To achieve a successful result, we advise you to follow the recommendations of an experienced master step by step.
We create the frame of the future skeleton
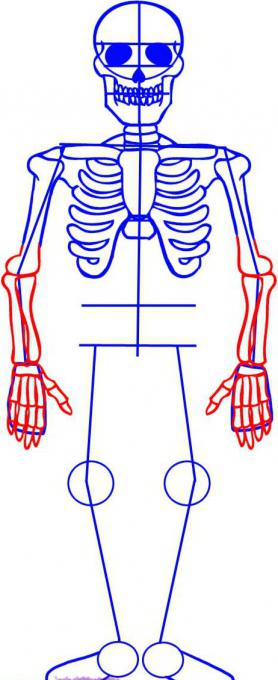
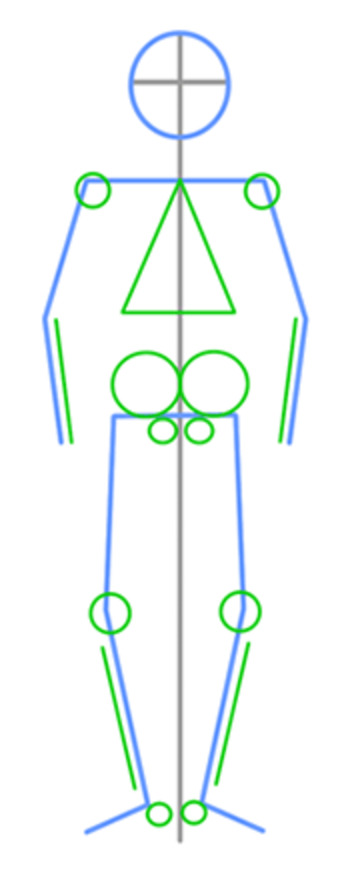
Step 1. Now let's learn in more detail how to draw a skeleton with a pencil. First, draw the basic frame. To do this, you need to start with a circle for the skull. Divide the circle into 4 segments with two lines intersecting at right angles, draw another one a little lower under the horizontal line. Draw a contour of the bottom of the skull under the circle. Draw eye sockets, nose opening and teeth as shown in fig. 1.
Extend the vertical line of the skull below - this is (the spine). Add a shoulder line, draw 2 shorter straight lines parallel to this line below to indicate the bases of the pelvis. From the shoulder and pelvic lines down, draw in straight lines the basis for the bones of the arms and legs, respectively.
Mark the middle of the spine with a fragment of a sinusoid. In the middle of the straight lines, denoting the legs, outline the elbow joints and knees in circles. At the ends of these straight lines, mark the future hands and feet with ovals. When building a skeleton, refer to Figure 1, which will tell you how to draw a skeleton correctly.
Draw the upper body skeleton
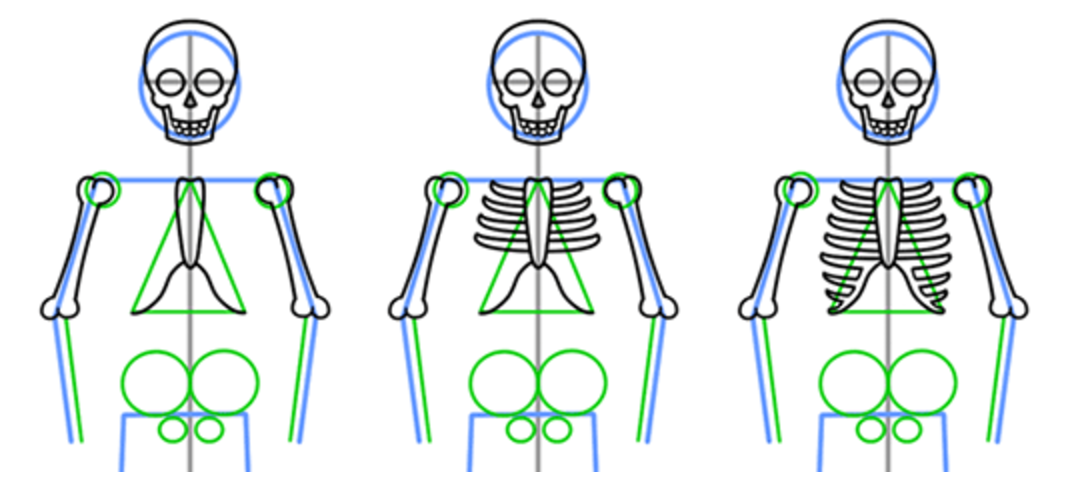
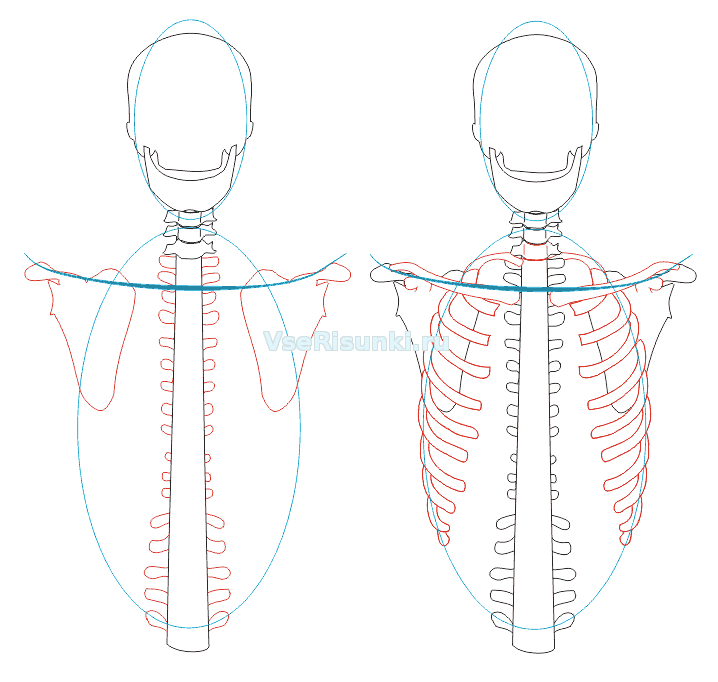
Step 2. First, fill the distance between the skull and the shoulder line with two short flat ovals to create the visibility of the cervical vertebrae.
Let's draw the collarbones, for which we draw horizontal lines with elongated ovals along the entire length to the right and left of the neck. Let's draw the humerus (upper) bone and the forearm (lower) of the same length. In this case, for plausibility, it is necessary to highlight the shoulder and elbow joints.
Figure 2 clearly shows how to draw the skeleton of the chest itself. The main thing is to try to draw correctly - these are the bones that are connected in pairs with the thoracic vertebrae. In total, a person has 12 pairs of ribs, but fewer (7 pairs of ribs are shown in our figure).
If everything worked out, half the job is done. Let's move on to the next stage. 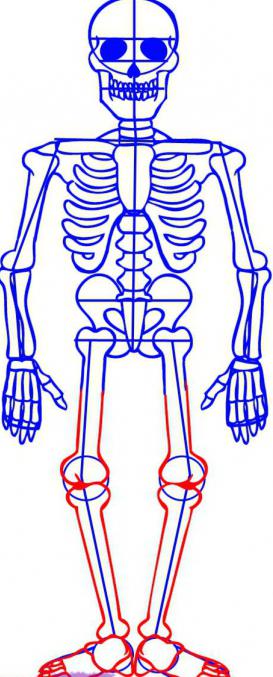
How to draw the skeleton of the lower torso
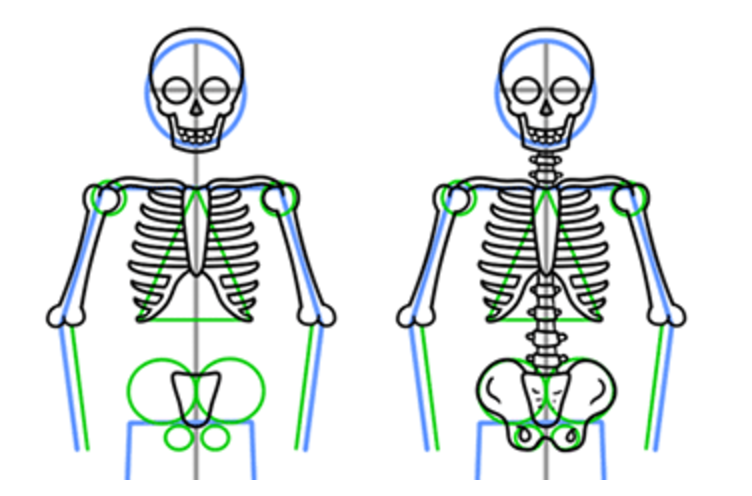
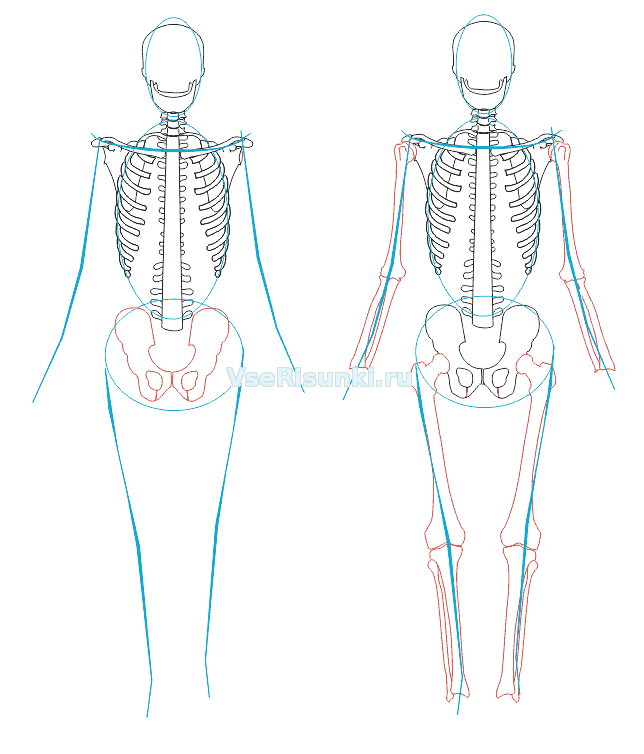
Step 3. Draw 4 vertebrae schematically under the sternum bone. Under them, with a vertically elongated cone, we denote the sacrum.
Drawing will be a little more difficult. If you look closely at the drawing, they resemble the outline. The line starts from the bone of the sacrum, rises in a smooth semicircle to the costal bones and also smoothly falls at an angle to the bottom of the sacrum. It turned out what in anatomy is called the pelvic area.
Now draw the femur (upper) and tibia (lower) bones of both legs. At the same time, note that the upper bone, in order to maintain the proportionality of the skeleton, is drawn a few millimeters longer than the lower one.
The femur and tibia are connected to each other in the region of the patella. In the first picture, this place was indicated by a circle.
Final stage
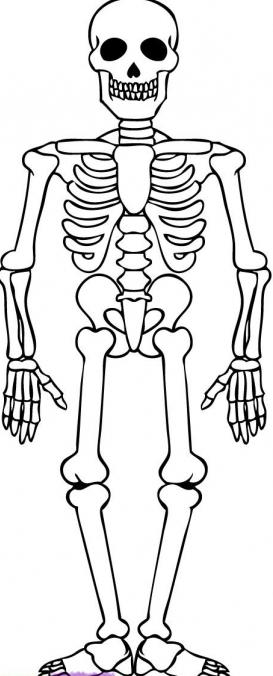
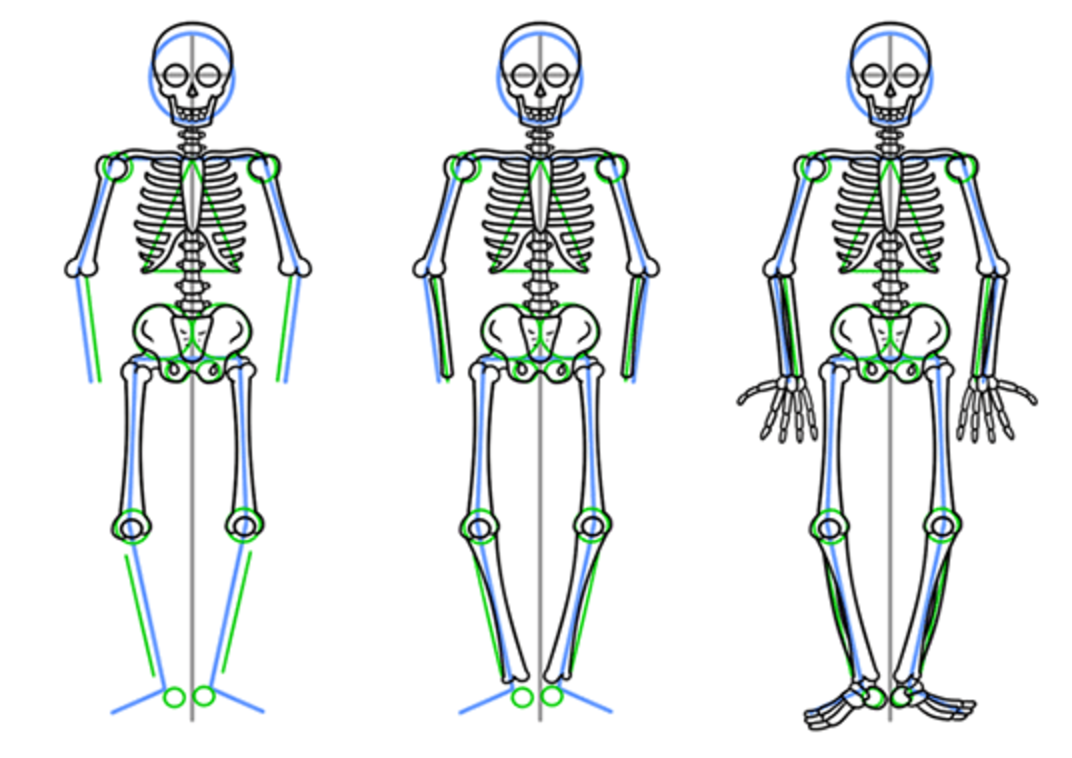
Step 4. To make the drawing natural, it is necessary to remove all the axial (auxiliary) lines with an eraser. At the end, it is desirable to add details to make the skeleton as similar to the real one as possible. For example, in the skull it is necessary to finish the cheekbones, outline in more detail the radius and ulna of the arms, the tibia and fibula of the legs, the connecting joints, carefully draw the hands and feet.
After the final stage, your drawing should resemble this one. If everything worked out, then now you know how to draw a skeleton.
For a thorough mastery of the drawing of a human figure, it is extremely necessary not only to theoretically study the structure of the bone foundations of the human body, but also the ability to competently and correctly depict it graphically.
The external plastic form of the human body is dictated by its internal structure. Therefore, without a clear understanding of the reasons for the change in external forms, it is impossible to convincingly and correctly construct a human figure in a drawing. Otherwise, the process of drawing will be reduced to passive drawing of visible forms and its meaningless repetition. It must be firmly grasped that drawing, in essence, is a continuation of the study of the laws of the structure of the human body. When drawing a person, students must learn the logic of the structure of his body and correctly convey and design the body so that its parts harmoniously combine with each other and with the whole. The study and drawing of the anatomical foundations of the human body should begin with a skeletal frame. The bones of the skeleton serve as a support for all parts of the body, and also protect the internal organs.
Turning to drawing the skeleton, students should be reminded that it is not necessary to draw every bone, they need to know the patterns of the internal structure, that is, it is necessary to master the structural and structural principles of depicting the human skeleton. Many students, when drawing a skeleton, focus too much on individual details, without seeing and not understanding the main thing, copying everything from nature, going so far as to recalculate all the edges, savoring each separately, which is initially unacceptable. When drawing a skeleton, first of all it is necessary to focus on its general constructive form, as if not noticing individual ribs and bones. Such a vision of the form allows students from the very beginning to the end of the drawing to correctly orient themselves in the logic of the constructive construction of the skeleton.
When constructing the human skeleton, it is necessary to use the nodal characteristic points available on it. These points mark the bending points of the joints, joints, edges and bases of individual parts of the skeleton, relying on which you can quickly and correctly solve complex problems when depicting the structure of the skeleton, movements, scale, proportion, as well as perspective contractions of the form.
In order to have a more complete picture of the structure of the human skeleton, it should be drawn from at least three positions, for example: front view, side view, back view or from a three-quarter position in the same order. But, for example, drawing a skeleton three-quarters to the right, there is no need to depict it again from the opposite side, in the same way from the side, and from the back, etc. The whole point of drawing a skeleton from different positions is to obtain complete information about the object being studied and depicted.
When starting to depict the shape of a human skeleton, it is necessary to think about its placement on a sheet of paper, i.e. about the compositional solution. When placing the drawings of the skeleton in three positions, it is necessary to take into account their relative position in relation to each other. This is necessary for the correct organization of the compositional center when depicting an object in various positions. In most cases, as practice shows, students, simplifying their compositional task, place drawings in order, without thinking about the artistic side of things. As a result, each drawing looks separate, in isolation from unity, there is no integrity and organization of the entire drawing on the sheet. Therefore, when drawing a skeleton from various positions, the following should be taken into account. When drawing a front, side and back view, one of the views should be shown slightly larger and with more contrast than the others. In this case, it is desirable to place the main position in the center of the sheet, and the view from the back - on either side.
Place the third position "side view" in such a way that the front part is turned towards the center of the sheet. In a word, all three images should be located so as not to cause a feeling of separation, but rush to the center and at the same time harmoniously balance within the plane of the sheet of paper. In terms of clarity and contrast of the drawing, they should be different, otherwise the drawings will look scattered, there will be no integrity.
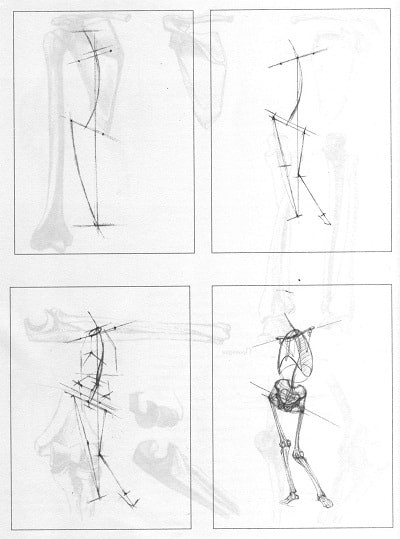
Starting to build a drawing of the shape of the skeleton, first inspect the model, studying it from all sides. Only after that it will be possible to begin work on the construction of the drawing. First you need to outline the main parameters of the shape of the skeleton: height, width, proportional articulation - the levels of the pubic joint, shoulder girdle, head, chest, pelvis, greater trochanter bone, knee joint. Everything related to the proportion of the human body, read in the "Proportions" section.
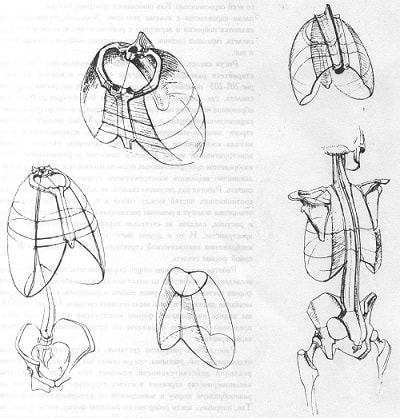
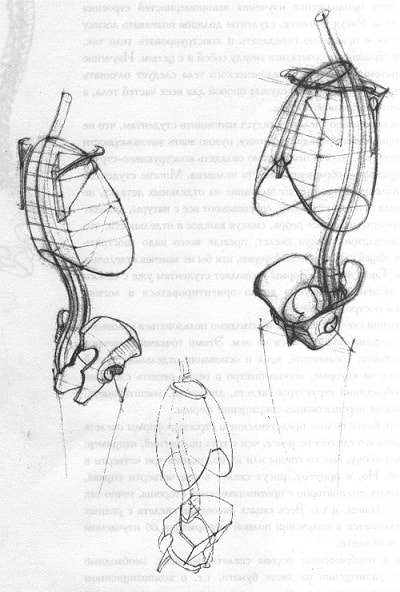
/ Analysis of the construction of a generalized form of the body skeleton structure. The drawings are made according to the method of G.Bammes /
For a more conscious understanding of the structure of the shape of the skeleton, you can consider it without its constituent parts, upper and lower limbs, head with neck, since when examining the skeleton in its usual form, the attention of students is scattered and they poorly master the logic of its structure.
So, a skeleton without upper and lower limbs, as well as a head with a neck, is a torso skeleton. The trunk, in turn, consists of the pelvis, chest and connecting element - the spinal column. As you can see, the body consists of three components. (Simple as that!). Therefore, the drawing should begin with the torso. First you need to draw in the margins a linear diagram of the skeleton of the body in various positions and even in perspective. Don't rush into the rest of the building blocks until you've got the basics out of the way. Gradually, as the work progresses, try to deal with the limbs. As for the head, hands and feet, they will have to be mastered in parallel, with all seriousness. As practice shows, most students do not cope well with such details. A good exercise here are sketches and sketches from anatomical atlases, diagrams, tables, skeletons, plaster casts, as well as from life, starting with your own hands and feet.
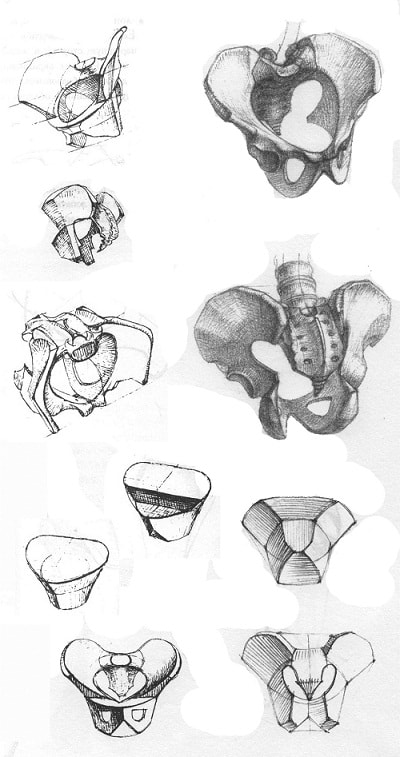
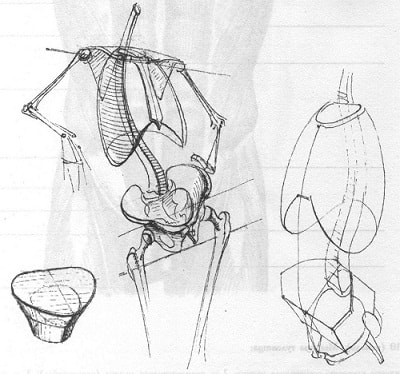
/ Constructive analysis of the shape of the pelvis. The drawings are made according to the method of G.Bammes /
When drawing a skeleton, do not accustom yourself to copying individual edges, but try to understand the logic of the structure of the main form. The figures above show the three-dimensional construction of the skeleton image, where the complex spatial construction of the chest is formed by four main planes, and the design of the shape of the pelvis is rationally generalized and logically built without unnecessary detail, using a strictly linear-constructive method. Using the same method, all the constituent elements of the skeleton are depicted. The linear-constructive method is the most rational way of depicting spatial forms on a plane and allows the most concise expression of the constructive essence of the form and structure of the skeleton. When working on a drawing of a skeleton, do not forget about the proportions of the parts between themselves and with the whole. Properly taken relationships will help in solving the problem. Watching the proportion in the drawing, watch the degree of perspective distortion of shapes in space. Both are of fundamental importance for depicting the anatomical structure of the bones of the skeleton, including the shape of the skeleton itself.
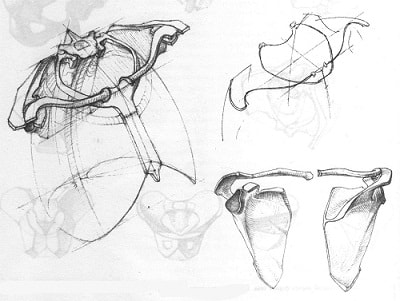
/ Constructive analysis of the shape of the shoulder girdle /
Working on a drawing of the general shape of the skeleton, at the same time, for research purposes, draw a design of the shape of the joints in the margins or on a separate sheet in order to better understand and understand the patterns of the mechanics of the movement of certain bone joints.
When working on a drawing of joints, you should start drawing individual bones, given that drawing, as one of the ways of knowing reality, will help you better understand the patterns of the structure of bone structures. Bones have a wide variety of shapes depending on their functional purpose. So, for example, the bones of the ribs are flat, the bones of the thigh, shoulder, forearm and collarbone are round. Moreover, each long tubular bone consists of a body - the middle part and two thickenings in the area of the joints with noticeable edges, while in the middle part of the body the edges are more softened. On closer examination, it is clear that all round bones somehow have faces, which should be guided by when depicting them. Read more about this in the Plastic Anatomy section.
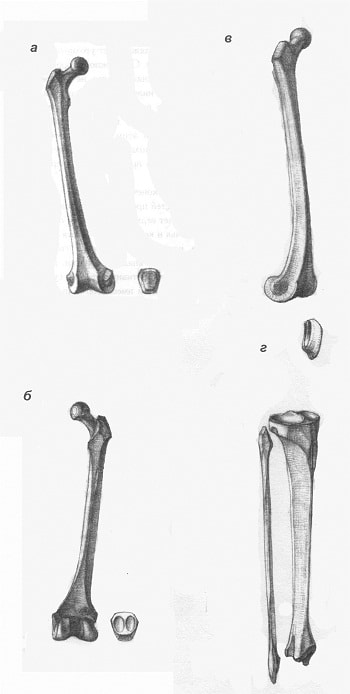
/ Bones of the lower limbs:
a - thigh bone (front view); b- thigh bone (back view); c - general view of the femur; g- patellar cup; d- bones of the lower leg. /
When drawing the human skeleton, drawing the shape of the pelvic bones is equally important. As practice shows, students are often limited only to copying the visible forms of individual bones, without delving into the constructive essence of the structure of the form. To learn how to build the shape of the pelvis, first of all, you need to thoroughly study its structure, directly with a pencil in your hand, making sketches from nature in various positions and angles. At the same time, try to understand the regularity of the structure of the form, do not limit yourself to superficial vision of individual bones.
The complex spatial structure of the pelvis is formed by four main planes, bounded on all sides by specific bones. The shape of the pelvis is formed by three bones: the ilium, pubic and ischium. Behind the pelvis closes the sacrum, which belongs to the spinal column. Two lateral (paired) bones of the pelvis - the iliac and pubic - are connected to each other in front in the pubic fusion, thereby forming a pelvis, which is a closed ring. Merging with each other and representing one solid bone, they, meanwhile (all three), participate in the formation of acetabular cavities, located symmetrically on both sides for connection with the femur.
When drawing the bones of the shoulder girdle, also pay special attention to the patterns of their anatomical structure. The shoulder girdle includes the bones of the scapula and collarbone. The shape of the blade resembles a flat triangle and has two surfaces. Its outer surface has a well-defined awn, going to the outside and ending with the shoulder process - acramion. Next to the acramion, the outer angle of the scapula has a glenoid cavity to form the shoulder joint. Due to its superficial position in the back area, the scapula has a significant impact on the formation of the external shape of the body.
When viewed from the clavicle, it should be noted that it has a curved S-shape when viewed from above and runs in a horizontal direction from the manubrium of the sternum to the humeral process of the scapula. Has a round cross section. The bones of the shoulder girdle do not form a closed ring, but, connecting with their internal endings to the handle of the sternum, form the sternoclavicular joint. Plastically, the clavicle plays an important role in shaping the external shape of the shoulder girdle.
The drawing of the human skeleton must certainly be based on the knowledge of proportions, which, acting in various mathematical relations, express the correctness of the structure of forms. This also applies to drawing the upper and lower limbs. When depicting the upper and lower extremities, special attention should be paid to the nature of the shape of the bones and their proportional relationships.
Due to different functional purposes, the sizes of the lower and upper limbs are different. The difference between these values is clearly visible. Paying attention to the nature of the shape of the bones, carefully follow their structural structure. So, for example, the femur bone, unlike the lateral bones, has a spherical head with a neck and a large trochanter in the upper part. The spherical head, connecting with the acetabulum, forms the hip joint. The middle part of the body of the bone, gradually expanding and somewhat thickening downwards, ends with the articular head. The skeleton of the bone should be depicted as concisely as possible in a linear constructive construction, expressing its constructive essence.
Regarding the structure of the bones of the lower leg, we observe that they, like the bones of the forearm, have a double bone formation: on the inside there is a tibia, and on the outside - a thinner fibula. The tibia, like all bones of the limbs, has heads at its ends. The top head is larger than the bottom head. The middle part of the body of the bone resembles a trihedral prism in cross section.
Particular attention should be paid to the design of the heads. The upper head resembles a five-sided prism and is somewhat close in mass to the adjacent head of the femur. Above their articular joints is a separate bone called the patella. The lower head of the tibia also has a thickening, but its size is half that of the upper one. From the outside, the fibula adjoins it, its upper head does not participate in the formation of the knee joint, while the lower one, attached to the edge of the head of the tibia, together with it forms internal and external protrusions, called ankles, which participate in the formation of the ankle joint . At the same time, it should be noted that the outer ankle is always located somewhat lower than the inner one, which determines the external shape of the joint when drawing from the front and from the back.
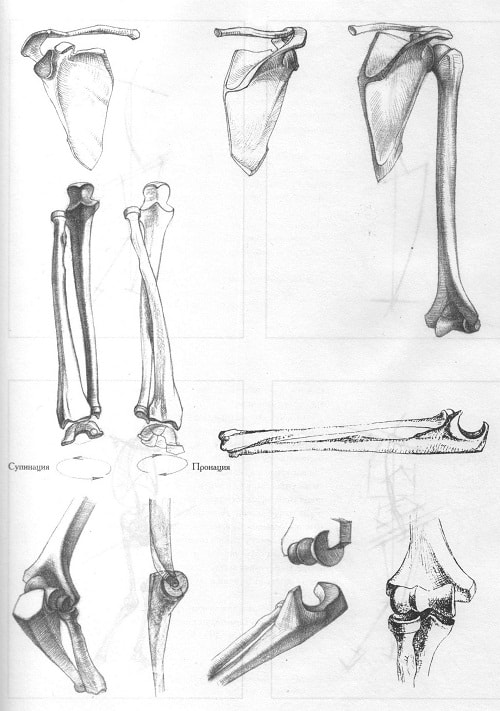
/ Structural and anatomical analysis of the bones of the upper limbs and their joints /
When depicting the bones of the upper limbs, special attention should be paid to the nature of the structure of the bones of the forearm and the heads of the bones of the elbow joint. The skeleton of the upper limb consists of the humerus, two bones of the forearm and the bones of the hand. When drawing the humerus, pay attention to the design of the shape of the head and the design of the glenoid cavity of the scapula belonging to it. Understanding their belonging, it is easier to build a constructive form of articular mechanisms. The lower head of the humerus has the form of a hinged roller for connection with two bones of the forearm - the ulna and the radius. Both of these bones, unlike the humerus, being together, thicken in opposite directions, i.e. the ulna is towards the top, and the radius is towards the bottom, while the proportional size of the heads of each bone is noticeably large.
/ The sequence of execution of the skeleton drawing /
It would be useful to remind you that when drawing a skeleton and its bones, in no case should you accustom yourself to mechanical drawing. This approach is completely unacceptable in the drawing. Therefore, when drawing the skeleton and its bones, try to get to the heart of the matter, seriously analyzing the structure of the anatomical structure of the skeleton, remember its volume-spatial characteristics and the integrity of forms.
In the process of work, do not forget to check your drawings with a full-scale model from time to time. At the same time, keep track of how proportional relationships are determined, perspective cuts are taken into account, and also check the state of the volume-constructive construction of the skeleton drawing.
/ Placing an image on paper /
This section deliberately omits three important skeletal details: the skull, hands, and feet. Given the complex structural structures of these parts, they are presented separately in the sections "Drawing the skull" and "Drawing the limbs. Hands and feet.
Thus, having completed work on the drawing of the human skeleton, having studied the basic anatomical patterns of the structure of bones, one should proceed to the study and drawing of muscle formations.
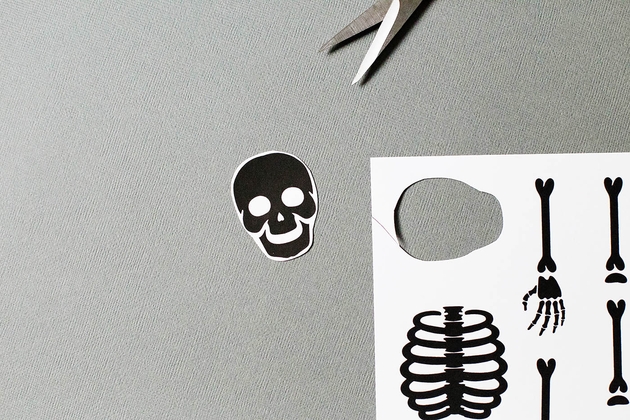
An easy way to learn the structure of the human body is to play the game "Build the Skeleton" with the kids. Focusing on the age of the child, you can complicate / simplify the rules of the game, choose the appropriate picture. We share a simple idea of creating a game with your own hands.
en.wikipedia.org
Find a suitable picture on the Internet and print it on a printer. Cut out individual elements and stick on cardboard (for strength). If desired, you can paste over the parts with tape on both sides.
 allfortheboys.com
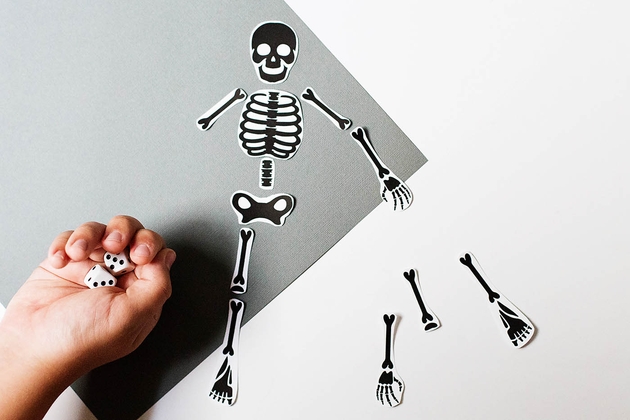
When everything is ready, tell the kid what "spare parts" our skeleton consists of. All bones can be conditionally grouped as follows:
- bones of the head (skull);
- bones of the body (vertebral column, chest);
- bones of the upper limbs (shoulder, forearm, hand);
- bones of the lower extremities (pelvis, thigh, lower leg, foot).
If this information is not enough for your inquisitive little one, study the skeleton in more detail, tell about the functions of each group of bones. Ask the child to move around and observe the work of a particular part of the body.
The adult human skeleton consists of 200-218 bones.
 allfortheboys.com
Game options
There are many game options:
- Just fold the "little man" like a puzzle.
- Hide the details in rice or any other cereal and give the child the opportunity to arrange real "excavations". Imagine with what passion a young paleontologist will collect the skeleton of an ancient man. You can come up with any story and dig up even Darwin himself.
- Play for speed. To do this, you need several printouts (according to the number of players). The sequence of moves is determined by the die. For example, who has more on the bones, he walks. Or who rolled a double on both dice, he has the right to attach one part of the skeleton.
- Play for luck. Print 2 sets and cut out not along the contour, but with simple rectangles. Turn the cards over and draw from the deck. In the process, you can change "spare parts". The one who collects his little man the fastest wins. You can come up with the rules yourself - it's even more interesting.
Cotton bud skeleton


Usually skeletons are drawn for Halloween, a holiday of monsters, ghosts and other wickedness. In this article we will demonstrate how to draw a skeleton, one of the main characters of this holiday, as well as movies and games.
If you already have some experience in drawing people, then this is very good, because skeletons are depicted a little more difficult due to the large number of small elements.
Step by Step Example
This example demonstrates how to draw a skeleton step by step in just 7 steps. So get your drawing supplies ready, let's get started!
The first step is to draw a simple sketch, which will help us further when adding some parts of the body. We depict a sketch with arms, legs and head.
Do not press hard on the pencil, because these lines will eventually be unnecessary and will need to be erased.
Now we are slowly building up the limbs to our sketch. Pay attention to how the lines of the skull go: the top merges with the circle of the sketch, the zygomatic bone extends in a semicircle beyond the edges, and then goes inside the head to the teeth, the jaw consists of angular contours.
We go down below and draw the neck, shoulders and seven ribs on one side and the other. Ribs are perhaps one of the most difficult elements of this pattern. Therefore, you will have to spend a lot of time drawing them.
Now we draw the hands. The upper part consists of one large bone, and the lower part of two thin ones. Then comes a brush consisting of many small elements.
Since the spine is located behind and most of it is not visible behind the chest, we draw only three bones. Then comes the hip bone, which is a bit like an elephant's ears.
We draw the legs, they are depicted from two large bones and a foot.
We erase all auxiliary lines and circles and our drawing is ready!
Cheerful skeleton
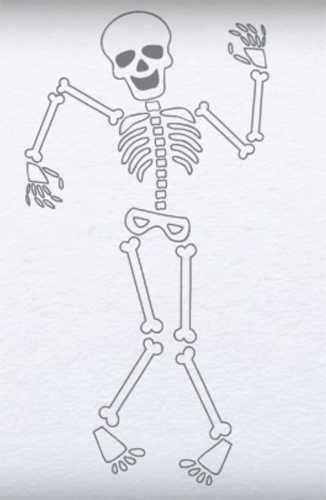
This time, let's look at a fun Halloween option that will show you how to draw a human skeleton. This drawing method is a little easier than the previous one, so it is perfect for beginners or children.
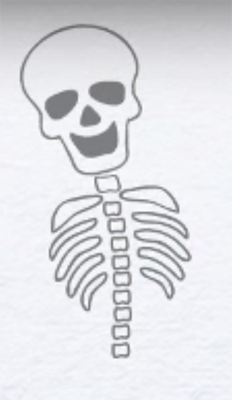
First, let's draw a skull. Let's draw a simple outline of the head. Since the skeletons are only made of bones and they lack all human organs, we will draw the space for the eyes, nose and smiling mouth.

We draw shoulders and a backbone from 10 elements. Since this drawing method is simplified, the chest will not hide part of it, it will be drawn around it.

The chest in total will consist of only eight small bones. They should be slightly banana-shaped and curve towards the bottom. In height, the ribs of the skeleton should end earlier than the spine.
We are working on the legs. Since our character is cheerful, he will dance, so let's make the legs at the knees slightly bent. Let's depict the feet as simply as possible, a narrow trapezoid and four toes in the form of a drop on each leg.
To depict our hero dancing, we bend his arms at the elbows. We raise one up, and lower the other down. The hardest part at this stage is the brushes. To depict it, we need to draw a quadrangle from which fingers consisting of two ovals will grow.
Pencil example
The last example will show us how to draw a skeleton with a pencil and will be perhaps the most difficult and realistic way of drawing within this article. Get your pencil ready, paper and eraser clean, let's get started!
We make the simplest sketch in the form of sticks of the torso, arms and legs. From above, we will draw an even circle, in the place of which a skull will appear in the future.
![]()
We are finalizing our sketch and depicting small details on it, which in the future will turn into elements of the skeleton body.
The sketch is ready and it's time for us to move on to detailing geometric shapes. Let's start at the top and gradually go down. So, we draw the skull, the two upper bones of the arms and the chest. To make the drawing more accurate, be sure to sharpen the pencil before this step.
The spine consists of very small elements, but usually does not cause any difficulties when drawing. But the hip bone may seem difficult to draw, as it has a very unusual shape.
The simplest in this drawing is the legs, as they are depicted from two long bones and a foot.
It's time to finally use the eraser and erase all the auxiliary lines that we no longer need. Also, do not forget to color the drawing in a light color.
Head
And for those who want to learn how to draw a skeleton head, we have prepared a special large article that you can read.
Now we will have a lesson on anatomical drawing. We will learn how to draw a human skeleton. To do this, you must have a minimum of biological knowledge, at least from the course of the school curriculum. Everyone knows that the skeleton is like a frame of the human body. It is made up of bones that are connected to each other by ligaments and joints. And muscles are attached to bones.
All this makes up the musculoskeletal system of a person and forms his appearance. There are a lot of bones in the human skeleton. All of them have their own Latin and Russian names. And each bone has its purpose. Models of human skeletons can be seen in biology classrooms in schools and medical institutions. Let's start drawing this difficult object.
Stage 1. We draw the skeleton on the entire sheet of paper. The estimated lumbar line will be in the middle of the sheet. Therefore, above the middle, we sketch preliminary auxiliary lines of the upper part of the skeleton. And under the middle of the sheet - the same lines of the lower part of the skeleton. So, in the upper part we sketch out two ovals, larger and smaller, and one slightly curved curved line. In a small oval, draw the contours of the skull of the head. We make its frontal part large, show the zygomatic protrusions. The lower jaw is attached to the upper. Next, draw the spinal column. And already under the head we show the first three cervical vertebrae on the spine.

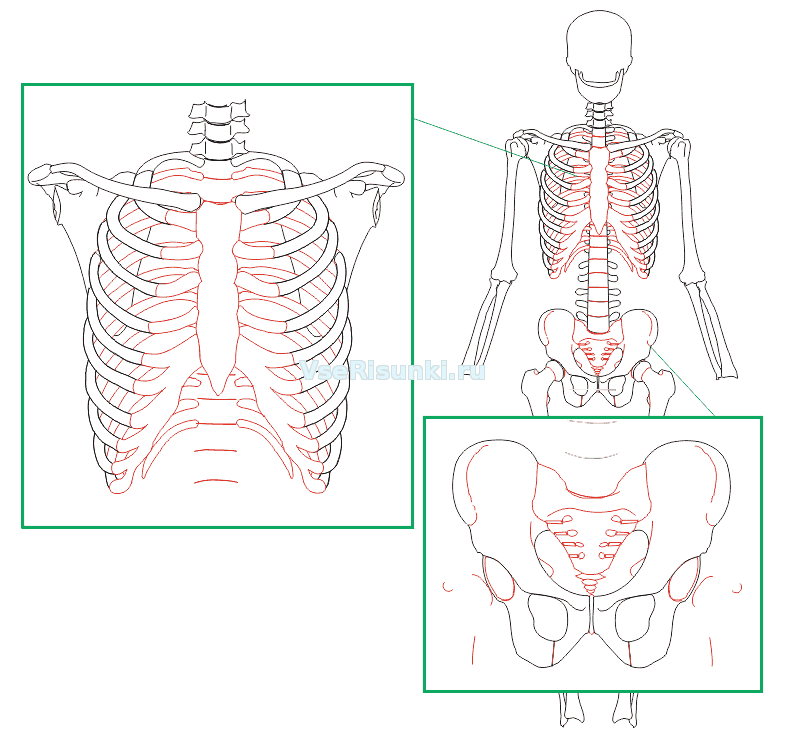
Stage 2. Draw the processes of the vertebrae, on both sides of it. We also show two symmetrically located scapular bones - scapulae. They are drawn under the curve. Next, we make out the chest. On a large oval, draw ribs in both directions. They converge to the central straight spine.
Stage 3. Now draw the pelvic bones. In general, the pelvis is formed by three pairs of pelvic bones that fuse together. We draw the sides of the pelvis on both sides of the lower part of the spinal column. They look like open wings of a butterfly. Then, you need to draw the bones of the limbs. Draw the shoulder and forearm along the lines. This is the skeleton of the arm. And from the pelvis, also in straight lines on both sides, draw the thigh and lower leg. This is the skeleton of a leg. The largest are the femurs.
Stage 4. At this stage, in an enlarged view, the windows show different elements of the skeleton, which still need to be completed more accurately. This is the chest. Here we finish drawing the sternum and the ribs attached to it. And below you need to add a few strokes to the image of the pelvis.
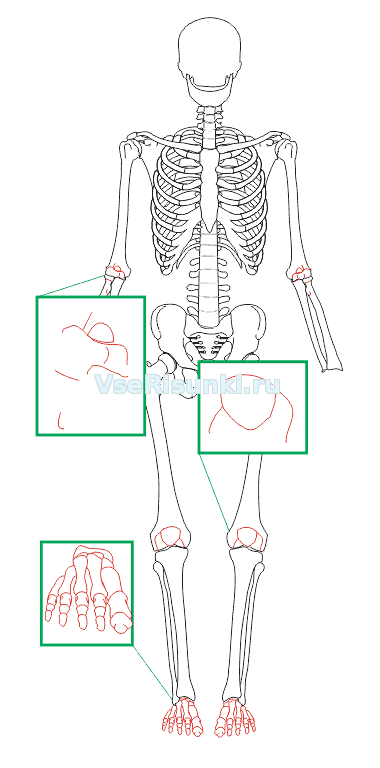
Stage 6. Add the phalanges of the fingers in the skeleton of the hands. On the skull we show the eye sockets, nasal cavity and mouth.
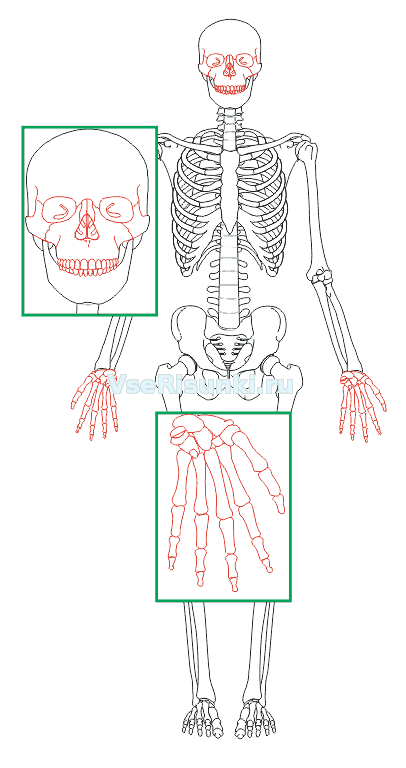
Stage 7. Well, you have completed this difficult lesson! The result was an image of a human skeleton with almost all the details.