A flower from a St.George ribbon with your own hands: how to make a festive symbol yourself. How to make a St. George ribbon from satin ribbons
The symbol of the Victory Day is the St. George ribbon. A beautiful tricolor ribbon is usually worn on clothes and goes to a festive parade and procession. Many people associate a ribbon with orange and black flowers with May 9 and festive events. However, such a familiar accessory can be slightly diversified and decorated in a completely unusual way. We propose to learn how you can easily and simply make a flower from a pre-prepared and purchased St.George ribbon for the festive parade with your own hands.
We make a flower from the St.George ribbon with our own hands: tips and tricks
We bring to your attention a detailed master class on creating a festive symbol with your own hands. In the variant of making a flower described below, the technique of weaving from satin ribbons "kanzashi" will be used. Thanks to an accessible description and demonstration with the help of visual photos of the process of making a victorious accessory, you can cope with it yourself.
To make a flower bud using the kanzashi technique, you will need the following materials and tools:
- A reps ribbon with a St.George coloring, three centimeters wide;
- Satin ribbons with a width of two and a half centimeters in black and orange;
- Glue gun;
- Sharp scissors;
- Special tweezers;
- Lighter or candle;
- Black bead for flower core decoration.
After preparing all the necessary material and tools, start making a flower from a previously purchased St.George ribbon quickly and easily with your own hands.
Using sharp scissors, cut fifteen centimeters of the ribbon. Then fold it at a sharp angle to form the base for your future victory flower. In order for the piece of your ribbon not to crumble and crumble, you should use only very sharp scissors in your work. After cutting through all the edges, it is necessary to process them with a candle flame or lighter. Then your cuts will be strong and will not fall apart when using the St.George ribbon flower.
From the reps St.George ribbon, six segments of seven centimeters in length should be formed. Now each of these individual elements must be bent in the center at right angles. As a result of the manipulations, you will get an unusual triangular shape of a piece of tape. Then bend the workpiece again to form a sharp corner shape.

At the base of your petal, you need to form two symmetrical folds. Now hold the bottom of your leaf with special tweezers and process it with a candle flame or lighter. Heated and melted under the influence of a hot flame, the reps St. George ribbon easily takes the shape and shape necessary for the composition.
To build the structure of your symbolic flower, you will need to form six petals with the same shape. These petals will form the bottom tier of your composition. Rep petals keep their shape perfectly and will not lose their properties even from strong wind or rain.

Now you can start assembling the lower tier of your composition. Each individual element should be glued to the base. All these elements must form in the form of a six-pointed flower. The appearance of your St.George ribbon flower will be better if the elements in the central part are not placed too tightly to each other. Leave a small space between the petals.
Make the same petals from a black satin ribbon. However, to form the elements, use lines of six centimeters in length. Glue all black blanks to the holes of the first tier.

Now form five elements from the orange satin ribbon. Use five centimeters in length to form the petals. By gradually decreasing the length of the cuts of each color, smaller petals are created. And in this case, when assembling a flower, all layers are visible.
Orange elements are glued in the shape of a star, that is, one petal will be directed upwards, while the others look sideways in pairs.
Cut twenty-five centimeters from the St.George ribbon, and create a loop-shaped element. On top of it, glue the previously created flower from ribbons.

For convenient fixation and wearing of the finished product, it is necessary to turn the work over and glue the brooch base or a large pin to the back side.
A selection of videos on the topic of the article
We bring to your attention a small selection of videos on the process of making flowers.
In this master class, we will make kanzashi jewelry for the St.George ribbon. For work, you can use thinner ribbons or fabric, but it is more convenient to try and train on wide satin ribbons.
To connect the parts, we will use hot glue (you can sew or use glue moment).
Option 1: Simple round kanzashi petal.
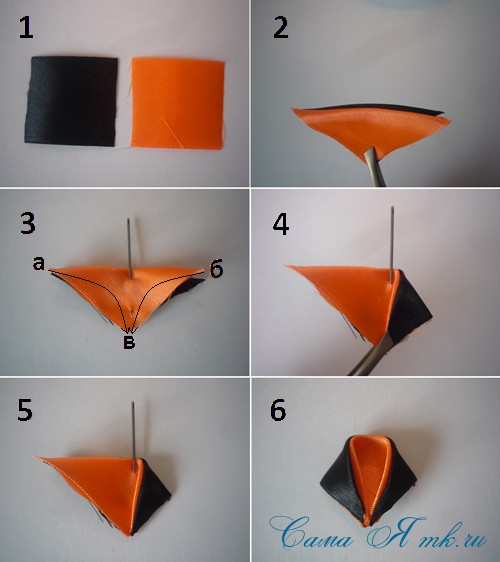
1. Cut squares from an orange satin ribbon. We will make 7-8 round petals from them.
2. Fold the square diagonally.
3. Then we bend the corners of the triangle to the top as shown in the photo.
4. It is more convenient (for a beginner) to do it in turn.
5. First, we seal one side over the fire.
6. And then the second is similar.
7. This is how it should turn out.
8. Fold the resulting part in half, that is, with the corners back.
9. Cut off the corners.
10.Solder the bottom cuts separately.

Front and back view of the petal ...

We make the required number of petals. For a flower you need 7-8 pieces. You can fold it the way I did it, or you can do it in any other way. I fix it with a hot glue gun.
We fix it with hot glue on a small circle of dense black felt so that the flower does not bend in the center, we attach any suitable decoration in the middle.

We fix it on the St.George ribbon and fix the brooch base with hot glue.


Option 2: double round kanzashi petal.
In addition, you will need: sharp scissors, a candle, a small piece of black felt, a brooch base, an ornament for the middle and a St. George's ribbon.
We use hot glue to connect the parts (you can sew or use glue moment).
2. Fold them diagonally and lay them on top of each other as shown in the photo. For convenience, you can use a needle.
3. Bend the side corners to the lower corner (shown by arrows). It is more convenient to take turns.
4. First one.
5. We seal the seam on the candle.
6. Then the second is similar.
I seal the seams, it seems more convenient to me. If you only solder the corners, then pre-process the edges of the squares on the candle.
7. Fold the resulting part in half, that is, with the corners back. You can solder the base of the petal on the candle a little.
8. Cut off the corners.
9. Solder the bottom cuts separately. 
Front and back view of the petal ...

If you solder the lower cuts together, you get another version of the petal, but, in my opinion, no less interesting.

We connect 7 petals together on a small circle of felt, decorate the middle.
We fasten the St. George ribbon and the brooch base ...


Option 3: A simple, sharp kanzashi petal.
Materials: satin ribbon 4-5 cm wide.
1. Cut the squares from the satin ribbon. We start making sharp petals.
2. Fold the square diagonally.
3. Let's add it up again.
4. Connect the corners again.

5. Weld the base of the petal well.
6. Cut off the corner.
7. We process the cut on fire.

Front and back view of the petal ...

In a similar way, we make the required number of petals of the desired color.
Option 4: Double sharp kanzashi petal.
Materials: satin ribbon 4-5 cm wide in two colors.
Additionally you will need: sharp scissors, a candle, a base brooch, any jewelry and a St. George ribbon.
1. Cut off two squares of different colors from the satin ribbon.
2. Fold them diagonally and lay them on top of each other as shown in the photo.
3. Draw each corner in turn to the opposite corner of the resulting figure.
4. Here's what you should get.

5. Fold to the middle and weld the base of the petal well so that it does not disintegrate.
6.Cut off the corner.
7. We process the cut on fire.

This is what the finished double petal looks like.

We make the required number of petals. Can be folded "spikelet" or in any other way. I fix it with a hot glue gun.
We fix it on the St.George ribbon and fasten the brooch base.


Option 5: Triple sharp kanzashi petal.
The triple kanzashi petal can be made in two ways: combine single and double petals, or in turn solder each petal to the previous one. In the second case, the petal will be smoother.

Or each petal separately ...

We make the required number of petals, sew or assemble with hot glue ...


An original decoration for clothes for you or as a gift for Victory Day for family and friends is ready!
Create with pleasure!
I was glad to help!
On Victory Day, in small towns, remote villages, megalopolises of our Motherland, you can see thousands of people, on whose chest flaunts the symbol of courage and heroism of Russian soldiers and officers - the St. George ribbon. This is not just a tribute to fashion, it is a respectful admiration for the memory of the fighters who defended Russia.
The St. George ribbon is a two-color element of the award of the Order of St. George, established in the 18th century by Empress Catherine II for the courage and services of soldiers to the Fatherland. For the first time, St. George's bows appeared on the May streets of our country in 2005 and since then have become an integral part of the celebrations in honor of Victory Day.
Flower from the St.George ribbon with your own hands
Every year on May 9, Russians go out to a festive parade, gags on clothes with an orange and black ribbon. If you want to have a personal symbol of connection with heroic ancestors, make a flower from a traditional ribbon, decorating it with decorative elements to your liking.
Materials and tools for work
- A piece of St. George's ribbon, about a meter. Sold in handicraft departments.
- Moment glue or hot glue gun. Grips quickly, holds tight.
- Metal pin clasp. You can take from an old brooch or buy in household goods.
- Small things for decoration: shiny beads, buttons, badges.
- Matches or lighter, scissors.
Flower making process
You will make a flower from a St. George ribbon quickly if you follow our advice.
- Cut seven 5 x 2.5 cm rectangles from the ribbon - these are the petals of the future flower.
- Bend the corners of the rectangle on the wider side to form a triangle. Fold this shape in half again.
- Unfold the part with the fold up and fold the bottom corner to the fold. Do the same on the reverse side.
- Light a match and melt the ribbon cuts. This will hold the sides of the petal together and prevent them from falling apart. Spread out the part.
- Fasten all the petals in a circle with glue, forming a flower. Attach a bead or button in the middle of the rim.

Making the base for the flower
Take a ribbon with a length of 25 cm, fold it, criss-crossing the strips of fabric. Fasten the fold and glue the resulting flower on top. Flip the workpiece over and pin the pin. Do not forget to cut off the edges of the tape with a bird.
For reliability, you can cut out a circle from black felt, less than a flower by 1 cm, and glue petals on it. And then fasten the resulting brooch with a pistol on the St.George ribbon.


Flower-medallion from the St.George ribbon
Take 40 cm of tape and cut it in half. Using a needle, cast one piece of tape per thread. Pull it with an accordion, form an unblown tulip. Fold the remaining tape in two and sew the bud to it. Secure the locket with a pin to your clothing.

Flower-brooch from the St.George ribbon
And this way of making an attribute is even simpler. You will need: a two-color ribbon, a thick sheet of paper, scissors, thread with a needle, a button, a clasp.
Cut a circle out of paper the size of a future flower. Sew the tape - 20 cm by hand in the middle, assemble it in small assemblies, glue it on a circle in the shape of a flower. Insert an army button in the middle. Glue the brooch to the material. Attach the clasp to the back of the ribbon.

Decorate a buttonhole, a bouquet of carnations, a handbag, a car with such cute flowers. Or present your craft to any elderly person you meet on the street, congratulating him on the holiday and wishing him good health.
The St. George commemorative ribbon is a popular attribute of May. Everyone associates this most blooming month of the year with the Great Victory, with the gray hair of humble veterans who have done an invaluable feat for our and future generations. To honor those who are still alive, to honor the memory of those who are no longer with us, we march in the Parade, we take part in the Immortal Regiment action. And St. George's ribbon is a thin thread that unites people of the future and the past, whole generations.
This master class tells how to make an elegant St. George ribbon with a hand-made kanzashi flower. The accessory will turn out to be beautiful and impressive. To decorate the brooch, you should prepare a black-orange marshmallow and oval pointed petals.
To make a kanzashi brooch you will need:
- 1 piece of St. George (black-orange) ribbon - 2.5 * 16 cm;
- 8 pieces of St. George (black-orange) ribbon - 2.5 * 7 cm;
- 8 pieces of orange satin ribbon - 5 * 5 cm;
- 8 pieces of deep black satin ribbon - 5 * 5 cm;
- black felt base - 4 cm in diameter (for St. George's petals);
- black felt base - 3 cm in diameter (under the central black-orange marshmallow);
- felt rectangle (under the pin);
- hugger 2 cm - 1 element;
- black half-bead 1.4 cm - 1 element.
How to make a brooch by May 9 in stages:
The bottom layer of the flower will be made of pointed petals, which will take a St. George (rep) ribbon measuring 2.5 cm by 7 cm.To make all the petals, you should prepare 8 identical cuts. Then singe them if necessary for a neat operation. Bend each strip at a right angle to mark the middle. Remember that reps are much denser than atlas, but easier to work with.

Then bend the resulting angle diagonally, combining the two processes, clearly joining the strips. You will end up with an acute-angled detail, on one side of which you will see a pocket. This side will become the back of the petal, turn the blank side towards you. At the bottom of the petal, weld the rep ends and make folds. Striped petals are all done using this technique.

Take a longer St. George ribbon, but the same width. The parameters of the segment are 2.5 cm by 16. Bend, but not at a right angle, but at an acute angle to get the base of the brooch. Prepare a larger black felt circle. For the bottom layer of the flower, 8 striped rep petals should be ready.

Glue all the petals into a flower, make a felt circle as the base. Next, glue the resulting blank onto a large loop. The lower part of the brooch is ready.

Move on to the second part of the work. To make an elegant central marshmallow, prepare orange and black satin squares with a side of 5 cm. Fold the details diagonally.

Pin the black triangle to the orange one (align them clearly over the entire surface). Bend two sharp corners in the resulting multi-layer workpiece. There should be a gap in the center.

Cut the place in the combined tape where all the corners meet, backing off by about 0.5 cm. Then bend the rest, making a fold clearly along the side corners. Bend the resulting triangle in height, combining sharp corners and splitting the central slit, revealing a black ribbon. Glue the corners with a flame.

Prepare 8 identical bright marshmallow tubes. And also at this stage you will need a hugger with a black half-bead.

Glue the marshmallow, glue the core in the center. All parts are glued to a small black felt circle.

Prepare a felt rectangle with a pin.

Residents of Russia celebrate Victory Day every year, paying tribute and respect to the Red Army, which broke the back of the Nazi regime. On this special day, it is customary to wear the St.George ribbon. Someone even wears this symbol all year round, it all depends on the desire of the person. Now there is an opportunity to buy a ready-made version of a folded tape in a trade pavilion, but you can learn how to fold it yourself. In this regard, the question arises, how to tie the St. George ribbon?
How to wear a St.George ribbon on clothes
To understand how to make a St. George ribbon, you need to familiarize yourself with the history of the symbol. The commemorative ribbon was created not just for fashion and style, it carries a deep meaning. Unfortunately, many young people still do not know the history of the creation of the ribbon.
Now it's not so easy to understand the history, especially when this sign appeared. There is a category of people who believe that the ribbon arose during the time of the Russian Empire. As a rule, it was worn by the military. The symbol itself was initially yellow, but after some time it was repainted orange. So, in the end, the already familiar St. George ribbon with orange stripes on a dark background appeared. It was proudly worn on the chest by the troops of Imperial Russia. They knew exactly how to properly wear the St.George ribbon on their clothes.

It is no secret that most citizens associate the black and orange ribbon with the symbol of victory in the Second World War. It was in 1945 that the Soviet army won a victory over the Nazis. Since then, first in the USSR, and then in Russia, every year on May 9, they celebrate a great victory. Despite the fact that more than half a century has passed, Russians still remember those memorable events, because in every family there is a hero who gave his life so that the homeland would go to children. Therefore, on May 9, citizens of the Russian Federation put on the St. George ribbon to express their respect and gratitude to the defenders of the country.
If you look further in history, you can learn that in the early 1940s, the People's Committee of the Navy proposed to approve the colors of the breastplate for sailors. This symbol was similar to the St. George ribbon. However, there are sources that claim that in 1710 many ships for military merit hung out a flag similar to the St. George ribbon. This feature indicated that the ship received a guard status.
As for the Victory Day in 1945, all participants in the hostilities received awards with the title "For Victory". This medal was trimmed on all sides with black and orange fabric.
How beautiful to tie a St.George ribbon?
A few days before May 9, many Russians lose ribbons or simply do not know how to make a St. George ribbon with their own hands so that it looks festive. It is worth noting that many people may know how to tie a St. George ribbon, but they may not understand the whole scheme.
First of all, you need to tie the fabric in the form of a bow or make it with a regular loop. It is possible that it will be necessary to learn how to do this, not everyone succeeds the first time.
Techniques for tying a St.George ribbon:
- How to tie a St. George ribbon? If a person has never tied bows before, then you can experiment by buying a meter of satin ribbon. The main thing is that the ribbon is black and orange.
- For convenience, lay out the fabric on a flat surface and make a loop out of it.
- After that, you need to do the same with the second end of the ribbon.
- Finally, cross the ends of the fabric and secure them with a pin.
How to fold the St.George ribbon beautifully? There is nothing difficult in this, since this method of tying is considered the easiest. People tie a ribbon like this when they wear it on a daily basis. Even a schoolboy can cope with this task, because it does not require special skills.
How to make a bow from a St.George ribbon? There is another way to tie a ribbon on a bow:
- To make a bow from a St. George ribbon with your own hands, you first need to create an ordinary ribbon bow.
- For these actions, you need a black elastic band. This thing serves as a fastener for the bow. As a result, the result may surprise with beauty, grace and reliability.
How beautiful it is to fold the St.George ribbon so that the bow is appropriate. For example, a badge does not always look good on a person with a presentable appearance, especially if the bow is pinned to the chest.
In this case, an option is provided in the form of a loop:
- To easily handle the ribbon, you need to put it on the table and then fold it in half.
- Tighten one end a little to make it shorter than the other.
- Then it is worth pulling a little to the side, creating the letter "G".
- The upper end of the ribbon should be pulled again, forming a loop.
Methods for tying a St.George ribbon
How to tie a St.George ribbon diagram? To date, many options for tying a ribbon have been invented. Although you will have to spend a lot of time to get it right.
You can learn how to make a ribbon in the form of a "butterfly", which is attached to the neck:
- It is worth noting that it is inconvenient to tie a ribbon around your neck, so it is better to experiment on some large toy. Even a regular cup will do.
- At the very beginning, it is worth making one end of the tape shorter than the other.
- When crossing the ends of the tape, you want the long end to be on top.
- Then make a loop by folding the short section in half. The result is a nice bow.
- Then again the long end should be passed through the loop so that it is on top.
- At the very end, you need to pull both ends in different directions.
How beautiful to fold the St.George ribbon in a bow
There is also a fun way to tie a holiday ribbon. A ribbon folded in a pentagon will decorate any formal suit. In addition, this option is considered very reliable and durable, since the tape stays in the same state for a super long time.
- You need to fold the tape so that one end is wrapped around your fingers.
- Then we thread one end of the ribbon, turning it in the opposite direction.
- We flatten both ends by tightening them tightly.
- You can trim the ends if necessary. However, do not singe them, the ribbon may lose its natural beauty.
Now, how to make a bow from a St. George ribbon will not be difficult for anyone, the main thing is patience and diligence. But there are also a few more things to consider. For example, on May 9, the St.George ribbon is worn on the chest on the left side, where the heart is. But don't be surprised if someone chooses to tie it around an arm or strap it over clothing. Also, do not forget that the St.George ribbon was not created for flaunting in front of others. This symbol personifies the feat of our ancestors, so this sign must be respected.
1 of 5
