Sew soft slippers with your own hands patterns. How to sew slippers with your own hands: patterns and instructions
In this master class I want to show how you can sew comfortable, soft, cute children's slippers. Children will love to wear these slippers in cool weather. The pattern is given for a child of 2 years.
I used velsoft for the base material (you can replace it with fleece, insulated footer, and so on), I took ordinary knitwear for the inside of the slippers. Sole - artificial suede, which will be insulated with batting.

We will need: two parts of the main fabric, two parts of the lining fabric.
On the sole: two parts in faux suede, two parts in batting, two parts in knitwear.
For the ears we need: four parts from velsoft, four parts from knitwear.
And two pieces of jersey for ponytails.

Let's start sewing with the ears. We take a pattern of ears and transfer to knitwear. Then we apply the jersey to the velsoft with the right sides inward, fasten it with pins and lay the line.

Trim seam allowances and turn inside out.

Here's what should happen:

We take the upper part of the base. We mark the line of the middle of the upper edge.
We fix our ears with pins to this middle.

We take the lining, apply it to the base with the right sides to each other and fix it with pins. Lay a line along the top edge. Do not forget to connect the lines of the middle of the upper edge. Stitched, trimmed seam allowances.

We take our future slippers, fold in half with the front sides inward and grind the back. Don't forget to trim the seam allowances.

Prepare the sole. We take a batting to it we apply a sole made of artificial suede.
We fix with pins, lay a line along the edge.

Now we take our future slippers. We fix with pins the base of velsoft and the sole of artificial suede.
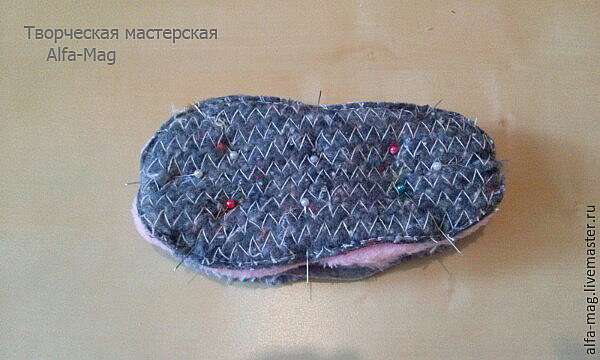
We grind. Trim the seam allowances.

We also do lining. Just do not forget to leave a hole about 5 cm. We will turn our slippers through it.

We stitched, trimmed the seam allowances and turned our slippers inside out.


The hole is closed with a hidden seam.

We insert the inner part of the lining into the base.
We make eyes for our bunny. We mark the location of the eye and sew on the beads. The eyes are ready.

For the spout, I took bright pink floss threads. Made a nose.

We made two pom-poms for the ponytails. Sewn to slippers.


We received such beautiful children's slippers!


Slippers - moccasins
The Indians sewed similar slippers - shoes for themselves and called them moccasins.
Slippers are made of felt or leather.
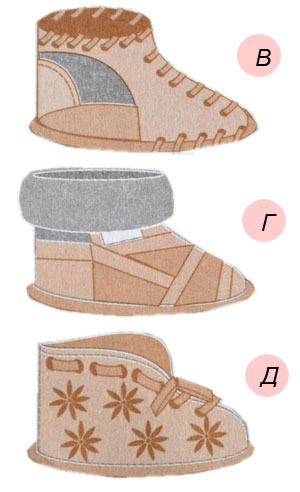
Two old felt hats can be used as felt. Soak hats overnight in water. When the felt is soft, straighten it and stretch it well (don't overdo it so as not to tear) by spreading it out on a flat surface. After it dries, cut out patterns for the right and left legs from it (Fig. A) according to the size of the foot you need. Side stripes of slippers, for which in fig. "a" is the width of 60mm, the baby slipper will have 40mm.
First, make a pattern out of paper, check all the dimensions again and redraw it on felt or on leather. Don't forget to cut out the tongue (fig. b). With a punch, punch holes in both slippers and tongues according to fig. "a" and "b". Sheathe them with thin strips of leather or felt of a different color (fig. c). Stitch the heel first, then the toe. Sew on the tongue when sewing the sock. It can be decorated with a pattern or embroidery (drawings with acrylic or special paints on the skin - on leather slippers, embroidery - on felt slippers) (Fig. d).
Nowadays, many people have problems with shoes, including home shoes. That is, people cannot buy comfortable slippers or slippers at home. But the legs after work or study so need rest. Therefore, we asked ourselves the question: how to sew home slippers.
And not just indoor slippers, but the original model. How to make slippers with your own hands in the form of Mice and Dogs - see the master classes. In addition, here you will find patterns for slippers of any size, from 36 to 45.
Such original slippers, similar to mice, are quick and easy to sew. Before sewing slippers, let's look for material for them. What can be taken as a sole: the tops of old boots or boots, leather from an old bag, fabric from an old backpack or briefcase, suede or thick cloth.
Take an inventory of old things - and you will surely find something suitable for sewing slippers. According to the principle of our master class, you can sew both children's and adult slippers.

“Ears” can be removed or made smaller and sharper - then it will turn out not to be a Mouse, but a Cat. Even a beginner seamstress can sew such slippers. If you don’t have a sewing machine, sew on your hands, with a “needle forward” seam.
For work you will need:
- A piece of dense fabric (cloth, denim, felt, drape, corduroy, and so on).
- A piece of leather for the sole.
- Foam rubber or batting (you can cut a synthetic winterizer from an old jacket).
- Needle, kapron threads.
- Threads for embroidery.
- Fleece or artificial fur for the insole and lining of slippers.
- Paper, pencil.
- Tailor's pins.
In order to sew slippers with your own hands - you need a pattern. To do this, we take our most comfortable and wide shoes or the shoes of a child, in this case a clog, put the shoe on paper and trace the sole with a pencil.


We take a sheet of paper and wrap it over the shoe. Trace around with a pencil and cut out the top of the template.


So, we cut out: 2 blue parts from cloth or fabric for the top, 2 white parts from fleece for the inside of the top, 2 parts from fleece for the insole, 2 children. for the sole, 4 blue parts for the ears (here you can choose from a larger and smaller version of the ears). Do not forget 0.7-1 cm - allowances for seams. In addition to these parts, you need to cut 2 parts from foam rubber for the sole.

We sew the ears - we sew them with small stitches with a contrasting thread.

Then we embroider the “muzzle” of the Mouse, cut out the nose from the fabric, sew on beads or buttons instead of eyes.


The ears need to be folded at the base as shown in the photo, and stitched with a few stitches. On top of our design we impose a white piece of fleece face to face. Then both parts are sewn, retreating 1 cm from the edge. We sewed the insole and upper together. Now you need to sew the sole.


We sew and stitch along the edges, stepping back from the cuts 0.7-1 cm. We leave the bottom not stitched - we still need to insert foam rubber here.

Then, turn the slippers inside out. It remains only to insert foam rubber or batting inside. To do this, we take our 2 parts, cut out of foam rubber using a stencil, and insert them inside the slippers.

Holding the foam rubber, we fasten the heel with pins and carefully sew the remaining unsewn piece of the sole. Homemade slippers, sewn with your own hands - ready. If you like it, you can sew slippers with different ears: with round ones - like bears, long ones - like bunnies, wide ones - like dogs.
Slippers Dogs - mk
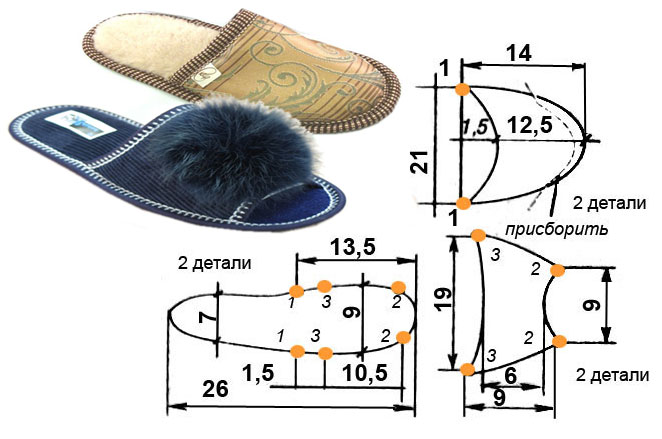
The second option for self-sewn slippers is Dog slippers. The pattern is suitable for sizes 35 and 37. When you cut the upper part of the shoe, pay attention to the width of the part (it seems to us that the width needs to be reduced by 1-2 cm). However, everything is very individual - many people like loose shoes.

On the diagram, the 35th size is indicated in red, and the 37th is marked in black, the slippers of the 35th size have open toes. Do-it-yourself dog slippers differ from previous slippers in that here the firmware goes along the top of the product.
For work we need:
- Fabric for the insole (cotton, coarse calico, bike, and so on)
- A strip of fabric for finishing.
- Narrow ribbon for bows.
- Sintepon.
- Sole made of leather, leatherette, cloth, suede, etc.
- Paper, ruler, pencil.
- Scissors.
- Nylon threads and thread for embroidery.

We will start the master class with the manufacture of a stencil. On sheet A4, we outline the points of the pattern and draw the details of the desired size. Cut out a paper stencil. We impose a stencil on the fabric, folding the fabric in 2 times. We need 4 parts for the insoles. Please note the details are different.

You will get 2 parts of the left, and 2 parts of the right slipper. And according to the same pattern, we cut out 2 parts from the padding polyester. We fold the blanks as in the photo, in the middle - a synthetic winterizer.

We chip off with pins and sew on a typewriter or manually.


We sew the sole to the workpiece, stepping back from the edge of 0.5-0.7 cm.

Cut out 4 top pieces according to the template. Fold inside out. We make out the “nose” and stitch it in a circle at a distance of 0.5 cm from the edge of the part.

We sew on buttons - eyes, we make out the upper cut with a strip of fabric.

We apply the finished top to the insole, pin it with pins and try it on the leg. If the depth of the top suits, we sew it around at a distance of 0.5-0.7 cm.

We cut out the ears arbitrarily - 4 identical parts. Sew around.

Sew the ears to both sides of the top. Embroider the mouth with colored thread.

The product is ready. You can decorate the ears with bows.

Ready-made patterns of slippers for all sizes

Patterns for sizes from 36 to 45, you do not need to add allowances for the seams.


If you like to make original and unusual bags, covers, mittens and other products with your own hands, then making homemade slippers will not be difficult for you. Moreover, you can sew slippers, warm children's boots, uggs from any materials at hand, for example, from an old sheepskin coat or tops of women's leather boots.
Do not forget that old things, clothes, shoes are free material for sewing new clothes and needlework. See What can be sewn from the old.
This article provides two types of patterns for slippers, as well as the technology for their tailoring. Advice is given from what and how to make home slippers, warm children's boots with your own hands.
To make a pattern of flip-flops with an open toe or a closed one, take a piece of paper and trace the outline of your foot. You can take old slippers (without a heel) of a suitable size, put them on paper and outline the sole.
If you draw your leg on paper, it is better if it is in a sock or stocking and it is advisable to sit on a chair to reduce the load on the foot. Then there will be no distortion in the size of future slippers on the pattern.
Outline the outline of the foot, and then check it. To do this, measure the distance from the edge of the thumb to the heel with a measuring tape or ruler. This value should correspond to the size of your shoes, for example, for size 43 shoes, this distance will be 28 cm with an error of half a centimeter.
To build a pattern of slippers, you can use the above calculations, fitting them to your size. If you have slippers of the style you need, and you would like to sew exactly the same ones with your own hands, then it is not necessary to build this pattern.
Wrap the top of the slippers tightly with paper or cloth, draw the outline of this part with a pencil or felt-tip pen and give allowances for the seams. After that, you can cut out this part, attach it again to the top of the slippers and check if it exactly follows its contour. Correct if necessary.
2. What can you make slippers from
For sewing home slippers, you need to use various materials. The right and left parts of the bottom of the sole are cut from shoe leather, split leather, leatherette. Insoles (the upper part of the soles of slippers) are made of split leather, suede or cloth. There should be another padding between the insole and the sole. Usually it is cut out of cardboard and batting (a synthetic winterizer, thin foam rubber is also suitable).
The details of the top of the slippers are cut from leather and lining, they can also be duplicated with soft pads, then quilted.
If the top of the slippers consists of two halves, grind them off or connect them with a braid. They are glued with a gasket and a lining, edging or braiding the cuts (closed slippers have one cut, open slippers have two). Then a decorative finish is performed.
3. Threads and tools

In order to sew durable slippers, you need to use special extra strong threads. For sewing slippers, cotton threads in 6,9,12 additions No. 30, 40, 50 are suitable. Cotton-lavsan threads No. 44 LH-1, 65 LH-1 or lavsan threads No. 22 L, 33 L, 55 L, 90 L. For stitching parts the top of the slippers is best suited for nylon threads No. 65 K, 95 K. For stitching the sole, stronger nylon threads No. 470 K, 565 K are needed.

The details of the top, the edging of the cuts can be done on a sewing machine, but you will have to manually sew the top and piping to the sole. Therefore, purchase a special awl in the hardware store. With it, you can sew strong and durable slippers from any materials.
After the pattern of the sole and top of the slippers is ready, you can start cutting out the details. When cutting the soles, give an allowance for processing the edge of 0.5 cm.
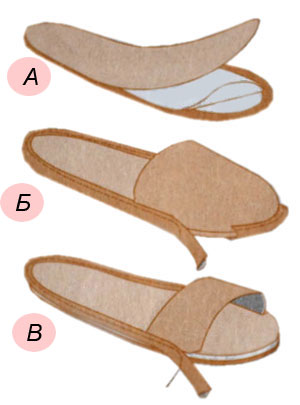
The gasket pattern is reduced by 0.7 cm along the entire contour so that the gaskets do not unnecessarily thicken the seam. Glue soles cut out of leather, cardboard, batting, split leather and trim the edges evenly (Fig. A).
Glue the sole along the edge with the top of the slippers with the seam outward (Fig. B), aligning the control marks. On a closed model, the excess length of the upper part is pre-fitted along the toe. If with a closed top you can allow some freedom for the leg, then in the model with an open toe, you need to adjust the length of the upper part so that it fits snugly around the leg.
The top is connected to the sole with an edge braid, piping, straight stitching. The welt can be made in the form of a piping or an overlay along the edge of the sole from a narrow leather strip (Fig. B). The seam can be closed with a decorative braid woven from thin leather straps, cords, ribbons, etc. To fix the finishing elements, you can use glue gun for needlework.
As in any work with paired products, operations are performed simultaneously on one and the other slipper.
5. How to make a pattern of warm house boots
 For those who prefer warmer indoor boots to slippers with an open back, the work is more difficult. You already know how to make a sole pattern, just outline the leg and add a seam allowance along the contour. But to make a pattern for the top of such slippers (such as uggs), complex calculations are needed. Therefore, we will use the better method of "wrapping".
 Since home shoes do not require a snug fit to the foot, but rather the opposite, shoes or boots with flat soles may well serve as a template for removing the pattern of the upper part and further modeling.
First you need to wrinkle the paper so that it is better laid out on the convex surface of the shoe. Then wrap it around your chosen shoe or leg. Wrapping the leg is not very convenient, but the pattern is more accurate. If you are satisfied with loose and spacious boots, then use shoes for the template.
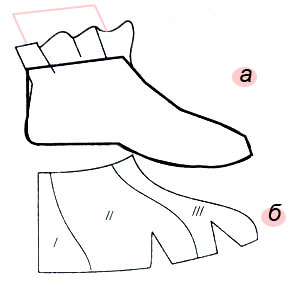
While wrapping the template, you can lay folds, fixing them with glue or paper tape, pins. Outline the connection line with the sole, the middle line along the front of the boot and along the heel, the contour of the upper edge of the boots (Fig. a).
Peel off the paper (without splitting the pins) if it does not lie flat. Notches are made along the line of connection with the sole in the toe area, the pattern lines are adjusted. The resulting pattern can be divided into several parts, depending on the model you have developed (Fig. b).
6. What and how to make homemade boots
The details of the top of home boots made of leather, split leather, felt, thick cloth, leather set (from different pieces of leather) are cut. The details of the top can include pieces of tapestry, velveteen, cloth, fur. Do not forget about 0.5-0.7cm seam allowances.
According to the same patterns, the lining is cut out, using split leather, cloth, baize, woolen knitwear, and fur for it.
Stitch the top and lining separately. So that the backs do not crumple, a leather heel is attached to the lining inside the boot. Along the edge of the boots, the lining is connected to the upper part with an inner seam, then turned right side out, and a reinforcing stitch is given.
The edges of the neckline can be processed with braid or edging strip of leather, leather braidif the lining is made of split leather, fur or knitted lapels (Fig. D).
Fasten the upper part of the boot to the sole in the same way as slippers, fitting the upper part in the toe and a little in the heel area. The seam is laid from toe to heel in both directions. If you attach in a circle, then due to the fit, the shape of the boot may be deformed, warped in one direction.
If the circumference of the upper part of the boot turned out to be larger than the soles, then the excess is taken into the heel seam.
So that children's home boots do not fall off the child during active movements, sew ties to them or pull them off with a strap pulled through the holes punched in the upper part. If the lining is made of fabric, then put metal blocks in the holes.
It is not difficult to make such slippers from felt or coarse cloth, suede with your own hands. To do this, you just need to remove the top pattern from any shoe and buy a few meters of colored braid. Holes can be punched with a special flat punch or cut with a narrow and sharp knife blade. Any materials can be used as a material, warming and strengthening them with gaskets, including the fur of a sheepskin coat, and for the protective lining of the bottom of the sole - leather from the tops of women's boots.
It will be a little more difficult to make such warm house boots, but they will not only look original and stylish, but also reliably warm your feet. Sew ordinary slippers first, after you learn the technology and working methods, it will be easy for you to sew other models of slippers with your own hands.
At any time of the year, shoes such as slippers are relevant. In summer, the foot in them rests from sandals, and in winter they do not allow to freeze. We suggest you do it attached to each master class.
Pattern preparation
Whatever slippers you sew, in order to simplify the sewing process, at the first stage you need to make a foot pattern.
Operating procedure:
- Take cardboard, marker and scissors.
- Lay a sheet of cardboard on the floor and place your foot on top.
- Outline the outline of the foot with a marker. Do not press the felt-tip pen close to the foot.
- Carefully cut out the trace along the outline.
Medicine is ready. Now you can apply this footprint to any fabric and sew slippers. If you need to sew slippers of a different size, then simply reduce or increase the pattern.
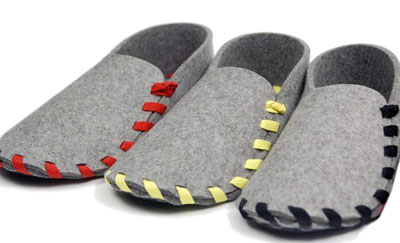
One piece closed toe slippers
A one-piece pattern is very easy to make. To build it, you will need to take a marker and a suitable dense fabric (for example, felt or fleece).

Master Class:
- Place a pattern on the selected material and circle it. Draw the elements as in the illustration above.
- Cut out the part along the outline.
- Fold the piece and sew along the edge.
- Carefully turn the slipper inside out.
- Make another slipper in the same way.
Optionally, you can add a lining. To do this, make a pair of slippers from thin fabric in the same way and sew the two parts together.
Slippers from an old sweater
From an old sweater you can sew slippers with your own hands. Patterns are not needed for them, it is enough just to have a foot pattern.

Sewing master class:
- Take an old sweater and cut off the sleeves.
- Fold the sweater and attach the pattern to it.
- Circle the pattern and cut out the soles of future slippers. In total, four such parts are needed.
- Sweep two parts of the sole together. So the slippers will be thicker.
- Sew one sleeve and one sole together. This can be done with thick threads with interesting stitches. So you will have a decorative stitch. Or you can use simple stitches, then the slippers will need to be turned out.
- Topstitch or hem the top of each slipper to keep the threads from fraying.
Sweater slippers are ready!
Children's slippers
Of course, a child can make the same slippers as an adult, just a smaller size. But it is much better to make interesting and unusual children's slippers with your own hands. Make patterns based on the child's legs.
Master class on creating children's slippers:
- Cut out three pairs of soles: two from fleece or felt, and one from a softer material.
- Cut out one pair of the top piece of the slippers. It should be slightly wider than the sole so that the slippers can be easily put on the foot.
- Additionally, cut out two pairs of ears and one pair of spouts.
- Cut out the letters "P" and "L" so that the child can distinguish the right slipper from the left one.
- Sew together all three insoles. The soft part should be in the middle.
- Sew a spout in the center to each top of the slippers, embroider eyes or glue buttons on the sides of it, make a mouth.
- Fold the ears in half and also sew them to the top of the slippers, stepping back a little from the edge.
- Sew the top and sole together.
- Sew the letter "L" on one insole, and "P" on the other.
Baby slippers are ready!
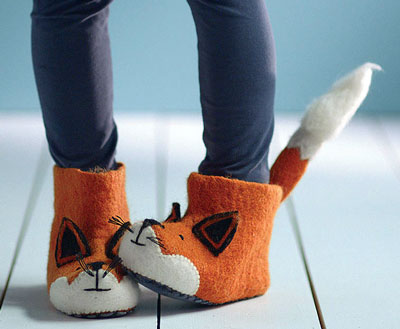
Slippers-boots
Felt slippers are very comfortable and warm indoor shoes that are ideal for the cold season.
Do-it-yourself slippers pattern (illustration 1) is done as follows:

- Circle your leg on a piece of paper or use a pre-prepared template.
- Draw one rectangle. This detail is the slipper cuff. Therefore, the dimensions of the rectangle depend on the features of your leg: the length should be enough so that the slippers can be easily put on and at the same time not come off, and the width is at your discretion.
- Draw a detail that looks like half a sock. In length, it should be slightly longer than the sole of the slipper.
When the pattern of slippers made with your own hands is ready, you can start sewing shoes.

- Take a thick fabric (such as felt) and fold it in half.
- Take any piece of fabric (for example, an old sweater) and fold it in two layers as well.
- Attach the pattern to the fabric and circle it with a marker or chalk.
- Cut out the details. In total, you should get the following number of elements: two soles, two cuffs and four “socks”.
- Connect one sole and two "socks" with needles-pins.
- Stitch or sew the details.
- Sew to the top of the slipper cuffs.
- Turn out the finished slipper.
- Sew the second "boot" in the same way.
Slippers-boots are ready!
Ballet slippers

You will need to take the following materials to make such house slippers with your own hands:
- Sole pattern (foot pattern) and sides.
- Soft fabric (for example, baize or flannel).
- Batting or other similar fabric for filling.
- Felt or any other fabric for the soles (you can buy a special non-slip fabric in a sewing store).
- Rubber.
- Threads, needle, scissors, marker.

Master class on increasing sneakers:
- The pattern of slippers (made by hand) of this type consists of two parts: the sole and the side. Print the finished layout on paper or draw your own.
- According to the pattern of the sole, cut out two parts each from the insole, the filler and the sole (illustration 1).
- Cut out two pieces for the top of the slipper. To do this, fold the fabric in half with the front side inward. Attach the pattern to the fold line and circle the outline. You need two such parts (Figure 1).
- Carefully fold the two layers of the sole and attach the top piece to them with pins, as in illustration 2.
- Sharpen the details.
- In the same way, make a lining for slippers from soft fabric (Figure 3).
- Sew the two pieces together. The seam should go in two rows (Figure 4). This is necessary so that you can then insert the elastic. So leave a small hole in the back.
- Turn the shoe inside out and insert the elastic.
- Sew up the hole.

Home slippers are ready! You can decorate the socks with decorative pompoms, roses or beads.