Dog breed drawn. Phased instructions for children on drawing dog pencil. Beautiful dog pencil gradually
In childhood, each of us created his own masterpieces on paper, and sometimes not only, using paints, pencils, markers and everything that could leave their mark on the surface of the surface. Not many have been transferred to his hobby in adulthood, and the majority left their skills at the initial stages of development. Of course, with the advent of children already in its own family and regular requests to draw someone parents begin to think about how to do it beautifully and at the same time quickly. It is for this that the detailed instructions are offered, how to draw a pencil a pencil in a pencil.
Why exactly a dog? Yes, because this animal is the most dedicated person, not one millennium and fully deserved that everyone learned to depict it most realistic and attractive.
Choosing the main tool
Why a pencil? The fact is that the pencil reserves such a trace that is easy to erase when creating an improper line or to grow. Neither with colored pencils, nor with all the more markers, it will not be possible to quickly correct the error, and the whole drawing will have to redo it. Before drawing a sitting dog, it should be sorted out in the notation of this tool. Simple pencils are produced in different stiffness and are marked accordingly. Soft rods (letter B) are necessary for cutting and creating shadows, rigid (letter H) - to circuit circuits. The digit next to each letter designation determines the degree of its softness or rigidity.

In order to draw a dog pencil for children (sits, lies or it is worth it, it does not matter), you must choose a tool of medium hardness with labeling NV. It will be easy to post if necessary, and the contours at the same time will remain clear.
Preparation of instruments
In addition to the pencil itself, a sheet of paper and eraser should be prepared. The last one should also take seriously, because from its quality will depend on how well it will erase extra lines when adjusting the pattern. Paper can be immediately prepared much, it is possible that the baby after seeing how his parent drew a sitting dog, and he wants to create his own masterpiece.
Option first. Head contours
To simplify the task, an inexperienced artist is better to start practicing with less realistic pictures. To do this, below offers detailed instructions, how to draw a dog sitting sideways.
- So, you should start with the eye. To do this, you need to put a bold point on paper, closer to the upper right corner.
- After that, over the point, it is necessary to draw a semicircle that will be an animal head, as shown in the figure.
- The next stage provides for the circuit in the contours of the dog's muzzle and its nose. To do this, you need to carry out a low line from the end of the semicircle, which is located closer to the eye of the PSA. Immediately you can draw a dog's mouth, starting the second line slightly lower.
- When the head has already received similar to the animal outline, you should draw a PSU Ear. Since he sits sideways, it will be one. The form for this can be chosen anyone at your discretion, the benefit of the variety of rocks makes it possible to raise fantasies.

Outline of body contours
- After that, from the bottom of the ear, if it is hanging, or from the end of the free end of the semicircle, if the eye sticks out, it is necessary to carry out a curved line down, which will be the back of the animal.
- Now from the opposite side, the contours of the chest and the back of the tail of the tail are observed.
- After that, the artist should draw a smooth front paw of the dogs, and then bent rear.
- The final stage will circle the contour of the belly of the animal and painting the paw of the opposite side.
If it's still not clear how to draw a seated dog in stages, should look at the photo above.
Instructions for experienced artists
If with the previous task it happened to cope very quickly and in the process did not arise difficulties, the next time you can try more complex pattern. Here, before drawing a sitting dog, even with confidence in your lines, it is necessary to cook an eraser, since all the work will be held as real artists.

In the instructions proposed below, the process of creating a puppy on paper, but with a change in certain outlines, a completely different animal may turn out.
Beginning of work
The creation of each real masterpiece begins with an outline. To do this, it is simply necessary to draw two circles on a sheet with each other so that the top is slightly smaller and they necessarily come into contact. The lines should be soft so that then some of them can be erased without a trace. In the future, they will be head and torso puppy.
After that, the dog should draw paws and a muzzle. The latter is an oval between the two previous circles, which captures the surface of both. Paws, since the animal sits, three, in the form of lines and ovals at their ends are drawn.
Drawing parts
How to draw a pencil seated dog further? To do this, you need to make a picture detail and circling the outlines of the ears and the nose of the animal. So that everything is symmetrically and naturally, the cross is drawn in the middle of the head. The ends of the horizontal line will indicate the location of the ears, and the middle of the vertical, which passes through the muzzle, will indicate the place of the future nose. In the centers of two parts of the horizontal line, it is necessary to draw eyes, and under the nose - mouth line. It must be kept strictly in the center of the previously designated

Among the important details also fingers on the paws of the puppy, the fourth leg, which will be slightly visible, and its tail. The tail shape can be made any, depending on the drawn breed, and if you wish, "revive" the drawing, you can add something to the disheveled fur.
Finishing stage
The adjustment of the drawing begins with erasing all the additional lines and according to the auxiliary outlines of the wool already on the puppy itself. Also in order to give a picture maximum realistic, you should add shadow to it. It is necessary to do it only with a soft pencil that can easily grow. The volume of the puppy will give shadows near the face, on the legs, ears and in the eye area. In order for the drawing to be as realistic as possible, the drawing shadows should be fine with your fingers or an unnecessary clean piece of paper. Also on the legs are diagnosed with claws, and with the help of an eraser, you can make glare light in the eyes and on the nose.
Conclusion
After a detailed study of step-by-step instructions, it turns out to look at any process from a completely different side. Now the question of how to draw a sitting dog, no longer seems so difficult even for an inexperienced person or child.

The main thing in creating your own masterpiece is to comply with the correct sequence of actions and do not rush. Each item must be worked with maximum clarity and concentration, then the drawing will be as realistic as possible. Also in drawing, you should pay much attention to detail, because they make the drawings "alive."
Now, to draw a true man and the most devoted animal, do not work for a long time and constantly disappointed in yourself. It is enough just to use detailed instructions from already experienced artists who are happy to help novice creators and simply dog \u200b\u200blovers to create their own masterpieces.
Hello everybody! Agree, it seems ideal from the point of view of the parent looks like a picture when our crumbs visit the mass of circles, where it is mandatory to draw music and music. But you know, it only seems to be, because time spent with his baby does not pass without a trace. We learn each other, learn to communicate, do something together. At the same time, we teach the child to something useful. Therefore, it is worth thinking to allocate time for general classes. For example, today our creative workshop will open up so that we trial. I found the simplest scheme, and we repeated it with my karapuz. Here is the work done and tell. And at the same time I will show you how interesting you can spend time with a crumb.
Master Class. Dog pencil
We will draw simple pencil. Such a picture:
- easy to fix if there are any flaws,
- and it will be possible to decorate.
I will not only tell, but also in the course of the case, show each stage of work with photo.
THE FOUNDATION
To work the baby was easier, let's start with what we will do the workpiece. We depict sitting Dog, and therefore, we make 2 oval.

Note:
- Upper oval less than the lower.
- They have a point of contact.
- The lower oval is at an angle, its central part is higher, and then it is lowered.
It is head and body.
Auxiliary lines
Now we will pay attention to those lines that will help in work:
- Curved lines connect the head and body. This is the neck.
- On the left line we will bring up for the bottom oval and lower down. So we go to Lapam.
- Somewhere in the middle of the "Body" there will be another paw.
- And in order to be seen that the dog is sitting, you need to draw below on the oval "droplet", the wide part of which will be right, and the narrow left. From this "droplet" we make two short dashes down.
- All extremities of the PSA ends with small circles.
- Around the place of connecting head and body make a small circle. So we denoted a petty nose.

Now that we have such assistance, draw parts.
MUZZLE
In the middle of the circle, we plan a triangle of the nose, from which sevendoux diverges in different directions. It is "fall."
"Delim" face in half. And at the same distance from the nose we indicate your eyes.
We got a retriever. His ears are pointed and lowered down. On the heads of the head we depict triangles.

BODY
- In fact, we are all ready that the final strokes finish the paws and fingers on them. It is enough to divide the stripes round "pillows" on the limbs.
- We erase all the extra stripes. We bring basic.
- Draw your eyes.

Final strokes
- A shadow hatching on the nose should highlight a convex nose and a plot around the eyes.
- "Christmas tree" depict "wool".
- Do not forget about the tail.

I hope you and your guys will be interested in doing creativity. And you still look at the site to view other drawings and crafts in my creative workshop. And therefore, do not forget about the subscription. Subscribe her yourself and help to arrange with your friends who also seek to comprehensively develop their little! And today everything! So far!
How to draw a dog if you still do not know how to draw very well? Try to draw a dog in stages, step by step by adding new details to the drawing. I will try to convince you that it is not difficult.
How to draw a dog in stages
Let's start the lesson how to draw a dog Phased pencil from a set of geometric shapes. Look at the drawing below, and try to repeat in your drawing. It does not look very nice, but will help to correct the dog.

After the basis is ready (in this case, all these figures are the basis) you can add ears and tail. Connect paw lines and torso.

Two ovals that served as the basis for the dog's body, you can wipe the eraser. Next, go to the paws and too wipe the extra line. We remove the line on the head of the dog - the line dividing the ear, and the dog's face.

If at this stage of the lesson how to draw a dog in stages. You got a silhouette of a dog - great! Do not be discouraged if it turned out not all, as I wanted. Try to figure out where there may be a mistake, and correct it. In errors there is nothing terrible - everything is allowed!
So, continue to draw. When the silhouette of the dog is ready, you need to work on to make it smoothly - wipe the "fat" eraser and coarse lines and replace them with smooth.
I also delete the line sharing head and neck, painted nose and ears.

Dog silhouette is completely ready! Draw your eyes and you can draw wool.

To draw wool you can use short strokes. Drawing a lot of such strokes, you can easily imitate dog wool. Please note that in some places wool needs to make darker.
The dog is the best friend of man. They are any forms and sizes, so everyone can choose a favorite breed. If you want to know what dogs are made and how to draw them, as well as about their ancestors, wolves, read this training material!
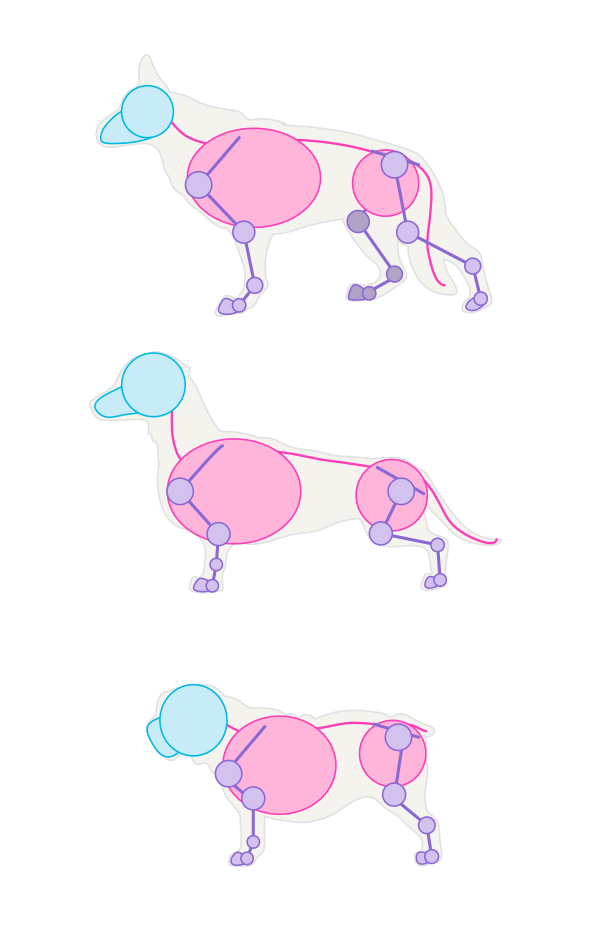
1. Dog skeleton structure
Step 1
To create a plausible pose, you need to first understand the structure of a dog skeleton. The problem is that there are so many breeds of dogs, and they are all very different. To solve this problem, we will return to the past - to their general ancestor, wolf.
Step 2.
Now we will analyze the complex skeleton on simple parts that are easy to remember.

Step 3.
When we understand the structure, we will be able to create any breed. Before building poses, you first need to look at the photo. Because Each breed has its own unique features, you need to note them before being built. Of course, this does not mean that you constantly have to resort to samples. You just need to understand what the difference between your breed and wolf!
Step 4.
If you want to draw a puppy, just make your head more. If it is a puppy of a large breed, he will have extraordinarily large paws.

Step 5.
The skeleton himself is not the only thing that is posing. The joints are needed by animals to move, so you need to understand them before drawing something in addition to the fixed profile. This dogs are very similar to cats, so I suggest you look at my first step
When you make sure you have studied it, you can draw a pose.
3. Muscular dog structure
Step 1
To give your dog's body, you can take simplified muscle masses. This is all that you need if you draw a long-chest dog as, for example, Afghan Broke - no one will see the muscles under her wool!

Step 2.

Step 3.
If you want to draw a shorthair dog, you need to learn more. More detailed muscles are useful when you need to emphasize the power of the dog.

Step 4.
My little dog family is now very muscular!

3. How to draw dog paws
Step 1
Although they look very similar, the front and rear paws are not the same, as well as our hands and legs. On the "hands" or front paws there is a thumb, called the arrived finger. A cranky ball on the "legs" or hind legs is called a defect.

Step 2.
Dogs, like cats, walk on the tips of the fingers. They do not have real claws, they are more like nails and are not used in battles.

Step 3.
To draw a dog paw, start with four bent lines as shown below.

Step 4.
Add pads.

Step 5.
Now you can draw the contours of the paw and add nails. Do not make them pointed and sharp. They are constantly stepping, because they cannot be drawn as cat.

Step 6.
Cover the paw wool, leaving the pads visible.

Step 7.
How to draw a paw from the front side:

Step 8.
My dogs now have cute paws!

4. How to draw a dog / wolf head proportionally
Step 1
Let's start with a wolf head and reinforce it under different breeds. First draw a circle.

Step 2.
Add the face.

Step 3.
Draw a symbolic nose at the bottom of the muzzle.

Step 4.
Make an outline of the contours of the skull.

Step 5.
On the top of the head draw ears.

Step 6.
Then add the forehead.

Step 7.
Now you can add your eyes between the forehead lines. The central line of the circle should cross them exactly in the center.

Step 8.
If you want to draw a puppy, you need to change a little this scheme:
- Eyes will be a circle and placed undercentral horizontal line;
- The muzzle can also be round and shorter;
- Ears - soft and easily folding;

Step 9.
If you want to draw a dog's head profile, other guide lines are needed. Start back from the circle and add a face.

Step 10.
Add the nose to the tip of the muzzle.

Step 11.
Add your ear.

Step 12.
Use additional guide lines to find a place for the eye.

Step 13.
What about other breeds? Many of them are really not like a wolf. This is not a problem - simply change the size of the head elements, adjust the space between the eyes, etc.
Looking at the sample, attach a large circle, its central lines and check all the proportions. Most likely, you remember this from the first attempt!

Step 14.

5. How to draw a dog / wolf eye
Step 1
First draw oval.

Step 2.
Add a rim of the eyelids.

Step 3.
Add corners eye.

Step 4.
Draw the pupil. Remember that its size depends on the amount of light.

Step 5.
Add bright areas around the eye. Imagine them with centuries and eyebrows.

Step 6.
To create a depth, add the shadow under the upper eyelid (it is in front) between both light areas and inside the eye itself.

Step 7.
To draw eyes into the profile, start with a drop-shaped form, and did not oval. Everything else is almost the same.
Now you know how to draw wolf eyes. The main difference between the wolf and the dog eye is that the dog's rim is not always so dark, and their eyes are always a round (therefore, a white section of the eyeball is seen). The most popular color of the eye in dogs is brown, and the wolves are predominantly amber / yellow eyes (and never go blue!).

6. How to draw a dog nose
Step 1
It's easy enough! Start with anchor, then draw a fin at its top. Now close the shape and draw the nostrils in the shape of a comma. Ready!

Step 2.
If you want to draw a nose into the profile, draw only half anchor and fin, and attach the ball to them.

7. How to draw dog's ears
Step 1
At the ancestor of dogs, wolf, pointed ears, and there are the same dogs of many breeds. They are easy enough to draw. Than a fluffy dog, the more the furious ears (compare the German Shepherd and Alaskan Malamute).

Step 2.
So where did the hanging ears come from? All puppies are born with hanging ears, because The supporting structures are not yet developed. Dogs were removed so that they become more friendly and sociable than wolves; People wanted the dogs to have a character like puppies of wolves. As a result, we received adult dogs with puppy features - playful, curious, infantile and sometimes soft hanging ears.
Drawing hanging ears, remember their origin. Start with a hard reason and then break them. It should also be remembered that in the process of improving rocks, some hanging ears have become longer and wider, losing their typical triangular shape. Like the royal spaniel.

8. Draw a dog mouth
Step 1
Roth protects dogs from overheating, so the rapid breathing is normal for them. Drawing a dog with an open mouth, you will create a pretty natural smile. Look at the picture below and remember the layers. It is important for creating a realistic dog mouth!

Step 2.

9. A few words about dog wool
If you want to learn how to draw wool, look this here here I will show you how important wool is to create a silhouette. Please note that the dogs are lower than the same size. Always start with poses and simplified muscles before drawing wool to avoid errors. Also, the shorter wool, the more you need to pay attention to the muscles.


Gav! Ready!
Thank you for reading this material on drawing dogs and wolves. You can tell you about the set of breeds, but with these basic knowledge of their structure you can draw any dog, what kind of want! Pleasant drawing, fast meetings!

Drawing animals is not easy. After all, draw and show the expression of the face, the naturalness of the posture is quite difficult, especially for non-professionals. And if we are talking about the picture of the dog, then convey such nature and it would seem unrealistic. Nevertheless, there is a whole set of detailed schemes describing a step-by-step creation of a person's friend in different poses. Let us dwell on the most popular options.
Materials and tools
So that nothing distract from the creative process, it should be started with thorough preparation of all necessary for drawing.
If the visual creativity is not a strong side of your hobbies, and there is a traction for the skillful possession of pencils and paints, it is worth using the methods of developing drawing skills, the effectiveness of which has been proven by experience not one generation of lovers of this type of visual activity.

How to draw a dog - we understand various techniques
Dogs differ not only by the breed, size, but also a pose, expression of fruits and even characters. And all these details need to be shown in the drawings.
Cheerful four-legged friend without auxiliary lines
There is an opinion according to which the beginners are better to take pictures on the basis of supporting figures. The scheme presented this opinion refutes.

Even a child can draw such a pretty dog
Instruction:
- Draw the body of the pussy in the form of an elongated bob.

We start with the figures based
- Triangles show the ears, and a rectangle stretched from below, nose. So, based on geometric shapes, we created the outlines of the face.

At this stage, we denote all major details of the animal image
- Draw a fur on the chest and a piece of the tail.
- Move from top to bottom: add circles for the eyes, as well as a pair of curved triangles of fur on your head.
- Show the wool sticking shreds on the neck.
- Take a completely tail, add a line for the upper and lower paws.
- Draw a smile line, the bottom of the lip.

Wool show zigzag lines
- We draw the shles of the wool on the neck, draw the cheeky and detail the paws, showing the fingers.

Fingers draw short arcuate strokes
Video: How to portray a sad puppy
Four steps dog
You can draw such a funny pet in just a few minutes.
Instruction:

Draw a sthamanently dog \u200b\u200bface
Dog's faces are considered the most complex element of the drawing, however, and with this task you can successfully cope.
Instruction:
- We start a drawing from a circle and two hanging ovals - ears. Inside the circle, we draw two intersecting slightly curved straight, and the horizontal line is below the upper limit of the circle by a third.

Auxiliary lines in the circumference are needed for subsequent detailing the drawback
- We make a nose. Show the outlines of the turned heart and add a triangle with two cuts.

The nose of the dog resembles the shape of a heart
- Getting to the most difficult - my eyes. Draw oval outlines. To show their shine, teeve the wavy lines inside the pupils.

Eyes should be placed symmetrically
- We supplement the image with small circles on the nose, lines for the eyelids and ears.

Detailing the features of the face
- Draw PSA's paws to which he put a face. To begin with, you show 4 similar to the triangles of the shapes located on both sides of the face.

Show the paws on which the muzzle is lying
- Add paw parts.

Draw your fingers on the paws
- Obligate contours and remove the pencil lines.

Remove auxiliary lines
- Color at will. Choose gray, black or brown shades.

Coloring the picture can be pencils, paints or wax crayons
Drawing a sitting dog
As a model, take a cheerful spaniel.
Instruction:

Draw a lying pussy
It is believed that small animals are the most shrinking. But at least most of them really these four-legged pets are pretty moving, they lie down to rest at all. Like, for example, this Schnauzer.

The lying figure is more difficult to draw
Instruction:
- Initially draw a circle that will be the basis of the dog's head. At its lower half, we carry out auxiliary horizontal line.
- Testing to the circle oval - animal torso.

Figures of the foundation for this picture will be a circle and oval
- Draw the shape of the top of the head, and below, that is, on the beard, draw wool.
- Add the ears of the triangular form.

Ears from this dog triangular shape
- Draw fluffy eyebrows, add beads eyes. We show the nose and focus on the wool around it.
- We draw the front paws, detailing your fingers and claws on them. We depict the chest, showing it with a fold under the left paw and the arc between the limbs.
- We carry out a smooth back of the back, add the back leg, downstairs it is detailed to the wool on it, show your fingers and claws.

Detailing the torso and muzzle
- We wash the auxiliary lines and, if you wish, paint the pet.

Breeds with thick wool comfortably paint with pencils
Do not buoy sleeping dog
The main principle of the image of sleeping animals - smooth lines.
Instruction:
- We start with auxiliary lines. In this figure it will be two circles - a little more for the head, and for the face a little less. In the circumference, we spend more two intersecting arcs. Testing the shape of the ear.

To the auxiliary lines teach your ear
- Show the shape of the head and ear of the animal.

We indicate the contours of the face
- Complete this sketch of the skull with the second ear and the lower jaw. Add the nose in the form of a heart.

At this stage, draw your nose, the second ear and the closed mouth
- We draw lines of jaws and slits - eyes.

The eyes of a sleeping dog are made as if a little singled
- We are taken for the torso, showing two slightly uneven parallel lines. Also show the growth lines of Pinsik's paws.
- Detailing the lines of wool on the chest.

Draw wool on the chest
- Add nostrils, lines of the arcuate form near the ears and eyes. We remove the auxiliary lines.

Add nostrils and folds on the forehead
- Color the drawing or leave in the pencil version.

Smooth lines - the main principle of sleeping animals
Draw a husky
One of the most popular breeds of dogs today. Many want to draw such a blue-eyed miracle: Which of the love for art, and who and hoping to get a puppy of this unusual dog.
It is interesting. Husky as the factory breed of dogs was registered by film from America in the 30s of the twentieth century. The ancestors of blue-eyed pets are riding dogs - the oldest breed of the North. It was this fact that was laid by the Americans in the name - "ESSS", that in translating English indicates Eskimos. But over time, the word distorted to the "Husky".
Instruction:

Video: how to draw a puppy husky
Mathematical method drawing shepherd
The basis of the drawing of the dog will not be auxiliary lines, but the grid with cells drawn by the indicated standards. For this picture it will take a ruler.
Instruction:
- We retreat from the edge of the sheet 2 cm on top and on the side, then the downstream three times 6 cm. The uppermost square divide in half the two horizontal segments of 2 cm 2 cm and we make three vertical segments, too, 2 cm.

- We start from my head. Draw the ears by taking the triangles as the basis. Smooth curved line show the forehead of the animal, teeping an open mouth with teeth, nose and language. Draw your eyes.

We start with an image of the muzzle shepherd
- Two arcs indicate the line of the neck and back. Show part of the body and the front paw with your fingers. We draw attention to the fact that the paw begins on the torso from the roundness of the joint.

First, show the back line, and then chest
- We draw the line of belly, the outlines of the leg from the foreground, the tail and the paw, which was in the background.

Lines connecting parts of the body shepherds, draw soft and smoothly
- We make color accents of a shepherd color. Optionally, paint.

Shepherd looks very beautifully in the painting pencil version
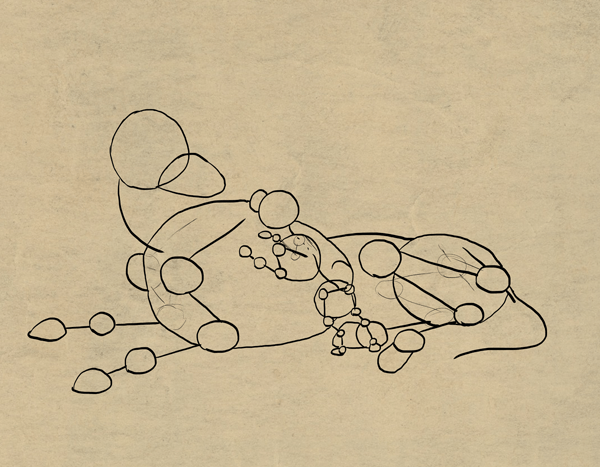
Photo Gallery: Draw a Taxa Simple Pencil
We portray the three guide circles for the head and the torso draw the face, the body, the paws and the tail of the head and the muzzle, draw your eyes, the nose, mouth and ear show the neck, body, paws and the tail
How to portray puppy
Who can be more funny little child? And it doesn't matter whether it is a person or an animal - all the kids are equally rare, cute and immediate.
Instruction:
- Visually divide the paper sheet into 4 parts. At the intersection of these lines, draw the spout, from which two arcs in opposite sides are derived. In the two upper imaginary quarters in the form of oblong droplets, we draw eyes, which should be correlated with the nose.

We start a drawing with a muzzle
- Detailing eyes. The inside of the eye is shaded, leaving an empty little circle - pupil. We do nostrils on the nose, and two arcs connect the smooth line.

It is very important to quickly paint the eyes to be expressive
- Soft lines show the outlines of the face of the dog. Connect the upper loop with the bottom of the face on the right side. On the left, we repeat the same action by drawing the eye.
- We draw a left ear resembling a large sheet. Draw wool with curves with cloths.

On the ears show wool
- We proceed to the body. On the right, we spend two parallel smooth arcs - this is the outline of the foot. From the smooth line of the torso, we draw a second paw on the principle of the first.

The outlines of the paws must be soft
- Detailing limbs. We connect two parallel lines, divide the distance between them to equal parts with parallel segments that are spinning so that your fingers come out. Add tail.
- We will mark on my forehead: we draw two parallel curves, which are first narrowed, and then they are expanding to the muzzle. Testing the shles of wool and slightly grow them.

We specify the image of the mark on the forehead, tail and wool
Photo Gallery: How to draw anime puppy
 We draw a circle and oval under it, in the circle we carry out the back of the pug's head and its ears are drawing a nose with folds, eyes and eyebrows, as well as the narrowed tongue we make the sketch of the chest and the front paws of the dogs add a torso, rear paws and tail Figure puppy pug
  Here is such a funny puppy turned out
What you need to know before being taken for watercolor drawing
These paints are pretty capricious: the desired shade is obtained only at a certain ratio with water, which does not always give the necessary consistency of the mass. So professional artists advise newcomers to start still with Guaisha: and the consistency "comfortable" and shades brighter. However, watercolor plots still have a lot of fans, including lovers to depict four-legged friends. All of them are combined by a number of subtleties of working with these paints.

Video: How to draw a watercolor puppy
Higher philological education, 11 years of experience in teaching English and Russian languages, love for children and an objective view of modernity - the key lines of my 31-year-old life. Strong qualities: responsibility, the desire to learn new and self-improvement.