How to make braided hair bows. A scheme suitable for long and short hair. How to make small bows? or Braid with hair bows
The hair bow is the hit of this season! This is one of the most stylish hairstyles that came to us from the West.
All modern women of fashion have already learned the skill of this hairdressing masterpiece. And this is not surprising: after all, a hair bow is suitable for both young ladies and older ladies. Often, this styling is used by stylish brides at their weddings.
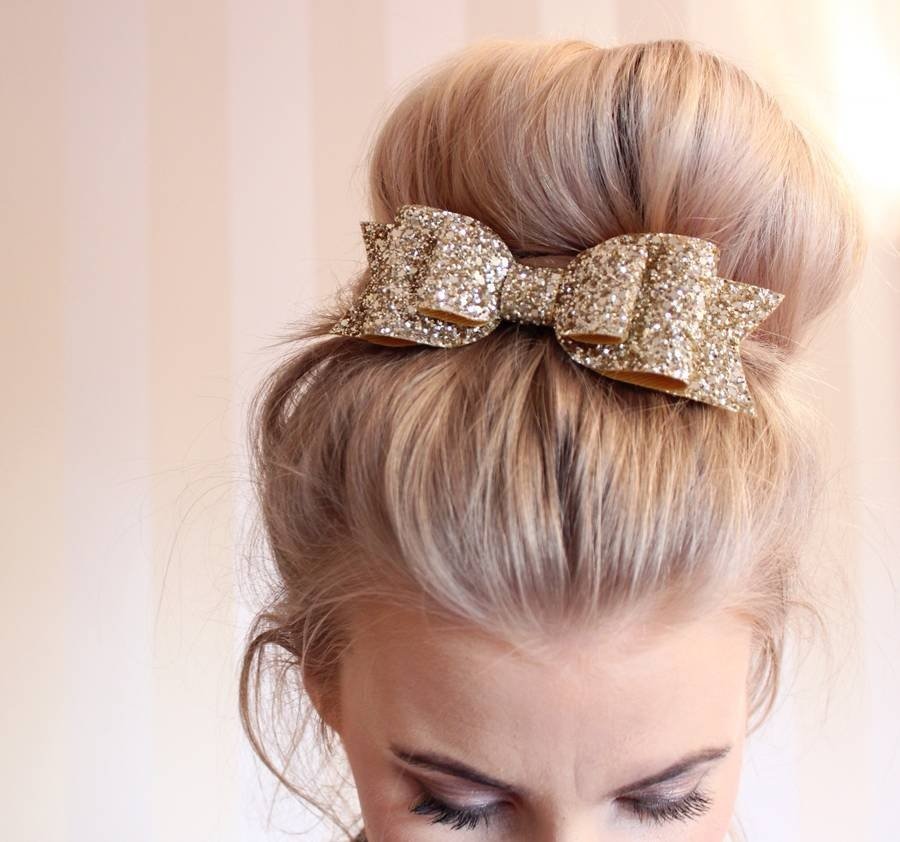
High bow
the bow hairstyle is suitable both for everyday life and for festive events
This hairstyle is unique in that it is suitable for both everyday life and for an evening out. This versatile one is organically combined with any style of clothing: jeans and sneakers, an elegant suit and an elegant dress. In addition, the bow does not need constant correction if it is made correctly.
So, to complete a high bow, you will need the following tools and materials:
- hairdryer for styling or ironing;
- comb-comb;
- thick brush;
- hairpins and hairpins;
- elastic bands of different thicknesses;
- styling mousse and hairspray.
Before embarking on a romantic bow, wash your hair, apply mousse to wet strands and dry with a hairdryer.
If the hair is thin and sparse, then wind it up before styling to add volume to the hairstyle. And curly and naughty strands - straighten with an iron. By the way, a high bow does not suit chubby girls, so we advise them to choose others.

high bow
High bow technology:
- Carefully comb the strands and collect them in a high ponytail, which is fixed with an elastic band. To do this, you must know. It should be noted that the curls should be perfectly combed and there should be no "cockerels" on the head.
- Take the second elastic and clasp the tail halfway. This will create a loop at the base of the elastic, and the loose ends of the strands will hang over your forehead.
- We divide the hair mass at the base of the tail into two parts, and throw the free ends hanging on the forehead over the middle of the bow.
- We fasten the tips thrown back with invisible pins and hairpins. Long ends can be hidden under the base of the hairstyle.
- Fix the resulting bow with varnish.

hairstyle bow on the back of the head
The bow looks beautiful with or without bangs. Stylish option: oblique long bangs to one side and a bow at the crown. You can read more about short oblique bangs here. You can also pull out several strands from the tail and twist them with a curling iron. It will be very original and playful.
On loose hair

bow on loose hair
A bow can be made not only at the top of the head, but also at the bottom of the head: in combination with loose strands.
There are some helpful tips for doing a bow:
- Performing a loop of their tail, do not make it too long, otherwise the "petal" will simply disintegrate.
- The middle of the bow can be pulled together either with straight strands or with a braid woven from the remaining ends. It will be very original. This composition will acquire a more complex and rich character.
- The low bow should not be located at the very neck. Its optimal location is slightly below the back of the head.
- Using hairpins and hairpins, you should select them according to your hair color. But if they play the role of decors, then the color scheme should harmoniously match and contrast with natural strands.
- The finished hairdressing composition should be securely fixed with varnish, especially for important events.
- You should not do a “butterfly” on your head every day. After all, regular hair pulling into a tight tail makes the curls brittle and thin.
- The bow does not suit the owners of a round and square face. As a last resort, irregular proportions can be corrected with asymmetrical bangs and extended strands at the temples.
- Although this hairstyle is considered universal, it will look at least strange on middle-aged ladies. Therefore, it is better to prefer a playful bow to young and young ladies.
So, a romantic bow can be made with different variations. Do this. The main thing: the hairstyle should bring its owner a good mood and confidence. Hair bow is sexy, practical and fashionable!
Fashionistas have long fallen in love with the hair bow hairstyle. It attracts attention, looks stylish and replaces fashionable expensive accessories. One of the main advantages: you can do it yourself and prepare for any event, even if there is little time left before it.


Varieties of hairstyles
Hairdressers and stylists distinguish several types of hair bows:
- for hair of medium length;
- for short haircuts;
- in combination with malvinka;
- as an ornament of weaving;
- bow on the side;
- small bows.
The hairstyle suits any style of clothing. During a morning run, it will not disintegrate, but on the red carpet will attract the enthusiastic glances of others. Depending on the size of the bow, the shape and method of creation, you can set the mood for the whole day.


A hair bow is considered a versatile hairstyle also because it can be made from straight and curly strands on either side of the head. However, you do not need to do it if the hair is in poor condition. Dull and brittle curls won't look good. The design will not suit girls with rough facial features: a large nose, a wide forehead and a rectangular chin will visually increase.


7 easy ways to make a hair bow
Before you start creating any of the hairstyles, you need to determine the location of the bow. It can be on top, bottom, side or a strand dotted with small bows. The color of the elastic should be chosen as close as possible to the hair so that it is not noticeable.


- Method 1. For long hair.
The first step is to collect the hair in a high ponytail. It is tied tightly with an elastic band. With the second elastic band, fasten the tail so that it folds in half, forming a loop. In this case, the ends should fall in front of the frontal area of the head. Then the resulting loop is divided into two equal parts using the tips falling on the forehead and fastened with invisible behind.


Long hair allows for experimentation. Therefore, we can single out another method of creating a stylish bow at home. A tail is also made for him, but they are divided with elastic bands into three identical parts. Each elastic band must be carefully hidden behind a small strand, wrapping them around and fixing them with invisibility. Then the split tail must be tucked in so that it is in front of the base of the tail. The ends can be evenly distributed behind the head, hidden in a bow, or positioned so that they look funny from behind the hair.

At the end, the hair is sprayed with varnish to keep it well.
- Method 2. For medium length hair.
First you need to gently comb all your hair into a high ponytail. When tightening them with an elastic band, you do not need to take out the hair to the end. There should be a loop, with the end that falls in front. The buttonhole should be divided into two equal parts and smoothed in the middle. The front strand is laid back to form the middle of the bow. It is carefully fastened with invisibility.

The ponytail can be tied differently. A small strand for the core is selected from the main tail and fixed in front. Then the tail is divided into two parts using a second elastic band. It is fixed at the very tips. A loop is made from the hair that remains between the elastic bands. She is rewound with the left strand and closes in a bow.
Finally, we fix the structure with a strong fixing varnish.

- Method 3. For short hair.
Owners of short haircuts rarely boast a beautiful hairstyle. Usually they do with styling or fleece. However, you do not need to deny yourself the feminine tricks. If you are patient, a hair bow can be made on such hair as well.


First, you need to separate two identical strands in the temporal zone and take them towards the back of the head. There they are connected with a thin, almost imperceptible elastic band so that a small loop is obtained. That is, you do not need to pull the ends out of the gum. Then we divide the loop into two bow ears. The hairstyle is obtained from the bottom of the head. The bow should be attached with additional hairpins so that it does not hang to the bulk of the hair. The middle is made in a separate highlighted strand. It is best to select it in advance from above, so as not to repeat all the manipulations anew.

- Method 4. Combined with malvinka.
Malvink's hairstyle is familiar to all girls from childhood. Its essence is to make a rim on the head with side strands, twisted into thin flagella. At the back, they are connected with a hairpin or elastic, and the rest of the hair remains intact. To create an evening malvinka, you can twist them or, on the contrary, align them.


Owners of long hair are in luck. They can stylize the familiar Malvinka and use a beautiful bow made of their own hair instead of the usual hairpins at the ends. So you can not only save on hairpins, but also surprise those around you with the originality of the hairstyle.


The implementation of such a hairstyle is slightly different from the classic version. To do this, you need to collect not all the hair in a ponytail, but only select the upper strands. It will not be very thick, but it will look great in the end. The bow itself is formed according to the same pattern. The resulting hair loop must be divided into equal parts, twisted together and the core must be fixed with a separate pre-prepared curl.


- Method 5. Bow as a decoration of weaves.
You can experiment with pigtails in different ways, creating amazing new looks. The collected comfortable hairstyle can be worn for daily walks, shopping trips, to work and to holiday events. A bow with a pigtail hairstyle will last a long time and will not spoil the mood with the strands that have fallen out.


To create it, you must first braid the well-known spikelet braid. But you need to weave it not in the standard way, but from the bottom up, starting from the neck, going up to the back of the head. To make it comfortable to weave, tilt your head forward, comb your hair well, and treat your hands with wax or gel. Next, a regular French braid is woven. In the process, additional strands are selected on both sides and added to the main ones. When the braid is braided to the level of the back of the head, you need to tie the tail with an elastic band and a loop is formed from the remaining ends. The loop is smoothly turned into a bow, dividing it into two equal parts. The core is fixed with a curl left in advance.


Braids can be woven in a variety of ways in any direction. The main thing is to leave part of the hair to create a bow.
- Method 6. Bow on the side.
For a hairstyle you will need a beautiful elastic band. First, the hair needs to be divided into four sections. They should be the same, so the area from ear to ear is highlighted, and then a line is drawn with a comb in the middle of the head. All hair is unnecessary for the hairstyle. You need to choose one of the parts, depending on which side the bow should turn out from.

 Bow on the crown on the side
 A strong tail is formed from the selected hair with an elastic band. You need to tie a loop with a beautiful elastic band, and hide all the ends under it. A bow is formed from the loop, the ears of which should be well straightened so that they are voluminous. Secure the structure with invisible pins or pins. You can keep a neat look for a long time with the help of varnish.
The hair that remains can be left loose by slightly twisting individual strands, straightened or braided into braids - any creative wish.
- Method 7. Small bows.
The hairstyle is based on a French braid, however, having gotten used to making small neat bows on your own, they can be introduced as separate elements into other hairstyles. For the convenience of weaving, you will need one large hairpin for work and many small ones for fastenings. The bows are on the sides of the head as standard, but in reality they can be done diagonally, along the bangs, around the head, or behind.


For a hairstyle, you need to comb your hair and divide it with an even parting into two equal parts. A strand of hair 1–2 cm in size is separated near the parting. If the bows are to be large, you can take a thicker strand. It is removed from the rest of the hair mass separately.
On the right side, you need to braid a tight French braid and tie the end with an elastic band. Next, the formation of bows begins. The strand separated in advance must be sprinkled with water or varnish. A large hairpin is threaded through one binding of the braid and catches the loop of the processed strand, pulling it out.

It turns out a bow, the size of which can be adjusted by changing the size of the loops. The tail that remains from the strand must be put along the braid, the next strand will hide it.
You need to repeat the actions until the end of the braid.
Advice!Before you do your hair, you need to prepare your hair. Clean and dry, they will be manageable, especially when combined with a fixing gel and mousse. You can use wax for extra shine.


Step-by-step instructions for creating
To create a hairstyle, you should prepare in advance several thin, almost invisible elastic bands and invisible hairpins. Every fashionista should have a comb with rare teeth and styling products.
- First step. To obtain additional volume, you must initially wind the strands on large curlers. It is enough to choose those hairs that are in the triangle of the parietal zone. Visually, it has the shape of the letter V.

- Second step. The rest of the hair should be gathered in a ponytail at the back of the head. You don't need to make it too high, it will get in the way. Hair will not fall apart in different directions if you pre-treat your hands with wax or gel. The upper strand is selected from the resulting tail and is attached with an elastic band over it, it will be needed in the process of completing the structure.
- Step three. At the bottom, another ponytail is formed with an elastic band so that the hair is divided into two equal parts. A neat bow is formed from these strands. It is firmly fixed with invisibility. You can hide the tips directly in the right or left half of the bow. They can serve as additional volume for the hairstyle.

- Fourth step. The strand left at the top helps to make the middle of the bow. It must be placed in the middle and secured with hairpins. It is fixed at the bottom, and the ends also hide inside the bow loops.
 Hairstyle with bow and greek headband Hairstyle with bow and greek headband. Step 9-10
 - Fifth step. The strands that did not participate in the creation of the bow and remained on the sides must be twisted into flagella and also hidden in the structure.
- Sixth step. You need to complete the big picture with bangs. A light wave looks impressive. The entire hairstyle is treated with a strong hold hairspray.
 Bow, intertwined with a pigtail and decorated with a beautiful hairpin
 DIY ribbon bows: simple, fast and beautiful
There is not always the time and desire to do your hair yourself. For such cases, you can stock up on original ribbons of your own production. They can be made in different sizes, shapes, colors. Any hairstyle will look bright and stylish with a homemade accessory.
To make a simple satin ribbon bow, you need to arm yourself with a 20 cm ribbon and a good mood. The material is folded in half and a loop is obtained, which is lowered down. The resulting two small loops are crossed with each other.
For a flower-shaped bow, it is recommended to choose a ribbon of medium width. It is twisted so that the resulting first turn is connected crosswise with the tip. You need to repeat the action several times until you get a flower of the desired splendor. It is fastened with the last turn and knot in the center.
A ribbon bow can be put on an elastic band or attached to the hair with a barrette It is convenient to make a small bow with a regular fork. To do this, a fork is wrapped with a thin tape so that one edge is free. It should be about 5 cm long. This end is wrapped around the fork and pulled out at the bottom of the short edge. Then this tip is drawn in the middle of the cutlery teeth at the top of the ribbon and lowered. It remains only to thread the end of the tape into the loop that has formed.
Going on a regular date or a party with friends, every girl thinks about how to style her hair. Sometimes you want something new, a new untested hairstyle. And the main thing is that it should be done easily and take little time. What hairstyle should you choose?
A hair bow is considered a beautiful and unusual hairstyle. It's pretty easy to do it yourself, you just need to practice a little. This hairstyle is usually done for medium and long curls. If you do not know how to make a bow out of hair, detailed instructions are presented at your disposal, in which everything is set out in a clear and accessible manner.
The bow hairstyle can be done in different versions: on the top of the head, back, on the side and on long, loose hair. Each method is good in its own way and will give the girl an extraordinary look.
The first way

Before making a bow hairstyle, the hair must be thoroughly washed and dried. If you do it on wet curls, the bow will not be lush enough. For those with fine hair, it is best to curl it with curlers or get wavy curls with a curling iron. All this is done in order to add extra volume to the hairstyle, which will make it even more beautiful.
Let's look at everything in stages:
- Take a good comb and comb the hair thoroughly so that it becomes smooth and manageable.
- Pulling all the hair into a ponytail, the last turn of the elastic should turn it into a bun with an unstretched tip. This bunch is done in the place where the bow is supposed to be. As mentioned earlier, it can be done from the back, on top of the head or from the side, as you like.
- The resulting bundle is divided into 2 equal parts, they will be halves of a bow. Then the part sticking out from under the elastic must be thrown over the middle and secured at the back using an invisibility or hairpin.
- To fix the hair bow, you can smooth everything with gel or apply varnish.
For a more visual example, watch the video clip:
Second way
If you are looking for how to make a hair bow in an original and stylish way, then this method is definitely for you. It will turn out not just a bow, but a bow on loose hair, with which it is not a shame to go even to the invited evening. So, what to do to get a hair bow.
Step-by-step instruction:

The third way
If in the previous versions it was told about how to make a bow out of hair on the crown of the head and on loose hair, then in the third method it is described about a bow on the back of the head. This method is no less easy than the others. Therefore, we advise you to read everything to the end. 
- Comb everything thoroughly and collect with a strong elastic band at the back of the head.
- Then divide the resulting tail into 2 equal parts and wind each of them on large curlers to give additional volume. It is very important that it is necessary to wind it inward, and not vice versa. If little time is allocated for the hairstyle, then it is better to use a curling iron.
- Pick up a comb and lightly comb the resulting curls.
- After both parts are ready, each part must be twisted to the face and secured with a hairpin or invisibility.
- For greater durability, stick the hairpin in the top in the middle. It turns out a kind of butterfly.
- At the end, apply a strong hold varnish to the hair with a bow.
Weaving bows

Weaving hair bows has become very fashionable and relevant among girls and girls. Every second owner of beautiful hair wants to make herself such beauty and surprise others with her new image. The only question remains: how and what is needed for this?
For this hairstyle, you don't need a lot of auxiliary things: an elastic band, a few hairpins, nail polish for fixing, satin ribbons if desired. Let's look at a detailed pattern for weaving two braids with small bows.
- We comb the hair and make an even parting in the middle.
- At the very beginning of the parting, we leave a small strand, about 2-3 cm. It will go to the bows. For convenience, we fix it with a hairpin so that it does not interfere.
- We braid one spikelet on one side, then on the other.
- We put a large hairpin in the side of the braid. This is done at the place where the bow is planned.
- Then we take a specially left strand and spray it thoroughly with varnish. All this is done to keep her smooth and obedient.
- We make a loop on the finger and push it into the hairpin. And we pull it through the pigtail. Thus, the first bow is obtained. In this case, a tail remains, which will be closed by the next taken strand.
- We take a new strand and pull it out in the same way.
- After all the bows are ready, we fix them with small hairpins.
Owners of long straight hair often think about what kind of interesting and original hairstyle to make for themselves. Habitual braids, tails and bunches quickly get bored, you want to surprise others and yourself with something unusual.
In contact with
An excellent option is a fashionable, stylish and slightly daring bow made of your own strands. There are many ways to make a bow out of hair, you can make it on the crown, back of the head, taking all the strands or a small part of them.
This hairstyle is not difficult at all. It is performed on straight or curly long strands. Such styling is suitable for study, work, festive events, special occasions. You can complement it with a hoop, hairpins, invisible hairpins, interesting jewelry or headbands.
With some skills, you can braid such a cute bow with your own hands, surprising all your friends with an unusual, stylish, chic hairstyle and fashionable way.
How to make a bow out of hair for yourself - video with options:
Before braiding yourself a hair bow, you should consider some recommendations and nuances:
- If your hair is brittle, damaged, dry or too thin, it is not recommended to do this hairstyle. She will look inconspicuous, will quickly bloom.
This styling is not suitable for those with a wide forehead, cheekbones, large chin and nose.
- In advance, you should prepare thin transparent elastic bands, invisibility and hairpins, varnish.
- If the strands are strongly curled, you must first straighten them with an iron or hairdryer.
This hairstyle looks best on voluminous, smooth or slightly wavy long hair. They must be clean and dry. Wet strands must be dried with a hairdryer, giving them volume.
- Before braiding a bow, the hair should be lubricated with foam or mousse, you can apply wax.
- If you want to braid a bow on long hair, which is not at all splendid and thick, you should first curl it with large curlers.
Hair bow hairstyle: 1st way
This simple method is suitable for those whose hair has grown at least to the shoulders or longer. All strands are tucked into a bow, the hairstyle looks strong, smooth, refined. Hair should be clean, very well dried.
It is best if the strands are washed in the evening, and you will begin to braid the bow in the morning. So the hair is more manageable, flexible.
The step-by-step instruction consists of four simple steps:
- First, the curls must be combed very carefully. Then choose where the hair bow will be - at the crown or the back of the head. All strands should be taken into the tail with your hand, you do not need to wear the elastic band yet.
- Now you need to take the elastic and start wrapping it around the base of the tail. Do not stretch the tail completely, leave a large loop. It should look like a round bun. We tighten the tail at the base harder so that the future bow will turn out to be lush and well fixed.
- Divide the resulting lush bun into two halves with our hands, forming them in the form of bow loops. Now, through these halves, you need to throw the ends in the middle that were not stretched through the elastic. It turns out a knot of a bow. The ends of the strand must be hidden under the bow, securing them there with hairpins or invisibility.
- If some strands are not too flat, you can press them to your head with modeling gel, ironing it with your hand. The hairstyle ends with the fact that the bow is sprayed with varnish from all sides.
If you wish, you can then put on a beautiful thin hoop on your head, attach a bright large hair clip on top of the bow. It is better to choose an elastic band that is inconspicuous, suitable for hair color.
Hair bow hairstyle: 2nd way
If you want to make a more beautiful or solemn hairstyle, you can braid a small hair bow on the loose strands. This hairstyle is suitable for those who have long enough curls. If they are too smooth, you can first curl them a little with curlers or braid them overnight.
The instruction on how to make a beautiful hair bow on wavy loose curls is quite simple, we will consider it in stages:
- First, the hair needs to be brushed with a massage brush. From the very top of the head, on the sides, we separate 2 identical strands for a small bow, the lower ones will remain loose.
- We connect the two upper strands in the middle of the back of the head, wrap them with an elastic band. The tail must be skipped not completely, leaving a small bun.
- Divide the resulting loop into two identical halves with the fingers of both hands, forming a neat bow.
- For reliability, you can still fix each loop with a hair clip so that it does not bloom.
- We throw the rest of the tail from the bottom up through the loops in the middle, making a knot, release the ends down.
- We correct the hair with our fingers, smoothing the strands.
- We spray the hair bow with varnish, comb the loose strands, trying not to touch it.
- The curls remaining loose can be left straight or curled at the ends with a curling iron.
Hair bow hairstyle from thick hair: 3rd way
You can make a larger bow at the back of your head by making it from two separate tails. The remaining strands hang down loosely, and the bow can be made in any size. You will need 4 thin elastic bands, hairpins, varnish.
1. Divide the hair along a horizontal line into two parts, we will make a bow from the top, and leave the bottom loose. Divide the upper zone with an even parting into two identical parts, tighten each with thin elastic bands in the tails.
2. Now each ponytail approximately in the middle must be tightened again with a thin elastic band.
3. Bend the first ponytail up and to the side so that its lower elastic touches the upper one tightly. It turns out the first loop of a large bow. We hold its base with our fingers, wrap it with one of the elastic bands so that it holds well. We do the same with the second tail, performing in the same way the other loop of the bow. We also fix it at the base.
4. Take one thin loose strand, wrap it around the elastic bands, forming a knot in the middle. We fix it with varnish. The hair at the bottom of the bow can be curled with medium-sized curlers, giving this hairstyle even more solemnity.
Hair bow hairstyle: 4th way
An even more interesting hairstyle in the form of a bow looks on lush, voluminous hair. You can even do a bouffant in front by lifting a little strand. Such a hairstyle is done simply, you can easily do it yourself.
The step-by-step instruction consists of simple steps:
1. Curls should be combed, taken into a lush ponytail from above. We leave most of the bottom loose. First, you need to comb your hair at the very roots and at the ends.
2. Now you need to once again pass the tail through the loose elastic band, leaving it hanging in a tight bun. It must be divided into two identical parts, pass the end of the tail through the bundle, making a knot on the bow.
3. The tips should be hidden under the bow and fixed with invisible ones. Loose strands need to be curled with a curling iron at the ends.
The fleece gives the hair volume, the hairstyle looks very elegant. It is recommended to use a curling iron to curl beautiful tight curls from the remaining uncollected hair. Curls under the bow will look very feminine, chic.
Tips on how to add volume to curls to create a bow hairstyle
To make the finished bow hairstyle look voluminous, you need to give the smooth slicked hair the necessary splendor. To do this, straight curls need to be curled with curlers or a diffuser, to make a bouffant.
- The bouffant is done with a comb with very rare teeth. The front strand is separated, lifted by hand, combed from the tips to the roots. You must do the same with all the necessary strands. Then you should comb them with a brush with frequent teeth, put them in your hair.
- Foam or mousse is applied to damp hair to add volume to the diffuser. Then strands are taken at the roots with the fingers of a diffuser, passed between them. It is better to dry your hair in this simple way, tilting your head down a little. The hair is tucked in with your fingers, lightly combed.
- To achieve the volume and splendor of the curls, they are wound on large or medium curlers. On each strand, mousse or foam is gradually distributed with your fingers, and the curlers are kept for about 20 minutes. Before removing the curlers from the hair, each strand is dried with a hairdryer.
Hair decoration bow
Having made a hairstyle in the form of a bow from your own hair on your head, you can also decorate it with various bright accessories.
- The bow looks very nice, complemented by hairpins with beads, flowers or shiny pebbles at the ends. They can be stuck in from above, below the bow, fixed in the middle, in place of the knot. It is recommended to use several of these pins, securing them in a row.
- Such an original styling with thin patterned hoops looks interesting. They can be worn on hair that is completely gathered or loose at the bottom. It is advisable to choose a bright, light, thin or shiny hoop.
- You can use a lace or cloth band, a plastic headband, a twisted scarf. It all depends on the mood and the shape of the hairstyle.
- If your hair is too short and does not allow you to make a bow from your own curls, you can cheat a little. Now headbands and hairpins with bows made of artificial hair are on sale, you can simply attach it to your strands and look fashionable, original.
All these methods are simple to perform, you can get the hang of it and make such bows with your own hands at the mirror. The hairstyle always looks feminine, stylish, attracts the eyes of others.
If skills allow, you can make a cute or mischievous hair bow on the crown, back of the head, side of the head, remove all strands or curl loose curls.
On a hot, rainy or windy day, you want to lift your hair higher and secure it. The usual ponytail and bun are already fed up, so there is an interesting and beautiful way to collect hair. You can make a bow out of hair. A hair bow hairstyle will help you create an unusual look. Do you like naughty and not ordinary? Then you will be interested to know how to make a bow out of hair with your own hands. Several detailed master classes will help you make a naughty bow out of your hair in a few minutes.
The "Bow" hairstyle is quite versatile, it can be easily made from curly hair and from smooth hair. You can make a bow out of hair on the back of the head, or you can make it on the top of the head, and the length of the hair can play a role. This hairstyle can act as a daytime, as well as for an evening light. But there are a couple of essential nuances, ignoring which is the same as harming oneself.
1. Nuance first: you should not make a "bow" from your own hair if your curls are dull, thin, lifeless and brittle. Not only will the hairstyle not look dignified, it will also not be able to maintain its shape for the time you need.
2. The second nuance:"Bow" draws attention to the face of its wearer, therefore, if you have a large nose, chin or a wide forehead, this hairstyle will not suit you.
Hair bow for girls
This hairstyle is so cute that many will like it. At first glance, it seems difficult, but if you look at all the steps, everyone can do it. This hairstyle can be done for a children's matinee or other holiday.

A beautiful bow hairstyle allows you to create a doll-like look on hair of any length. A great option for a festive occasion, for example, a hairstyle for a children's matinee.
STEP 1. Tie your hair into a ponytail.
STEP 2. Separate a small strand from the very center of the tail and remove it to the side, securing it with a clip so that it does not interfere.
STEP 3. Divide the remaining hair in the ponytail into 2 sections and gently comb each one.
STEP 4. Using the tongs from the base of the tail (near the elastic), curl each strand separately into a curl. If your hair is long, curl the strand in several steps - it is important to get a beautiful spiral curl.
STEP 5. Making a bow. Roll the strand in the form of a half bow, securing it with invisible ones near the base of the tail. Do the same on the other side.
STEP 6. Now we take the strand left at the beginning, it can be fixed with an invisible or transparent elastic band to the tail, and we braid a pigtail from it. The main thing is that this pigtail is in the center of our bow.
STEP 7. Roll the end of the braid and tuck it into a bow.

Cute hairstyle hair bow step by step instructions
How to make a bow out of hair: video tutorial
This video tutorial will teach you how to make a hair bow in a few minutes. Showing in detail what to do. Prepare in advance 2 thin hair ties and a few bobby pins.
How to make a bow from hair below the shoulders: photo tutorial
You will also need invisibility, two hair ties, a comb, and styling products. Styling spray if you have unmanageable hair and hairspray to fix your hairstyle. Next, see the photo instruction.

What we need: a hair comb (with sparse teeth), several invisible hairpins or hairpins, two elastic bands for thin hair, hairspray. In order for the hair to fit better in the hairstyle and not crumble, it must be washed and applied with balm before styling.

Tie your hair into a high ponytail and tie it well with an elastic band. Then, using the second elastic band, fold the tail in two, so that the ends of the tail are in front - falling on the forehead, and secure.

Divide the resulting bunch into 2 parts using the ends of the tail. Secure the ends at the back with invisible ones. Spray your hair with nail polish.

Hair bow on the head: a detailed photo lesson
A low bow is an interesting hairstyle. Suitable for daily trips to school, institute. You need to do this hairstyle in the same way as in the previous lessons, but only the tail needs to be tied a little lower.

Other hairstyles
Hair can be collected and made a bow out of them in another way. For this option, you will need one elastic band and several hairpins or invisible pins.

A bow on long, loose hair is very romantic and feminine.

