Do-it-yourself soft toys. Simple DIY fabric toys. Video: We sew a minion master class
The most pleasant thing is to play the toy that is made by the caring hands of a loved one or a hand-made master. Such a toy is endowed with special warmth, love, soul. But it’s even more pleasant to make a toy yourself. This creative process is a lot of fun. The article below provides many options for how to sew do-it-yourself soft toys from fabric, and a description of the manufacturing process.
Any, even a completely inexperienced, novice master can make a good toy, based on the tips and patterns given. Fabric toys are in fashion today, and they are simply beautiful and pleasant to the touch. It is not difficult to master the technique of sewing such toys, you can choose primitive options that are cut and sewn in one piece, or encroach on complex composite toys, if you try, even beginners can master them.
Today, do-it-yourself soft toys made of fabric are very popular, patterns for which and a description in stages for beginners are given in our article. Moreover, it can be animals and dolls. It even happens that a bunny or a cat is sewn in the shape of a doll in clothes, such toys can be attributed to the "tilde" style. All fabric toys are made from different materials. For example, it is better to sew any animals from fabrics such as:
- Fleece. This material is very easy to work with and pleasant to the touch. The fleece toy is a pleasure to play and hold in your hands.
- Plush. It makes stylish vintage bears or hares.
- Artificial fur.
- Cotton: chintz, poplin.
- If you decide to sew a doll, then you can use for it:
- Thick jersey.
- Cotton.
Tilda style dolls, hares and bears are very well made from linen or cotton. For primitives, fleece and cotton are suitable.
Choose the color of the fabric according to the idea. For the body of dolls and toys "tilda" is suitable bodily material, it can be slightly grayish. For animals, choose any color, the main thing is that the whole image is harmonious.
The garment fabric or decor should be in harmony with the base material. Therefore, before starting work on a toy, you should think over the whole image. Experienced craftsmen are advised to even make a sketch or sketch of a future creation.
Photo gallery: Patterns for sewing soft toys


Details and decor
For fabric toys, you can use special plastic blanks as eyes, spouts, which are abundantly offered by needlework stores. They are very easy to use. We just sew the eyes and nose to the right places, or even glue it.
In addition, small buttons or small black beads can be used as eyes and nose.
Another simple option would be a painted face or muzzle. To do this, use acrylic paints. Variants are also possible here. You can sketch a muzzle, marking the eyes and nose with simple dots, or you can draw a realistic muzzle or face. To do this, first draw a sketch on the face of the doll or toy, draw the outline of the eyes, outline the nose, draw the line of the mouth.
Then paint with paints. First, the eye sockets in white, then draw the details with dark shades. You can rouge a doll or animal with real cosmetic blush, powder or pastel, using a sponge or a cotton swab.

Caterpillar soft toy
Details of the muzzle of the animals can be made from fabric by cutting out and sewing on circles for the eyes and a triangle for the nose.
And another interesting option for making a muzzle or face is embroidery. A complex face must first be outlined with a pencil, and then embroidered with threads. This is done after the parts have been cut but not sewn yet.
Hair for a textile toy will be a special moment. They can be done in different ways:
- From threads for knitting, by unwinding a small cut and sewing them to the head of the toy. You can weave a braid from threads and sew dolls or bunnies to the head, or beautifully twist the braid on the top of the head or on the sides of the head and sew on pretzels.
- From special tresses with hair, which are sewn or glued to the head of the toy.
- From yarn for felting. To do this, you need to roll the hair with a special needle for felting, give it the desired shape.
- Simple bangs or tails can be made from felt by simply sewing cut out bangs and tails to your head.
- Draw the hair.
- An already finished toy can be decorated with small decor: bows, beads, rhinestones, buttons, by sewing them on or gluing them to the finished toy.
Primitive toys
Primitives are fabric toys that are made in one piece. It can be any animal in which one detail is cut out at once with the head, body and legs.

Primitives can be:
- Seals and dogs.
- Bear cubs.
- Fish.
- Elephants.
- Bears.
- Monkeys.
- Any birds: cockerels, owls.
Well, in general, any animal that the master only wants.
Sewing this toy requires very little time and effort, but, despite the fact that it is done simply, you need to approach the process with all care.

Primitives can be very small, suitable for a pendant or keychain, medium-sized for play, or large in the form of decorative pillows. The pattern does not change in these cases, only its size changes. The toy is always cut out on the fabric folded in half, in one piece. After that, only the decor is sewn.

One of the options for such a primitive do-it-yourself soft toy made of fabric is a cat, patterns and descriptions for beginners to which are given below.

Soft toy "Cute cats"
To work we need:
- Pattern of a cat, it is shown below.
- The fabric of the main shade: white and red, you can use fleece or any other.
- Sewing machine, needle and thread.
- Scissors.
- Sintepon.
- Beads for eyes, decor.
- We cut out the cat from the main fabric folded in half.
- Cut out two mugs for the eyes, a triangle for the nose and hearts for decor from fabric of a different color.
- We sew eye circles, nose and hearts on the front of the cat, first we bait it with our hands, then we sew it on the machine.
- We fold the front and back halves of the cat exactly, sew on the machine, leaving room for the filler.
- We fill the toy with padding polyester, a small toy can be filled tightly, a large one or a pillow can be filled with medium density.
- Sew up the hole with our hands.
- Now we embroider small details: antennae, eyelashes, eyebrows, sew decor and beads or buttons in place of the peephole.
- You can tie a ribbon or sew a bow to the cat.
A wonderful toy made of fabric in the shape of a cat is ready.
They are mainly sewn in one piece. There may also be those with a sewn-on head or legs. But they are all done according to the principle described above.
Primitives made from light cotton can be turned into fragrant souvenirs. To do this, we hang them on a loop of braid, dip them in a special fragrant and dyeing solution.
It is done as follows: dissolve strong infusion of black tea, instant coffee in water, add cinnamon and vanilla. Soak the toy, you can boil it. Then we hang it to dry in the oven for 20 minutes at a temperature of 120 degrees.
The fragrant souvenir toy is ready. You can decorate it with paints or sew on bows, a skirt.
One of the favorite do-it-yourself soft toys made of fabric is an owl, patterns for beginners are given below. We have selected the simplest and most interesting patterns, you can choose any one that suits you.

For an owl, you can use beautiful cotton, chintz with a printed pattern. You can combine colors and fabrics with each other, choosing according to color and texture.
The owl must be decorated with stripes, buttons, bows, ribbons.
The procedure for making an owl:
- We cut out the details.
- On the front side of the owl we sew all the small details of the muzzle and decor.
- We sew the wings and ears, if they are planned.
- We put the wings between the front and back of the body and sew.
- We turn it out and stuff the owl with padding polyester.
- Next, you can beautifully decorate the owl with bows, sew on eyes, buttons, ribbons and beads.
- The owl can be hung on a lace loop and put on a twig, simply by sewing on the fabric loops.

In addition, an owl can become a decorative pillow on a sofa, armchair or bed if you make it large. Or it can be a keychain if the owl is very small.
Stylish DIY soft toys made of fabric or plush in the form of a Teddy bear are very popular today, patterns and descriptions for beginners are given below.

Teddy bear is a rather complex toy that is made from many parts. For her, you need to carve out a head, ears, upper and lower legs, and a body.
The following are several options for a pattern for a teddy bear. It can be made from printed cotton, plush or faux fur. After the bear is ready, you can dress it up or decorate it with decor, tie a tie or ribbon bow, sew or glue flowers or buttons. We'll talk about clothes for toys later in the article, first, a little about the stages of creating a bear:
- All details must be transferred from paper to fabric and cut out.
- After that we sew separately the muzzle, legs, body, ears.
- The most important point is the assembly of parts. We carry it out with the help of a special thread fastening or a button-thread fastening, sewing through both legs at once at the top and bottom. Sew on the head and ears.
- After that we sew on the eyes and nose, or we embroider with a thread and a needle.
Here the Teddy bear is ready, it remains to decorate or dress it, and admire it.
Tilde style toy. Hares
A tilde-style toy is a very popular type of soft toy today. This is not necessarily a doll, but, for example, a bunny, which we will consider further. "Tilda" is an attic doll made of natural fabric, remnants of fabric, scraps, competently and stylishly combined with each other. For a tilde bunny, cotton or linen of a natural unbleached shade is suitable.

Soft toy "Hare"
- We transfer the pattern to the fabric, cut it out. The ears can be cut from two different fabric shades. The back of the eyelet is in basic fabric and the front in brightly printed fabric.
- We bait all the details, we sew each one separately.
- We stuff the head, legs and body quite tightly.
- Now we sew the head and ears with a simple seam, and fasten the legs with a thread or button-thread fastening, two through and through at once.
That's all, hare - the tilde is ready. It remains to dress him up.


Clothes for fabric toys
Clothing for fabric toys can be very simple, one-piece, just symbolic. Or rather complicated, detachable, like on people, so that it would be interesting to change it. Clothes can be sewn or knitted.
Clothes for the toy can be put on while sewing the toy itself, then it will not be removable. For example, if we sewed a hare, then before sewing its arms and legs, we can make a blouse, put sleeves on the arms and then sew it on. So with pants, you can cut and sew jeans, for example, put them on the legs on top and then sew on the legs.
The simplest type of clothing will be a fluffy tulle skirt. To do this, collect a strip of tulle and sew it on the animal's waist or put it on an elastic band, then the skirt will be removable.

Knitted sweaters or dresses look very good on sewn toys.
To do this, you can knit or crochet a full-fledged sweater, with a fastener, which will be removed, or also, with details, the body and sleeves separately, put the handles into the sleeves, and the body into the body and then sew it.
If you are making a toy for a child to play, then make removable clothes, you will have to tinker with it, it must be with an elastic band or with a fastener in order to take it off and put it on. But the child will be delighted, and this toy will definitely become a favorite.
Non-removable clothing or no clothing at all is suitable for an interior toy.
Recently, educational toys have appeared on the shelves of all stores. "And how without them ?!" - teachers exclaim. Let's figure out what an educational toy is.
As the name suggests, this is a toy that develops something in a child: fine motor skills or some kind of knowledge. By and large, all toys are developmental: the rattle teaches the child to control their hands (grab, shift from hand to hand, throw). And yet, developmental ones are usually called those toys that allow the child to learn something in a playful way. You can make many of these toys yourself.
The main stages of child development
Before you start making a toy, determine what age it will be designed for. Obviously, the five-year plan will not be interesting. It is also important what the child is fond of. It depends on what shape your toy will be and what kind of plot it will be combined.
I would like to remind you that everything is individual. Perhaps your child has already mastered some skill ahead of time, perhaps not.
0- 3 months
The child lies on his back most of the time. It is necessary to develop the ability to focus your gaze.
Types of toys: mobiles, bright rattles, garlands, beads.
Requirements for toys: different textures, lightness of toys, simple shapes. The colors are bright, but not variegated. Preferably no more than 5 items.
3 - 6 months
The child moves more and pulls all objects into his mouth. Learns to roll over from back to stomach. It is necessary to develop coordination of movements, hearing and vision, and the skill of grasping.
Types of toys: tumblers, rag beads, toys with a mirror, rattles - dumbbells, rings. Developing rugs with arcs. Rag balls, bracelets with buttons.
Requirements for toys: bright, multi-textured toys that emit different sounds.
6 - 9 months
The child learns to crawl, recognizes loved ones. Able to entertain himself for a while. It is necessary to encourage motor and speech activity, as well as develop the ability to grab an object not with the whole hand, but with two fingers.
Types of toys: educational rugs, sorters, pyramids, nesting dolls, musical toys with buttons.
Requirements for toys: bright, sounding toys should differ in shape, weight, method of use.
9 - 12 months
The child learns to walk, talk. It is necessary to develop motor and speech activity.
Types of toys: developing rugs and picture books, rolling toys, dolls with pronounced facial features, glove and finger puppets, pyramids, cubes, sorters, options for boxes, buckets, baskets (toys - inserts).
Requirements for toys: toys made up of different parts that can be assembled and disassembled. Toys that reflect real-world situations.
1 year - 1 year 3 months
Active development and exploration of the surrounding world begins. The child manifests a desire for independence. It is necessary to develop motor and speech activity, as well as thinking operations: comparison, generalization, analysis.
Types of toys: pyramids, cubes, insert toys, musical instruments.
Requirements for toys: toys made up of different parts that can be assembled and disassembled.
1 year 3 months - 1 year 6 months
Development of speech, encouragement of speech activity, development of fine motor skills (unfastening - fastening in various ways). Development of the operation of thinking.
Types of toys: educational rugs and books, cubes, toys with a surprise (secret), sorters.
Requirements for toys: toys that allow to generalize objects based on similarity, size, color. Names of animals, plants, clothing, etc.
1 year 6 months - 1 year 9 months
Active knowledge of the surrounding world. It is necessary to develop active use of objects for other purposes, independent play, understanding of emotions.
Types of toys: toys reflecting real situations and objects of the surrounding world, animals.
Requirements for toys: object games (plot, construction, etc.). Toys requiring to show and name colors, shapes, choose an action.
1 year 9 months - 2 years
The child is actively developing socially. It is necessary to develop an understanding of shape, color, size.
Types of toys: sorters, pyramids, cubes, books.
Requirements for toys: toys that can be grouped by shape, color, size.
2 - 3 years
The child's active social development continues, he already knows how to interact with other children. It is necessary to develop fine motor skills, as well as the ability to distinguish shapes, colors, sizes.
All kinds of toys. Crafts from natural materials, paper, plasticine.
Requirements for toys: toys for subject, role-playing games.
35 years
Activity, the ability to independently build their game activities. These skills need to be reinforced.
Types of toys: children's lotto, puzzles. Games for studying the time of day and seasons. Learning the alphabet and numbers.
Materials for making educational toys
There are a lot of materials for making educational toys, most of them are in every home!

Remains of fabric
Educational toys are good because you can use the leftovers that every needlewoman has for them. For example, the remains of various fabrics, felt, fleece, knitwear. Different textures are welcome!
Want to make your life easier? Use small pieces of fabric that are applied to new suits.
Those who know how to knit can use squares that are knitted to calculate the loops.

Everything is used: laces, ribbons, buttons, beads, zippers, buttons, drawstrings, snaps, adhesive tape, buckles and much, much more! And small thermoapplications may well play the role of a secret hidden behind a curtain or in a pocket.

Furniture fittings
Latches, hooks, keys with locks and threaded screws can be used, for example, when "building" a house.

Rustling elements
The rustling of this or that element is achieved due to the crumpled cellophane wrapper from tea or a box of chocolates nested inside.
Thundering elements
The thundering elements represent a huge scope for imagination. Place inside a plastic container for shoe covers or a plastic egg from Kinder Surprise, into which some cereals (rice, peas, buckwheat, small pasta), salt, dried cherry pits or acorns are poured.

Ringing elements
Most often they represent a small bell, bought for little money in a souvenir shop or a fishing shop.
Shiny and transparent elements
These include pieces of thick foil, the inside of juice or milk packaging, and packaging for toys or bedding.

Opening elements
They are usually very popular with children, especially if someone is hiding under them) Options: window, pockets, curtains. Or you can use these ordinary water or juice caps.

Old clothes
Some craftswomen use children's clothes for their babies, which are already small for them.

Excipients
As soft fillers, they usually use synthetic winterizer, foam rubber (then your cube will keep its shape) or foam.
However, I am sure that if you think about it, you will definitely come up with something of your own!
What are educational toys
On the Internet, you can find a huge number of self-made educational toys: books, cubes, panels and rugs, pillows, stands, houses, animal figures, etc.

Developing mat


The plots are also varied. It can be some kind of children's fairy tale or just a plot picture.

Remember, for example, what your boy is fond of: cars or little trains?


Interesting versions of books "about the baby" - they not only develop motor skills, but also help the child to better know the world around him.

Or maybe it will be just a cube, with some elements? It's up to you to choose.

All toys can be divided into 2 large groups: those with whom the child can play independently and those for which need help or the presence of an adult... Usually, the first include entertaining toys for children in the first months of life, as well as toys that develop fine motor skills. After several shows, the child will be able to unbutton a zipper or a button, unscrew the cap, etc.

The presence of an adult requires toys that develop the ability to count; find more-less, right-left, top-bottom; name colors and geometries, body parts or animals, explain rules of behavior or traffic, etc.

Toy variations and the skills they develop
Such a bracelet is useful for a very small baby (from 2 to 4 months). It will contribute to the development of the baby's hearing and vision, as well as the coordination of movements.

Beads (sling beads)
Sling beads develop color perception, tactile sensations, teach the child to touch and roll small elements. Or, in addition to beads, you can attach several small knitted animals or fruits.

Pillow with buttons
Despite the seeming lightness, the toy is quite interesting. develop the baby's tactile perception. Take it with you on the road and ask your child (depending on his age) to find all buttons of a certain color, count them (on the whole pillow, in one row or column), find the largest or smallest button of a certain color in a row or on the whole pillow, show which button is to the right of the little blue one, etc.

Book
Develops fine motor skills, teaches the names of animals, allows you to study colors and geometric shapes.


Stand with locks
I'm sure the boys will absolutely love it! There are so many things that you can open, unfasten, turn and press. It is quite simple to make a developmental stand, most of the elements can be found in the closet of any man.

The rug is a fairy tale
The rug develops the child's speech and imagination. Simple leading questions from parents will help the kid to quickly master these skills (Imagine that Kolobok turned the other way? Who will he meet? Etc.)
It is easy to create original toys from socks and leftover fabric. See how to sew a pillow toy, Basik's cat, make an educational board.
Original toys with your own hands from socks

Please the children, make such dolls for them. To do this, you need a little, namely:
- socks;
- thread with a needle;
- scraps of light plain yarn;
- filler;
- narrow braid;
- dark beads;
- scissors.
Even those who do not know how to use a sewing machine can make such original toys. Only the possession of a needle will come in handy.
- Cut the sock in half. One part is the foot. The second is the heel with elastic. You only need the first one. Stuff it with filler, but not very tightly. Sew on the right and left with a needle to define the sides. You also need to make the legs, stitching in the lower part in the middle. Sew up the top hole through which the body for the baby doll was stuffed.
- Cut a small circle out of a light-colored fabric, gather it on a thread, tighten it a little, fill it with filler. Then you need to tighten the thread, fix it. Do not cut yet, but sew the resulting head to the body using the same thread.
- Sew on beads instead of eyes. You can rub blush across your cheeks to brighten them up. Tie the junction of the head with the body with a braid.
- Take the second part of the sock, cut off the heel, you won't need it. Only the upper part is needed - with an elastic band. Tuck in at the cut, sew along the edge here on your hands. Put the cap on the doll's head, sew it at the top so that at the end you get such a "tail".

To make such an adorable cat, you will need:
- 2 socks;
- threads;
- needle;
- scissors;
- synthetic winterizer;
- marker - better water-soluble.
Sew the hole in a straight line so that you have two ears.

Use a marker to draw the facial features of the original toy.
If the marker is too bright or not water soluble, then a plain pencil is best.
Now you need to embroider according to these marks, taking a thread of the appropriate color.
In order for such original cat toys to acquire front legs, you need to make them from a second sock. To do this, first cut it in half across, and then - as in the photo.

Now these paws need to be sewn up, stuffed with padding polyester, and stitched to the toy's body.

Here is such a wonderful animal turned out. If you like him, make him a friend.
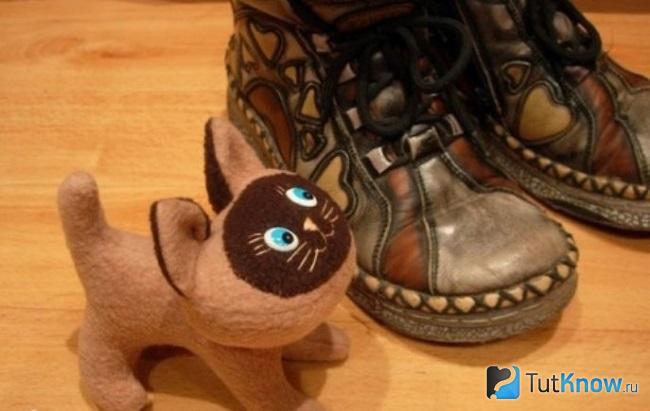
DIY soft toy cat

This character is very similar to the cartoon character. The pattern clearly shows how such a soft toy cat is made. It will require:
- soft dense fabric of beige and dark brown color;
- filler;
- threads;
- eyes for toys.
- Cut out two parts of the abdomen, stitch them in the center. The two side blanks need to be sewn on the back. You have 2 parts. Sew them together in the area of the paws, tail, on the sides.
- Create a kitten's head from the corresponding details. Cut out a muzzle for him from a dark canvas, stitch it onto the character's face. Stuff your head with filler through the bottom. Put it on the kitten's neck, sew it with a blind seam on your arms.
- Each eyelet consists of two parts - brown and beige fabric. These triangles are sewn in pairs, turned inside out through the still unsewn bottom. Then the ears need to be sewn to the head, making them along the fold.
- It remains to sew on the eyes, embroider the mustache, eyelashes, mouth and nose with light threads, and a soft toy, which is so interesting to create with your own hands, is ready.
How to sew an original pillow toy?
Kids love these items very much. They first play with these stuffed animals, then when they get tired they use them as cozy pillows.

Before you sew a pillow toy, prepare:
- fabric, pleasant to the touch;
- filler;
- scissors;
- pink canvas for decoration.
- 2 pcs. for the head;
- 4 - for the ear;
- 2 - for the body;
- 2 - for 2 tails;
- 2 - for the ear pad.
Stuff the body and tail with filler. Sew the tail to the body where the markings are. Sew on the head, after filling it with a small amount of filler. Attach the patch to the ear with pins, stitch it by turning the edges. Decorate the second ear in the same way.
Cut out the nose, heart, ornaments for the tail from pink fabric. Sew on them too. It turned out to be a wonderful product. If you want to know how to sew a pillow toy to make it look like a funny bear cub, then watch another master class.

This will require:
- beige and white fabric;
- a piece of black leather;
- filler;
- threads;
- needle;
- scissors.

As you can see, they are oval, straight from the bottom. Sew the details in pairs. Sew a light face, black nose on the front of the bear. To make it, cut a small circle out of leather, gather on a thread, fill with filler. Sew the toys onto your face.

Now fold the front and back with the right sides, inserting the stitched legs between them. Sew around the edge leaving a gap. Turn out the workpiece through it. Fill it with filler, sew up the hole.
You can make such original toys from the remnants of fabric. If there is a monochromatic one, you will get the muzzle of a dog and a cat, and from a colored one - their bodies.

The following pattern will help to sew a toy pillow in the shape of an owl. It is created from the main fabric, and from the colored one - a beautiful bird's skirt.

If you want your child to like the toy even more, then sew little owls as well. Sew a wide strip of fabric on the owl's belly, stitch it vertically to create pockets. Put owls in them. To keep them well, cover with the wings of the mother bird. Fasten them with buttons.

Pom-pom toys
They come out warm and cozy.
To make them you will need:
- cardboard;
- pencil;
- round templates with a diameter of 2.5–7 cm;
- multi-colored yarn;
- sharp scissors;
- felt;
- glue gun.

Using the lids, draw circles. Place smaller coins in the center and outline them. Cut out the resulting cardboard rings. Make cutouts on the side of each.

Align two cardboard blanks of the same size. Wind the yarn around them tightly. Separate the cardboard. Cutting the yarn in the center, insert the thread in the middle, tighten it, tie it.

For each animal, you need to make two pom-poms of different sizes. The smaller one will become the head, the larger one will become the body.

Connect these elements by tying them with threads. Cut out ears, eyes, nose for an adorable animal, attach them with a glue gun.

The lamb is made of white threads, the eyes are cut out of black fabric, the nose is made of pink, the ears are made of white.

Create the chicken with yellow pom-poms.

These are the original toys you can make with your own hands.

If you have kids at home, make useful things for them from the leftover materials.
DIY original educational toys

Soft books are an irreplaceable thing for a kid. It is interesting to do such educational aids with your own hands, thereby saving a lot of money. To make such educational toys, you will need:
- the cloth;
- threads;
- scissors;
- sheet filler;
- finishing elements.
If you do not have a sewing machine, sew each sheet with a basting stitch on your hands, making long stitches.
Do the same for the rest of the pages. Each should teach something to the baby. On one you can sew a sneaker, fasten a lace on it, so that the child practices lace up it.
Let the girl learn to weave a braid. To do this, sew three ribbons to the top of the page.
It is useful for a child to get acquainted with the clock. Cut a circle out of a light dense fabric, sew numbers to it. Cut out the hands of the clock from their dark canvas. Clip them in the center of the dial.
For a child to study geometry from an early age, cut out various shapes from the patches, sew them onto a book. The same pair must be created from fabric and Velcro attached to them. The kid will look for paired figures, match them.
You can not sew a book, but attach geometric shapes to a dense drape, let the child find pairs for them.

If you have cardboard boxes, make a whole set for cars out of them for the boy, which will include:
- washing;
- gas station;
- garage;
- riser.

Cars can be made from the same material. You will make them from wood, plywood.

DIY development board

You won't get bored with such a toy! After all, there are so many interesting things here, you can scroll the phone disk, learn how to open and close a real lock. Now you do not need to click the door chain, latch, since all this will be on the board. Abacus will help a child learn to count, scales - to weigh objects.
To make such "smart" original toys with your own hands, you will need:
- door lock, latch, chain, handle;
- abacus;
- scales;
- switch;
- buttons;
- the cloth;
- rubber bands;
- switch;
- glue gun;
- colored cardboard;
- self-tapping screws;
- MDF sheet;
- sneaker, etc.
- Lay out the items on the prepared board. See how to position the lock so that it closes well. The same goes for the latch, door chain.
- Screw one half of the lock to one plank with self-tapping screws, and the other and the doorknob to the other. Attach these boards to the MDF in the same way.
- To keep the abacus in working order, you could rattle it with your "knuckles", attach only the frame to the board.
- Glue the scales, housekeeper, and other items using the hot gun silicone rods. Cut out the base of the phone from cardboard, glue it to the board, fix the dial in the center.
- Cut out a small dress from the fabric, sew buttons and an elastic band to it in the form of loops. Let your child learn to unbutton and button clothes.
You can use various items that you have at home to decorate the development board.
Original toy - Basik cat
This toy is loved by both children and adults. This cute cat is sewn from a material that is pleasant to the touch.

If you want to quickly create such an original toy, then use a simple pattern.

At the bottom of the back and tummy, you need to make a groove, then these details will become more voluminous.
On Basik's pattern, the groove points are indicated by triangles. You just need to match the opposite sides of each shape and sew on the wrong side.
- The muzzle consists of two identical parts, cut out in a mirror image. They need to be connected by stitching in the center.
- For each foot you need to cut out 2 did. In total, you will need 4 parts for the hind legs and the same for the front legs.
- Sew the paired pieces on the wrong side, leaving the top unstitched. Turn out the legs, stuff them with filler. Sew the muzzle to the tummy.
- Here's how to sew Basik further. To assemble this original toy, place the front on the back, put the front and hind legs between them, placing them in place. Turn the toy out through the hole left at the bottom.
- Fill the animal with a little filler and sew the hole on the hands.

Here are paws with toes. Don't forget to sew a tail on the toy. It is given on a pattern.

Sew a fish from the trimming of a colored canvas, put it in Basik's paws.

You can dress up the cat at your discretion, clothes for Basik are also easy to sew.

If this is a winter version, a hat with earflaps and a scarf will do. You will sew the first one from the remnants of fur, and knit a scarf from yarn.
Here are some original toys you can create with your own hands. Choose the ones you like and get down to needlework. And to simplify the process of creating new things, get ideas for inspiration, watch selected videos.
Toys are what attracts both adults and children, they are completely different and for different purposes.
DIY fabric or textile toys are some of the safest and most attractive types of toys for children. They can be played by children from early childhood, but in adulthood, soft toys do not lose their relevance. For example, now it has become fashionable to give and decorate home comfort with handmade interior toys. As a rule, such toys are not cheap, so many consider them a sign of luxury and prosperity.
Even the simplest toy, made with high quality and with love, can become very valuable and necessary in someone's family!
For example, my daughter has become a favorite toy - the owl Angela, which I made for her a couple of years ago, she now does not part with her and takes her to sleep with her for a walk, and to the store, to the dacha, (it's good at least they bathe separately)) in in general she fell in love with her. I think most children either have a favorite toy, or really want to have it.
Therefore, today I propose to make a beautiful toy for a gift, and for whom it will be up to you to decide!
Below I have collected templates with a pattern of toys, as well as a step-by-step master class on making.
How easy it is to sew a stuffed animal. DIY soft toys for beginners with templates
For beginner craftswomen, the easiest way to sew will be from a simple pattern.
For example, take a bear template and print it on a printer, increasing it to the desired size, but you can also redraw it on paper, for this, increase the template you like to a suitable size on a computer monitor, attach a white sheet of paper to the screen and carefully trace all the contours of the pattern with a pencil.

Then cut the paper template along the contours.
Choose a pretty fabric for your toy.
If this is not a complicated toy, for example, like a bear in the photo, then here you need to fold the fabric in two with the front side inward, you can fix it with pins for convenience so that it does not slip, then attach a paper template to the fabric and trace the contours of the fabric with soap or chalk.
Cut out fabric blanks, leaving seam allowances.
We sew on a typewriter with the usual straight stitch, leaving a small hole in order to then turn the toy onto the front side.
Notches should be made in the places of the folds so that the fabric does not pull in these places.

Now everything is turned inside out on the front side and stuffed with padding polyester, padding polyester or other similar fillers.
It should not be stuffed too tightly, but so that there are no empty areas, the filler must be distributed evenly.
The hole through which they were stuffed at the end is sewn with a blind stitch.
We glue or embroider the toy's eyes and mouth, nose.
We add beautiful details, for example: a bow, a flower, a scarf, buttons, or in general, you can sew clothes. There is a huge field for creative experiments.

Implement the idea!
Simple fabric cat pattern.
Another easy-to-sew model is a kitty.
It is sewn and cut according to the same principle as the bear, only here two parts are cut out.
This is the cat itself in two parts and the tail, also in two parts.
They are sewn separately, small holes are also left for turning inside out and for stuffing with filler, then the tail is sewn to the base of the cat.
You can decorate as you like to your liking.

I got such a kitty.
Gave it to my sister for home comfort)

How to sew a complex toy? DIY fabric ball, an interesting idea
A toy that is more difficult to manufacture is one that contains many parts and which is assembled in a certain order.
One night I got an idea, why not sew a ball out of fabric, it seemed so simple in my head, but when the idea got down to business, without an example it was difficult to understand what to cut, how much to cut and how then all this is correct sew.
Therefore, I share an example by which I did.
You will need two templates, a hexagon and a pentagon. We transfer them to paper, or even better to cardboard.

We need to cut 20 hexagons and 12 pentagons from the fabric. I used the fabric in two colors, but this is not necessary, you can make it completely monochromatic or, on the contrary, colored, this is at your discretion.
As you cut the required number of polyhedra, it is better to expand them so that you can visually understand how you will sew.
This is what the ball layout looks like. 
Another layout option

This version of the ball is made of felt, it is easier to sew.
I chose to sew from coarse calico and on a sewing machine, so you still need to leave allowances for the seams on the fabric. And iron the seams. You don't need to do this on felt.
All parts are simply sewn into two halves, and then these two halves are joined together. You need to connect from the seamy side, and then leave a small hole not sewn up and turn it out through it.
Fill tightly with padding polyester, and sew up the hole with a blind stitch.

Such is the ball - I turned out handsome!


See also - article felt toys
Fabric toys step by step master classes with patterns.
I offer some more ideas for interesting toys with step-by-step master classes.

Fabric rainbow fish


A boat made of fabric.


A beautiful soft toy will not leave anyone indifferent, especially if it is handmade. Both a child and an adult will appreciate it.
Making soft toys with your own hands is a rather interesting and exciting process that immerses an adult into childhood.

It doesn't matter if you don't have any experience as a seamstress, the main thing is the desire to tinker, and everyone can handle a needle and thread.
DIY soft toys for beginners
A handmade soft toy is much more priceless than a purchased one. To make such an original thing you will need:
- study the simple technology of its creation;
- pick up source materials;
- competently make a template for the future product.

On the Internet, you can easily find a large number of master classes for making a variety of soft toys. You can also go to shops selling goods for needlework - there you can buy kits and manuals for making soft toys with your own hands.
It will be great if you make a toy with your children. Such a pastime will develop their attentiveness, promote familiarity with work, order and accuracy.

The main thing is to remember about safety and not leave children alone unattended.

Materials used to create the stuffed toy
The following fabrics can be used to create a soft toy:
- Knitted;
- Silk;
- Cotton;
- Woolen;
- Velvet and velor;
- Felt.
General instructions on how to make a stuffed toy
- Select the starting material, carry out the necessary preparatory work with it - washing, ironing, steaming;
- Cut by template;
- Baste all details along the marked lines;
- Sew details;
- Fill the product with filler;
- Fold all the details of the product and sew them;
- Finalize the appearance of the toy.

It is preferable to make the pattern from cardboard - this facilitates the process of tracing the template on the material and increases its service life.

Master class: how to make a toy "Mouse" with your own hands
A wonderful, small-sized toy "Mouse" is intended for babies up to 1 year old. It will help develop the sense of touch. It will be very interesting for crumbs to play with such a bright, funny little thing.

Sewing "Mouse" is very simple:
- Take the suggested template;
- Prepare scraps of material, preferably bright colors and contrasting thread;
- Align all parts of the product from the front side, sew them using a buttonhole seam;
- Make ears, eyes and nose;
- Put a synthetic winterizer inside and sew on the tail.
Below you can see a photo of the finished toy.

A similar little thing can be used as a Christmas tree toy, for this it is enough to make a loop.

We sew a turtle
We will need:
- multicolored cotton scraps;
- cardboard template;
- synthetic winterizer;
- buttons or beads for the eyes;
- needles, threads, scissors.

- Making a pattern. To do this, draw the head, tail, legs and body (with a radius of about 15 cm, make the bottom of the shell a little smaller);
- We attach the template to the seamy side of the material, circle it. Next, you need to cut out two parts for the head, tail, shell and 8 for the legs;
- We make 4 darts on the upper body. This will add bulk to the product;

- Sew together parts of the head and legs, fill them with filler. We also sew the tail. We do not fill it;
- We sew all the details of the shell, leaving holes for the limbs and filler;
- We connect all parts of the product with a blind seam, sew on the tail;
- Making eyes. The turtle is ready!
Soft toy "Cat"
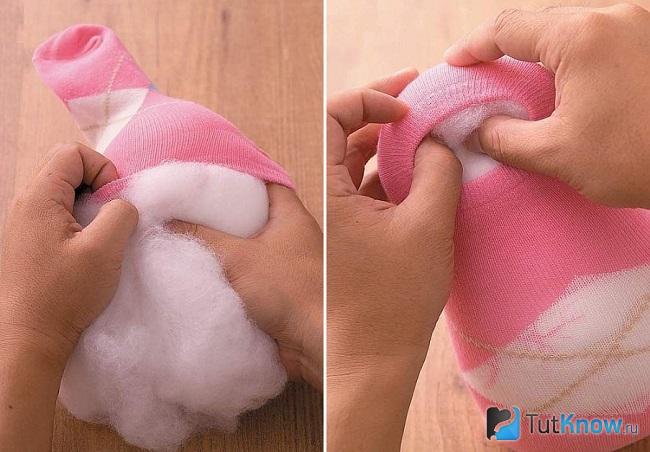
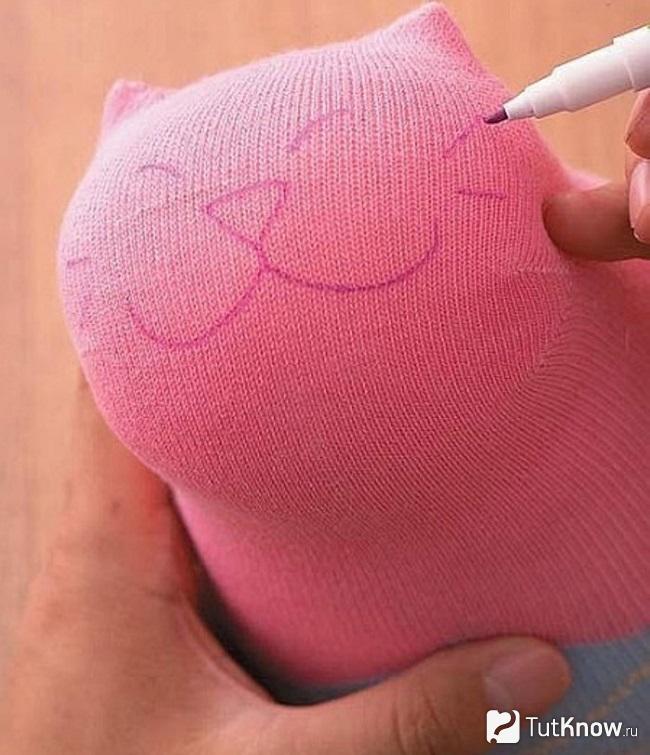
In order to sew the "Cat", we need a sock, and a new one. Next, decide what kind of cat you want to get as a result - fat or thin. It depends on where you need to cut the sock.

For a fat cat, you will need the part that covers the sole. The upper part of the elastic must be pushed to the side. Then stuff the filler tightly into the toy so that the body is larger than the head.
Note!

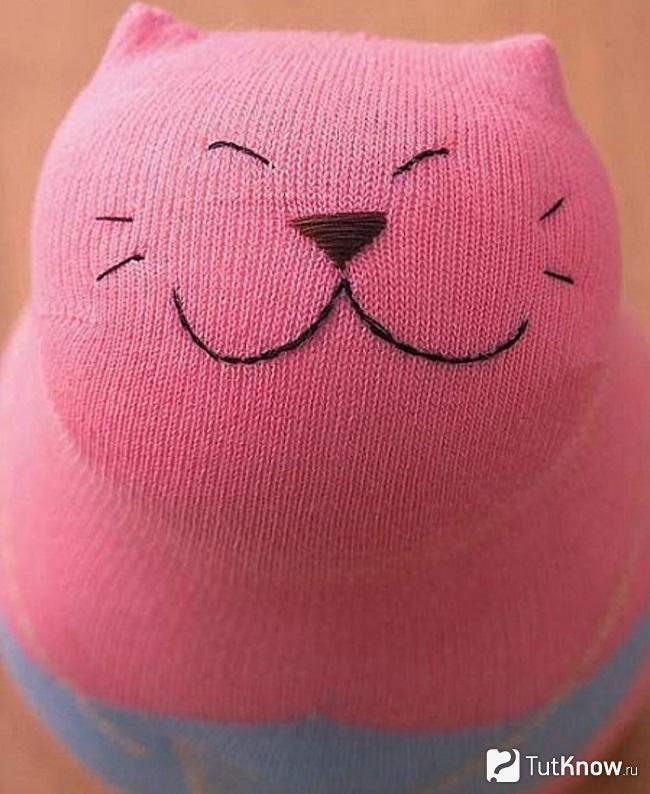
Bend the edges of the hole inward, pin and sew. By stretching, we form the ears. The next step is to embroider the eyes, nose and mouth with a thread of a contrasting color.

The finished product can be decorated with a beautiful ribbon, scarf, bow, brooch.

Below are photos of a variety of soft toys that you can sew with your own hands.

Sewing toys at home is not at all difficult, and the result of such work will bring satisfaction. We wish you every success!

Photo of soft toys with your own hands


Note!


Note!

