How to make flowers from balloons with your own hands: step by step instructions, ideas. How to make a simple and complex flower, chamomile, rose, a bouquet of flowers from long, SHDM and round balloons: a diagram. The best flowers from balloons with your own hands: photo. How sd
Balloon flowers are the best interior decoration for all kinds of children's festive events. Many parents are interested in how to make a flower from balloons with their own hands in order to create a bright festive atmosphere without resorting to the services of specialists. Making such jewelry is not such a difficult task, and bright large flowers from balloons will delight both children and adults. If you master several basic techniques for creating flowers from balloons, you can turn a festive room into a real fairy tale.
Most often, to create "airy" decorations, long modeling balls are used - this material is very easy to work with. The so-called "sausage balls" can take any shape, bend, twist, shrink. To quickly inflate balloons, you need a hand pump - without it, the work will be very unproductive and tedious. An important rule: you only need to twist the balls in one direction. So that in the process of work the previously twisted sections do not unwind, they must be carefully held with your hand. Namely, in order to avoid unwinding, the first and penultimate element of the flower should be fixed. To twist correctly, it is enough to make three or four turns.
To prevent the balloon from bursting during modeling and to be as flexible and pliable as possible, it should not be completely inflated. The ponytail should remain not inflated by a few centimeters so that air can move inside the ball. Often, at the end of the work, the tail is associated with the beginning of the ball, and for this it should not be too densely filled with air. The length of the non-inflated section varies depending on the number of twists - a couple of centimeters are enough for the stalk, and for the petals, the length of the section not filled with air should be increased to ten centimeters.
How to make chamomile from balls
Having a general idea of how to make a flower from balls, you can safely experiment, make your own changes to the technique, come up with original solutions. But, before creating author's masterpieces, you need to master the technique of making the simplest flowers, for example, chamomile. To create a simple but very cute balloon chamomile, you need three long balloons of different colors. One of the balls should be green - the stalk of the flower will be made from it. The second ball will be used to make the petals, and the third will be used for the middle.

For example, the petals will be made from a red ball. The end and the beginning of this ball should be connected to each other - as a result, a circle is formed. This circle will twist several times. First, two symmetrical twists will be formed, which will divide the circle into two equal arcs. Next, you need to fold two arcs side by side and twist them together, dividing the figure into three identical parts. Each of the parts should consist of two "sausages". Having bent the figure in places of twists, you need to form an "accordion" consisting of three double elements. Next, you need to make one joint twist of all three double parts, right in the center. A flower of six red petals is ready. Each petal is shaped like a ring.
To create a small core, you need to donate a whole ball, for example, yellow. Having inflated a long ball, you need to twist so that a small round fragment forms at the end. The rest should be cut off, leaving a small tail for tying the knot and connecting the middle to the stem. You can press your finger along the center of the core to make its shape more original. The stem connects to the middle with a simple knot. To put on the petals on the resulting structure, you need to stretch the junction of the middle and the stem and thread it from the side, into the narrow space between the petals.
 The stem will consist of a trunk and two leaves. To form the leaves, you need to make one twist on the basis that the “shoot” will split in two. The twisted piece is divided into two equal parts in the middle and twisted with the barrel. Ideally, the two leaves should be symmetrical about the stem of the flower. That's it, DIY balloon chamomile is ready!
How to make a rose from balls
You can get a very spectacular rose from balloons in just a few operations. You will need four balls - one for making a corolla, two for the bud and one for the stem. The bud consists of two parts: one part is made in the form of a six-petal "chamomile", and for the second a specific technique is used. The ball is tied in a knot, but not tightly. The ends of the ball are folded together in a ring, forming a loose weave. The corolla is made in the same way as chamomile, but from four petals. The elements are folded in the following order: corolla, six-petaled part of the bud and the upper part of the bud. The stem is performed in the same way as for the above-described chamomile.
If you make several flowers with petals of different colors, you can form a luxurious bouquet of flowers from balloons. And several such bouquets, combined into a common variegated floral arrangement, will decorate a spacious room, filling it with a festive atmosphere.
Balloons! It is always a good mood and always a holiday! We are already accustomed to the fact that we can decorate the interior for a home (and not only home) celebration with balloons. But, by the way, balloon flowers can be an excellent alternative to a bouquet of fresh flowers. Of course, if we are not talking about a romantic date or a marriage proposal (although, it depends on how you look at it). But in any case, such a gift will always be original and materially very beneficial. In addition, making flowers from balloons with your own hands is actually quite simple.
By the way, the art of decorating with balloons is called aerodesign, and the technique of making such decorations is called modeling. Let's find out how to make flowers from balloons to make a bouquet from them or use as decoration for a festive interior.
Balloon bouquet
In order to make a whole bunch of colorful balloons, it is enough to understand the principle of making such flowers and first try to make at least one flower. Let's get started?To make one flower, take four bright round or oval balls of the same color, for example, lilac or red, and one round ball of a different color (white, yellow, blue). In addition, we will need a long sausage ball for modeling and, preferably, a special pump for inflating the balloons. Of course, you can inflate round balloons with your mouth, but it is quite difficult to do this with a long balloon.
So, first we inflate four colored balloons - these will be the petals of our flower. Now we connect them in pairs and twist (tie) both pairs together. The petals are ready. For the middle of the flower, inflate the fifth round ball. We inflate it so that the size of this ball is two or three times smaller than the previous balls, place it in the middle of the petals and fix it from below. It remains to make the stem. To do this, inflate (not very tightly) a green sausage ball and secure it with one end from the bottom of a bunch of round balls.
We make the rest of the flowers in the same way, using multi-colored round balls and green balls for modeling. We collect the balls in a bouquet and tie them with a ribbon in the middle of the bunch of stems. By the way, if such a bouquet, consisting of at least three flowers, is placed on the floor, slightly pushing the “stems” apart for support, then it will take a strong vertical position and serve as an interior decoration. 
Balloon flower for modeling
A more complex technique for making flowers from balls with your own hands, but also quite affordable for any craftswoman. For this we only need two modeling balls and a pump. We will make a flower from one ball, the other will be a stem, so we choose a green ball and a ball of any other color.First, we make a flower, for which we inflate one balloon not too tightly, while leaving a pipette tip three centimeters long. Now we tie the lower end of the ball with a strong knot and tie both ends of the sausage together. Then fold the sausage in half (lengthwise!) And twist it in the middle twice. Next, we press both parts of the ring to each other, visually divide it into three parts and twist again twice to get three pairs of "sausages". Now we fold them with an accordion and proceed to the most virtuoso part of making a flower.
We take the accordion with our left hand and clamp it into a ring from the index and thumb, clasping the ball in the twisting points so that the "sausages" curl up in an arc at the top and bottom of the ring of fingers. We grasp the three upper "petals" with our right hand and twist again. We unclench our fingers and see that a flower has turned out from the accordion.
For the stem, inflate (also not quite tightly) a green ball and tie its tip. Having stepped back from this tip ten to twelve centimeters, we twist the sausage. Now we bend the short part in half and screw the tail of the ball to the place of the first bend (the first knot). Then we insert the stem into the flower, passing it through the middle and leaving the folded short part of the stem outside above the flower.
Having departed from the base of the flower about forty centimeters, we bend the stem first up and then down again. Then, in the middle of the resulting triple part of the stem, we make another twist and we get a stem with leaves. Now the whole flower is ready. 
Chamomile on the ceiling
This balloon flower, in general, is not a flower, but a ceiling garland. Nevertheless, such a handmade decoration looks exactly like a flower made of balloons. For it we need four red latex balloons, four white ones and one gold one. Making such a chamomile is as easy as shelling pears.- We inflate red balloons with a diameter of twenty centimeters and connect them.
- We inflate white balls with a diameter of about twelve centimeters and also make a bunch of them.
- We inflate a golden balloon with a diameter of eight centimeters.
- We tie the golden ball in the center of the red balls.
- Place the white bundle between the red balls and the gold ball, placing the red and white "petals" in a checkerboard pattern. We fix it.
Such a daisy, placed on ceilings or walls, will be an excellent decoration for a festive interior! Try it. You will definitely succeed!
Today, various balloon crafts are becoming more and more popular. They are often used to decorate wedding cars, shops, shop windows, various festive events, interiors, walls, and facades. How to make a bright flower yourself from an ordinary ball, we will tell you in our article!
For modeling products, not only sausage balls are used, but also other types of balls. Balls of various materials can be used: plastic, foil, vinyl and rubber.
Rubber balls can be of various shapes, sizes and colors. Their surface can be matte, transparent and with a metallic sheen. Foil balls are stronger, more durable and hold their shape well. Plastic balls keep their shape much longer. They are made of specialized hypoallergenic material.
We will look at the easiest way to create flowers from balloons. For modeling we need green and red balls and a hand pump.
Option 1. Beautiful ball chamomile quickly and easily
First, we make a bud. We inflate a red ball with a pump, and, leaving 3 cm, tie a knot.
We tie the end and the beginning together into two knots.

Fold in half, twist in the middle two times.

Then we twist it in two places, dividing the product into three equal parts.

We put the products in an accordion.

Then we take an accordion in the place of twisting and twist three petals with the other hand.
 You should get such a simple flower.
 Then we make the stem. Inflate the green balloon not very tightly, otherwise the balloon may burst. Step back ten centimeters from the knot, twist and bend so that the knot is in the place of the twist.

Insert the stem into the center of our flower.

We twist and bend the green ball.

Our chamomile flower is ready.

2 way to create chamomile using cardboard
We cut out smooth round holes in the cardboard, one of which should be 15 cm in diameter, and the second 10 cm. We need them as a template. Then inflate the round balloons for our flower petals. Choose one of the colors that you like. If the balloon is too large, blow out the excess air and tie a knot.

Let's make the middle of the flower from two smaller balls. These balls must be multi-colored.
We carry out the same procedure, choosing the size using cardboard with a cut of 10 cm and tying a ball.
Then tie the two larger balls together for the petals. To do this, you can take a thin wire or thread.

We will also tie the other three balls together. Try to keep them evenly distributed among themselves. And hold them together by holding the balls with one hand and wrap the thread or wire around the ends with the other.

We tie two sets of balls together in the same way. All ends should connect in the middle. They might look a little ridiculous at first, but adding center will work fine.

We also tie the balls for the middle of the flower together. They should face different directions when securing the ends.

We attach the central balls around the petals, so that there is one ball in the middle on each side. Then we tie the ribbon to make it easier to hold the product.

You can make the stem with a wooden stick wrapped around it with a green ribbon.

We make iris jewelry with our own hands
Long balls can be used to make a recognizable beautiful iris. For the bud, we need a lilac or purple ball, and for the stem we need a green ball... We inflate the ball so that there is 4 centimeters left for the tail. We fold it exactly in half, connect the end and the beginning of the ball with a thread.
We place the knot in the middle and twist the ball twice in this place. There should be two loops.
We put the hinges.
We retreat one third from the end of the loops and twist them together. We get an iris bud.

Then we make a stem for the flower. We take a green balloon and inflate everything the same way. We put the ball in half. Having retreated 8 cm from the center, we will twist it several times. Thus, we will form a leaflet.

In the same way, we do the second piece of paper, folding one of the ends next to the first loop. We level the leaves and connect the bud with the stem.
It takes a little practice and you can make more sophisticated and complex ball products. This will especially delight your children, because the process of creating various figures is quite an exciting and easy task.
It is necessary to observe safety precautions when working with balls, which, together with the terms, are given below:
- As the balls can burst, keep them away from your face.
- Round balls are not designed to be curled.
- It is advisable to cut the nails short.
- Use a water-based marker to draw on the ball. Alcohol marker can corrode the balloon.
- The tulip is the bubble at the beginning of the balloon.
- A joint is a small part of a ball formed by twisting.
- The bubble is the inflated area between the twists.
- Twisting is the twisting and rotation of the ball, which creates a bubble and a joint.
Video gallery for making crafts from sausage balls
What kind of flowers have we already made, both from sweets and from paper, but today an even more interesting option is flowers from balloons! Such flowers always look joyful, and it is very pleasant to receive them. Let's look at the instructions and learn how to make them!
How to make a flower from balloons with your own hands?
Flowers can be different, as well as their colors, so first of all we need to decide what color we want to get flowers, then we need to pick up the balls. We only need two balls, one for the stem, the other for the petals. You can also prepare a pump for balloons so as not to manually inflate them.
Before starting work, you should tell how to properly twist the balls. The main thing is correct - all twists are done with one hand, in one direction, away from you or towards you. With your other hand, just hold the ball so that it does not move.
Let's get started!
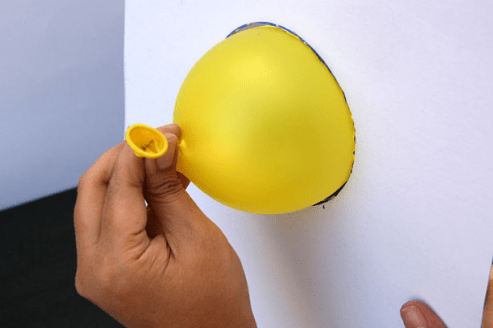
1. We inflate the balloon, it is necessary not to completely inflate it, but leave the tip 3-4 cm. We connect the two ends of the balloon.
2. Now you should bend the ball in half.

3. Divide the ball into three even parts. We twist.
![]()
4. We bend it into an accordion.

5. One of the most difficult stages, our accordion needs to be twisted in the area of joints. Gently holding your fingers in the area of the joints, we scroll several times. The first time it will be difficult, so you can ask for help from someone close or friends.

Thus, we got a flower! Now let's get down to the stem.
6. Take a green balloon and inflate it with a pump. Do not inflate too much to prevent the balloon from bursting during the twisting process.

7. Having stepped back from the knot 10 centimeters, we twist it.

8. Then we bend the resulting segment in half and hide the knot, twisting it with the main stem.

9. We push the stem up into the flower.

10 ... Let's make the petals. We bend the stem into a small accordion.
Flowers made with your own hands from balloons will decorate any celebration and will be a good gift and a token of attention for your birthday, March 8. Making such compositions is called aerodesign. It is also widely used to decorate party halls for weddings, anniversaries and other events.
How to make flowers from balloons step by step
Such beautiful and light crafts can be twisted not only by an adult, but also by a child. There are many ideas on how to get this or that flower from ordinary balls. Figures are twisted mainly from special long balls for modeling (SHDM), but other types are also suitable for creating compositions.

Simple
Below is an example of how to twist a simple flower. For this, one long ball is used. It is pumped with air using a pump, leaving 10-15 centimeters of the tail not inflated.
The tip of the ball is twisted and hidden inward. Then a small bubble forms at the end - this is the future center of the flower. Next, a loop is formed and twisted around the bubble. Two more loops are also made. The air inside the ball is gently moved from the end of the remaining "sausage" closer to the bud. The flower is ready.


From sausages (long SHDM)
Experienced craftsmen can create any kind of flower from balls for modeling. Having learned how to twist simple shapes, they move on to more complex ones.
The photo shows an example of what else can be done from the SDM.

Lily of the valley flowers can be twisted in another way, using round balls.

Other flowers look no less beautiful:

From balls of hearts
Flowers from heart-shaped balloons are very beautiful.
You can twist a few balls of chamomile and attach it to the stem.

Or use one heart bead as a bud.

Chamomile
Chamomile is the easiest flower to perform. Below is an easy way to create this plant.

But there are techniques to make a flower more interesting:

Having figured out how to properly twist the petals to obtain different shapes, you can also collect the following products:
- Option 1.
- Option 2.
Roses
A rose is a beautiful and at first glance complex flower. But making it out of SDM is easy.
You need to start from the middle of the flower. A bubble is formed at the end of the "sausage". Then the loop is twisted and a small ball is pushed into it. The middle is ready.


The resulting loops are threaded into each other in a circle. The excess part of the ball is removed. A stem is screwed in its place.

The rosebud is even easier to make. To do this, twist three loops with a small bubble on top. Then the petals are fastened with bubbles into a bud and attached to the stem.

Tulips
The tulip is twisted in a manner similar to the option for creating a rosebud. But the loops are made longer and instead of the third, only one "sausage" with a bubble at the end is left. Then the petals are connected from above and attached to the stem.

In this case, bubbles at the ends of the petals can be omitted.

Of round balls
Bright and beautiful daisies are created from round balls, which are used both to create garlands and decorations, and separately.
To create a flower, you will need two cardboard circle templates with a diameter of 10 centimeters and 15 centimeters. With their help, the size of the balls is controlled.

Inflate 5 balloons of one color and one small of the other. Then the large balls are tied together in a circle. In the center, a small center of a different color is fixed.

You can complicate this method by adding another row of medium balls. You will get an equally beautiful flower.

Bouquet
When assembling a bouquet, it is worth remembering that extra leaves on the stems interfere with the connection of flowers.

You can beautifully tie the balls into a bouquet in the following ways:

Composition on the wall
Balloons are popular for room decoration for adult celebrations and children's parties.

The balls are fixed to the walls with duct tape.

Various suspensions are used.

Compositions are formed from flowers.


Fasten ready-made flowers into arches above the entrance or center of the table.

Forms flower garlands.


Master class on how to make a bouquet
To present a bouquet of balloons, it is placed in a pot or basket.
In a pot
A flower pot is easy to make. This will require round balls and several long ones.

A finished flower is attached to a round ball. Then the edge of the CMM pot is formed around the flower.
You can weave the vase in a different way. Prepare 4 rings as shown in the photo. Then fasten the tiers with tape. The vase is ready.


In the basket
A basket is a more complex product.


You will need several long balls of different colors.

First, the bottom is formed from small bubbles.


The remaining balls are braided around the spokes. At the same time, gaps of different sizes are made to give the basket the desired shape.


Then the unnecessary ends are removed and the handle is attached.


There are other ways to weave a basket made of SHDM.
Leaf modeling
The easiest way to make leaves is to form a loop on the stem. To do this, the stem is bent the required number of times and twisted in the middle of the resulting "accordion". Thus, 1, 2 or 3 leaves are formed.


For tulips or lilies of the valley, longer leaves are needed. They are made from separate balls, twisting loops of the desired size from them.
Having learned how to make simple leaves, you can try to master more complex weaving methods.