Sew a simple chair cover with a back. Making chair covers with your own hands
Practicality and simplicity are the basic keys of any interior today. The more convenient a thing is to use, the higher its functionality will be. In the 21st century, as never before, became popular and kitchen chair covers... And this is due to many reasons and reasons.

First of all, such a construction made of canvas allows you to refine or change the appearance of even the oldest and most unremarkable means of sitting in an instant.
Secondly, they make furniture safer, and the floor covering often protects it from scratches and mechanical damage.
Thirdly, at any time you can quickly remove and give it to cleaning or washing, but with standard soft upholstery, such a trick is completely impossible to crank.
Modern types of covers for kitchen chairs
Today universal and luxury models are relevant for the kitchen. They help to be furniture not only practical to use, but also to be the decoration of the entire kitchen.
In this case, the very shape of the product will completely depend on the imagination and desire of the owners, taking into account, of course, the shape and size of the stool. They can have a loose fit or more dense, which will fit every piece of furniture.

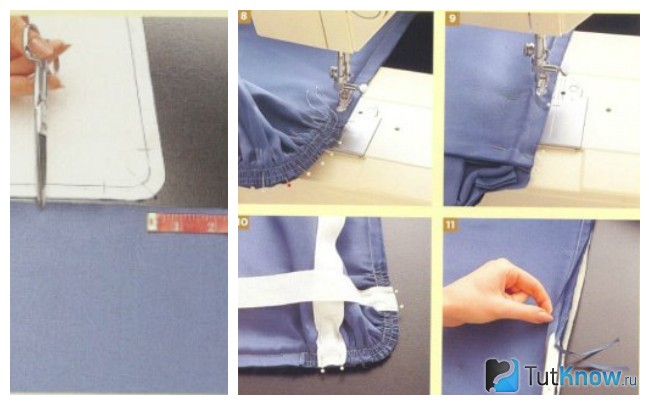
Universal models can most often fit on chairs of different designs, since they do not take into account the armrests, and the back can be adjusted and fixed using special lacing.
The mount itself can be partially decorated with accessories, bows, ribbons, or it can be completely hidden.

Universal models can be made in the form of a tablet - round or square with ties on two or four sides for legs.
Such products are used for ordinary stools to make them more comfortable, soft and practical.

Universal "capes" can have in their arsenal and pillowcases, which are used for the back. Moreover, they can have different lengths and at the same time cover not the entire height, but only a separate part of it. They are called cropped models.

There are also semi-covers. By type, they very much resemble "pills" for stools, but here the main part has an elastic band around the edge of its entire perimeter.
It is she who reliably fixes the edges, and does not allow the fabric to move in a chaotic manner during use. Such products are often made not from a dense material, but from a lighter and transparent one.

They can quickly fail, but at the same time they reliably perform all the functions that are assigned to them.
Less commonly, fabric with an elastic band has a water-repellent feature. It is quite practical and convenient in the kitchen, especially when there are small children or frisky animals in the family.

Luxury cases are made for special occasions. They can usually be seen in expensive restaurants for banquets or weddings.
At home, they can be used when receiving guests or holding individual romantic evenings.

They are usually made using expensive materials. Most often they consist of a long base, ruffles, a closed back, large bows, an abundance of ribbons and other accessories. Less commonly, fringes, floral artificial elements or folds are used for decoration.

Beautifully decorated chairs require special treatment and attention. Therefore, they do not accept hanging on the back of outerwear or handbags. And with a large suspended load, they can even tip over backwards.

What is the best way to sew kitchen covers?
- the place is functional and crowded. The whole family gathers here several times a day, cooking is constantly happening, pets are spinning under their feet, someone uses the kitchen table to do other useful things.
That is why it is not at all logical to use any material for draping furniture for every day.

The main selection criterion is good dirt-repellent properties, a "breathable" surface, density and resistance to constant cleaning or washing.

Kitchen chair cover fabrics
Gabardine
The product has a rather dense structure, but this allows it to remain thin in appearance. Gabardine most often consists of natural natural ingredients, but there are exceptions.
With an abundance of cotton, silk or wool, it wears a matte shade. It lays down beautifully and envelops any surfaces, giving them a noble shine. Synthetic gabardine is less durable, attracts small debris and wipes off quickly.

Crepe satin
It is a rather soft and resilient material that can also have both natural and synthetic bases. Crepe satin is quite durable and resistant to dirt or scuffs.
Moreover, its appearance is very noble and sophisticated. From afar, it can be mistaken for silk or satin, thanks to its special brilliance and sophistication. It is great to sew products with folds or frills from it.

Supplex or lycra
It is the most elastic and pleasant material that has the ability to stretch. It is very easy to clean or wash, dries quickly and is quite pliable with various draperies.
It is often used to create bright and unusual design ideas. It has a nice glossy sheen that creates a festive atmosphere any day in your kitchen. 
Organza
Organza is very transparent but dense. Its main components are viscose, silk or polyester. Ideal for sewing covers due to their properties, they do not succumb to dirt and dents.
Quite often, it is used to decorate chairs that are located in the kitchen studio. Other elements in this room are decorated with the same materials.

Spandex
Spandex is very lightweight and pleasant, which can be easily stretched and returned to its former shape in a moment. Spandex is very breathable, but waterproof and durable.
The material is capable of not changing its color after prolonged use and does not fade in the sun. Professionals often call it "mesh" and are happy to use it for interior decoration.

Brocade
Brocade is a heavy piece that looks very noble and expensive. It is used in cases of making covers with patterns.
Despite its chic look, brocade is very problematic to use. It is better not to give it to frequent washings, but to clean it with the help of special products and techniques. This can be best done with regular dry cleaning.

You can create covers for chairs in the kitchen with your own hands. This will help you save money and make your finished products extraordinary and individual.
They are usually made in order to protect furniture from wiping and dirt, but they can also be used to diversify the kitchen interior, especially if several more kitchen accessories are made with the same fabric.
The boring and annoying upholstery in the kitchen can simply be hidden under new and bright products that will give the kitchen a second life, even without expensive repairs.

You do not need to have a special education or special sewing skills to understand how to sew a chair cover. This can be done even at home from improvised means.
Very often, hostesses decide to take such a bold step after the next attempts of a mustachioed pet to sharpen their claws or an abandoned children's hand stained with chocolate.
It is they who save the nerves and expensive furniture, allowing you to preserve its original appearance for a long time. After all, their cost is very low when comparing prices for a new banner or the purchase of new furniture.

Do-it-yourself chair covers can be made from only 1.5-2.5 meters of the required canvas. It can be very affordable and affordable.
The main rule for choosing a material is its practicality in use and ease of cleaning. It must be thick and strong enough to withstand repeated washing and abrasion when used as intended.

Don't despair if you don't have a sewing machine at home. Do-it-yourself chair covers can be made without any problems without an overlock. To do this, you just need to make the correct pattern using paper and manually process the edges with thick threads using zigzag stitches.
In this case, it is imperative to lower the edges to the seams, taking 1-2 centimeters in reserve. You can make a pattern using a dummy, which can be made from paper and tape in perfect proportion to the chair.

Before purchasing materials, it is imperative to take all measurements and take into account all possible extensions of the legs and back. If the cover will have decorative additional elements, then their sizes must also be taken into account in the total amount of the canvas.
In addition, it is imperative to have a small margin, which will go to makeready, seams, inaccuracies in cut, fabric shrinkage after washing. On average, one average chair requires about 1.5 meters of fabric to make a product.

Important advice! Before you sew a chair cover from expensive knitwear, be sure to practice sewing an identical project from a cheap or even unnecessary product that may end up at home.
This will help save you from unnecessary waste, and in the process you will be able to learn about all the "pitfalls" that await you during your work.

Another sewing trick is the use of zippers. They can have both straight and florid appearance. Most often they are sewn into the side parts and used for secure fixation.
But usually covers are made with buttons, ties, bows or hooks. It all depends on the imagination of the craftswoman and the final design of the finished thing.

Special attention should be paid to the design of the product. If the back and seat will not be sewn together, but will act as a separate ensemble, then you must carefully take care of their correct and reliable fastening.
Otherwise, when using such a chair, the entire fabric will wrinkle, "slide" to the side or twist. Sometimes in such cases, banal lacing or dense elastic bands can come to the rescue.
You need to take care of such fasteners in advance, even before you start cutting and sewing designer items for your home interior.

How many more ideas, what can be the covers for the chairs in the kitchen. See photos, comment, tell your friends!


How often have you caught yourself thinking that your interior is missing one, but very important detail? You wanted to change something in him, and did not know what? Covers for chairs with a back are just that element that is so lacking in a modern, cold and often devoid of warmth and individuality interior. Today the editors of the site will tell you how to choose the right fabric elements for a certain style of the room, what to look for when choosing fabric, how to draw up a pattern and make a unique set of covers yourself.
Read in the article
Features of covers for chairs with a back: not only beautiful, but also functional
The cover is not just clothes for your chair, but its second life. Sometimes “dressing up” a worn-out piece of furniture is much cheaper than replacing it or buying it, especially when the furniture is dear to your heart and gives you memories. Of course, an old chair can be painted, but won't it lose its uniqueness?

In this case, the cover will hide all the flaws without touching the most precious - memories and pristine appearance. Modern furniture can also be updated with the help of covers. For example, when a purchased pair of chairs does not match a new headset at all in style or color scheme.
The difficulties of draping loose-fitting covers
Covers with sophisticated drapery add festiveness and chic to any room. Typically, these capes can be found in banquet halls and rooms for celebrations. The main thing is that the bulky fabric does not interfere with the main functions of the piece of furniture.


When to choose draped capes
Free-cut draped capes are most often used not to protect seats, but to decorate the interior for the holiday. An ordinary piece of fabric decorated with a bow can be used - the effect will be amazing. The advantage of these covers is that they are suitable for use on almost any seat. Usually for these purposes, flowing fabrics are chosen, such as organza, silk, veil.
 An interesting solution could be to use the fabric on its own, without fastening seams or any embellishments.
  Combined fabrics decorated with flowers or a bow look great
What is Universal Chair Covers
These covers are suitable for standard chair sizes. They are most often made from dense, stretchable fabric that takes the shape of any chair. They are also called Eurocovers. They perfectly hide all the flaws and are affordable. Usually, such covers are very well cleaned, keep their shape, and are highly wear-resistant.

These covers are perfect for both chairs and armchairs. They can be purchased at a bargain price, and the covers themselves are suitable for chairs with different backs.

Criteria for choosing fabric for chair covers: what is important to remember
The fabric determines the result of the work by almost 50%, the rest is the skill of the seamstress. When choosing a material, it is important to consider which room the cape is sewn into, what functions it will perform (except for the protective one), perhaps the cape will serve as an additional storage place.
Advice! When choosing fabrics to match, be sure to test them for staining when soaking. Cheap fabrics can lose their "presentation" after the first wash.
Consider the main types of fabrics that are most often used when sewing chair covers. Among the most expected fabrics to list, we will name, perhaps, linen. Are you surprised? In our rating of upholstery fabrics, this natural material is in the first place. The fact is that flax has a unique ability to self-purify.
Interesting fact! In ancient times, people wore linen shirts for at least 10 years. In the absence of washing machines and modern cleaning equipment, this is a good reason to opt for this particular fabric.
Among the disadvantages are traditional ones: the fabric wrinkles quickly and is difficult to smooth out. Such covers will perfectly fit into the interior of a summer cottage or kitchen in the Provence style.
Crepe satin- the ideal upholstery option. Easy to wash and clean, practically does not get wet. It is very convenient because it stretches well and, with a certain skill, can "fit" into any chair practically without loss.
Brocade- spectacular, but short-lived material. It is rather a fake decoration for the evening than an everyday attribute. Perfect decoration for furniture during photo shoots. The main disadvantage is that after the first wash, loss of shape is possible.
Gabardine- looks great and is easy to decorate. It keeps its shape perfectly. However, it slips heavily during sewing. However, for the sake of such beauty, isn't it worth it?

Matte, elastic fabric will perfectly "fit" on any surface, hide irregularities and leave no folds.
Spandex- stretches beautifully. It is easy to stretch and put on any frame. In fact, it is lycra, but more durable. The fabric does not wrinkle and is perfectly washable.

Sometimes used for special occasions, weddings or other significant occasions veil or mesh... This is a versatile but, unfortunately, completely impractical material.

Cotton fabric- eco-friendly, inexpensive, hypoallergenic natural cotton fabrics - the best solution for decorating chairs in a nursery or kitchen. The main disadvantages are that they instantly get wet, and the paint on them fades from washing and in the light. The method of painting cotton once and for all has not yet been invented.

Interior design in different styles: how to choose a fabric
When choosing chair covers, first of all focus on the style in which the room is decorated.
| Photo | Style | Description |
 | Provence | Linen, cotton, floral prints, ornaments - all this is a laconic rustic provence. Capes are easy to make and, at the same time, exquisite: lace, ribbons, hand embroidery. Colors, pistachio, blue. |
 | Classic | Simple forms without frills, white, calm tones, subtle aristocracy in every detail. Graceful bows and grooves. From a variety of fabrics, it is better to opt for satin, silk, which can be decorated with gilding. |
 | High tech | A cover for a chair or stool can be like this. Modern materials - jeans, viscose, restrained colors, lack of romanticism. Strict forms. Catchy colors, sometimes even poisonous colors. |
 | Country | Cotton, linen, silk - these are the fabrics that are most often used for sewing country-style capes. Solid, floral, catchy, with ruffles and lace. |
We decorate the interior of the apartment, or how to choose chair covers for different rooms
Chair covers have long ceased to be a decoration of dining rooms or living rooms. They are widely used to decorate children's rooms and even classrooms. The only thing to remember is the uniform style of the room.
Which fabric is suitable for kitchen chair covers
The main rule is that the fabric you choose should be washed well, not absorb odors, be durable and tolerate frequent washings.
Important! Choose commercial fabrics that do not absorb moisture. It will be possible to remove dirt from such coatings with an ordinary damp cloth.

Cases with a soft filler, for example, a thin layer of padding polyester, are often used. It creates a great shape, however, it is better to provide such a pillow with a removable cover.
We transform the interior of the living room
Chairs with capes look great in the living room. They will emphasize the overall style of the room. At the same time, it is not necessary to create multi-layered capes; in some cases, it is enough just to find your own flavor.

The materials used are fabrics such as drape, tapestry, velor or suede. For a summer cottage or a summer veranda, you can use light linen and cotton capes.
We maintain a business style in the office
For the office, swivel chairs are most often used. Unfortunately, they are short-lived and lose their original appearance.
 Or the classic version - but how much it suits the owner of the chair, it's hard to say
Zippers, Velcro or discreet hooks can be used as fasteners. No ribbons or bows!
Chair covers for the little ones
And here is just where fantasy is better not to restrain. The children's room is exactly the place where the scope for non-standard ideas is open. The fabric for the nursery should be selected taking into account the preferences of the child and with a consistent approach to his safety. The child should not get tangled in bows or hooked on with Velcro.
 A great idea is to attach an applique or a soft toy to the cover. In this case, you can be sure that no one will use this chair, except for a child!
 However, for the sake of functionality, we must not forget about the durability and safety of the cover. Check in advance all fasteners or elements, make sure that the baby does not put a cover on his head and does not strangle himself with strings. It is better to use Velcro as fasteners, and not buttons or ribbons.
The main nuances of choosing wedding chair covers
As we noted above, a wedding is a special celebration. That is why wedding covers are always an element of a fairy tale, innocence, simplicity and grace.

Good day, my dear readers))). Today I will share with you an unusual experience, since the master class will be on the topic: how to sew the chair covers, in other words, simply decorate them. What is it for, you ask? Indeed, this question will certainly arise for many, since not every person will be faced with the need to have beautiful chairs made of ugly ones.
In my case, an old and tattered Soviet chair that has been in the attic for many years will turn into a chic chair that will add a certain charm to any interior.
On the Internet, you can find a huge number of ideas, but for my chairs I chose this photo, only the legs of the chair I had to close completely.
For one chair I needed:
- 2 meters of any fabric with a width of 150 cm (it is advisable to take a dense one - jacquard, costume, etc.)
- synthetic winterizer 200 - 1 meter
Before you start cutting, of course, you need to take measurements from the chair.
What parts are we going to measure?
- the height (b, see the figure below) and the width (a) of the back of the chair
- the width (in) and depth (g) of the seat of the chair
- the height of the legs (d) from the desired length of the cover to the seat

As a result, the cover will consist of three parts:
- Back (detail 1, see the figure below) bends around on both sides, the part consists of three parts (two layers of fabric, and in the middle - a layer of padding polyester), tied with strings for beauty and fixation.
- Seat detail (detail 2, see the figure below) also consists of three parts (two parts made of fabric and in the middle a synthetic winterizer).
- A ruffle is sewn to the part on the seat along the entire perimeter (detail 3, see the figure below), for me this ruffle completely covers the legs of the chair, if desired, it can be made shorter.

You measure your chair, almost all sides were about 50 cm (plus or minus a few cm, the seat of the chair may also not have a square shape, take this into account when measuring), so I deliberately do not write my measurements, but conditionally. It just seems to me that all the chairs of the standard model (especially the old Soviet ones) have approximately the same dimensions (I am not considering small chairs or stools, or designer ones right now - I hardly want to sew a cover on them !!))).
Layout of cover details on fabric:
The details are very conveniently laid out, while there is not even a residue left:
- 1 - a part for the back, we cut it out so that the shared thread of the fabric goes from top to bottom, as in the figure, such parts need 2 pieces, but I forgot to depict the second one schematically, so keep in mind that the second part of the back is placed under two parts No. 2 (in Fig . there is free space), but at the same time it is cut not along the share, but sideways, and this part will be internal to the back detail.
- 2 - part for the seat, 2 pieces
- 3 - ruffles, my leg height is 40 cm, the ruffle height is 43 cm, taking into account the allowances and hem at the bottom. The seat of the chair has a perimeter of 200 cm, so that the ruffle looks beautiful (so that there is a "wave", like on curtains), then you need to take fabrics not less than 1.5 times more. I took 300 cm on the ruffles, I will need to lay them in folds around the perimeter of the seat. The detail of the ruffle is sewn into one strip of two, so that the length is 300 cm.
- 3 a - this detail is conditional, I just cut off the square, sew it separately on the back of the seat.

How to sew a chair cover with your own hands?
After you build a pattern for the cover, you can start the sewing process itself.
Cut out the back part from padding polyester:

Cut out the seat detail from the padding polyester:

We cut out two parts of the seat from the main fabric:

We cut out two parts of the back from the main fabric:

We sew two parts of the seat with a padding polyester, first fold it face to face, put the padding polyester on the wrong side, then sew and turn it inside out. We also sew the remaining side, bending the allowances inward, this seam will be visible on the front side, but will not be noticeable on the cover itself, since it is located near the back and will be covered by the back part. 
We do the same with the backrest on the chair (the same principle), sew in the synthetic winterizer inside and turn it inside out, we spend on the open side. 
You will get such a beautiful detail: 
Cut out two stripes for ruffle: 
I cut a square from one of the strips so that I can then sew it onto the back of the seat piece. 
We process the sides and bottom with a double hem on this cut-off square and sew to the back side of the seat part, retreating cm 4 on the sides.


I will also need to cut out the laces in order to tie the cover on the back and seat parts at the back of the chair.
The lace will be 40 cm long, so we cut strips 42 cm long and 4 cm wide, in the finished form the lace will be 1 cm wide.
You will need 6 such laces, 2 for the seat and 4 for the back of the chair.


Sew on ready-made laces on the sides of the seat part from the side of the back legs of the chair: 
Then we sew both stripes for the ruffle into one piece, iron the seam, process the side seams and the bottom of the ruffle with a double hem and evenly sew to the seat part, while the ruffle goes to the required length on the lace, so the chair legs will not be visible. I used one-sided folds on the ruffle.
At the end, process all the sections on the cover with an overlock or zig-zag so that the fabric does not crumble.
We also sew laces on the back detail, stepping back from the edge of 10 cm (this is how we sew on a lace on each of the four sides).
Here is such a beautiful chair cover:


And there was such a terrible chair ... ... 
So it turned out pretty - still beautiful, given the original type of furniture))).
Do not be afraid to experiment and invent new things and sew with me! See you soon on the blog pages, good luck!
The house should be nice and cozy. Each person has his own understanding of the beautiful, so we furnish houses in different ways, but always "for ourselves", our mood and tastes of the household.
A cozy home for me is where you are expected, where you can relax and gain strength, where it is clean and beautiful. In such a place, even walls heal, but harmony lives in the soul.
To get even closer to a corner where you can hide from the hectic life of the modern world, I propose to make textile chair covers. 
As always, sewing begins with a pattern, which we will talk about in today's master class. I hope you find it interesting.
To sew a chair cover
, it is necessary to take several measurements, but first you need to decide which cover we will sew. Covers are on:
- back
- seat
- back and seat
There are also different chair covers based on the occasion. It all depends on the pattern and fabric you will be sewing from, as well as ribbons and other sewing accessories. Before starting work, you need to make a pattern, think over the reason for putting on covers (holiday or for every day) and buy the right amount of fabric.
Making a pattern of covers is quite simple, since most often chairs with straight sides, which can be easily measured and made a schematic drawing.
The easiest way to make a chair cover
- this is to prepare two strips of fabric and fasten them with strings. The joints can be sewn, or you can leave, but fasten with another pair of strings in the front.
If you do not have the ability to sew a cover, then you can simply cut it out.
made of fabric, the edges of which do not crumble, then the pattern of the cover will look like this.
Although you will still need to sew on the strings, this can be done without using a sewing machine.
The pattern of this chair cover is two different pieces (pattern for the back cover and pattern for the seat cover). We sew the cover on the back like a bag. The seat cover consists of two parts (seat and skirt) that are connected together. At the corners, we lay the skirt in the folds. We fasten the cover to the chair with strings.
Chair cover with round seat (and round back)
not much worse than the previous pattern (even in some ways easier, because you don't need to make folds on the skirt).
A schematic pattern of a cover for this type of chair consists of 4 main parts: a round seat, 2 parts of the back (long back and short front) and a skirt. To make the cover beautiful, it is proposed to sew triangular ties to it. On request, these can be ribbons.
As you can see, making a pattern is not difficult. The main thing is to sew the cover so correctly that it is beautiful.
Happy work!
To receive the best articles, subscribe to Alimero's pages.
How to make chair covers and sew a tablecloth to make the dining area chic and cozy. Learn how to create a play house for a child from a table.
The content of the article:
Home comfort is made up of details. If a tablecloth flaunts on the dining table, and covers to match on the chairs, then it will be pleasant to dine here in such a lovely setting. There is one more function for capes. They will help you transform old chairs into new ones. If leather or wood is covered in this way, it will be more comfortable and pleasant to sit on.
Making chair covers - choosing a style, creating a seat

For such needlework, you will need:
- thick fabric, such as muslin;
- threads;
- needle;
- elastic band (depends on the style).

If you are going to sew a strict cover for a chair, without a "skirt", then you need to measure the sidewalls of the seat, mark its corners. On the pattern, and then on the fabric, they will need to be cut.
Remember to leave seam allowances of 1.3–1.5 mm on all sides. Let's first consider the option of a cape without a "skirt". Attach the pattern to the fabric, cut the canvas along it. To prevent such a seat from slipping, cut 4 ribbons from fabric or dense braid that need to be pinned to the seat from the back side in order to tie it and fix it in this way. After that, you will tuck the edges of the fabric and sew them, at the same time sewing on these ties.

If the seat is rounded, then when drawing a pattern, do not forget to mark these curves. Make notches on the fabric seam allowances so that the cover fits well in these places.
When stitching corners, insert 4 pieces of elastic here (one for each corner), stretch each segment, and grind. Make one more seam that will be parallel to the first, moving them slightly towards the center to hide the elastic and make this place more durable.
Now let's consider the second option, when the cape for the chair is made in the form of a "skirt". Then you don't need to create the seat sidewalls. Having cut it out on the fabric, stitch on the tape, gathering it along the entire length, including at the corners or only at them.

See what other chair covers you can sew with or without a "skirt".

- In the first picture, this part is only on three sides of the seat, with the fourth there will be a one-piece back.
- On the second - you see a variant with a sidewall and a small "skirt".
- On the third - with a "skirt" of greater length. In the second and third photos, folds are laid in the corners of this part of the cape for a better fit. The bottom is edged with ruche.
- On the 4th photo, folds are laid on the lower part of the back seat.
- On the fifth - they are only in the corners of the seat.
DIY back cover
We continue to sew the cape for the chair. If the back is rectangular, and the top is even, then put the fabric on it, as shown in the photo, baste from the sides. If it is semicircular, then sew at the top with a needle and thread.

Remove the workpiece from the backrest, pay attention to the fact that it can be done without effort.
Since many fabrics have shrinkage, iron the entire length of the fabric with a steamer prior to cutting. Then it will not change its size after washing.
Cut the seams on all sides, leaving 1.3 cm allowances. Sew the back on a typewriter, stitch it to the seat, after which the chair cover is ready. You can leave it as it is or decorate with various elements.
How to make accessories?
You can decorate the covers with such buttons, sewing them on the back of the cape.

To make them you need:
- plastic rings;
- the cloth;
- needle;
- threads to match;
- yarn;
- ball pen.

Take a plastic ring and place it on the canvas. Outline this detail so that you can wrap the edges of the resulting circle inward, and they would meet in its center with a small margin.

Wrap the ring with a cloth, bring the edges to the center, sew them together with a needle and thread.

Insert fine yarn into the eye of a large needle and sew a decorative stitch along the edge of the button.

Cut out a circle from the fabric, the diameter of which is equal to the diameter of the ring. Sew on the back of the button. Put a ballpoint pen here, sew it in the center with thread.

Duplicate the resulting loop with dense transverse turns.

This is how you can make decorative buttons to decorate your chair cover. Use them or another accessory for decoration. Here's how to make a ribbon bow. Cut 4 equal segments out of it, and the fifth one is slightly smaller.
Connect the edges of each of the four ribbons, bend these elements into eights, sew in the middle.

Now fold the blanks in pairs as shown in the photo, tie in the center with a thread. Fold the fifth tape longitudinally, wrapping the edges inward.

Tie it in a nice knot in the center. Wrap the edges back, sew them, after which the bow, made with your own hands, is ready.

After you have made the cover for the chair, decorated it, there is one more important item left to sew, and then the dining area will be perfect for you.
How to sew a tablecloth with your own hands?

To make one, you need to cut a rectangle out of the fabric. It should be about 15 cm larger than the table top on all sides. Tuck the edges of the workpiece, sew them on a typewriter. To sew such tablecloths for the table further, cut a ribbon out of the canvas.
If the fabric for the tablecloth has, for example, a white background and green blotches, then cut out a ruff from a plain green one. In the same way, while observing the color scheme, cut out frills from other canvases.
To make such an edging as in the photo, you first need to process it with an overlock on one and the other side of the tape. If you do not have such an overcast, then just fold the edges on both sides, stitch.
Read how to make a round tablecloth. After all, if you have a table of this shape, then this is the right one.

Measure the diameter of your table, halve this figure to find the radius. Fold a wide fabric in half, then in half again. Measure the calculated radius diagonally from the central corner, add as many centimeters to it as you want the future product to hang from the sides.
Further, the round tablecloth is processed along the edge. If you have an overlock stitch, you can do it with it. If not, then take a slanting baita. Fold it with the right sides of the tablecloth to each other, sew on the wrong side. Iron the seam, turn the tape over your face, sew it on this side, turning the edge inward.
If you do not have a ready-made, purchased bias tape, make one yourself. To do this, cut the fabric diagonally into strips 2.5–3 cm wide. They will stretch well, which is what is needed for this kind of work.
If you wish, your round tablecloth will be made a little differently. Place the cloth on a clean floor. Flip the table onto it. Circle the tabletop on the fabric, cut out, adding 1.5 cm seam allowance on all sides.
Cut the ruff out of the same or another fabric. Work this detail from the bottom, stitch along the edge of the tablecloth, making folds from this edging at the same distance. Or, first collect this part on a thread with a basting stitch, and then sew along the edge of the tablecloth.
You can make not one, but several of these frills.

In the same way, a tablecloth is created on an oval table, only it is made according to the shape of its table top. Those who know how to embroider can decorate it this way.

And a tablecloth on a rectangular table can be like this.

Then cut out a rectangle for the countertop according to its size, sew on the sides of the fabric cloth equal in length to the distance from the countertop to the floor. Usually banquet and wedding tables are decorated this way.
In the latter case, such an idea for decoration is suitable.

On the sides, the tablecloth is edged with fabric with evenly laid folds and decorated with a rectangular piece of silk fabric.
Making houses for children
Surprisingly, but a tablecloth, sewn in a certain way, can turn a table into a playground. Probably many of you have noticed that kids love to crawl under the table, play there. You will not need to buy houses for children, as you can temporarily turn an ordinary table into such.
Here's what you need to do this:
- dense fabric;
- cardboard or paper;
- cellophane or transparent fabric;
- scissors;
- Velcro;
- thread, needle.

Here are the stages of work to create such a useful thing.
- We start sewing a tablecloth for children by cutting it out. Measure a rectangular tabletop, cut out a cloth of this size, cut out by adding 1.3 cm on all sides.
- Measure the distance from the table top to the floor. Remember it - this will be the height of the rest of the details. Measure their width by placing a tape measure or a measuring tape between the table legs. Cut out a large back side, and two smaller ones that you will position on the right and left sides.
- There will be 3 parts in front. Two are the same, on which you will make the windows and the third, which will become the door.
- To make the blanks look good from all sides, open out 2 identical parts. Then you will sew them from the inside out, turn them out. If you want to quickly sew a house for children with your own hands, then do it differently, taking a dense double-breasted fabric.
- Sew the long side of the back of the table with the short ones, stitching them at the top to the canvas of the table top.
- To make windows, lay the blank in front of you, place a square sheet of paper or cardboard on it. Using the same stencil, cut out a window from thick cellophane. You can use transparent fabric instead, but make these elements with a margin.
- Tape these makeshift windows crosswise. If you are making a tablecloth from two canvases, then put cellophane between them where the holes for the windows are cut, sew. If you are using a plain one, then put these "glasses" on top of it, turn over with braid or strips of fabric, tucking them up.
- Stitch these elements by sewing them on top to the fabric tabletop, and on the side, to the side blanks.
- The width of the door should be such that it goes over the window blanks by 5–10 cm on each side. Sew it to the top of the countertop, and then sew 2 fabric ribbons here. When necessary, the child will raise the door, fix it with the Velcro fasteners sewn onto these 2 ties.