Decor felt boots in the home environment. How to decorate baby boots
 Traditional shoes since the times of Rus', felt boots did not attract the attention of designers for a long time. And only in the 90s of the last century, famous Russian fashion designers gave a second life to this relic. It turned out that felt boots can look fashionable, beautiful and stylish. Let's see how this can be done.
 After the return of the fashion for Russian felt boots, the ideas for decorating them were replenished with many new products. Schemes can be easily found on the Internet, and by adding your own imagination to them, you can get an elegant and stylish drawing to your taste.
What tools might be needed
 There are two ways to fix the ornament on shoes: glue or embroidery. Different finishing methods may require different auxiliary tools. Depending on the chosen method of fixing the picture, you will need:
- glue;
- brushes;
- paints;
- marker or marker;
- threads and needles;
- iron.
IMPORTANT. For work, use only PVA glue. Superglue, as well as "MOMENT" and other similar varieties are not suitable.
The selection of threads matters, they should be in harmony with the shoes in color, composition and texture. Choose only high-quality threads, in order to avoid shedding, among synthetic and cotton varieties.
Possible decoration materials
 The choice of basis for future design is very extensive. It can be beads, rhinestones, lace, fur, satin ribbons, tinsel, sequins. As well as their various combinations that can transform your modest-looking shoes.
The selection of materials, as well as the creation of a beautiful pattern from them, depends only on your imagination.
How to decorate women's felt boots with your own hands
Not only fashion designers can transform the appearance of this simple product, each of us can do it. We will tell you how to get a stylish and unusual model out of your shoes.
 This way to decorate shoes is popular, as the products are made of soft wool, on which it is easy to apply drawings and fix various additions.
The material for the ornament can serve as ribbons, sequins, beads and threads.
In stores you can buy ready-made kits for embroidery.
Choose a needle that is thick and strong, with a wide eye, to avoid breakage. You will also need scissors and chalk.
ON A NOTE. We do not recommend using acrylic threads - the fur layer of the product is too dense for them, and they can tear. The best choice would be floss.
The order of drawing.

 It goes well with beads and other materials.
They need to be sewn with a strong synthetic thread or fishing line.
You should not choose voluminous jewelry, as they can create inconvenience by clinging to clothing.
Show your imagination by making a pattern of beads of different sizes and shades. The embroidered pattern will appeal to both an adult woman and a girl.
Beads to decorate boots
 An unusual and bright ornament can be obtained using this material.
You will need nylon thread, embroidery thread (to match the shoes), needles with a thin eye, beads of different colors, transparent beads.
Mark the outlines of the drawing with chalk or soap. It will be difficult to sew each part separately, therefore, to simplify the task, put the beads on one thread and lay them on the indicated contours of the pattern. Fasten the thread with small stitches, then sew the beads tightly and without gaps. Don't forget to grab a layer of wool. It is not necessary to pierce it, as the thickness of the shaft can complicate the process. At the end of the work, correct any deviations from the pattern scheme and fix the thread knot on the inside of the shoe.
ON A NOTE. Give preference to a large pattern so that it is noticeable. Ideally, the image should fill the entire side surface of the product.
 An easy and quick way to transform your shoes.
You will need scissors, a needle with a wide eye, threads, a knitting needle, chalk.
Use the crayon to mark the pattern of the ornament. Embroider should be starting with larger details and moving on to small elements.
Ribbon embroidery works well with back stitch or cross stitch. An option would be to use lacing, where it is sewn onto the boots, and then you pass a ribbon of rich colors through it. The lacing can be tied into a beautiful bow.
REFERENCE. Ribbons are an easily soiled surface, so they are not suitable for everyday shoes.
Lace is on the move
 Choose a rough base, such as crocheted fabric, which goes well with felt boots.
The design will not take you much time: carefully iron the laces and simply sew them to the inside of the shoe.
Decorations are selected depending on the height of the product: narrow material is combined with low felt boots, wide - with high ones.
Optionally, the ornament can be combined with beads.
We decorate felt boots with fur
 Both artificial and natural bases are equally suitable for work. It is advisable to pick it up with a short pile, such an ornament will not be overwritten and will last longer.
Additional elements of the pattern can be large leather buttons and voluminous laces.
The fur is stitched on both sides, make the joint either from the back or from the inside.
For little girls, shoes with fur balls that bounce fervently as you move are ideal.
How to decorate children's felt boots with your own hands
You can experiment with decorations for children's shoes as you like: they can be cartoon or fairy-tale characters, spaceships, cars - and your child will be happy to wear such beautiful and bright felt boots.
Children's embroidery on felt boots
 Young women of fashion will like patterns in the form of a snowflake or Christmas tree, flowers, butterflies, stars. Embroidery with beads, small beads, sequins and multi-colored ribbons will serve as a great addition to the pattern.
Alternatively, you can use various bows, girls love them very much. Ribbons, lace, beautiful fabric are suitable as a material. Optionally, add bows ready and attached to shoes with rhinestones, bright pebbles, beads of various sizes.
Isothread embroidery
 Since this embroidery method is performed on thick cardboard, it is enough to take care of a suitable substrate for your pattern, it can be leather or fabric. Using the backing, sew the ornament to the shoe.
ATTENTION. Be careful not to wrinkle or damage the base with the embroidered picture while working.
However, the isothread technique itself will require a certain time to complete, this must be taken into account.
Painting on children's felt boots
 The choice of pattern depends on your imagination and on the preferences of your child. On the eve of the upcoming holidays, these can be New Year's characters: Santa Claus, snowman, snow maiden or just snowflakes. Wearing such beautiful shoes will be a joy for the baby.
To work, you will need glue, brushes, acrylic paints, a palette, a film (transparent), a felt-tip pen and an iron.
Apply an adhesive layer on the surface of the shoe and wait until it dries a little and becomes transparent. Then, with chalk or a bar of soap, mark the outlines of the drawing and circle them with a marker.
Fill in all the details of the ornament with multi-colored paint. Leave it to dry (about 6 hours), then iron it under a thin cloth and without steam.
Instruction
If you want to embroider a rather complex, detailed picture, use the technique. Choose a pattern scheme on the Internet, in a magazine, or draw it yourself on checkered paper. Attach an overhead canvas to the felt boot - it can be removed from under the embroidery by pulling one thread at a time. Grab the canvas around the perimeter so that it does not move while you work.
Embroider the pattern in rows. You can fill in each square individually by passing the needle from the lower left corner to the upper right, then to the upper left and lower right. Or first embroider half of the crosses in the entire row, then return to the beginning of the row and add the missing halves. So that the threads do not get tangled on the inside of the boots, before returning to the beginning of the row, fasten and cut the thread, embroider the remaining halves of the crosses with a new one. When the drawing is ready, moisten it with a spray bottle to soak the starched canvas, then pull the canvas out with tweezers.
A pattern with larger details can be embroidered with satin stitch. In this case, transfer the contours of the image immediately to the felt boots. You can use fabric transfer paper or freehand sketch with a ballpoint or gel pen. Make the drawing a couple of millimeters smaller than necessary so that the stitches protruding beyond the outline close the lines of the sketch. Fill in the outlines with close stitches. If you want to make relief embroidery, make one layer with thick threads, and close them on top with threads of the desired color. The top layer can be attached both to the boots (if it is thin enough) and to the threads of the “substrate”.
It will look unusual. Sewing each bead separately is inconvenient - the base is too thick. Instead, string the beads onto a long string. Lay it on a pre-pattern and attach with small stitches across the warp thread. To do this, use thin threads that match the color of the boots. In the same way, you can do embroidery with multi-colored ribbons or braid.
In order for the embroidery to be combined with the texture of the boots, choose thick enough threads. Wool or synthetic material of the same thickness or cotton crochet threads will do. For such threads, pick up a gypsy needle with a fairly wide eye.
During operation, you will have to make quite significant efforts to pierce the felt boots through and through. Be sure to use a thimble to push the needle. You can also try not to drag it through, but pry only the top layer of the base.
Before starting work, check how well the selected threads are dyed. After all, they can shed from contact with snow. Soak a short piece of thread in water, and then lay it on a white cloth. If there are no colored traces left, the threads can be used.
Related videos
The most common felt boots can be turned into a trendy and stylish thing by decorating them with embroidery beads. Such a wardrobe item will not only warm the legs, but will also become a key detail in creating a fashionable image.
You will need
- - beads of different shades;
- - glass beads;
- - nylon threads;
- - a needle with a thin eye;
- - threads for basting.
Instruction
Think of the pattern you want to embroider. Proceed from the size of the side part of the boot top, the color of the wool from which it is made. Choose round beads and long glass beads, put a few pieces of both on felt boots, see how the shades are combined with each other. Pick up nylon threads that best match the color of the boots.
Lay a basting seam on the felt along the contour of the created pattern. To do this, select threads of a color that contrasts with the material of the felt boot. The outline will help you sew on the beads strictly within the limits where necessary. You can use the remnant to draw a pattern, but the trace will not be visible on light felt boots. In addition, it is impossible to draw a thin outline on felted wool.
Sew on beads in areas where your pattern requires it. Try to keep the beads tightly, forming solid colored zones, try not to go beyond the basting threads, which serve as a color border. Fasten each bead to the plane of the shaft with one stitch, do not try to bring the needle inside the felt boot after each stitch, just grab a small piece of felted wool. After two or three beads, pierce the bootleg through and through, bring the needle inside the boots, secure with a few small stitches. Pull the thread to the working side, continue embroidering. When all the beads are sewn, fasten the thread from the inside.
Outline the drawing with a long glass bead. Sew it strictly on the threads of the basting. Outline areas fully embroidered beads. Sew each glass bead with a through seam, fix the thread on the back of the product. Adjust the pattern if in some places the sewn beads go beyond the outline.
Remove the basting seams from the product.
Related videos
Satin stitch embroidery is the most beautiful technique in which you can create beautiful paintings and panels. This needlework combines many secrets of folk traditions and is gaining great popularity in our time.

You will need
- - cotton fabric;
- - hoop;
- - floss threads, silk;
- - bobbin threads;
- - needle;
- - scissors.
Instruction
Embroidery is done with stitches, in which the outline of the pattern is filled with stitches. It is performed in different colors of threads, on different fabrics. Mostly small floral patterns are embroidered in this technique. Usually, a double-sided smooth surface without flooring is used to create a picture, in which the number of stitches is not counted in advance. They are applied to the fabric pattern parallel to each other, evenly filling the contour.
Patterns or elements with uneven contours, such as leaflets, fill in with artistic oblique stitch. The stitches should be at different levels, have different lengths. Embroider rounded objects (fruits, berries) with a straight stitch. Before this, be sure to sew the outline of the pattern with a “needle forward” seam. Artistic oblique and straight stitch is embroidered with colored threads or silk.
To create the volume of an embroidered picture, use a one-color shadow surface. Run it with an oblique or straight stitch, threads of the same color, but take several shades (from light to dark). For embroidery, use shiny silk threads or cotton floss. Don't pull the thread too tight. The upper ones should be weaker than the lower ones so that the lower stitches are not visible on the right side of the fabric.
Small elements are usually embroidered with satin stitch. To do this, take floss or silk in one thread. The thinner the thread, the more beautiful the pattern will lie. Arrange the stitches tightly, one to the other, so that the ends do not touch, but go one after the other. Make each seam in the middle of the next stitch, stepping back a little, under the thread of the previous seam. Short stitches will look better. On the front side of the satin surface, a shiny pattern is obtained, and on the wrong side - small seams.
In order for the pattern to be voluminous, use a straight surface with flooring. First, make the pattern with thick threads in two layers. Use a straight satin stitch and then apply stitches perpendicularly to create a decorative embroidery surface.
To make a welt stitch, first sew the outline of the pattern with a “needle forward” seam. Make an incision near the form, insert the needle from the inside and stick it from the front side into the fabric. Narrow, twisted stitches are obtained. This type of smooth surface is used to embroider the middle of the flower.
To embroider large elements with satin stitch, use the “attached” technique. In this case, the stitches overlap from one edge of the pattern to the other. Each stitch is additionally secured with small stitches superimposed perpendicularly.
For the background of the picture, choose soft, pastel colors (gray, gray-green, cream, blue-gray). All the details of the picture are clearly distinguished on them. Black and white create a strong contrast. The main pattern and background should be in harmony with each other.
Start embroidering a picture with large details of the picture.
Related videos
Helpful advice
After the main drawing is completed, remove the work from the hoop and carefully look at it, identify flaws.
Sources:
- satin stitch embroidery
Birds can often be seen on embroidered tapestries, tablecloths, towels. This is also appropriate on clothes in folk style. The execution technique depends on which bird will be on your product. The bird can be stylized as a hardanger ornament or quite realistic. In the latter case, a cross, tapestry or smooth surface is more suitable.

You will need
- - linen or cotton fabric;
- - floss threads;
- - canvas;
- - embroidery needles;
- - hoops;
- - a picture of a bird.
Instruction
Choose a picture. For embroidery, they are more suitable with a small amount of small details. The bird should be in its characteristic pose. She can sit on a branch or fly with her wings spread. For a peacock, it is better to choose a front view so that its magnificent tail is visible. For an embroidered product, photographic accuracy is not at all necessary. The bird can also be stylized.
If you can't draw, find a suitable picture of a bird. Scan it. In Adobe Photoshop it can be turned into
Valenki, as we all know, are primordially Russian winter footwear. They are incredibly warm and comfortable. But such shoes do not really fit into modern clothing styles. Felt boots are usually produced in three colors - black, white and gray, and they all look exactly the same. But after all, every woman wants to be beautiful, individual, to have some kind of zest. If you still bought boots for yourself, then try decorating them yourself, you will see how these shoes will sparkle in a new way.
Decorating felt boots with your own hands is a creative process. It all depends on your ideas and imagination. Try to remember what kind of needlework your soul lies in, and start decorating. And in order to make it easier for you to decide on the choice of jewelry, we will offer you a few ideas.
Decoration of felt boots with paints
Acrylic paint is often used to decorate felt boots. Before applying it, prime the felt boots, completely or a certain place for painting, with PVA glue. This is done so that the paint lies evenly, and the villi do not interfere with the drawing. When the glue dries and becomes transparent, apply the selected pattern or pattern to the impregnated surface with a bar of soap or chalk. Now circle the drawing with black paint using a thin brush. After that, feel free to color the drawing as you wish. But remember that after drying, the colors become a little darker, so take this into account when choosing shades for painting.
Let the paint dry for 7-8 hours, and then iron (without steam) each felt boot, after covering it with a thin cloth.
EmbroideryFor those who like to embroider, the option of decorating felt boots with embroidery is suitable. It can be satin stitch or cross stitch. Choose a pattern and use carbon paper to apply it to the felt boots, or draw it by hand with a pencil or chalk. This will be the main outline for embroidery. The texture of the boots is quite rough, so choose thick threads (woolen, synthetic or cotton). Stock up on a gypsy needle with a wide eye and a thimble. Before performing work, check the quality of the coloring of the threads so that they do not shed later.
fur trimSometimes people are interested in how to decorate felt boots with fur, which is also not particularly difficult. Choose black, white or colored fur, it can be in tone with the color of the boots or contrast with it. Cut out blanks of the desired width and length from the fur, sew them to the shoes from the inside, and then fold them to the outside, and then glue them. On the edge of the fur can be trimmed with braid. And from the remnants of fur for each felt boot, you can sew two pompoms.
Using appliqués to decorate boots
If you decide how to decorate children's felt boots, then a fun application in the form of cartoon characters, funny animals, cars, various flowers, snowflakes or snowmen is best suited for this. Pieces of fabric, ribbons, buttons, and even rhinestones are also suitable for this. Choose stripes in contrasting colors,  After all, children love everything bright. It remains only to sew or glue all this to the outline of the picture, and the unique felt boots are ready.
Boots embroidered with beads
Beaded embroidery will also look good. Before decorating the felt boots with beads, pre-apply the selected pattern on their surface. It is inconvenient to sew each bead separately - the base is too thick. It is better to string the right amount of beads on a long thread. Then place it on the drawing and secure with small stitches. For the base and fastening of beads, use thin threads that match the color of the boots.
In the old days, mothers decorated children's felt boots with embroidered snowflakes or the child's initials, so that the baby in the kindergarten would not confuse his shoes with someone else's. Today, felt boots have regained popularity, and the decor of shoes has become much more intricate.
Painting with paints

If you have minimal artistic ability, try painting the felt boots with acrylic paint. First treat the area on which the drawing will be applied with PVA glue - then the paint will lie evenly and easily. After the glue dries and becomes transparent, outline the outlines of the drawing with chalk or dry soap and paint with acrylic paints. Leave the felt boots to dry for about 10 hours, and then iron the pattern with a warm iron through cotton fabric.
Embroidery

Embroidery lovers can decorate winter shoes with an embroidered pattern. Any technique is suitable - cross stitch, satin stitch, embroidery with ribbons or beads. It is more convenient to first draw a drawing on the felt boot with a pencil or chalk. You need to choose thick threads (woolen, synthetic or cotton), a thick gypsy needle with a wide eye and a thimble will come in handy.
Application
The easiest way is to buy ready-made iron-on in the store. But you can also connect your imagination - make an applique yourself from scraps of fabric, pieces of fur, leather, large buttons, beads. The appliqué can be sewn onto felt boots or glued on.
sparkling jewelry

Little girls love all things shiny. From boots, decorated with beads, glass beads and sequins, a little fashionista will be delighted. You need to embroider with strong synthetic threads or thin fishing line. Thread a thread into a needle with a thin eye, string beads on it and fasten them to the felt with small stitches, trying to make the thread invisible on the surface. Sequins are easier to stick on.
felted on felted

If you are familiar with felting (wool felting), you can easily make a cute voluminous decoration for felt boots - for example, flowers, a snowflake or your favorite cartoon character. Felt decorations are not sewn on, but "rolled" to the shoes. By the way, you can attend a felting master class with your child.
Knitted ornaments

Another option for decorating girls' boots is knitting. You can crochet a decor for the shaft or a small brooch.
By the way, you can buy handmade felt boots (with or without decor) from
Perhaps the fastest and easiest way that will allow you to decorate this unusual woolen shoe with your own hands is embroidery with satin ribbons. In order to perform this kind of embroidery, you will need:
- felt boots;
- satin ribbons of different colors;
- scissors;
- threads;
- needle with a wide eye;
- spoke;
- chalk or regular pencil.
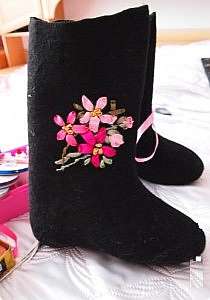
We have chosen a bright floral motif to decorate our boots, and you can opt for any drawing or pattern you like.

First, you will need to carefully transfer the selected pattern to the shaft or make a small schematic sketch on it yourself. To do this, you will need a regular crayon, which will later be easily wiped off the surface.
Please note that first of all it is necessary to embroider large flowers, then buds, and only after that you can start embroidering stems, leaves and cores. Since the wrong side of our product must also be neat, we will have to abandon the transitions with ribbons. Instead, after finishing one piece, we will need to fasten the tape and cut it. To complete the next part, you will again need to fasten the ribbon on the wrong side of the product.
When choosing ribbons, pay special attention to the fact that a ribbon with a width of 3.6 mm will easily pass through this product, but for a wider ribbon - 12 mm, you will have to additionally pick a small hole with a knitting needle. Separately, I would like to note that ribbon embroidery can also be combined with cross-stitch or back stitch.
Here are some original and stylish embroidered boots we got.
If you didn’t really like the pattern we have chosen, we can offer you such wonderful and easy patterns that can also be embroidered with multi-colored ribbons on felt boots.
Flowers

Snowflakes

In addition, the so-called pseudo-lacing can be made from ribbons on felt boots. To do this, you will need to sew the lacing itself on the front, through which you then pass the tape in a contrasting color. If desired, you can later tie it into a beautiful bow.
How to embroider a pattern on boots with threads
Modern women of fashion have long been accustomed to decorating their clothes with various embroidery, which is probably why you can increasingly see felt boots with embroidery in the wardrobe of many girls and women. This at first glance ordinary and nondescript winter footwear is instantly transformed after a beautiful unusual pattern or ornament appears on it.

So, in order to make felt boots with embroidery, you need to prepare all the necessary materials and tools in advance:
- threads: floss, synthetic, silk, cotton;
- felt boots;
- scissors;
- drawing;
- pencil, crayon or small remnant;
- thimble;
- thick needle (it is often called "Gypsy").
Felt boots, unlike ordinary fabric, on which we are all used to embroider, are more “thick” and therefore we need a large needle and a thimble. In addition, it is necessary to check the threads selected for work in advance and make sure that they “do not climb” during the operation of the shoe.
As a rule, boots are embroidered with a cross or stitch, although in some cases a regular stitch is also used. Additionally, such embroidery can be decorated with sequins, glass beads or beads.
Let's get straight to work.
First, choose the drawing you like. Then fix the dense canvas motionless on the felt boots.
It is worth noting that smaller details are usually embroidered with a cross. As a rule, all rows are embroidered in turn, but some needlewomen prefer to embroider in squares.
Large details are embroidered with satin stitch, while trying to make the stitches "lie" as tightly as possible to each other. In order for the selected part to become more convex, you must first embroider it with thick threads, and only then, on top of them, make neat stitches with threads of the desired colors.
After finishing work, you will need to slightly wet the canvas and carefully pull out its soaked fibers with tweezers.
Here are some wonderful and stylish handmade felt boots we got.
How to decorate ordinary boots with beads
Now we will hold a small master class that will tell you how you can embroider ordinary felt boots with beads and turn them into exclusive and bright winter shoes. Before we get started, let's prepare everything you need in advance:
- ordinary boots;
- beads of different colors;
- threads that can be used for basting;
- nylon threads;
- a needle for beads (with a thin eye);
- bugle.
We start work.

First of all, you need to find a suitable pattern or come up with it yourself. When choosing a pattern, be sure to consider the color of your boots, and the size of the bootleg, or rather its side part.
If you are at a loss with the choice of colors for embroidery, you can first attach beads and glass beads of the selected shades to the felt boots in order to see how they will be combined with your shoes.
In addition, you need to pre-select nylon threads that will match the color of the felt boots themselves.
Then, on the felt boots, you will need to make a “basting” seam, which will run right along the contour of the selected pattern. To do this, you will need threads that will be clearly visible on felt boots. Thanks to the presence of such a contour, you can easily sew on beads in your chosen area.
Pay attention to the fact that on black felt boots you can draw a pattern with a remnant, but on lighter ones - no. However, keep in mind that you will not be able to draw a thin, neat outline on felted wool.
Sew on the beads quite tightly, so that there are no gaps between them. After passing the needle through the wall of the felt boot, put a bead on it, and then, grabbing a little wool, sew a couple more beads in this way. After that, the needle will again need to pierce the bootleg through and through.
After you have sewn all the beads, you will need to fasten the thread from the wrong side.
Then, sewing the glass beads with the help of a “through” seam, make an outline for your drawing.
At the end of the work, you just have to remove the "basting" seams from the product.
Look at the photo and you will see what an amazing pattern turned out on the felt boots we have chosen.
As you yourself have probably noticed, self-made embroidery can transform almost beyond recognition even such seemingly ordinary and uninteresting shoes as felt boots. Colorful, unusual embroidery on felt boots will allow you to stand out from the crowd and feel like a bright individuality. Thanks to such shoes, even in winter you will look very stylish and modern.