How to make homespun walkways. How to make rustic rugs with your own hands. Making a rug out of old towels
It would seem, well, how can an ordinary small rug change the interior? But it turns out that it can become not only useful, but also a bright, interesting detail in interior design. Of course, you can buy it in the store, the good thing is that now there are rugs for every taste and color. But think how nice it will be when you make it yourself, especially since such a rug can be easily made from old things, for example: threads, fabrics, wine corks, belts, and much more. All you need is to know the step-by-step instructions, stock up on the necessary materials and patience. And the site will tell you 12 ideas on how to make rugs from old things with your own hands.
Making a rug with your own hands from belts is very simple. For this you will need:
- 10-12 natural or artificial leather belts
- awl or leather puncher
- twine or rope.
Pre-make the belts the same length by cutting off the buckle. Make holes along the edges of the straps at a distance of about 2-3 cm from each other and 0.5 cm from the edge. Sew them together using hemp thin rope. The order of pulling the rope is arbitrary, you can sew along the belts, across, cross to cross between the holes. Metal staples instead of rope will also look very stylish.
2. Soft rug made from old fabrics

Required material:
- scissors
- pieces of old (unnecessary) fabrics, you can use old clothes
- bath mat (with holes)

1. Cut fabrics into small strips
2. Using tweezers or a hook, begin to poke the strips through the holes.
3. Tie all fabric strips in a simple knot.

3. We make a do-it-yourself rug from old towels

Required material:
- old towels
- scissors
- sewing machine (needle and thread)
1. Cut your towels into several strips. In this example, each strip is about 3-4 cm wide.

For convenience, you can fold each towel in half, cut into 2 halves. Fold each half in half again and cut into fold lines, etc.
It is desirable that all towels are approximately the same size.

2. Put together 3 strips of different colors and secure them with threads (sew the ends). Start weaving a “pigtail” from these strips. After finishing weaving, stitch the ends again.

3. Make several of these "pigtails" and then connect them into one long strip with a needle and thread (or a sewing machine).

4. Start rolling your long strip into a spiral, securing it with thick thread.

5. Fasten the entire structure and turn it over so that the seams are on the bottom.

Your rug is ready!
4. Wine cork rug
Wine bottle corks are a great material for a variety of crafts for the home and garden. One useful option is to make your own cork rug. Cork bark practically does not absorb moisture and bacteria do not multiply in it, which is why cork is great for rooms with high humidity, that is, for the bathroom. And walking on a cork rug is not only very pleasant, but also useful!

In order to make a small rug, you will need:
- 150-180 wine corks;
- glue;
- a piece of water-repellent material for the base (rubber shower or yoga mat, rubberized fabric, soft thin plastic);
- sharp knife;
- large sandpaper;
- cutting board.
1. Gather and prepare corks. If you do not have the required quantity, then corks can be bought in online stores. Wash them thoroughly in warm soapy water. To remove red wine stains, soak corks in a bleach solution and leave them overnight. Then rinse well and leave to dry.
2. Cut each cork lengthwise into two pieces. Use a cutting board and a sharp knife. If the cuts are very uneven, smooth the edges with sandpaper. For convenience and safety, it is better to cut the cork not on its side, but by placing it in a vertical position.

3. Lay the corks cut-side down on the table as they will be located on the rug, determine the size of the future rug. Then cut out the base of the desired size from the rubber material. You can come up with a pattern yourself, it can be a checkerboard, even rows, zigzags.

4. Start gluing the corks to the base with an adhesive suitable for gluing such surfaces. First glue the corks around the perimeter, then moving towards the center. Remove excess glue immediately with a cloth.

The cork rug should dry completely. To make it completely waterproof, you can treat the surface with a sealant. If you will use a cork rug in the bathroom, it is advisable to dry it in the sun at least once a month for prevention.


5. Rug woven from shreds

Necessary material for making your own hands:
- dense fabric (basis for carpet)
- pieces of fabric
- black thread
- needle
- scissors
- fabric glue
- adhesive tape
- protective coating spray (if desired)

1. Choose the size of the carpet and prepare the right size canvas.
2. Prepare long strips of fabric. Each strip should be about 6-7 cm longer than the main part of the carpet.

3. Prepare several bunches of 3 strips and start weaving a “pigtail”. You need several blanks, then to combine them into one carpet.
For convenience, secure the ends of each piece with duct tape.
Do not weave to the end - leave some fabric unwoven.
4. Apply glue to a thick canvas. No need to skimp on glue.
5. Carefully lay the blanks on the canvas so that they stick.
6. Connect all the blanks together with a needle and thread.
7. Remove the adhesive tape from the ends. Trim the ends so they are even.

Carpet is ready!
6. Do-it-yourself pom-pom rug: Option number 1

Required material:
- wool thread
- scissors
- bath mat (with holes)
1. Wrap the yarn around your fingers (the more you wrap, the thicker the pom-pom will be).
2. Carefully remove the wound thread from your fingers. Prepare another short thread - about 20 cm long - and tie it around the wound thread (in the middle).

3. Cut off the ends with sharp scissors. Cut off the extra parts with scissors to get a neat round pom-pom. But do not cut the thread with which you tied the pompom, you will still need it.

4. Make enough pom poms to cover the bath mat. After that, start threading through the holes and tying it to the rug, thereby attaching the pompoms to the carpet.
Pompoms should be close to each other.

5. When you have tied all the pompoms to the carpet, you can cut off the ends of the threads.

Do-it-yourself pom-pom rug is ready!
7. Simple Pompom Rug: Option #2

To make this white and blue pom-pom rug, you will need:
- thick woolen threads for knitting;
- mesh base for the rug;
- scissors.

1. Make pom-poms in different colors to create a smooth gradient color transition. You can make a plain rug or lay out a specific pattern. You can also play with the size of the pompoms, using large, smaller and very small ones. To do this, look here, what is the best way to make pompoms of different sizes.

2. Now tie each pom pom to the net, following the color scheme. Try not to see the canvas between the pompoms.


If desired, the reverse side of the knotted rug can be covered with fabric or knitting so that the pom-pom rug is beautiful from all sides, even from the inside. If you could not find a suitable base - mesh - it does not matter, pompoms can simply be sewn to any fabric.
8. Round foot mat made with a hoop
Old knitted T-shirts are actively used by craftswomen for various crafts, in particular, the idea of making rugs out of them is very popular.

Necessary materials:
- 3-4 T-shirts (other things, ribbons or ropes)
- children's gymnastic hoop or hula hoop for adults
scissors
The size of the mat depends on the size of the selected hoop, you can take both the daughter's gymnastic hoop and the large slimming hoop. The technology of weaving is very simple, even a child can handle it by making a round rug on a hoop in his room.
Cut T-shirts or other old outerwear into strips of equal width, from one side seam to the other, so that you get rings. Put each strip on a hoop: first a vertical line, then a horizontal one, and then divide each sector into equal parts with a strip of a T-shirt.
Important! The strips of fabric should not be very tight, otherwise the finished rug will wrinkle and will not hold its shape. Ideally, the T-shirt strip should fit almost freely over the hoop, with minimal fabric stretch.
It's likely that if your hoop is larger than your T-shirt strip, it's too tight or you're using ropes at all. In this case, simply wrap the hoop with a cloth or rope and tie a knot.
Try to make sure that all the lines of the base intersect at the center point. We start weaving the rug from the center. Take a strip of a T-shirt, fasten it with a loop to one of the lines - the bases and pass it under and over the longitudinal lines.

When the strip ends, tie another T-shirt ring to it, hide the knot under the previous row. Continue weaving in the same way, alternating pulling the strip under and over the longitudinal lines. Try to keep each circle tightly pressed against the previous one, avoiding large spaces and holes between them. After you have finished weaving, cut off the ends of the loops with scissors and tie them in a knot.
9. Mat with backlight
Sometimes at night you want to go to the toilet, go to the kitchen to eat, drink a glass of water or prepare a bottle of formula for the baby, so you have to get up and go out of the bedroom. In the dark, and even half asleep, there is a risk of stumbling upon something, and it is not always possible to turn on the overhead light so as not to wake up other family members. For such cases, LED floor lighting in the rug will be an interesting and useful solution.

Craftswoman Johanna Hyrkas came up with the brilliant idea of using an LED strip as an illuminating sign for the way out of the bedroom. The tape is twisted in a spiral, located inside a round rug woven from an ordinary rope, and a long tail leads further from the room. Soft cozy light spills over the floor, not interfering with sleep.

This rug with LED lights can serve as a night light in a child's room. In addition, a strip of rug can be laid along the walls and lead to a toilet or kitchen. For such purposes, it is better to use a sealed closed LED strip. You can make a rug with your own hands, using a large crochet hook or braiding a ribbon with thick yarn or a rope with your fingers. Of course, there are expensive models of LED floor lighting with a light power regulator. But often a homemade option is a great budget solution, as in this case.
10. Rug of labels from jeans

The concept of using garments after they have been worn out for other purposes is far from new. For decades, women have been making patchwork rugs and quilts out of old things. In the same way, you can make a do-it-yourself carpet from jeans labels. The only problem is to find enough labels, because even a small rug will need at least 50 pieces.

To make such carpets with your own hands, it is better to sew labels on some kind of fabric, even thin. Labels sewn on top of each other will give the carpet the necessary density. Use a sewing machine to work, as manually sewing on each label is a very laborious task. Sew along the perimeter of the label, where it was sewn to the jeans. You can choose the pattern yourself - the correct even grid, herringbone, spiral for a round carpet, but labels in a slightly wrong order, sewn on top of each other, look the most spectacular.
11. How to make a French bracelet rug

Required material:
- old fabric 2 colors (you can use old T-shirts)
- scissors
- needle and thread
- adhesive tape
The width of each piece of fabric is 20-25 cm, and the length is 3 meters. If you are using old T-shirts, then you can connect several pieces with a thread and a needle.

1. Lay out 5 strips of different colors in the order you want them to look on the future carpet.
2. Next to the 5 laid out strips, put 5 more strips in a mirror image.

3. Take the first strip, in this case pink, and tie it as shown in the image. First, bend the fabric so that the number 4 is formed.
4. Continue tying the pink stripe around the rest of the stripes until you reach the middle.

5. Start doing the same on the opposite side, tying another pink strip around the remaining 4 strips. Start also with the number 4, but in a mirror image.
Do you have too many things in your closet that you can’t wear and feel sorry for throwing away? No problem! From them you can sew an excellent designer rug for your home using the ideas and technologies described in our article.

What is needed to make a rug? Yes, anything! Open the closet and inspect things with a critical eye. The list of materials that can be used is very large:
- old knitwear - t-shirts, sweatshirts, jumpers;
- dense fabric from jeans, coats, jackets;
- the remains of knitting threads, rope or cord.

Advice! Materials can be combined, giving free rein to imagination, as a result, the house will be decorated with an original and unique carpet that keeps the warmth of your hands.


When choosing a technology, consider the characteristics of carpets from different materials. Patchwork and fleecy are suitable for the bedroom, it is pleasant to walk on them barefoot, but they do not last long. Knitted and woven carpets are stronger, but tougher, it is better to lay them in the hallway, kitchen. Bathroom rugs should absorb water well, dry quickly and not shed.

Front door mats need to be washed and cleaned frequently, it is better to use waterproof materials for them.

Consider also the style of the new thing and its compatibility with your interior. Variegated multi-colored carpets will perfectly fit into the design of a children's room, wicker and woven rugs will decorate a kitchen or a country house.

A strict openwork carpet or a product with a classic ornament will take pride of place in the living room, giving it charm and comfort.

Types and methods of manufacturing
A colorful homespun rug or a patchwork rug - what should a beginner craftswoman choose? Techniques for making carpets for the home are very diverse. If you exclude completely unique ideas, they can be combined into several groups.
Sewn- a decorative coating sewn to a dense base, or individual elements sewn together. This group includes shaggy bathroom rugs and "grandmother's" braided rugs, as well as pompom rugs for children.


knitted- rugs of rectangular, round or oval shape, crocheted or knitted. To give them volume, not only threads are used as a material, but also strips from any non-loose fabric.


nodular- on a mesh base, a lot of patches of soft fabric, rope or thread are tied with a knot, imitating a long pile-grass. As a basis, take a polypropylene mesh from a hardware store.


Woven- they use the traditional weaving technique with longitudinal and transverse threads and a simple home-made weaving "mill". The basis of such rugs can be flaps of any fabric and thread. Strong weaving will not allow the fabric to crumble.

Wicker- they are mainly made of durable cord. Such rugs resemble a mat, they are extremely strong and durable, but not very pleasant for the feet, so they are usually used in the hallway.

glued– carpets made of original materials, glued to the base with a suitable adhesive. Any elements are suitable for their manufacture: leather, dense fabric, cork, pebbles. The main condition is that they should be pleasant to walk on.

The tool necessary for making a rug with your own hands is in the arsenal of any needlewoman: knitting needles and a hook, needles of different thicknesses, a sewing machine, as well as skillful hands and imagination.
Advice! Do not be afraid to try new tricks unknown to you - on the rugs you can perfectly practice and hone your skills.
Shaggy knotted rug
The basis for such a rug is a construction polypropylene mesh or mesh for needlework. Pile can be made from any soft, non-flowing material - knitwear, fleece, terry cloth or thick knitting threads. Craftswomen often use old T-shirts to make it - such a rug is soft and does not require extra costs.

Table 1. Knotted rug from old T-shirts - a master class.
| Steps, photo | Description of actions |
|---|---|
| Prepare strips of knitted fabric: tear off the sleeves and neck of the T-shirts, open the seams. Cut them with sharp tailor's scissors into strips 3-4 cm wide. The length of the strips depends on how long the pile you want to get, 10-25 cm is enough, taking into account tying a knot and further alignment. |
| Scroll the resulting knitted strips in the washing machine without detergents in the shortest mode, for example, “rinse”. This is enough for them to curl into tubes. If you use jersey in several bright colors, make sure that it does not fade, or wash different colors separately. |
| The resulting blanks after pressing will be almost dry, they must be completely dried in the dryer or scattered on a large terry towel - it will quickly absorb the remaining moisture. |
| While the knitted blanks are drying, prepare the mesh. Cut it to the size of the rug, give the base the desired shape. If the edges of the mesh are unraveling, glue them on both sides with duct tape. |
| To thread the blanks through the mesh, you will need a crochet hook. It is brought from above into one of the cells of the grid and taken out to the next cell. They grab a loop from a knitted tube folded in half and pull it into the first cell. The ends of the workpiece are threaded into the resulting knitted loop and the knot is slightly tightened. It is more convenient to do this with the help of the same crochet hook. The ends are straightened, if necessary, their length is equalized, and only after that the knot is tightly tightened. When making a plain rug, it is more convenient to start from one edge and, moving in rows, fill in the grid. If you want to make a rug with a pattern, it is better to create a template in advance and color the grid with multi-colored markers - this will make it easier for you to fill in the pattern with patches of the desired color. |
| The rows are filled in a checkerboard pattern - this will achieve a uniform thickness and density of the pile. From time to time, check the wrong side of the rug and, if necessary, align the knots. |
| The pile of the finished rug can be trimmed with scissors, and the edges trimmed with cloth to give it a finished look. To extend the life of the rug, you can sew a dense fabric to it from below. |


A similar rug can be made without a mesh; instead, a dense base fabric is required. Knitwear blanks are made according to the above method.
The base fabric is cut to the size of the rug. A strip of narrow double-sided tape is glued on, knitted tubes are attached to it with the middle part, close to each other. They are sewn on a typewriter directly on top of the adhesive tape.

The first row of shreds is bent, at some distance the second strip of adhesive tape and knitted blanks are glued, sewn. So continue to the opposite edge of the base.
Advice! Rugs made of knitted patches can have any shape: in the form of a heart, an asterisk, a fluffy cloud. This will not complicate their manufacture - it is enough to prepare the base of the desired shape.


Rug from fabric braids
It differs from patchwork rugs in its dense wicker structure and original variegated coloring, which is achieved by interweaving knitted stripes of different colors.

For such a rug you will need knitted ribbons of different colors. The thickness of the finished product depends on their width, for a dense thick rug it is better to take ribbons about 5 cm wide. How to get a long ribbon without knots from a T-shirt is shown in the video.
Video - How to make a ribbon without knots from a T-shirt
Table 2. Carpet of knitted braids - a master class.
| Steps, photo | Description of actions |
|---|---|
| Cut old t-shirts of different colors into strips 4-5 cm wide as described in the video, this will avoid unnecessary knots. To make the strips twist into bundles, you can moisten and dry them. |
| Fasten three strips of different colors at the ends with a strong thread. Start weaving a regular pigtail out of them, tightening it not very tight. Gradually roll the pigtail into a spiral. |
| After laying the next turn, it is necessary to fix it from the inside with a needle and a strong thread - at least No. 20. |
| By gradually adding ribbons of a different shade, you can achieve the desired color scheme. It is convenient to connect the ends of the tapes without knots using a needle and thread. The coils can be temporarily fixed with clerical clips. |
| After laying the last turn, the end of the pigtail is carefully brought to the wrong side and secured with threads. |


To achieve the strength of the carpet, you can use a sewing machine. In this case, a long braid is first woven, and the winding is carried out directly under the foot of the machine. They start the end of the pigtail, lower the needle to its beginning and, turning the product, lay the next coil. Sew in a zigzag at the junction of the turns.

Braid rug - manufacturing steps
A rug stitched on a typewriter is more durable and tougher, lasts longer and looks neater, besides, this method saves time.
Advice! When making a rug, it is better to use sewing machine needles marked H-S or H-SUK - these are needles for knitwear, they easily push the knitted loops apart and do not tear the fabric.
Video - Rug from old socks
Knitted rugs and rugs
Very popular in the days of our grandmothers, knitted rugs are back in fashion. And this is not surprising - the knitting technique allows you to create things that are unique in beauty and fit into any interior.

Simple round crochet rug
The easiest option that even a novice craftswoman can handle is a two-color round rug knitted with double crochets. It will require knitted or thick woolen yarn and hook No. 10.
Row 1. For the first row, you need to tie a chain of 6 air loops and close it into a ring. Passing a loop into the resulting ring, knit 2 air loops to lift the row and 11 loops with a crochet.
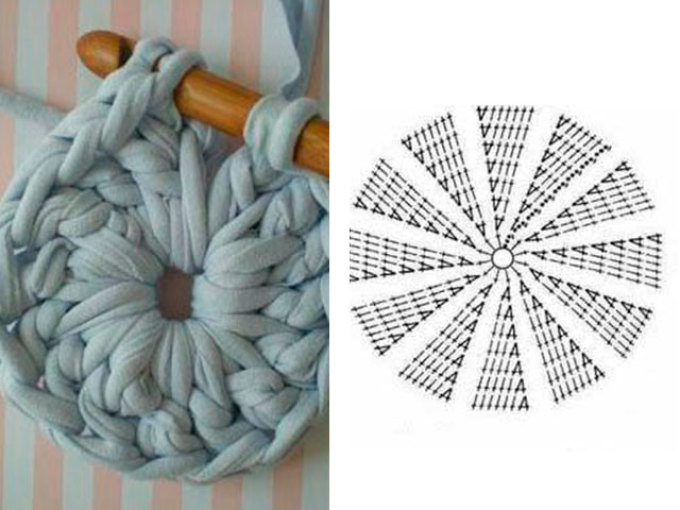
Row 2. The second row is knitted with a thread of a different color: 2 air loops and 2 loops with a crochet in each loop of the first row.

Row 3. Change thread again. Two air loops are knitted, then a double crochet and two double crochets alternate in one loop according to the scheme.
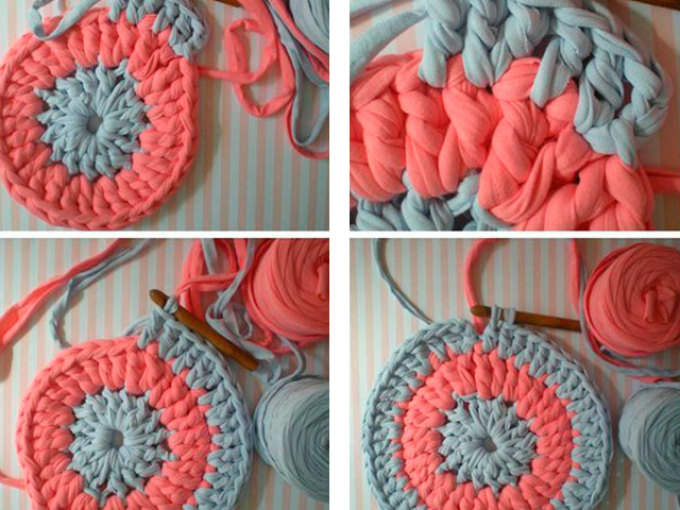
Row 4 onwards to desired rug size. Work 2 chain stitches, then double crochet stitches in each stitch and two double crochet stitches in one stitch at the end of each sector. The color of the threads is alternated to obtain an ornament.

The last row is tied with a contrasting thread with single crochets and the last loop is tightly tightened. Cut the thread at a distance of 5 cm and hide the tail with a hook from the wrong side of knitting.

Knit rugs can be both crochet and knitting. Mostly the simplest tricks and loops are used, but experienced craftswomen surprise with complex openwork products. Schemes of knitted rugs are given below.


Video - Oval rug made of plastic bags
Homespun rugs and rugs
Classic homespun carpets and rugs have excellent thermal insulation and create a special atmosphere of comfort. In addition, for their manufacture, you can use scraps of any fabric - knitwear, chintz, calico. The more varied the color scheme, the more fun the rug will turn out to be.

Woven rugs and rugs are made rectangular, their width is limited by the width of the loom. How to make a simple woven rug is described below.
Table 3. Do-it-yourself woven rug from fabric scraps - a master class.
| Steps, photo | Description of actions |
|---|---|
| To make a rug, you need a wooden frame according to the size of the product. It can be made from a board or a bar with a section of 20x40 mm, connecting it to the corners and self-tapping screws on the reverse side. Small carnations are attached to the upper and lower bar of the frame - warp threads are attached to them. Carnations can be replaced with push pins. Two removable wire rods are attached to the sides of the frame - weft threads will be attached to them, they are needed to keep the rug in shape. The frame can be mounted on a stand or placed on a table. |
| As warp threads, strong threads or strips of fabric in a neutral color are taken. They are hooked onto the studs on the upper and lower bar with a snake. Fasten to the knot at the start and end points. |
| For duck, the fabric is cut into strips 1.5-2 cm wide. You can immediately tie individual strips into a common thread and wind them into small balls. The weft thread is attached to the corner nail and weaving begins. Wefts are threaded through the threads of the warp with a snake, then from above, then from below the warp, alternating the position of the weft in each subsequent row. The edges are looped through the spokes on the side slats to ensure even edges. |
| It is convenient to weave on both sides from the edges to the middle. In this case, it is necessary to observe the pattern and the same tension of the threads so that the rug is even. The duck is pressed tightly against the previous row. |
| By gradually changing the color of the fabric stripes, you can create ornaments and smooth transitions. The best solution is to use fabric of different colors, but the same structure. |
| At the final stage of weaving in the middle of the rug, it will be difficult to thread the balls between the warp threads, it is easier to use separate strips of fabric and a crochet hook. |
| The ends of the fabric strips are carefully tucked into already woven rows of 10-15 cm, this will allow them to be well fixed. After that, the free ends are cut off. Remove the base from the studs, remove the removable knitting needles and remove the mat from the frame. |


Video - Master class. Homespun rugs
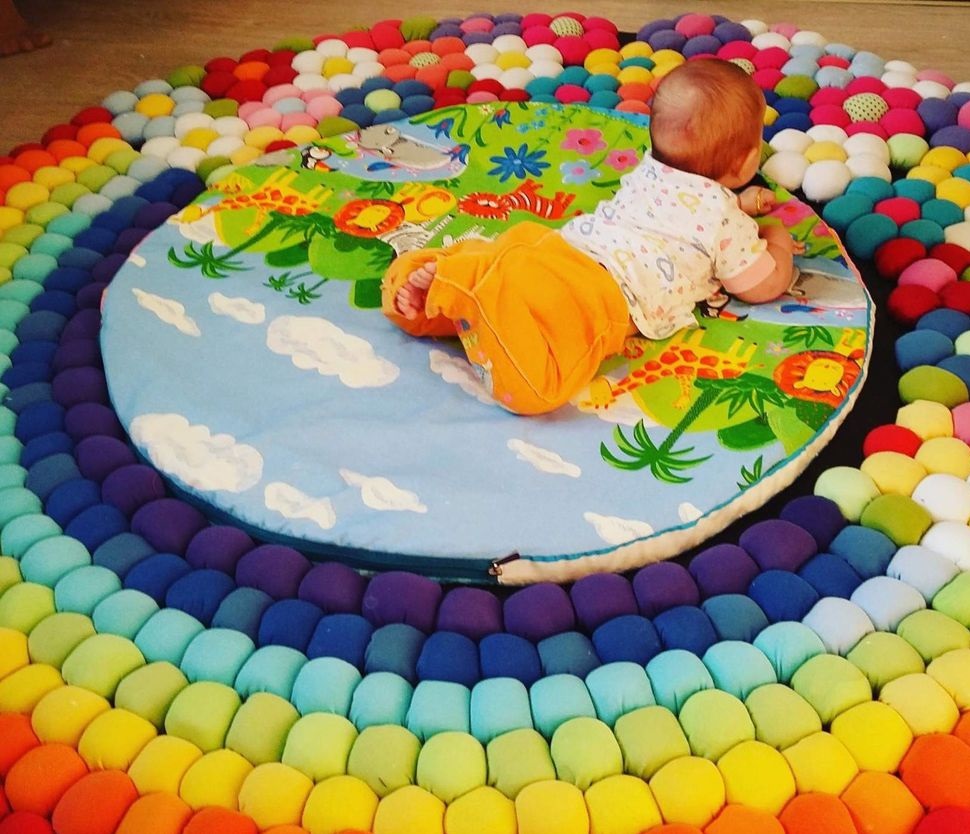
Children's pom-pom play mats
Bright soft rugs that even the smallest ones can sit and lie on are a great idea for a children's room! To make such a carpet, you will need multi-colored pompoms made of thread or fabric.
A pompom rug made of threads can be made literally in one evening. For it you will need multi-colored knitting threads and a base fabric. To make pompoms, a skein of thread is stretched between two supports and firmly tied at a distance of 5 cm with a thread of the same color, leaving ends 10 cm long. It is cut between constrictions and scissors to give the pompons a round shape.

The ends of the tightening threads are pulled through the base fabric or mesh and tightly knotted. Lay the pompoms quite tightly so that there are no holes in the rug.

A developing rug made of soft knitted pompoms is a more complex product, but it is simply indispensable for a children's room, because even babies can be laid on it.
Table 4. Pompom rug - master class.
| Steps, photo | Description of actions |
|---|---|
| 1.Hot glue gun 2. Tailor's scissors 3. Strong thread and large eye needle 4. Cardboard pattern 5. Old T-shirts or knitted fabric in different colors 6. Thick fabric or non-woven fabric 7. Furniture foam 8. Sintepon 9. Oilcloth for a mattress 10. Bright fabric for a mattress cover 11. Zipper for mattress topper |
| A round pattern-pattern with a diameter of 12-15 cm is cut out of cardboard. Blanks for pompons are drawn around it and cut out from multi-colored knitwear. Their number and colors depend on your imagination. |
| With a “forward needle” seam, a circle is sewn along the edge with an indent of 0.5 cm, the edges are slightly pulled together. Scraps of furniture foam rubber are wrapped with synthetic winterizer so that there are no protrusions. |
| Pompoms are formed from fabric and filler, the edges are finally pulled together and sewn up. |
| Prepare pompoms of different colors in the required quantity. They are laid out in packages so that later it is convenient to create a drawing. |
| The base of the rug is cut out of dense fabric in the form of a circle with a diameter of 1.5-1.6 m. Pompoms are glued to the base with a hot-melt glue gun, observing the selected pattern, in this case, a rainbow. |
| Having fully fixed the drawing, you can begin to manufacture the mattress. It is made of furniture foam rubber with a thickness of 50-100 mm. A circle with a diameter of 1 m is cut out, covered with oilcloth, fixing it on hot glue. |
| A mattress cover is sewn from a soft bright fabric: two circles with a diameter of 1.1 m are sewn from the wrong side to 2/3 of the circumference, turned inside out and sewn in with a zipper. Put the cover on the mattress and lay it on the mat. Velcro can be provided on its underside for fastening. |


Braided rope rug
A very practical and durable rug can be made from a thick rope - nylon, jute or cotton. For a rug measuring 0.85x0.6 m, you will need about 60 m of rope 1.2 mm thick.

For convenience, it is better to weave on a flat surface, on which the dimensions of the rug are indicated - it is easier to keep its proportions. The ends of the nylon rope must first be burned so that it does not unravel. The ends of a jute or cotton rope can be fixed by wrapping it with a strong thread.
The weaving pattern is shown in the figure. First, weave the first row of the pattern, then repeat it several more times until the rug is completely filled.

Prices for bath mats
bath mat
Video - Do-it-yourself jute rug
A homemade rug is not just a new life for old things. Small handmade details give the home a unique flavor, create a positive mood and an atmosphere of comfort.
Warm and cozy home decor, whose unprecedented relevance in recent decades has been successfully used by designers to offer new products, can be quite handmade, and no worse than famous craftsmen do. This decor makes an ordinary living space a truly home.
One of my favorite decor items is definitely a rug. More recently, the fashionable trend of interior design with oriental-style carpet products has changed. It has been transformed into something new, minimalist, cozy, uncomplicated, but extremely complementary to any interior. Woven, felted and knitted rugs, for all their simplicity, can organically merge into almost any interior design, dilute the strict minimalist lines of modern organic interiors, add a bionic component to classic design, make static “old” styles interesting and modern, and become an elegant addition to style interiors. art deco, modern, pop art, etc.
The relevance of floor decor and manual execution also implies its high cost. But it turns out that creating such a product as a home rug is quite accessible to everyone. What distinguishes the technique of making carpets from other artistic techniques? These are mostly inexpensive manual manufacturing methods, so not only designers with a name can make beautiful rugs.
The history of the Slavic rug
Weaving originated at the dawn of mankind, over 25,000 years ago. The manufacture of rugs, rugs, paths appeared simultaneously with the advent of hand weaving and knitting. Almost every corner of the world has its own traditional rug-making techniques, which have evolved into world-famous hand weaving techniques, the secrets of which have been passed down from generation to generation.
A widely known technique is the weaving of Persian carpets. The spread of wool-based carpet technology is associated to a greater extent with the development of cattle breeding and the availability of wool as a material for manufacturing. Carpets were at the same time decoration and insulation of nomads' dwellings, in addition, they were ideal for transportation, as they took up little space. The production of small-sized rugs was originally associated with religious oriental rituals; unique examples of hand-weaving are presented in museums. Persian handmade carpets still involve an almost filigree weaving technique that cannot be reproduced by machines, and are fabulously expensive.
 19th century loom and craftswoman Evseeva Lidia Ivanovna, village of Kroshnozero, Karelia
Among the Slavic peoples, carpets and rugs belong to the “grassroots” techniques that do not require a high level of skill, such as weaving finer fabrics, lace weaving, and lace knitting. In Russian huts, it was customary to cover benches, chests, sleeping places on stoves with rugs. Over time, the hostesses began to use them for floor insulation and as a decor item, as bedside or entrance rugs. Such use initially had only a practical component, since the huts often cooled down by morning, and walking on the cold floor after sleep often led to respiratory diseases. Only over time, rugs become the subject of traditional Slavic decor.
 Homespun rug in a Russian hut
Woven rugs, round rugs were traditionally made from things that have served their time, this is a kind of processing technique, giving a new quality to old things. Homespun rugs became popular in the 19th century. Flax, hemp, bast, straw, that is, materials that could not be used for weaving, were also used as material. Rugs made of coarse materials were used at the entrance to the huts, and those made of softer fabrics were used as bedspreads. Initially, the fabric was cut into long pieces 0.5-2 cm wide, and then scrolled on a spindle. Then they were woven in the usual way, using threads made of durable material as a basis - hemp, linen, cotton. Usually the method of weaving rugs involved a two-thread technique, but there were also rugs woven on three- and four-thread threads. For weaving rugs, special reeds with larger teeth were used; they were used to knock threads into a single canvas.

As a rule, there was no special eclectic meaning in the patterns and ornaments of the paths, as is typical of other folk handicraft techniques. The decorative effect was achieved due to the different colors of the threads, most of all there are “irregular” paths without any rhythmic pattern. There was no system in changing the color of the thread, the paths resembled a picturesque field and always admirably decorated the interior. Various techniques were used to decorate rugs, for example, “bows” and “butterflies” were used, which were made from contrasting inserts with a raised pile. For complex patterns, well-known textile techniques were used: wrapping, weaving, hand-picking. “Pigtails” were made as a decor or border for the report - white and red or black threads were twisted together and used to lay a pattern strip.

In addition to homespun rugs, round rugs were popular in Rus'. For weaving such rugs, a more complex technique of weaving with a pigtail on the basis was used, a little later, for simplification, woven braids were used, which were sewn together, and the technique of crocheting rugs was also widely used. As the main pattern when crocheting, a regular single crochet is used.

Entrance mats
The entrance to the dwelling has a certain meaning. Entrance rugs are the hallmark of any home, they convey the emotions of the owners, joyfully greet everyone who enters, protect the house from "bad" energy and the evil eye. In addition, the entrance mats must be functional, strong, they are made of dense rough materials, often on a rubberized basis. Entrance mats are usually made from dark materials so they don't get dirty. Vibrant multi-coloured rustic rugs that don't show dirt are the perfect entryway solution.

A popular entry solution would be various straw rugs that you can weave yourself - both braiding techniques and woven techniques are used. The only drawback of such rugs is the fact that over time the straw begins to crumble, however, the quality life of such rugs is several years.

As a material for the manufacture of entrance mats, it is recommended to use hard thick ropes; different colors give decorativeness to the mat. The fastening of the rope thread in such rugs can be done in different ways. The decorative part of the rug made of rope is attached with silicone or glue, and then glued to the rubberized base. Such a rug may well be used on the street.
Corridor rugs
The appearance, texture, size of corridor rugs depends on the type of room. Among them, homespun paths are the most relevant, especially for long narrow corridors. In small apartments, rugs of various sizes and colors can be used, the material for manufacturing is selected based on the necessary functionality of the rug, service life, and the number of permanent residents in the apartment. The lower the requirements for wear resistance, the more opportunities for creativity.
 Weaving a rug from a rope according to the crochet method, such a rug can be used in the corridor, living room, bedroom
Of course, the traditional Slavic technique for making rugs allows you to make something more from floor paths than just a covering. At the moment, multi-colored paths are a full-fledged decor that brings a life-affirming touch to any interior. The element of decorative organics, giving things the possibility of a second life, surprisingly positive color images make the use of such traditional decor popular. It is important that such rag rugs are well washed, do not wear out, do not accumulate dust, which other floor coverings presented in stores in a wide range cannot boast of. In most cases, these rugs are natural, although synthetic fabrics can also be used. Rugs can be both summer and winter woolen. Replacement mats are very convenient to store rolled up in a closet.
 Rug crocheted from thin cotton rag ribbons
Modern trends in the manufacture of rugs
Handmade techniques for making various decors have long been exploited by designers, and rugs are no exception, which offer a huge space for creativity and self-expression. The techniques used allow you to create almost any patterns, experiment with color, create new original solutions. And always colored rugs will be associated with positive emotions. They like to give, decorate interiors and create their own.

A simple and affordable technique for weaving rugs is, of course, the technique of weaving “pigtail” and sewing individual braids together. The use of different materials allows for mind-blowing experiments, such as making rugs from fleece ribbons in different colours. Such rugs can be used as bedspreads, napkins. New materials for weaving, of course, allow you to more carefully select colors, it becomes more harmonious, refined. Masters use soft transitions between shades, experiment with the shape of the rug, create amazing collages that blend into almost any interior. In the example below, the braids are woven together, and a zigzag stitch is sewn to sew the rug.

Rugs for nurseries and bedrooms become the object of author's design. At the moment, soft pompom rugs, fluffy tufted rugs, sirloin technique rugs are being made. Such rugs occupy a worthy place by fireplaces, near beds, in children's rooms.


Rugs can be made using the tapestry technique, perhaps these will be the most expensive rugs, but the result will exceed what was intended. The tapestry weaving technique has recently become more and more popular, which is why it is used by craftsmen to make expensive designer rugs. A pre-created sketch, careful selection of threads allows you to get an extra result. For ease of manufacture, a full-size color sketch is attached to the base. Weaving carpets using the tapestry technique is painstaking and slow work, but the result is worth the time.
 A rug made using the tapestry technique and the process of making a tapestry
How to make do-it-yourself rugs
There are several ways to make rugs yourself. The simplest method is to weave rugs with a pigtail. It's an effortless, simple and effective way to get a beautiful rug with your own design, perfect for your preferences.

The shapes of pigtail rugs can be completely different. If you decide to make a rug from old things, then the rag thread must be prepared accordingly.

For beautiful braiding, it is important to make clean connections between the rag ribbons. This can be done, for example, as follows:

Pigtail rugs can also be woven on the warp, eliminating the need to sew the pigtails together.
 The scheme of weaving a rug on the basis: 1 - left weaving; 2 - right weaving; 3 - weaving with clearance; 4 - compact weaving; 5 - weaving with alternating slope; 6 - weaving with a constant slope
Weaving a rug can be done on fairly simple equipment, and the length of the rug can also be adjusted by rearranging the canvas. Radial rugs are woven using the same technique with a radially fixed warp. Depending on the thickness of the fabric thread, you can adjust the size of the rapport, of course, the thinner the original fabrics, the thinner the thread will be. As shown above, thin fabrics are strengthened with several additions.
Video: a master class on weaving a rectangular rug on a loom
An alternative to loom weaving can be crocheting. Moreover, very beautiful rugs are obtained from linen and blouse fabrics. If you are making a thread from small pieces of fabric, then we recommend cutting it in a circle to avoid multiple connections. The preparation of the thread and the weaving itself are painstaking processes, as a rule, weaving 1 m 2 of the rug takes about 5 hours.

On the finished product, you need to fix the warp threads well. In many cases, the edges of the track are sheathed with tape, which can be an additional decor. Most often, the warp threads are fixed and left in the form of a fringe that adorns the edges of the track. Weaving on the basis allows you to make a variety of patterns. The texture of your rug will depend on the thickness of the thread, the thinner the thread, the more the rug will look like a tapestry.
In conclusion, let's say a few words about the creation of pile rugs based on. Such rugs are pleasant to the body, and the technique allows you to create the most complex patterns. In order to weave a rug, you need to prepare a strong base with rare threads and prepare threads of the same length. As a rule, such rugs are made of yarn. The pile is fastened according to the scheme shown in the photo.


Also an interesting solution is to make rugs from pom-poms, for this you need to first make pom-poms according to the scheme below, then they are attached to the base. Various patterns can be created from blanks of different colors, making rugs from pompoms is an excellent way to recycle leftover yarn.
 Pompom manufacturing scheme
 Attaching pom poms to the base
Various options for rugs - entrance, bedside, paths, rugs, allow us to make any, even the most modest housing, cozy and comfortable. Rugs can be made from different materials and designed for different seasons. They are convenient for storage, cleaning, wear-resistant enough. In addition, the ancient technique of making rugs allows you to get rid of annoying things and give them a new life in the form of a rug that will please the eye for many years. It all depends on your desire, possibilities and imagination. Any rug will be original and truly author's.
Old things, accumulating in our wardrobes and chests of drawers, cause a lot of inconvenience. Homemade rugs from old things are an interesting highlight in a modern interior. We will reveal the secrets of making them with our own hands, describe everything step by step, give a master class, supported by a photo of finished products.
Inspired by the idea of creating a rug from old things, go through your wardrobe and select everything you don’t need. Next, prepare your clothes:
- Cut off details that can still be useful - buttons, buttons, zippers.
- Trim necklines, thick seams, pockets, and other irregularities.
- Cut the strips. Their width depends on the thickness of the material. The thinner it is, the wider the tape.
- Cut the ribbons in a spiral to increase their length. For smoothness, round the right corners.
- Roll up the balls, sorting the strips by color. So it is more convenient to combine shades.
Advice. Before cutting the strips, pull the piece cut from the old knitwear horizontally and then vertically. When stretching, you can see in which case the fabric is twisted to the front side. Cut the ribbons in this direction.
Soft fluffy patchwork rug "Grass"
Such a rug is very pleasant to the touch, it is pleasant to step on it with your feet, you can sit on it. The best material for him is boring T-shirts or Lycra items that have not been used for a long time. Whatever you choose, you need to prepare strips of 20 x 120 mm. Let's take a look at the process step by step:
- We buy a basis - a grid painting or plaster. If there is a special mesh for carpets, then it will work, only its edges must be protected from unraveling with masking tape.

Rug "grass"
- We cut out the desired size and place the base on a non-slip plane.
- We retreat from the edge of 1 cm. Insert a crochet hook, hook the flap with it and pull it through the hole to the middle.
- Tie the strip into a knot. The process is continued until the mesh is completely filled.
- We put on the edge of the rug sequentially on both sides of the adhesive cushioning material and iron it several times with a heated iron.
The rug is ready. Using this technique, you can create patterns, match stripes by color, or randomly arrange multi-colored stripes. In any case, you will get an exclusive model. Verify this by looking at the photos of the finished products.
Attention! When choosing a hook, make sure that its diameter is 2 times the thickness of the patchwork thread.
Crochet rug making tutorial
The hook is able to create beautiful things from unnecessary things, including all kinds of rugs. They are laid on stools, laid on the floor near the sofa or at the door, sofa cushions are made of them, and used as a hot stand. It is easier to knit a scarf-shaped rug. Let's start with him.
Scarf rug
So that nothing distracts from the creative process, we will prepare everything in advance:
- hook number 10;
- old things.
Now you can start:

Round crochet rug
For its manufacture, we use the usual circle scheme. A rug of this shape is not much more difficult to knit than a rectangular one:
- make a loop;
- we knit air loops from it - 6 pcs;
- we tie the resulting half-columns;
- perform lifting - 1 air loop;
- we continue to work on the formation of a circle, performing double crochets.
Approximate scheme for adding loops:
- 1 row - knit 2 single crochets from each loop;
- divide the circle into 6 equal parts;
- knitting the last loop of each segment, add 1 double crochet.
- We finish the circle by knitting to the desired size.
The rug is made without the use of a hook. Having cut the strips, take 3 of them and cut off the ends with a pin. Then braids are woven from them.

If the length of one of the tapes is not enough, then another one is attached to it, and so that the connections do not join, they are hemmed in a checkerboard pattern. Not reaching 200-250 mm to the edge, the pigtails are narrowed so that the ends of the rug are even. To achieve this goal, it is necessary to gradually reduce the width of the tapes. Thus, at the end, the width becomes 2 times smaller than the original.
The pigtail is sewn around the first loop and twisted like a spiral. By fastening the blanks to each other, they get a rug.
Interesting idea: patchwork square rug
A beautiful warm rug consists of squares. To implement this idea, you need to be able to handle the sewing machine. In addition to it, you will need:
- dense flannel patches of 0.8 m in different colors;
- threads;
- disk knife;
- ruler;
- scissors.

In finished form, the product will have dimensions of 86 x 110 cm. Next, we take several steps:
- We cut out the quadrangles, for which we fold the flap in half inside out.
- We cut out 63 squares with a side of 180 mm using scissors or a circular knife. If you expand them, you will get twice as many, but you don’t need to do this yet.
- We lay out the blanks according to any chosen scheme.
- We make a seam along one side of the figure. We repeat the same action with 3 sets of squares.
- We connect the initially stitched 2 pairs of squares so that their edges are oriented in one direction. Thus, we make an assembly of 6 squares, and then add a figure to row 7.
- We continue the process until we get 9 rows of 7 squares, sewn together with the orientation of the edges in one direction. On the opposite side, the surface is smooth.
- We collect all the elements of the rug, for which:
- We connect 2 strips of 7 squares sewn together along the long side with a seam outward with a seam allowance of 2.5 cm;
- join the next row, and continue until you get 9 long rows sewn together, consisting of 7 elements each;
- overdue the entire rug at the edges, leaving an allowance of 2.5 cm;
- we make a fringe by making cuts on the edges with a distance of two and a half cm without damaging the seams;
- We wash the product and let it dry.
These are the masterpieces you can create with your own hands at no cost and with a minimum of effort.
Rug from old things: video
Do-it-yourself rugs: photo


What is "Hand Made"? This is a banal, ordinary needlework, English transcription, a new, fashionable, modern sound. After the term came into use, interest in this activity increased.
Hobby handmade - is it boring or fun
Earlier in Rus', only girls from noble families could afford to embroider a handkerchief at their leisure. They did this for fun and in order to show themselves from the best side, to demonstrate the meekness of their temper.

The peasants did not particularly use handkerchiefs, they saved the fabric. It was necessary to create cloth with the help of a spindle, sew clothes, curtains, bed linen, tablecloths, embroider all this for yourself, your family, home, comfort. Also for the young ladies of the gentlemen to prepare fabric, threads.

In our time, each person diversifies leisure at his own discretion. Buying fabric is not a problem. Patchwork, ribbons, woolen, linen threads, beads, beads, rhinestones, lace help to realize the most daring ideas in practice.

It is fashionable to make clothes with your own hands, accessories, a variety of decorations for the interior of the room. Notebooks, carpets, dolls, paintings can be made if desired. handmade is an exciting hobby that everyone can afford. Needlework is still considered something boring, tedious.

Why handmade carpets?
Christian Dior once seriously wanted to make carpets. This art conquered him, but in the end he chose, nevertheless, clothes. It so happened. Despite the fact that the meter abandoned this idea, to this day, designers are especially respectful of hand-made carpets.

On a sunny morning, throwing the blanket aside and walking barefoot on a delicate, luxurious carpet that gives bliss is certainly pleasant.


The interior, comfort in the house is a source of self-sufficiency. It happens that the area of \u200b\u200bthe apartment is small. How to buy an apartment? It's a difficult question. Not everyone and not at any age can afford to buy a spacious apartment. In this regard, longing can creep into the soul, settle in the heart.

The flow of self-love in the river of self-sufficiency will be blocked either by a bump or a stone of undesirable circumstances. This can only be changed if you create a good interior design. In this case, when you come home, you can relax and unwind. The nervous system will recover, mood will improve, irritability, anger, quarrels will disappear.

A compromise will be found at the right time, discussion, dialogue will help improve relationships with colleagues. Perhaps loneliness will disappear, a friend, a loved one will suddenly appear.

A handmade carpet is a great start, the first step on the road to success. The room will be different. You can make it both from specially purchased materials, and from unnecessary shreds.

Suitable manufacturing technique
After looking at the photo of the rug with your own hands, examples, you can get a lot of ideas. Rugs can be very different. There are not so many techniques for their creation.

Having chosen the best, optimally suitable one, concentrating on creativity, setting yourself up for success and luck, you should get to work. Doubts are redundant. You can even make a rug in one day.

Carpets are:
- woven;
- sewn;
- wicker - from a rope or from shreds;
- crocheted or knitted - with and without a fabric base;
- made of softwood, pebbles and other materials that evoke sympathy.


A woven rug is created using special tools. This method is centuries old. If spending on tools is not included in the plans, you should use everything that is at hand. This is the basic principle of handmade.

Sewn rugs imply the use of any fabrics. If there are a lot of T-shirts, jeans in the house lying around, they can be cut, turned into applications, sewn onto the base, use a synthetic winterizer.

It is easy to turn the same T-shirts, sweaters, pita, blouses into a filler, grinding to the scale of confetti, a little larger than dust - the threads of the main fabric should hold them.

You will have to divide the base into cubes, triangles, so that the filler does not roll, it is harmoniously distributed. After all this is done, you need to sew a canvas with a pattern.

Cubes and rhombuses sometimes interfere, deform the pattern. It is more rational not to turn the carpet into a blanket, use several layers of fabric or a thin, smooth, even synthetic winterizer.

From only applications and shreds, you can create a fluffy, openwork rug if desired. It will be less durable. Perhaps it will have asymmetry. But is it bad? The main thing is that this rug fits the interior design, its style.

Braided from patches or rope is more difficult to create. You need to know how to tie knots. An example diagram would be helpful. Having got the hang of it, figured it all out by trial and error, it will be easy to draw your own scheme. It's just that it's unlikely to be able to draw it right away.

The easiest way to master the art of weaving carpets from patches and rope is to practice. The diagram can be intimidating. Sometimes they look at her for a long time, not daring to start. You need boldness, optimism will come in handy. For some people, this particular technique is immediately easy to give, becomes a favorite. Handmade helps to reveal talents, teaches to be surprised at oneself.


How to make a do-it-yourself rug if you have yarn, a hook or knitting needles? It doesn't get easier. But the process of its creation will take quite a lot of time.

Schemes will help to master this skill, learn how to knit the desired shape. Pompoms will do. It will be faster to make a carpet out of them.

Unusual materials for a handmade carpet are often chosen. Everything that is at hand is used - at your own discretion, to your taste. The main thing is that in the end the carpet is not slippery.

A room, an apartment should be such that it is comfortable in it. This is real self-care. To have a rest after a troublesome day, to get enough sleep, to warm up in the winter cold, to devote a little time every day to yourself is important for yourself.

This can be done if there is a personal space created with a screen or with the help of color, skill, talent, handmade products.

DIY rug photo


