How to make stained glass windows from colored tracing paper. Paper stained glass with your own hands. Master class "Narcissus Stained glass do-it-yourself paper and cardboard
Stained glass "Firebird" (made of packaging mica and corrugated paper)
Author: Romashova Elena Vladislavovna,KOGOBU SPO "Omutninsky College of Pedagogy, Economics and Law", teacher of theoretical and methodological foundations of organizing productive activities for preschool children
Purpose: the master class is intended for teachers of any educational organization, students, it can also be made by children of creative studios and houses of children's creativity.
Target: interior decoration.
Tasks: development of creative skills and abilities:
in drawing (working out the skill of mastering graphic materials - pencil, marker, paint);
in color science (selection of colors and color harmonization);
in design (decoration of a stained-glass window with various visual materials and their fixing on the contour).
From the history of stained glass:
stained glass(fr. vitre - window glass, from lat. vitrum - glass) - a work of fine decorative art or an ornamental character made of colored glass, designed for through lighting and designed to fill an opening, most often a window, in any architectural structure.
The history of stained glass windows began only in the era of Christianity. Although archaeological excavations prove that stained glass windows already existed in ancient Egypt. From the surviving literary sources, a stained glass window in the period of the birth of Christianity was a set of multi-colored glass pieces of various sizes, which were fixed with putty in the slots of stone or wooden boards. They served to decorate window openings. A striking example of that era is the Byzantine stained-glass windows that adorned the first Christian churches.
The first medieval prototypes of stained-glass windows served as decoration for the windows of temples in Gaul, and then appeared in England and Germany.
The radiance of the first stained-glass windows corresponded to early Christian concepts of the connection between light and spirit. And stained glass was perceived as an intermediary between the earthly and the divine world. The bewitching beauty of light rays, spreading to all pieces of colored glass, was perceived as divine power and love.
The stained-glass window received a special heyday in the Middle Ages. In the X-XII centuries. in the temples of France, plot stained-glass windows appeared from pieces of colored (red and blue) glass, cut out along the contour of images and fastened with lead strips. Colored glazing of windows was a glass mosaic inserted into stone or wooden window openings.
In our time, there are several technologies for the manufacture of stained-glass windows:
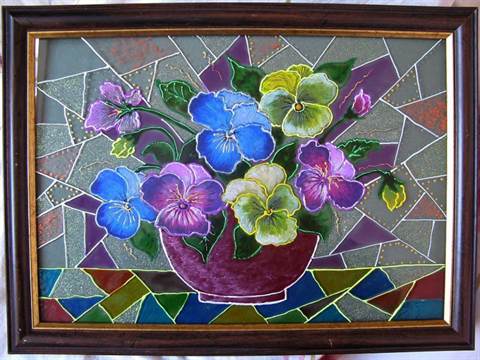
1. Filled stained-glass windows are glass, on which the outline of the pattern is applied with thick paint and is 1-2 mm wide and high. The contour forms areas into which thinner paint is subsequently poured.
2. Film stained glass is a kind of application. Only film is used instead of colored paper.
3. Real stained glass windows are made from pieces of colored glass. They are both the most beautiful and the most difficult to manufacture. Currently, the most popular stained glass manufacturing technology is the tiffany technology.
4. Stained-glass windows made of paper.
Manufacturing technology of stained-glass window "Fire-bird":
Materials: You will need - Whatman sheet of A2 format; gift mica of red, yellow, raspberry colors, corrugated paper of blue and light green hue; double-sided and regular tape, stationery knife, scissors, PVA glue; black marker, black gouache, brush.

Sample:

The image is scaled down. Click to see original.
1. Transfer the outline of the stained glass window to paper or draw it yourself.


2. Paint over the outline with black gouache.

3. Cut out unnecessary contour details with a clerical knife or scissors.


4. Cut out silhouette pieces of the desired color from gift mica and secure them with double-sided tape (simple tape, PVA glue) from the wrong side. Cut off the excess with scissors or a utility knife. In this way, fill in all the details of the bird image.


5. From corrugated paper in blue and light green tones, create a background for the work, also gluing it from the wrong side with adhesive tape or PVA glue.


6. You can decorate the interior!


Dear teachers, parents, children, you can use not only such materials. In this technique, it is convenient to use different materials (like a collage), for example, other types of paper; rhinestones, sequins, feathers, cotton wool and more. Here are some of my students' work:
Master class on making paper stained glass "Narcissus"
Golyshevskaya Natalya Mikhailovna, senior educator of the MBDOU "Kindergarten No. 12" of the general developmental type in BarnaulTarget: to acquaint children, educators, parents, teachers of additional education with the technique of making paper stained glass windows
Tasks:
- to develop the creative skills of preschool children in drawing, color science, design;
- to teach to determine the properties and texture of various materials;
- to develop graphic skills of possession of visual materials.
Purpose: a finished paper stained glass window can serve as a wonderful interior decoration, an original gift.
Creating a paper stained-glass window is not a quick process, requiring some preparation. It is the participation of an adult that will help to better organize the work of the child, determine the stages of creating a stained-glass window, in addition, an adult will help the child to fix the visual material against the background.
For work we need:
- black cardboard;
- green and yellow napkins;
- green plastic folder;
- glue stick;
- scissors;
- simple pencil

Template #1

Template #2

Work sequence:
1. Transfer the contour drawing of the stained glass window (15 * 20 cm in size) onto black cardboard and then cut it out.

2. From a yellow napkin, cut out the detail of the flower petals and glue it to the contour of the flower on the back of the stained glass window

3. Cut a strip from a yellow napkin, wrinkle it and glue it in the middle of the flower on the front side of the stained glass window

4. From a green napkin, cut out the details for the leaves, glue them on the back of the stained glass window

5. From a green plastic folder, cut a rectangle 15 * 20 cm in size, glue it on the back of the stained glass window

6. Twist the flagellum from a green napkin and glue it to the flower stem.

7. From a green plastic folder, cut out the details of the leaves, glue on the front side of the stained glass window

8. Cut out a strip with “teeth” from a green napkin and glue it at the bottom of the stained glass window.

Our stained glass is ready! I really like stained glass windows, especially those made on glass or fabric. Such works are very beautiful, but the creation of a stained-glass window is a rather complicated process. However, this does not mean that you can forget about this wonderful technique. Why not try making a stained glass window out of colored paper or cardboard. Such a craft or pendant can be made with children, if there is a desire.
What you need for crafts:
1) rose pattern;
2) colored paper or cardboard (we chose black thick paper, the most suitable for stained glass);
3) red and green paper (this can be double-sided colored paper, tissue paper or colored tracing paper);
4) scissors and a clerical knife;
5) needle and thread;
6) glue.
How to make stained glass from colored paper:
1. Transfer the rose template to the selected colored paper or cardboard. Cut out two copies. Cut openwork holes with a clerical knife (work for mom).

2. Glue tissue paper (colored paper, colored tracing paper) under the openwork holes. Red paper - under the petals, and green - under the leaves.

3. Glue the two parts together.

4. Let's make a hole in the upper part with a needle and skip the thread. Now the stained glass rose can be hung somewhere. It will be very beautiful!
Most recently, while preparing for the Lantern Festival, I saw stained-glass windows made of colored tracing paper. They fascinated with their beauty, brightness, mixture of colors, a fairy tale that is hidden in every multi-colored picture.
I thought it would be great to make such stained glass windows with children. And we were really taken by this process.
Stained-glass windows made of colored tracing paper can decorate any holiday - New Year and Christmas, Easter, March 8th. They can be made seasonal - in autumn, use fallen leaves and dried grass, in summer - bright flowers, in winter - silhouettes of carved snowflakes.
To make a stained glass window, we need:
- Colored tracing paper. I wrote about how to make it
- White tracing paper
- colored cardboard
- You can print the silhouettes of stained glass characters or draw and cut them yourself.
- Scissors
- Utility knife or cutter
- Glue stick (from another glue, the tracing paper is deformed)
In this article, I share the technique of making stained glass windows with children of preschool and primary school age. For adults, the technique is more complicated, I haven’t tried to work in it yet, so I won’t undertake to describe it.
Progress:
1. Prepare a frame of colored cardboard with a width of at least 0.8 cm. It is better to take dark and bright colors. The shape and size can be any, cut the hole inside with small scissors or a clerical knife.

2.Now we need a screen made of white tracing paper, on which everything else will stick. Stick a suitable sized sheet of tracing paper on the frame from the wrong side. Trim off excess tracing paper. From this moment on, all work is carried out on the wrong side of our future stained-glass window.

Frame and screen for stained glass
3. Prepare the silhouettes needed for the plot. You can print them out by finding suitable images on the Internet or draw them yourself on cardboard or paper. Let the silhouettes be black or made of cardboard in the color of the frame. In addition to the heroes of the story, these can be trees and other elements of the landscape, a house, the contours of the moon and stars, if the picture is night. Cut out small details inside the silhouettes with a cutter or a sharp clerical knife. Make holes where something can glow - lanterns, house windows, stars and the moon. The figures of heavenly bodies can do without contours - make them immediately from colored tracing paper. Spread the silhouettes with glue stick and stick them on the screen with the dark side. Before you fix the part - look at the light how it will look.

Pay the child's attention to the fact that the hero does not hang in the air, he can make a clearing or a path of dark paper.
4. Now comes into play. It can be cut with scissors or torn off. If the child is small, he can simply decorate the space around the characters with colorful pieces. Ask an older child to come up with a story and help bring it to life a little. In our experience, children of 8-10 years old independently made interesting compositions, could measure out the necessary pieces of tracing paper (and this is sometimes not at all easy). Five-year-olds mostly experimented with color more, which did not stop them from getting magical multi-colored works as a result!

five-year plans

Stained-glass window with a bird (above) was made by a 9-year-old girl
Try on the tracing paper, looking at the light before gluing, watch the mixture of colors. To get a brighter color, stick 2-3 identical pieces on top of each other.
5. After finishing work, you can glue it on top with another sheet of white tracing paper. We didn’t do this - on the other hand, it’s also interesting to look at the stained-glass windows and figure out how this or that color turned out.
Hang your stained glass on the window and admire the result. They will also look fabulous and mysterious by candlelight in the late evening.


I hope that stained-glass windows made of colored tracing paper will decorate your home and create an atmosphere of celebration and magic!
If you want to understand how to make stained glass on paper, then this article is for you. Stained glass on paper is also called a squiggle pattern - this is an unconventional stained glass technique. Mostly it's for kids. Making a wonderful picture using this technique is quite simple and interesting. Cardboard, glass, plastic, plywood are suitable for the basis of the picture. For wall paintings, it is better to use opaque materials.
Which plot to choose for the picture is up to you. The image affects the atmosphere of the room. For the nursery, of course, it is better to choose children's drawings, for the kitchen - geometric patterns or abstraction. For the rest of the rooms, you can pick up a variety of ideas that will fit well into your interior and look stunningly beautiful. Stained glass windows have been known for several centuries and are an element of luxury and a sign of wealth.

What is needed for work? The basic list of required materials and tools may include:
- Paper - sheet A4;
- Simple pencil;
- Marker or black marker;
- Cardboard;
- Eraser;
- Watercolor paints;
- Frame.
Let's go to the lesson
Stained glass always starts with an idea. In order to make a picture out of paper using watercolors, you will need: a pencil, scissors, half a sheet of white drawing paper.
How to draw a stained glass window and make such a beautiful picture with your own hands?
Step by step work:
Stage 1: determine the size of your stained glass window.

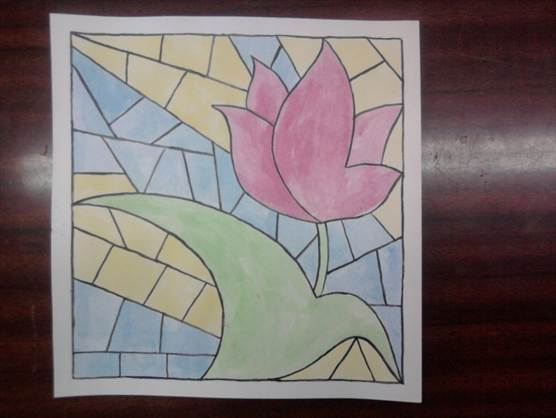
Stage 2: draw a stained glass pattern with a pencil. You can draw a sketch for a future picture either on your own or download a ready-made template.

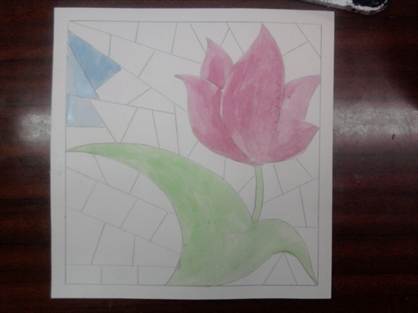
Stage 3: we apply the remaining colors of the stained glass with paints. First, paint all the fragments of the pattern with the same color. Let the paint dry to avoid mixing colors, then another color, etc. After coloring all the fragments, leave the picture to dry completely.


Stage 4: fill the space around the main pattern.

Stage 5: draw the outline in black. You can also paint it with black paint using a thin brush or use a black felt-tip pen. It is better to start drawing from the upper left corner so as not to smear the drawing.

A little about other types
There are many types of stained glass. The technology for making a stained glass window from colored paper is almost the same as with the help of paints.

First we make a sketch. We draw a frame of 3-4 cm on the sheet and transfer the drawing to it in full size. Outlines should be wide. We color the contour with a black felt-tip pen. Cut out pieces of the pattern using a sharp knife. Then you need to cut out the details from colored paper and glue them on the back of the work. Trim excess. Your stained glass is ready!
You can make a stained-glass window with your own hands.


Filled stained glass- This is a kind of stained glass imitation process, which is performed on a whole sheet of glass with self-made paints. To do this, put a large sheet of paper on the table, with a working glass on top. Outline the glass. Transfer the sketch to paper and circle all the contour lines of the sketch well and place the glass on top. Draw all the contour lines with the prepared paint. Now prepare the fill paint and fill the fragments between the contours with paint. Fill in 3-4 layers, while the varnish after each fill should dry for 10-15 minutes. Then cover the drawing on top with a colorless varnish and leave to dry completely. After 2-3 hours, your stained glass window will be ready.

Little tricks
Stained glass is a decorative picture that can be made in any style.


Masters are often silent about some, in their opinion, minor details. Here are some tips to help you make stained glass:
- never start knowledge with the most difficult, start with the simplest. Never take on a large drawing with many small details at once. First, try a simple pattern, and when you master the technique a little, you can take complex drawings.
- use different types of paints for work, they all also fall on the drawing in different ways. The brightness and light transmission of the picture depends on the number of layers of paint.
- for accurate adjustments to the pattern, use ear sticks and cotton pads.
- use a sharp knife or razor blade to remove broken lines.
- use wet alcohol wipes for hands.
- lighting should be good both from below and above the work in order to immediately reveal the shade of color and the density of the coating.
- one of the main components of beautiful and neat work is its quick execution. For example, if you apply contour paint too slowly, it will differ in both color and thickness. When pouring slowly, the paint will lie in an uneven layer and this will affect the quality of its surface.
Video on the topic of the article