Christmas tree from Christmas balls on the wall. Wall Christmas trees for the new year
The Christmas tree is the most important and favorite attribute of the New Year.
A beautifully decorated tree fills the apartment with a magical atmosphere of celebration and comfort. But what to do if there is simply no place in the house for this New Year's decoration?
Moreover, given that the coming year of the Horse is especially favorable for creative and creative individuals, the wall-mounted Christmas tree can be made from the most unusual materials.
Wall Christmas tree made of fir branches
For those who love innovation, but do not want to go beyond the traditional canons, the best solution would be to hang a Christmas tree made of fir branches on the wall. Such a New Year's miracle is made very simply - just pick up the right amount of small spruce branches and fix them on the wall in the shape of a Christmas tree. In this case, you can use both live branches and branches of an artificial tree.
You can decorate this New Year's symbol in the same way as a traditional Christmas tree - using your favorite toys, bows, tinsel and garlands. The most important thing is that Christmas decorations are light and preferably not breakable.
In addition to homemade compositions, today there are ready-made analogues of such jewelry. An artificial wall-mounted Christmas tree will be an excellent attribute of the holiday for several years in a row.


Christmas tree from a garland on the wall
We all remember from childhood how, on the eve of the New Year holidays, assembly halls in kindergartens and schools, in addition to the most evergreen beauty, were decorated with wall-mounted garland Christmas trees. A Christmas tree on the wall, made of a garland, will become a real symbol of the upcoming holiday for the child. In addition to the garland itself, the wall-mounted Christmas tree can be decorated with Christmas toys, beads or bows. To add even more entourage to the decor, you can pre-draw the outline of the Christmas tree with chalk, and then hang the garland itself on it.
If a Christmas tree on the wall from a garland seems to you not the safest decoration for a child, try to make an analogue of the New Year's beauty from tinsel. A tinsel Christmas tree can also be decorated with various toys, beads, pictures, etc.


Christmas tree painted on the wall
What child doesn't love to draw? There is no doubt, allowing the kid to draw a Christmas tree right on the wall, this New Year's decoration will be remembered by him for the rest of his life. Of course, the creation of such a decor is possible only if someone in the family has good artistic abilities. But you can simplify the work, for example, by drawing only the outline of the Christmas tree, and then decorating it with a garland or beads. Or use special stencils for drawing.


Christmas Tree Wall Stickers
If staining the walls with paint seems unacceptable to you, a good alternative to a drawn Christmas tree will be various New Year's stickers in the form of a Christmas tree, which today you can easily buy at any decor store, stationery store or in special New Year's departments of supermarkets. These stickers do not leave marks on the surface of the walls at all, since they are attached using a special safe adhesive. It is noteworthy that a huge assortment of New Year's stickers will help you choose a decoration for absolutely any interior.


Christmas tree on a wooden wall: an original solution
In principle, a do-it-yourself Christmas tree for placement on the wall can be created from almost any material. It all depends on personal preferences and, of course, on the interior of the room. For example, interiors in the style of a chalet or Provence are perfectly complemented by a wooden wall Christmas tree. If the house has one long wooden plank and several small ones, it will not be difficult to build a Christmas tree from them. Having picked up suitable decorations for such a composition, the Christmas tree will become not only original, but also stylish.


It's even easier to make a Christmas tree with a few pieces of wood. It is enough to attach them to the wall horizontally, creating an outline of the Christmas tree, and then decorate with a bright garland and toys.


You can also make a wooden Christmas tree from large chips or from circles from logs, laying them out in the desired shape.


In addition to the fact that such decorations look original and unusual, they will surely bring happiness in the New Year, because the element of the next year is a tree.
Christmas tree on the wall made of unusual materials
A few years ago, Sydney-based designer Briar Stanley presented his unusual creation to the world - a canvas on which a variety of objects (keys, photographs, wooden spoons, drawings, etc.) are laid out in the shape of a Christmas tree.

Based on his work, you can create your own wish tree. The most important thing is to decide what you most want in the New Year - to attract money to the house, meet your love, get a new job, have a baby, etc. - and choose the appropriate characters.

A similar magic Christmas tree can be created from existing toys. It is only necessary to correctly combine them in size and shape, so that, in general, the composition resembles a Christmas tree.

A Christmas tree cut out of colored paper or cardboard also looks very beautiful on the wall, and in order for it to acquire its own special decor, it is enough to decorate it with beautiful toys or appliqué.

And lovers of unusual solutions will surely like a Christmas tree made from disposable paper cupcake tins.

In addition to paper, it is quite possible to use fabric, such as felt or organza, to create such an ornament. Unusual fabric Christmas trees will look great in the bedroom or in the children's room.

A wall-mounted Christmas tree can even be created from an ordinary rope or long beads. The main thing is to show imagination and decorate your own creation with those things that personally bring joy to you. For example, as an addition to such a homemade Christmas tree, New Year's cards or photographs will look very beautiful.

Some believe that without a real Christmas tree, the holiday will lose its special appeal. But the main task of a Christmas tree or pine is to give joy. A wall-mounted Christmas tree, made with your own hands, keeps a piece of your mood. Therefore, the most important thing is that the Christmas tree on the wall is created only in a good, high spirits, then it will surely delight you throughout the holidays. And the unique spruce aroma can be recreated with the help of compact compositions from living twigs or aromatic New Year's candles.
A Christmas tree was born in the forest, it grew in the forest ... And let it grow further. In order to celebrate the New Year, it is not necessary to cut down a living tree. It is much more reasonable to create a symbol of the new year on your own from improvised means. Moreover, for the Christmas tree you need to free up a separate corner in the room, constantly sweep out crumbling thorns. For a wall model, all this is not required. Only a little imagination, improvised means and desire.

In the first case, the Christmas tree is simply painted with oil paint on a pallet. A few nails, toys, an asterisk on top, and an unpainted wooden lattice turn into a symbol of the New Year.

Nails come in handy here too. You need to drive them directly into the wall in the shape of a Christmas tree, and then pull the knitting threads onto the resulting metal frame. Then you can decorate with toys to taste or give an impromptu Christmas tree to the children. Let them hang Kinder toys and candy wrappers on it.

A few wooden slats, nails, a luminous garland, and quite a pretty Christmas tree looms on the wall.

For those who have no time to bother with the design of the wall, you can lay out books in the closet in the form of a Christmas tree.

And again a ball of thread. This time it is taped to the wall and decorated with New Year's cards and paper figurines.

If children's toys are lying around the house, you can attach them to the wall in the form of the same Christmas tree.

Every housewife will surely find paper molds for cupcakes. But a Christmas tree from these molds will not be found in every home.

The same Christmas tree, only laid out from cash tapes. Looks truly impressive. Worth a penny.

Very often in garages or closets you can find fragments of wooden rulers that have failed.
If you nail them on the door in the shape of a Christmas tree, you can get a good New Year's decoration.

The shelf in the shape of a Christmas tree looks quite original. You can put together (however, as well as decorate) it yourself.

In the children's room, you can stick paper decorative balls in the shape of a Christmas tree on the wall. And you don't need to decorate. Wall application will look bright.

Probably, this is what the wall tree looks like for the most patient people. Indeed, in order to cut out so many fragments from paper, one desire is not enough. It takes a lot of time, effort and patience.

It is much easier to draw the outline of a Christmas tree on the wall and glue a paper garland to it. Moreover, this design looks no worse than the previous one.

What could be more original than a Christmas tree from the rulers? Only a Christmas tree made of wooden clothespins, on which you can hang both New Year's gifts and glass balls.

Or you can just lay out a Christmas tree on the wall from a luminous garland. Both bright and beautiful.

A New Year tree is an obligatory attribute of the holiday, but who said that it should be alive? And now we are not even talking about artificial trees, but about simple and budget options - for example, a Christmas tree on the wall: the ideas are so numerous that we decided to devote a separate article to them. A creative DIY Christmas tree is an ideal option to get a Christmas tree cheaper than a real tree. This is also your case if you protect nature or just want to surprise guests for the New Year with your originality and imagination. And at the same time - save space in the apartment.
Creative Christmas tree made of paper
From old newspapers and other paper - triangular sheets are cut out, which are glued to the wall one above the other. You can turn on your imagination and make the ranking of the triangles by color, and to make the Christmas tree seem voluminous, you should only glue the upper part of each element, and slightly bend the lower part towards yourself. You can cut figures of various sizes - from triangles to stars and make a Christmas tree on the wall from them.
Christmas tree made of cardboard
From cardboard - the easiest option. You can make one large cardboard Christmas tree, but many small ones hung around the house will look much more stylish. In the center of such a cardboard Christmas tree, you can cut a circle in which to hang a Christmas tree toy or other decoration.
Christmas tree made of fabric
From fabric - there are many options, from a simple fabric application to a complex design, when several fabric "pillows" of different sizes are made. Such pillows are fixed on top of each other, the largest is at the bottom, the smallest is at the top.
Christmas tree made of small decorative items
From buttons, Christmas decorations, shells and other little things - such a Christmas tree can be laid out on a wall or on a piece of fabric. Absolutely any little things are used, depending on your imagination, and they are fixed on the surface with glue or double-sided tape. Among other things, such a Christmas tree is a great option to use cute, but completely unnecessary trash.

Christmas tree on the wall from a garland
A Christmas tree on a garland wall is another extremely simple option that requires you to have a Christmas garland or LED strip in your house that is attached to any available surface. The main advantage of such a New Year's tree is that it glows, creating an atmosphere of festive comfort. The main thing - before turning on such a Christmas tree in the network, check the garland for serviceability, otherwise the wallpaper may light up.

Christmas tree made of wood
A Christmas tree made from natural materials - branches, cones, dried leaves and even just wooden sticks can be used. Application from these materials is laid out on fabric, a sheet of paper or simply on the wall, if you have such an opportunity.

Christmas tree from ribbons
From ribbons - ordinary fabric ribbons are laid out in the form of a Christmas tree on a plane or folded into bows and mounted on a metal base. By the way, this is also a great option to use unnecessary pieces of fabric lying around in the house.
Christmas tree made of wire
A Christmas tree made of wire on the wall is quite time and effort consuming, but a very attractive looking option. First, a cone-shaped frame is made of wire with one flat side for fixing on the wall, and then a garland, ribbons, toys, in general, any decorations that will look organic and that your imagination will tell you, are fixed on it.
Christmas tree from products
From food products - here you can use banal sweets laid out in the form of a New Year's tree, as well as some original pasta planted on glue. If you don’t mind, then you can use dried fruits or any other edible materials. The main thing here is that they do not deteriorate at room temperature for a long time. An essential advantage of such a Christmas tree is that after the holidays it can be eaten.
Christmas tree from shelves
A Christmas tree made up of short shelves on the wall is not only an original, but also a practical option that will surely come in handy for you throughout the next year. The bottom line is that in the corner of the room or just on the wall one above the other, shelves of different sizes are installed from the larger one (below) to the smaller one (above). For greater resemblance to a real tree, the shelves can be painted green, and Christmas toys, candles and other decorations can be placed (or hung) around the edges. The top shelf can be decorated with a large snowflake, a star or a Christmas tree top, and then the resemblance to the New Year's tree will be maximum.

This list of ideas for a Christmas tree on the wall is by no means exhausted. All options can be combined with each other, or you can try using other materials: tinsel, balloons, unnecessary CDs or DVDs, money, and so on. If you have imagination and a little skill, the house will receive an original Christmas tree made by yourself by the New Year and you will not be ashamed of it!
Good afternoon - today I continue the theme of wall-mounted Christmas trees and post a selection of master classes. In photographs and drawings I in detail - step by step- I'll show you how and what to do so that you get an excellent Christmas tree on the wall, made by yourself.
So, let's not delay and immediately begin to deal with the ideas of Christmas wall trees and options for bringing them to life with our own hands.
IDEA #1 - A VINTAGE Christmas tree on the wall.
It is very easy to make such a Christmas tree in your apartment. Now I tell you all the technology... how to age the pages of a book ... how to fix all this on the wall (so that the wall itself does not suffer).

The essence of the work: we make a crate frame from cardboard ... we yellow the pages of the book ... we tear them apart and stick them on the frame. We hang the frame on the wall (one nail is enough).
What you need: Old unwanted book, Rope, One nail on the wall, corrugated cardboard from an old unwanted box.
HOW WE MAKE SUCH A TREE - three simple steps.
Step one - MAKE A FRAME FOR THE CHRISTMAS. To do this, we cut the cardboard box into wide strips ... and fasten these strips with adhesive tape in such a way that we get a TRIANGULAR SILHOUETTE OF THE CRATE (here, for clarity, I drew how such a frame might look like).

Step Two - AGE THE PAGES OF THE BOOK. There are 2 ways here.
Method one: We take a book (not yet torn into sheets, it’s more convenient) ... and take a lighter (or turn on the gas conformation on the stove in the kitchen). We bring the END OF THE BOOK closer to the fire for a few seconds - so that the flame licks slightly the sides of a dense stack of pages ... do not be afraid - the paper will not catch fire. Because you are holding a thick pile of sheets in your hand, the fire cannot catch such a voluminous pile ... but the edges of the pages will slightly scorch and darken.
Method two: We take a cup with strong brewed black tea and a sponge (dishwashing sponge). We take a book in one hand (also a dense stack of sheets) and apply a sponge soaked in black tea to the side end parts of the book ... moisture wets the edges of the pages and can crawl inside a little. Not deep - just enough so that the edges of the pages turn yellow.
Step Three - ASSEMBLE-GLUE THE PAGES ON THE FRAME. We take our cardboard skeleton ... and paste the pages on it in a chaotic manner ... After laying and gluing all the pages, we take a long rope and lay it along the contour of the Christmas tree - we fasten it with glue from a glue gun.

When the whole paper Christmas tree is ready, we just have to hang it. To do this, we attach a loop of rope to the top of the frame ... and for this loop we hang a paper Christmas tree on the wall. And that's all.
IDEA No. 2 - a wooden Christmas tree on a wall made of sticks and twigs.
ESSENCE OF THE METHOD: cut the branches into segments of different lengths (from large to small). We lay them on the floor in the right order ... and wrap each with a rope - as if we were weaving a Japanese mat. We hang a Christmas tree mat on the wall (one nail is enough for this).
WHAT YOU NEED: a lot of branches of different approximately the same thickness ... thin rope or twine (you can buy it at a hardware store or in the button department of a store that sells all sorts of lace, ribbons and twine). Still need toys for decoration. (You may also need a drill.)
HOW WE MAKE THE CHRISTMAS
Step one ... WE CUT AND LAY THE BOUCHES in the correct order. That is, they collected knots, laid them from smaller to larger ... We looked at where the large ends stick out and trimmed the ends (they cut off the excess - the cured extra cuttings of the branches were also laid where they fit in size).
Step two - FORMING THE CHRISTMAS with a rope. THERE ARE 2 WAYS (with and without a drill)
Drill method - Just take the branches and drill CLEAR HOLES at both ends of such a width that our twine passes freely through them. And then we simply string such drilled branches on a rope from two ends ...
Method without a drill- If you do not have a drill, then you can simply tie the branches with a rope. That is, they wrapped the ends of the upper knot with a rope ... then they wrapped the ends of the second (slightly larger) knot with the same rope twice ... then they wrapped the ends of the third knot 2 times ... and so on. Starting from the top to the very bottom of the wall Christmas tree. You can not just wrap the branches around with a rope, but tie them up by tying knots (this will be more reliable).
Idea number 3 - a tree made of branches hanging on the wall.
ESSENCE OF THE METHOD- branches are hung on the wall (with a glue gun or nails. That is, for this method you need a wall that you don’t feel sorry for, for example, a barn wall ... or you can make this wall Christmas tree on a large piece of plywood. And then lean this piece of plywood against the wall. So you keep the walls of your house in order (and there will be no need to make holes in them again).
WHAT YOU NEED. A wall that is not a pity or a sheet of large plywood. Thick branches of trees of various shapes. Nails or glue gun. Christmas toys and garland.

HOW WE DO
Step one - PREPARE THE BOUCH. We cut the branches into pieces of different lengths (from larger to smaller).
Step two - WE FASTEN THE BOUCH TO THE WALL. We stuff the branches with nails or attach them to the wall with a glue gun. If it's a pity to spoil the wall, we do it all on a large piece of plywood or cardboard.
Step three - DECORATE THE CHRISTMAS. From thin branches we make an asterisk (we simply fasten the branches with a rope). We hang an electric garland, we attach Christmas toys and pine cones to the branches.
VARIANTS OF THE SAME VERSION
can be made NOT from boughs ... but from neat PLATES-shelves.
Then it’s not a pity to spoil the wall - because the shelves will come in handy after the New Year. They removed the star and garlands - and that's it ... you can put something useful. The photo below perfectly illustrates the same principle - four shelves of different sizes on the wall + a star + a garland of paper flags - and everything immediately turns into a Christmas tree.


Or you can make a Christmas tree - FROM SHORT SHELVES on the wall.
Like in the photo below - a very original idea. Such shelves can be found on sale ... you can put together your own.

Such a wall shelf has a simple drawing - at the top regular square board (20x10 cm) and under it three triangular boards knocked together edge to edge ( the size of the sides of the triangles is 10x20 cm)... They are attached to a flat board with their short side. To make it clearer, I drew a diagram below.

Idea number 6 - WALL TREE CHRISTMAS.
Here in the photo below we see several Christmas trees that appeared on the wall thanks to the usual stretched twine-strings. They are very easy to make... and not necessarily with nails (why ruin the wall)
ESSENCE OF THE METHOD: We install fasteners for ropes on the wall. We stretch the twine on the fasteners. We hang decorations on twine.
WHAT DO YOU NEED: Fasteners for ropes are ordinary carnations ... or you can buy small glue hooks (like for towels in the bathroom) to fix them on a smooth wall or cabinet door or on the door of a room ... they do not stick to wallpaper).
HOW WE DO: making it easy here. The main thing is to come up with a design for HOW the strings of our Christmas tree will be located on the wall ... Let's see what options there may be.
TWINE CAN BE POSITIONED - vertically, diverging beams . Like in the photo of the wall tree below. One fastener at the top IN THE CENTER ... and a row of several fasteners at the bottom along ONE HORIZONTAL LINE. They stuffed fasteners ... tied strings ... They attached decorations to the string.

TWEETS can be positioned HORIZONTALLY… in small segments (from the widest segment at the bottom to the shortest at the top).

Or twine can be randomly confused between stuffed fasteners ... it also turns out beautifully (see photo of the Christmas tree on the wall below).

By the way, instead of a rope, you can immediately use an LED Christmas garland. It is long enough. And it can also be positioned RADIALLY - that is, with rays from the top of the Christmas tree to the bottom ...

Idea number 7 - Christmas trees from INSULATED TAPE on the wall.
The essence of the method - we buy ordinary electrical tape in the store(the one that is wrapped around wires, similar to colored tape). And with the help of this electrical tape, we paste the outlines of the Christmas tree directly on the wallpaper ... The design can be very different. To your taste ... For example, like this - the photo below. Toys can be immediately glued to electrical tape ... or then glued over the Christmas tree with separate pieces of adhesive tape.

From the same electrical tape, you can screw a RADIANT STAR (as in the photo below). And from pieces of electrical tape (which were folded in half) you can make tiny flags ... if you stick these flags on a thread ... you get a tiny garland of flags - see the photo below.
So you understand how, right?
We take a thread and a lot sticky pieces of tape. We attach such a piece to the thread (so that the thread lies in its middle) and fold the piece in half so that its sticky sides meet. Got a flag - and the thread inside stuck between two glued halves... and there are many, many such flags on a long thread to do. And we hang such a garland on our Christmas tree on the wall. If you buy immediately set of COLORED ELECTRIC TAPE from different colors (yellow, green, red), you get a pretty bright wall Christmas tree.

IDEA No. 8 - a wall-mounted Christmas tree made of pompoms.
Here's an idea for decorating a Christmas tree wall from wool beads. Here we need pompoms. They can be made with your own hands from a thread or from yarn for felting.
The first way - take yarn for knitting. We put two paper bagels together - and wrap them with threads. We cut it with scissors, putting them under the threads - between the walls of the bagel - and we get a pompom.
Second way - We buy wool for felting. We collect soapy water in a bowl - we tear off a ball of wool ... we wet it in soapy water ... we roll the ball with our hands for 2-3 minutes (like plasticine) - and put it to dry.
When we have accumulated a lot of balls - just string them on a thread y (tying knots so that there is the same space between the balls) - it is necessary that the balls are not pressed close to each other
On the wall (or a piece of plywood, if you feel sorry for the wall) we fill the carnations - and fasten the turns of our garland for them.
Idea number 9 - CHRISTMAS ON THE WALL FROM A GARLAND.
By the same principle, a garland Christmas tree is made. We drive carnations into the wall (or glue glue fasteners) and wrap them with a garland.
You can attach a lot of fasteners (often, often, at a short distance from each other) and then the zigzag turns of the garland will densely dot the wall with beautiful New Year's lights.

Or you can make fasteners less often - and the zigzag of the garland will be wider ... And in contrast to it, you can make an oncoming zigzag from a string of beads (as in the photo of the Christmas tree below).

Or you can just make the OUTLINE of the Christmas tree on the wall with an LED garland. Like in the photo examples below.

Idea number 10 - MOSAIC Christmas tree on the wall.
Also you can use MOSAIC principle to create a Christmas tree outline on the wall. Anything can serve as mosaic details. It can be rows of Christmas decorations, dishes and paper crafts. Pay attention to the photo below - this tree looks stylish precisely because everything is arranged IN CLEAR ROWS… There is harmony and symmetry.

Of course you can scatter randomly... but in order to turn out beautifully in chaos, there must also be its own harmony and balance ...
Here's how, for example, in the MOSAIC Christmas tree on the wall below. There are no longer clear rows of paper napkins ... But still, harmony and balance of large and small dark and light are maintained.
IMPORTANT THING - if you want to repeat such a Christmas tree on a wall of paper napkins - then do not make MORE THAN THREE COLORS ... otherwise it will turn out to be nonsense. Three colors are the measure of style.

These are the Christmas trees on the wall we made with our own hands today.
I am sure that my article is very useful to you. And your hands are already itching to make a Christmas tree on the wall to decorate your home on New Year's holidays.
I wish you good luck and a happy new year.
Olga Klishevskaya, especially for the site ""
If you like our site, you can support the enthusiasm of those who work for you.
Happy New Year to the author of this article, Olga Klishevskaya.
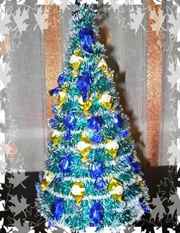
A wonderful New Year's souvenir can be an artificial Christmas tree made of tinsel. Such a beauty can be presented as a gift, in addition, she can perfectly fit into the interior of any room.

A selection of educational video lessons
This article will contain a selection of videos in which the needlewomen will share their author's ideas.
How to make a Christmas tree from tinsel and paper
In the first master class, the process of making a Christmas tree from drawing paper and tinsel will be described. For work, you will need about two meters of tinsel, a sheet of drawing paper, a pencil, scissors and glue.
First of all, on a piece of drawing paper, you need to outline the contours of a circle with a radius of about twenty-five centimeters, but only half of the indicated circle should be cut, because such a semicircular detail is needed in order to make the base of the Christmas tree. The edges of the cardboard part must be overlapped and the seam secured with glue.
After the cardboard base is ready, you need to apply glue to the surface of the base and stick the tinsel in a circle. Beads, bells can be attached to tinsel as decorations.
The base can also be made of paper, in which case we need a sheet of paper, scissors and glue.
First, you need to twist a cone-shaped element from a sheet of paper, which will serve as the base of the Christmas tree, and cut off the excess paper so that the future Christmas tree is stable. Then it is necessary to apply glue to the surface of the cone and carefully glue the tinsel in dense rows in a circle.


From wire and a piece of wood
In the second master class, it will be described step by step how to make a Christmas tree from wire and tinsel. For work, you will need pieces of wire of different densities, a wooden stand, tinsel and Christmas toys that can be attached as decorations.
First of all, a piece of wire must be fixed in a wooden stand, for this you need to make a hole in it and drop a little glue. To form the trunk, it is desirable to use a dense wire. To make a frame for future branches, pieces of thin wire must be twisted in a spiral and wrapped around the trunk. Then the tinsel should be fixed on a wire frame.
How to make a Christmas tree out of tinsel and candy
To work, you will need a sheet of cardboard, sweets in bright wrappers, tinsel, adhesive tape and scissors.
First, from a sheet of cardboard, you need to form the base of the future Christmas tree in the shape of a cone. Then, sweets should be attached to the surface of the base with adhesive tape in loose rows. Then all gaps must be closed by wrapping the base with tinsel.

wall variant
In the fourth master class, we will talk about how to make a Christmas tree that will look beautiful on the wall. There are two options. The first option - you can simply attach the tinsel on the wall in the shape of a Christmas tree, fixing the bends of the branches with stationery needles. The second option is to make a bulk product. To do this, you need to cut out the composite halves of the Christmas tree from sheets of cardboard, then you should connect them with a strip of fabric. Then the tinsel must be fixed along the edges of the Christmas tree, then inside the contours. Loops must be made on the back of the product so that it can be hung on the wall.


