Master class “Do-it-yourself layout according to the rules of the road. Layout according to traffic rules "my safe road to kindergarten"
Crafts on the theme of the rules of the road - visual material that allows children to remember how to behave on the road. Make them with the kids.
Crafts traffic rules: 3 options to choose from

To make a visual aid for children, take:
- carton boxes;
- glue;
- scissors;
- colored paper and cardboard.

To make at home, cover the box with colored paper.

Get a box. Help the child draw rectangles of the same size on paper of a different color, using a ruler and pencil, which will become windows. These details need to be glued to the facade of the house.

To make them more accurate outlines, attach a ruler, circle with a felt-tip pen or a bright pencil.

Windows can be made flat rectangular or three-dimensional triangular. In the first case, the child will cut out this figure from paper, glue it on top of the house.

To implement the second idea, you need to cut out a rectangle, fold it in the form of a three-dimensional triangle, glue it so that the seam is at the top.
Make some more buildings with the kids. Let some of them become shops, others schools, and others houses. To mark the functional purpose of these buildings, write and stick signs to them. It will be written on them that this is a children's educational institution, a supermarket, and on residential buildings write the name of the street and the house number.
After that, make a zebra, that is, a pedestrian crossing. To do this, white strips are glued onto a sheet of black cardboard, the width of which is 5 cm.

Then the roadway is made. For it, you need to stick strips of white paper 1 cm wide on gray cardboard. In the center there will be a dividing strip consisting of two segments. Short strips of the same width must also be glued to each of the sides of the movement of cars.

If you are planning to create a large rule of the road craft, then glue as many marked sheets of cardboard as you need to work.
Lay the road markings on a table or glue them to an upside-down flat lid from a large box, such as table hockey. Arrange houses, place cars on the roadway, put figures of people next to the pedestrian crossing. Then it will be possible to play with children, showing how to cross the road.
But this lacks another important detail - a traffic light. How to do it, you will learn by reading the next paragraph. In the meantime, check out 2 more ideas that will tell you how to make children's crafts of the rules of the road. After all, they may not be voluminous.

Let the child, under the guidance of adults, glue a house on a sheet of blue cardboard, make a road, a pedestrian crossing, a car and a traffic light next to the building. In the process of creating this work, you can help children learn the basic rules of the road.
Create a fabulous city together, where figures and houses will be molded from plasticine. This material will help make the road. To do this, knead the black plasticine well, grease it between the outlined contours. Thin sausages made of white plasticine are stuck on top to create a pedestrian crossing and a dividing strip for cars. Lawns, paths, people are created in the same way.
The house can be made from two blocks of plasticine of the same color connected together, or exchange this mass in your hands and coat a small box. Windows are made of plasticine of a different color.

You can take toy cars or also mold them from plasticine.

After you have familiarized yourself with the three options for making crafts for kindergarten, see how to make a traffic light. It can also be created from various materials, depending on what you have available.
How to make a traffic light with your own hands?
If there is a plumbing pipe lying around at home, and there are shoulder straps, a cap, a police baton, then you can make such a character.

If you do not have such traffic police items, then make them from colored paper and cardboard. So, to implement the plan, take:
- plumbing pipe;
- wooden stick;
- acrylic lacquer;
- whistle;
- acrylic paints;
- cap;
- shoulder straps;
- wand, and in the absence of this, colored paper and cardboard.
Cut the pipe in half crosswise. Draw with a simple pencil where the traffic light will have facial features, red, yellow and green circles. Paint it all with paints of the appropriate colors. Make two holes with a drill at the level of the character's shoulders, stick a wooden stick here, glue shoulder straps. Put a cap on top of the pipe.

Hang a whistle on one hand of the character, a wand on the other. Here's how to make a traffic light. If there are no ready-made attributes, then stick black stripes on white cardboard, roll this blank into a pipe, glue the sides from the large edge. You will get a wand. Shoulder straps are also easy to create, we cut them out of blue colored cardboard.
If we talk about how to make a traffic light, then for this the easiest way is to paste over a rectangular cardboard box with dark colored paper, glue here on each side a circle of red, yellow and green.

If you still have a box from a dairy product, this is just what you need. Cover it with black paper, and attach mugs of the appropriate colors to the sides. In order for the child to better understand that you should never cross the road on a red light, draw a sad emoticon on the circle of this color. Yellow will have a straight mouth, while green will have a smiling one, which means an invitation to move. Hide the top of the box under the cap, which is cut out of colored paper, its details are glued together.

If there is no such container, you can make a traffic light from a sheet of cardboard. The next photo shows how to cut it, what should be the dimensions.

Straighten the cardboard box, open it, cut out the circles.

Glue black paper onto cardboard, cut out squares from red, yellow and green. Glue them on a dark base. Roll it up. Cut out and glue the handle from cardboard, attach it to this roll. Insert this blank inside the glued traffic light. By turning the handle, you will change the color, thereby checking whether the children have mastered the lesson about the rules of the road correctly.

The next traffic light is made of very interesting materials, for this take:
- three laser discs;
- three juice caps;
- glue;
- lace;
- scissors;
- paints and brushes.
If you want to make a traffic light so that its elements are voluminous, then use the origami technique for this.

To do this, cut squares with sides of 5 cm from green, yellow and red paper, from which you need to twist the parts that are glued together.

Ready balls need to be attached to the stand, after which the work is over.

A very interesting traffic light is made of plastic bags.

For this craft you will need:
- garbage bags in red, yellow and green;
- cardboard;
- scissors;
- colored paper.
- To do this, first cut off the handles from the packages.
- Then, starting from the outer corner, cut into a long tape, as shown in photo number 2.
- After that, you need to wind this tape on the palm of your hand or on two identical cardboard circles, in the center of which there is a lace.
- Now the coils are cut from the outside. If you wound the tape around your hand, then tie the resulting blank in the middle with a piece of plastic bag, tighten it, tie it.
- To make a traffic light, you will tie these loose laces together, thereby connecting the structure. You can glue pens and a wand made of cardboard to the exhibit, eyes made of colored paper, make a cap from the same material.

If mothers know how to knit, they can perform this traffic attribute from threads. It is necessary to knit a black rectangle with knitting needles, wrap a bag of kefir or milk around it, sew it from the side, top and bottom.
To fit the bottom and top, knit rectangles the same size as these sides, sew them to the main fabric.
Crochet the circles, attach in place.

Cardboard and tinsel will also make a wonderful traffic light.

Scenario "The Adventures of Dunno in a Noisy City"
After the crafts according to the rules of the road are brought to kindergarten, it's time to start the holiday. On it, the guys in a playful way, with interest, will study the basics of behavior on the road.
To the music, the children enter the hall, sit on the chairs. The host greets them, their parents and says that we live in a beautiful city. There are streets, lanes, cars rush along the roads, buses drive. To cross the road in such busy places, you need to know the rules of the road.
- The name of the place where passengers are waiting for transportation?
- What sound tool does the traffic police officer use to stop the offender?
- The silent tool of the traffic police officer?
- On what part of the road are pedestrians allowed to walk?
- What is the name of the part of the road where the traffic moves?
- Stop.
- Whistle.
- Wand.
- Sidewalk.
- Bridge.
The host says that the guys know the basic rules of the road, and now they will tell you how to cross the road. Then, in turn, the children come out, read poetry. The first says that the traffic light is a great helper, warns when you can go and when not.
The second child gets up and reads in poetic form that the color red indicates that there is danger nearby. In no case should you go across the road where the transport goes when this traffic light is on. Yellow urges pedestrians to wait, green lights up and invites them to cross the road. Then the guys tell a poem about a pedestrian crossing, about a zebra. After all, only on such a marking you can cross the pavement.
Next, the game begins, which is called "Collect the puzzle." Children are given large puzzles in which there are road signs or traffic lights. They must collect them. You can divide the guys into two teams to arrange a competition.
Next comes the mobile game with flags. At one end of the hall, children line up near the starting line. The teacher stands on the other side of the hall, holds a flag in his hand. If it's green, you're good to go. When the teacher raises the red one, the child should immediately stop. When the green attribute is raised again, you need to continue moving. The winner is the one who completes all the way the fastest without mistakes.
For the next competition, you need to make petals, a core out of cardboard, lay it all in the form of a flower on a table or on a carpet. On the reverse side of these blanks are written questions regarding the rules of the road. If the children do not yet know how to read, the parents will do it for them, but the children themselves must answer.
You can come up with other competitions to hold a holiday regarding the rules of the road. They can be studied not only indoors, but also on the street. When the snow falls, paint black stripes on the cleared path with a can of dark paint to make a pedestrian crossing. Put traffic lights on both sides of it. You will simulate the situation by “turning on” various colors.
You can also draw some road signs on the snow and study them with your children.
Such games will help the children to better learn the rules of behavior on the road, and crafts will become a visual material that contributes to the assimilation of the material.
If you want to see how to make a traffic rule-themed craft, the following story is for you.
Municipal budgetary preschool educational institution "Kindergarten "Rainbow" of the city district of Reftinskiy Pedagogical project "Adaptation of young children to the conditions of a preschool educational institution" Developer: Teploukhova T.V., teacher of the 1st quarter. categories; Nogina E.A. educator; Explanatory note Relevance of the project: In a family environment, a child with ...
Municipal budgetary preschool educational institution "Kindergarten "Rainbow" of the city district of Reftinskiy Educational project "Theater of Magical Transformations" artistic and aesthetic development of young children (1-2 years old) Project developer: T.V. Teploukhova, teacher of the first qualification category Project participants: T.V. Teploukhova, main...
Ecological education of children is, first of all, education of humanity, i.e. kindness, responsible attitude to nature, and to the people who live nearby, to the descendants who need to leave the Earth suitable for a full life...
Guidelines for the production and use of the didactic game of ecological content “Lotto. Animals» Materials: 1. Printed cards with images of animals 2. Thick white cardboard 3. Film for lamination or wide adhesive tape 4. Laminator, scissors 5. Pouch made of opaque fabric. Production: 1. Printed images: playing field (4 pcs.)...
Master class for making a game layout "City Street"
Norkina Oksana SergeevnaTeacher MADOU kindergarten No. 21 "Rosinka" of the combined type of the urban district of the city of Kumertau of the Republic of Bashkortostan
The master class is designed for educators, but parents can also come in handy.
Purpose: training in game modeling, the formation of safe behavior on the roadway.
Target: making a model for game modeling in work with children of senior preschool age.
Tasks:
- to acquaint children with the rules of the road, the purpose and signals of traffic lights, with road signs, to expand knowledge about the rules for the safe behavior of children on the street;
- to activate children for independent activity in the corner of traffic rules,
The game layout can be used for the development of fine motor skills, visual perception, social orientation, orientation in space.
Description:
Stage I - the basis for the layout To make the basis of the “City Street” game layout, we need: 2 pieces from an MDF panel (I have them 53 cm each), a piano hinge, screws and nuts for fastening.

We drill holes in the MDF panels with a drill in the selected places, fasten the piano hinge with screws and nuts.

In order for our layout to stand at an angle of 90 degrees and not fall back, on one side we fasten the corner limiter (I have this part of the attachment from the old curtain), paint over the lower part of our layout with black paint.

Now we will draw up the upper vertical part of the layout. To design it, we take 2 pictures with the image of houses (I arranged these for myself).


We print the pictures in duplicate, laminate, if there is no laminator, then you can simply paste over with tape. The picture becomes brighter and it is easier to take care of the layout - to wipe the dust, for example.
We paste one copy of our laminated pictures, joining to the layout, that's what we should get.

Now we will give the card volume. To do this, we cut out the buildings at our discretion from the second copies, and paste them on pre-prepared blanks from the ceiling tiles - single background and double foreground, in my work I used the adhesive for ceiling tiles "Master"

Cut out buildings with a utility knife

We stick (I use the same “Master”) on the layout, our street has “depth”.

We turn to the design of the roadway. We take construction tape, highlight the pedestrian crossing, the dividing strip, that is, what we will paint over with white, close everything else.

In my work I use ordinary aerosol paints in a spray can, they are sold at any hardware store, they dry quickly, they are easy to use. Highlighted all the lines in white - remove the adhesive tape. The roadway and the crossing are ready.

Stage II - Paper machines. Now it prints templates for paper machines, there are a lot of them on the Internet, for example, let's take these.


The image is scaled down. Click to see original.
We laminate the printed templates (1 sheet of laminated film - 2 sheets of templates with cars), fold the sheets with the white sides inward. We laminate in order to make the cars more rigid, bright and make it possible to wipe them. When the sheet is laminated, we cut it along the contour and we get 2 sheets laminated along the colored side, the second side remains unlaminated (paper) - the paper sticks together better, and the laminated cars shine. This is what a laminated sheet with templates cut from 3 sides looks like.

Cut out car templates, glue.

Stage III - road signs. Now we turn to the manufacture of road signs.
Materials: it took me 2 sheets of ordinary white office paper, ceiling tiles (better washable), stationery knife, toothpicks, glue master, mosaic of 3 colors (red, yellow, green), laminated sheet with sign blanks, I used this one.

The image is scaled down. Click to see original.
We cut and paste 1 copy on the tile, cut it out with a clerical knife along the contour, on the other hand we paste 2 copies (if you wish, you can not stick the second part of the sign. We make a stand for our signs. Birch a sheet of white paper and cut strips of 4-5 mm along the long side sheet. For one sign, you need 5 strips.. Take one strip and wind it on a toothpick forming a tight "roll" - this is the upper part of the stand. Glue 4 strips into a long strip, twist into a "roll". On a large roll, put a small one on top, We dip the edge of the toothpick in glue, pierce our "rolls", pierce the blank with the road sign with the other edge of the toothpick. All our sign is ready.

To make the traffic light more voluminous, add a small mosaic of the corresponding colors to the lights, pierce the holes with an awl, insert the mosaic.

Our fleet

Our signs

Thank you all for your attention! To begin with, I pursue only the goal of sharing the experience of what is being created for the first time.
As it probably happened to many of us, one fine day when you came to pick up your child from kindergarten, the teacher offered to participate in the development of the material, technical and cultural base of the group, or rather, to make a model of several streets with houses and intersections.
There was not much time to make handicrafts for the DC, so almost all my free time was devoted in the evenings. No specific idea came to mind, and it was decided to just start. I went to the nearest building materials store and purchased several types of self-adhesive film, although as it turned out later, only two were required.
I think it makes no sense to especially paint the production process, because. you can see everything in the pictures. I will dwell on the fact that for the manufacture of this layout I needed a color laser printer, a self-adhesive for printing on a laser color printer, a laminator, a glue gun, and, well, improvised tools: a clerical knife and a ruler.
Well, now specifically about the process !!!
A sheet of laminated chipboard measuring approximately 70x70cm was taken and pasted over with a black matte film, i.e. this is the backdrop of a further roadway. I’ll pay attention - read on the net how to properly glue the self-adhesive, because. will relieve further nerves and translation of the material. Luckily, I had a special pencil for writing on glass, and I marked it with it.
Well, until the muse of landscape design visited me, I started making road signs, thought for a long time what to make, dug in the pantry, and found crosses for laying tiles and a snipe. I printed various road signs on self-adhesive for laser printing, as well as the textures of walls, paving slabs, windows, doors, etc., from which I then made road signs and houses by pasting cardboard. Ideas came as they were made... 
For the manufacture of the landscape, it was customary to use a material - a foam substrate for a laminate.
Well, let's see what happens: 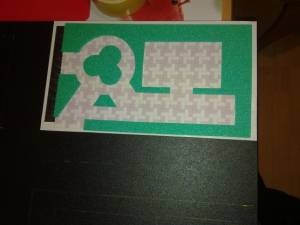


I'll start from afar, with a backstory. Why I decided Stasik to make a layout of "Roads".
For quite a long time, the son, like many boys, is passionate about cars (this hobby was especially aggravated when Mark appeared, and Stas was asked to sit quietly so that his brother could sleep). But he rolled them exclusively on the sofa, not on the floor. Our sofa is 8 meters long and often we have nowhere to sit, because everything is full of cars. (We have a 2-room apartment, so all our games and toys are in the hall).
Stasik loves to build trains out of these cars, both the largest and the smallest cars take part.
About two months ago, my husband and I noticed that the fabric with which the sofa was upholstered in one place was slightly folded and when driving a typewriter, Stas slowed down and seemed to drive over a speed bump, then the driving speed increased. That is, he liked to drive along such a “bump”, sometimes he even created it himself, crushing the fabric))).
Many times we offered him to play on the floor, but to no avail. I'm not sorry, but sometimes it was just not convenient. All the same, I also want to sit on the couch, and Stas was very indignant at this, because. we created unnecessary obstacles on "HIS road". And laughter and sin)))
At one fine moment, the idea came to create for him such a road, a game one. (So that the sofa was freed)))). Since he likes it so much. Found on the Internet the embodiment of such ideas. The only thing left to do is to prepare everything and start. I ended up getting back to work after 2 months. It took 2 weeks (of course, because everything was done at a snail's pace, but there were good reasons for this - my children)))).
And here's what happened. My husband and I jointly created such a layout. 
Next, I will describe step by step what, why we did it, suddenly you are going to do it and it will come in handy for you))) I photographed almost everything step by step. According to the plan, such a layout was created for small cars (well, still ...)))
My sister kindly gave us an old board game box. It is flat and large, with not high sides. What you need. I settled on connecting both the lid and the base of the box together so that the road was larger. I didn’t measure it, but it came out approximately 1 m 80 cm long ... and about 70 cm wide ...
At the main part of the box in the middle there was another side-separator. I also partially decided to use it in the work and made cuts - driveways.
Then I collected boxes of different sizes for buildings. 
On one part of the box there was a glossy drawing, as a result the paint would not have taken it, I pasted it in places with paper and masking tape. 
Dad was given the task to build a two-level garage (Stas also has a special love for this, all cars must drive into the garage.). both floors of the garage have slopes - ramps from different sides. It is quite large, so it "settled" in the corner of the layout.
Covered the boxes with paper. I made signatures for them (according to Doman, after all, we are still doing it))) The buildings were made based on what kind of cars Stas had - a fire engine, an ambulance, a police, an emergency service, etc. .. well, a school, a kindergarten, a store and an apartment building the house is so, for fullness.
True, my husband criticized me for what kind of windows I painted ...: Where did you see such windows? ... I: I don’t know, I always draw windows like that)))
Initially, I wanted to paint all the buildings, but I didn’t really like the effect .. so only 2 did this - the police and the store. 
I marked on the box where these buildings will then stand.
To be honest, all this time I didn’t worry much about what we would do, and my son would not play there, but then he reassured me that he wanted to play this game when it was still like that))) 
When all the preparatory work was over, I "planted" all the buildings in place on double-sided tape. 
Started painting. I decided to start with greenery, with grass. I painted everything with gouache in two layers. Grass has 2 layers + third strokes - grass imitation. 
Also, I remembered that there must certainly be bumps - “speed bumps”. I took a sleeve from cling film, it is long and strong. My husband cut it lengthwise and I glued it on double-sided tape along the entire road, as many as 4 “lying down”. 
The railroad went around me. We have a small steam locomotive. Painted her backing 
And rails. Started painting the road. 
When everything was dry, dad made markings with a tape corrector, very convenient. And I suppose if he did it with white paint on black, then it would probably turn gray and it would not be so even. 
And another feature for Stasik was a barrier that regulates traffic on the main road to the garage from the railway. It was so funny, I told both grandfather and dad that we need a barrier, come up with and make it for us from whatever you want, and so that it opens and closes. I can only offer popsicle sticks that my sister has collected. As a result, the husband made it from small planks, blocks, this is the basis. I made a hole in one, connected it to an ice cream stick with a toothpick, voila. Everything opens and closes and is quite strong, unlikely to break. 
Once waking up after a daytime sleep, Stas was delighted. With markings, the road had a completely different look, like a real one. And he started playing. 
I had to add details: road signs and finish painting the fence.
Road signs turned out the size of a 10-ruble coin. I printed them out on a printer and connected them with tape with a toothpick, laminated them well. Here are the crumbs: 
We inserted them into the layout itself as follows: we pierced the road with a thick needle, inserted a ready-made sign there, and added a little super-glue. And everything is safe. From the bottom of the box, these places were glued with adhesive tape so that they would not cling. 
Ready! Please do not judge strictly.
I will explain that this layout was made exclusively as a game, and only in some places it can also be used as a training one. The markings on the road are conventional, in many places the lane is thinner than a car .. Not all rules are followed ..
Road signs are not as numerous as they should be in reality. All because I did not want to clutter up the road with signs, it would simply not be convenient for Stasik to play. They are rather like this ... for the entourage))) but practically correspond to their location, as it should ..
We will learn the signs later, in a different form, but for now we will play!
Stas appreciated our work. He especially likes to roll cars from the slopes from the garage, drive over bumps and through the barrier. Sometimes, however, he doesn’t drive quite on the roads, on the grass, he just plays as he wants, he’s still small ... he doesn’t care about all these rules)))
And now a photo of the result from different angles, near, far, from above, from the side and with Stas playing))) 


I will be glad if you like it.
My husband and I are happy because our son is happy.
Budget (spent 0 rubles, everything was at home), original, handmade, in which our soul, our creativity is invested.