How to make an Easter Bunny from a napkin. How to make a paper napkin bunny. Bunny from a napkin
How to fold a rabbit or a bunny from a napkin to decorate the Easter table - see our material.
How to make a rabbit (bunny) from a napkin
Before you make a bunny (rabbit) from a napkin, decide on the color and color of the napkins. Their choice will depend on your preferences and on what the Easter table setting will be like. We offer you some photos for inspiration, see which Easter napkin bunny you like the most.

How to make an Easter rabbit (bunny) from a napkin
To make these festive Easter napkin bunnies the centerpiece of your Easter table, start with well-starched square napkins. Fold the bottom third of the napkin up and the top third down, making a rectangle.

Easter table decoration: How to fold napkins (diagram)
The video shows in detail how to make a napkin bunny for the original Easter table setting. Everything is clear without words, and you will no longer have the question of how to fold napkins or how to make an Easter bunny out of a napkin.
Rabbit from a napkin video / Bunny from a napkin video
The second way to make a rabbit (bunny) from a napkin. For him, you will need not only a napkin, but also a thread and an egg. Follow the instructions in the photo and you will get a great napkin in the form of a rabbit (bunny).

If this seems too complicated for you, make felt napkin rings with Easter bunny ears.
- Make a pattern of the desired size, cut out the details, as in the photo.
- In the middle of the "ear" you can stick a material of a different color.
- Then, under one of the ears, make a longitudinal incision. Passing the second "ear" into it, you will close the napkin ring.

Another way to make a bunny napkin ring is out of cardboard. The scheme is approximately the same as that of the previous craft.
- We draw a template of the desired size.
- We cut out the details from the cardboard according to the template.
- In each part we glue the opposite ends.
- For decoration, you can glue a button.


Now you know how to fold a napkin in the form of a rabbit (bunny) or, in extreme cases, make a ring to make a rabbit (bunny) from a napkin.
Do-it-yourself bunny napkin!A napkin rabbit is not even a real craft with children, but an idea for setting a children's holiday table. Today you will learn how to fold a bunny-shaped napkin with ears and a tail. This serving idea works for both paper and fabric napkins. A diagram of how to make a rabbit out of a napkin is shown in the figure below.
How to fold a napkin in the form of a rabbit with your own hands:


We fold a napkin in the form of a rabbit - a description of the master class
Take a napkin, unfold it and place it on the table in front of you. Mentally divide the napkin into three equal horizontal parts. Fold the top third of the napkin over.
Bend the bottom third of the napkin away from you, and you will get a horizontal strip of napkin.
Mentally determine the center of the strip and bend its right side along the central axis.
Fold the left side in the same way. Then bend the left and right ends of the napkin towards you to form a rhombus. What you should get is shown in the sixth figure of the diagram.
Fold the left and right edges of the napkin in half towards the center line. Rotate the napkin 180 degrees so that the small protruding triangle is facing you.
Now flip the napkin over to the other side, the fold lines will face the table and the flat surface will face you.
Bend the same small triangle up. Fold the napkin in half along the center line away from you. What you see is the rear view of the napkin bunny. On the front of the rabbit, insert the bottom left corner into the right pocket.
The napkin usually stays on by itself. However, for fidelity, you can fasten the corners with a pin, but be careful with the pin if you plan on having children use the napkin.
In general, with proper folding and depending on the material of the napkin, you can usually do without pins, the rabbit is already holding on. For greater similarity, you can move apart or slightly bend the ears of the rabbit.
How to make a rabbit (bunny) from a napkin
Before you make a bunny (rabbit) from a napkin, decide on the color and color of the napkins. Their choice will depend on your preferences and on what the Easter table setting will be like. We offer you some photos for inspiration, see which Easter napkin bunny you like the most.
How to make an Easter rabbit (bunny) from a napkin
To make these festive Easter napkin bunnies the centerpiece of your Easter table, start with well-starched square napkins. Fold the bottom third of the napkin up and the top third down, making a rectangle.

The video shows in detail how to make a napkin bunny for the original Easter table setting. Everything is clear without words, and you will no longer have the question of how to fold napkins or how to make an Easter bunny out of a napkin.
Rabbit from a napkin video / Bunny from a napkin video
The second way to make a rabbit (bunny) from a napkin. For him, you will need not only a napkin, but also a thread and an egg. Follow the instructions in the photo and you will get a great napkin in the form of a rabbit (bunny).


If this seems too complicated for you, make felt napkin rings with Easter bunny ears.
Make a pattern of the desired size, cut out the details, as in the photo.
In the middle of the "ear" you can stick a material of a different color.
Then, under one of the ears, make a longitudinal incision. Passing the second “ear” into it, you will close the napkin ring.

Another way to make a bunny napkin ring is out of cardboard. The scheme is approximately the same as that of the previous craft.
- We draw a template of the desired size.
- We cut out the details from the cardboard according to the template.
- In each part we glue the opposite ends.
- For decoration, you can glue a button.

The New Year is approaching - a bright and warm holiday filled with fabulous expectations. On this day, all relatives and friends will gather at the same table to sincerely, from the bottom of their hearts, wish each other happiness and the fulfillment of all desires. Of course, the table on this holiday should be special, memorable, carrying an element of a fabulous surprise. Many housewives think over the festive menu in advance, looking for suitable ones that can surprise and delight guests. But no less hassle requires the design of the table for the holiday. For example, how unusual is it to fold napkins in the tone of the upcoming holiday so that they become a decoration of the feast?
The upcoming year 2011 according to the eastern calendar is the Year of the Rabbit. And the Rabbit is not only a symbol of family and tranquility. The Year of the Rabbit is the best time for friendly communication, as well as the manifestation of creative possibilities. Let's pay tribute to this friendly and sociable animal, showing maximum creativity.
A good decoration for the New Year's table will be napkins folded in the form of hares. By the way, if you are fond of folding napkins, this skill will also come in handy for decorating the Easter table!
We will need square linen or cotton napkins. First, iron the napkins and lay them out on a table or any other flat surface. We start adding up like this:
1. Visually divide the napkin into 3 equal parts. We wrap the bottom part to the middle, and then the top. We smooth the resulting folds with an iron.

2. We have a strip of fabric that needs to be folded in half. Smooth out and re-fold the strip. Lay the top two corners down to the smoothed fold.

3. We wrap the two lower corners up and towards the middle. As a result, the napkin should take the form of a square placed at an angle.

4. We wrap two side corners to the middle and iron the folds.

5. We turn the napkin 180 degrees so that the bottom side of our design is on top.

6. We make a tail for a hare: turn up the bottom corner.

7. Both corners, going along the bottom of the tail, wrap forward and fix with a pin. We draw out the ears of the bunny.

Happened? Isn't it a beautiful and original solution for decorating the New Year's table, which will especially please and surprise your kids? Learning will be doubly fun if it is folded in the form of a long-eared one! Let this New Year's bunny make your moments of communication at the festive table wonderful and unforgettable! And the magical mood will last for the whole year!
Aida Svezhentseva specially for the site Our recipes
2010 - 2013, . All rights reserved. Copying is prohibited.
Hello guests and blog subscribers! Today's topic will be unusual, but interesting.
More recently, a new symbol of Christ's Resurrection has come to the Russians. This cool tradition came to us from Germany and every year it takes root more and more with us. As you guessed, we are talking about a wonderful fluffy animal. And his name is a rabbit, often called a bunny.
In the last note, we already conjured over, and even made a mountain, but today I want to invite you to make another Easter souvenir, I hope you don't mind.
As always, I share with you those ideas from the Internet that I personally liked. What are we going to create with today? I think that from everything that is at hand, that is, from improvised materials and all sorts of things.
Well, I'm starting to surprise you. Wow, hold on! By tradition, I start my note with the most unexpected and interesting ideas.
For example, take a look from ordinary disposable cups you can get such cuties, and even molds from chicken eggs have gone into business).


From ordinary paper ribbons, or you can take satin or decorative ribbons, build such a lovely friend.

You can also mold from sweet dough and then arrange a meal for tea, these are such small animals. It can also be made in the form of a bun.


And you probably won’t even guess, cook something delicious). By the way, do you already know what you will have on that day?

Therefore, along with these specimens, you can immediately come up with types of work from a special dough for modeling, I hope you are familiar with this, it is similar to plasticine, but more tender.


You can also make figures from mastic.


Long-eared silhouettes made of polymer clay.


An excellent master on this matter, see here:
And of course, of course, you can’t get anywhere - this is salt dough.


Well, plasticine, of course, has always been and will be loved among children.


These are some funny freaks, the mood immediately rises to 5+.
Or, look, I found such a charming wreath of twigs, isn’t it really cool? And it smells like spring.

Well, if from the simplest, then of course these are paper crafts, twist the sheet into a cylinder and then glue the ears and muzzle with a mustache, you can also use cotton wool.

And, you can fantasize and make an envelope for decorations.

The simplest model, voluminous and appliqué style.

Or that handsome man on strings.

Here, even from cotton wool, the product is cute and fluffy.

And this one is plaintive from a napkin.

Take your pick.)

Interesting! Disposable spoons and plates, sticks can still come to the rescue. Affordable and cheap material has always been in fashion, and will be.

It looks great, you can even hang it on the wall, it will be like a picture.


And here is a masterpiece from a glove, we already did this once. Remember? Something similar when talking about

In general, if you have a shirt in your locker that you don’t mind throwing away, then feel free to sew such a rabbit out of it.

If you don’t know how to sew, there is an idea for this case. You can decorate a boiled egg.

Ha, from toilet rolls, such a friend will appear.


And even from ordinary clothespins, you can do the following together with preschoolers.

Or such cute rabbits a boy and a girl.

And this bunny from a chicken egg and pumpkin seeds, well, a real exhibition option, ha ha).

Well, in conclusion, from pompons, it is also quite possible and attractive to perform this craft.

How to make a paper bunny for Easter?
In fact, everyone has paper and cardboard at hand, and therefore we often make crafts from these tools. While applying various techniques, such as origami for example, etc. Now I want to show you something pretty cool and unusual, our rabbit will be made in a vintage motif. Although you can build it in any other style, this is up to you.
We will need:
- scrap paper
- cardboard
- glue or hot glue gun
- scissors
Stages of work:
1. The first thing you have to do is find or use this template. Print it out, you can enlarge it to make a great friend. Cut out all the details with scissors.

2. Then, according to this sample, you need to attach and circle all the details.

3. Well, now for the cause, it remains to glue everything together. To make it look more voluminous, bend a strip of cardboard with a spring and glue it to two blanks.

4. I hope you understand what I mean.

5. You could first cover the hare with scrap paper to make it more convenient to work.

6. And finally, our long-eared cutie is ready and will delight you and your whole family.

Also, as an option, you can make a rabbit in the form of a basket. By the way, I have a great selection on this subject, if you missed it, then watch


From corrugated paper, you can also make such a product in the form of an application.

You will probably be amazed, but even from a child's hand, or maybe an adult, you can also fold one life-size masterpiece.

By the way, you can find any picture on the Internet and do something like that out of it.


Or you can not be smart, but glue ordinary cardboard strips, like this.

How to make an eared felt out of felt (diagrams and patterns)
It’s easier to craft than from this material you probably can’t imagine. I have on this subject, there you can find a bunch of all sorts of new ideas for yourself if you are obsessed with this matter.
Today let's put on small souvenirs that you can give for this year's bright holiday.
The kids will also play with them, in general, both a gift and a toy will turn out two in one.

As always, first get a picture somewhere, for example, you can use this one.


Then start sewing around the edge.

For softness, you can add a little synthetic winterizer inside. You can make a dozen of them.

Well, the final moment, this is an ornament, make them bows from satin ribbons, you can sew on another button and a bead.
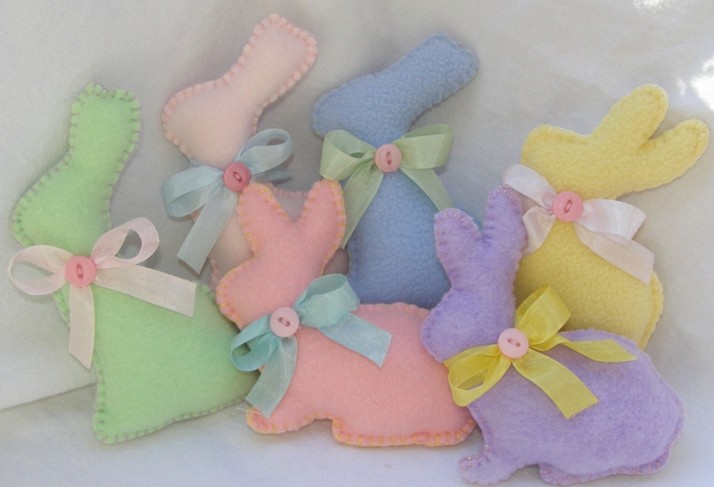
You can create such an eared one, it will remind you more of a soft toy.

If you suddenly need a schematic for this friend, then hold it, here it is.

You can also perform funny mini-bunnies on your fingers and play a performance. Cut out such blanks from the material.

For the ponytail, use woolen threads, wrap them around your finger, then tie the middle with a thread and cut.

Sew the blanks together along the edge.

This is how delightful it should be.

It is not necessary to use felt, you can also make a toy from another material.

I also really liked the idea of a souvenir that can serve you as a basket or a vase.


This decor can stay in your kitchen for a long time, use it as a candy bowl.

You can do anything, the main thing is to call your ingenuity, even in the shape of an egg you can sew a bunny.


Or look at another funny animal I found in the form of a handbag.


This one is also very cute and beautiful fluffy.


And if you want to sew a real toy, then take this masterpiece as a basis, I have its templates in my piggy bank, write to whom you need.

And finally, another modest and cute long-eared friend.


And if you want to please your kids, you can make them such a present from the cartoon Smeshariki Krosh.

We create a hare from a napkin for Easter
In general, you won’t guess from what else people have thought of making a rabbit. Yes, from an ordinary cloth napkin, you can take a handkerchief and make such a product.

Lay the square cloth in front of you and get to work. Do not forget to also take threads, scissors and all sorts of little things for decoration.


Flip over to the other side.

Fold in half and that's it.

A little magic, and everything will work out by itself.

Now the ears are sticking out, tie the muzzle with a ribbon.

Sew a pompom on the back, and a nose and eyes on the front.


No one can resist such charm, the main symbol of Easter is ready.

You can also turn it like this, a little differently.

You can also make quite a lot of these Easter bunnies if you use these tips. After all, you can take a paper napkin for table setting.

And from it to add a brilliant surprise with an egg.
Here is such a charm that you can live in an apartment.

For clarity, I took two similar schemes to make it easier to understand. 
And this is the simplest model, here you don’t even need a diagram with a description, so everything is extremely clear how to build such a thing.

Rabbits (bunnies) in origami technique
All of us in childhood created our first works, and used this famous technique. You can do such work with your child or for a labor lesson.
I found such a scheme for you, at first it even resembles a form, as if you started to create

And this model is more complicated than the previous one.

If this model is not clear to you, then use the more detailed and step-by-step description that I found in one of my journals.


Here is such a cutie.

A more graceful image, in this picture.


Do not forget that there is also modular origami.
Knitted crochet rabbits + description
I came across one toy yesterday, in general, for beginner needlewomen, what you need, because here you don’t even have to break your head, just knit a square with any loops, you can use at least knitting needles, at least a hook.

And if you really want a masterpiece, then knit according to this detailed master class.


I suggest you read the following stories:
One hare is more beautiful than the other, isn't it?
In general, I will soon post an article on knitted Easter toys, so don't miss it, there will be a lot of interesting things and, as always, there is plenty to choose from. Well, in the meantime, you can tie this big-eared boy.

Here's another miracle they came up with, like a kinder surprise, you open it, I'm there. If your baby does not like chicken eggs, then try to disguise the egg in this way. Who needs it, I can give a link to this master class.

Or use the scheme, this souvenir resembles tilde dolls.

If you don't like it, you can knit an amigurumi hare. 


You can also give everyone a knitted keychain.

Perhaps you will like this application of yarn threads.
Easter Bunny Workshop with Egg Pockets
There is probably nothing better than to make something beautiful and unusual yourself. Like, for example, such a charm, you just can’t take your eyes off.

I am personally very glad that I met such a bunny on the Internet, incredibly beautiful.

On the forums and in contact, the girls shared schemes with me.


I share them too.)


Or even this piece.

The crochet hook works wonders when creating such magical decorations. Here's a workflow for you.


By the way, we made a basket of fabric with you in
Well, if suddenly you are not friends with threads, then make it out of paper.

It's generally a super idea to make coasters out of napkins.


Original bag.

And even a box.

But, if you own the art of wood, then build something like this, a very beautiful composition.

Easter souvenir Rabbit made of cloth
I suggest that you first familiarize yourself with the patterns, maybe they will become your assistants in this matter.


In my city, Tilda dolls are in great demand, they can be found at exhibitions and on sale. 

Here is such a gift copy of a bunny.

And if you suddenly want to make someone laugh, then make such a weirdo. Super toy!

You can also make an ingeniously tender and beautiful pink hare. Print the blanks and circle them on the canvas.


In addition to everything, you can embroider with floss threads as a decoration.

The simplest is the variant of the ovoid shape of the rabbit.


That's all I have today. I hope you liked the note and you write your comments and likes. Join my group in contact and be healthy! All the very best and positive! Bye!
Sincerely, Ekaterina Mantsurova