How to make a flat Christmas tree out of paper. Christmas tree made of newspaper or magazine tubes. Christmas tree made of one sheet of paper
Many beautiful Christmas trees can be made from paper and cardboard for the New Year.
The very first way to make a Christmas tree for the New Year holidays is to take green colored paper, you can blue or light green, you need to draw a circle on paper, for this you can use any round object or compasses.
We divide the circle into 12 equal parts, cut it slightly, it is desirable that the cuts are not cut to the middle. We make cones from the corners, fix them with glue. In this way, we make several tiers for the spruce, if the spruce is large, then there will be a lot of green leaves, about 20 - 30. If you need to make a small spruce, then it will be small.
The next step is to pierce all the leaves in the center of the leaf, for this you can use a needle or other sharp object, we close up the spruce with a thread or thin wire. The top of the spruce will be a triangular hat made of green paper, which should be glued to the top of the New Year's beauty.
The next spruce will be made of green stripes. To do this, take green paper, cut strips out of it. The length of each strip will be different, since the spruce has different tiers. The strips should be 40, 30, 20 and 15 centimeters long. The next step, the strips must be carefully twisted, for this you can use a pencil or a toothpick. We remove the made rolls from a toothpick so that the spruce is lush, you need to give it a little fluff.
The end of the strip, after they have fluffed up, must be fixed with glue, we make small droplets look like strips, which we lightly press.
We string small rolls onto a toothpick, which need to be glued together with glue. The next step is to glue our droplets to the trunk of the future spruce.
We make the top from a roll, make it in the form of a droplet and glue it to the top of the spruce.
Beautiful toys made of colored paper can be glued to the prepared Christmas tree.

A very beautiful spruce is made from colored cardboard.

To do this, take a cardboard, draw a spruce on it. Cut the tree along the lines you have drawn.

We bend the tree in the middle, make small cuts. The first spruce is cut from the top to the middle, the second from the bottom to the middle. Then carefully insert the cuts so that they match with the tree. We fix it with tape.

In order to decorate the spruce, you can use a brush and paints, felt-tip pens or pencils, different glitters.

The next spruce is very simple. To do this, draw circles of different sizes with a compass. The circles need to be folded in half, then folded again. It should turn out about three times.
The resulting circles need to be straightened, and then a small hole cut out. We glue the pencil with shiny paper, you need to spread it with glue, string the spruce tiers, make the top out of foil or just glue the bead. That's it, the New Year's beauty is ready.
New Year is the funniest and most children's holiday.
Even adults are not afraid to look funny in the red caps of Santa Claus and with a bunch of gifts.
What can we say about the kids who are trying to take part in all matters in this joyful mess!
The main attributes of the New Year are Santa Claus and a Christmas tree.
Traditionally, a large Christmas tree is decorated with toys and tinsel, and round dances are held around it. What if you make an unconventional Christmas tree?
A beautiful do-it-yourself paper Christmas tree will not pretend to be a central place, but it can decorate a children's room or become a souvenir gift. Believe me, such a Christmas tree will find its use.
A Christmas tree is made from paper, cardboard, colored and corrugated paper, tinsel and any other materials at hand.
It is easy and fun to do: children take part in the work with great pleasure.
Two-year-olds, for example, can roll plasticine balls, which will then become a toy, or glue a small piece in the place indicated by the adults.
And the memories of the joint craft will last for several days.
There are at least a dozen ways to make a Christmas tree out of paper with your own hands, but in any case
you will need:
- Paper (colored, corrugated, thick - whatever)
- Pencil with ruler Glue and stapler
- Scissors
- Sometimes compasses
Model No. 1. Tree made of paper volumetric
 First, the base of the tree is made - a cone. If the tree is planned to be large, the cone is made of Whatman paper (it can be replaced with four A4 sheets glued together). A center is marked in the center of the wide side, from it we draw lines to the two lower corners, cut it off (do not forget to leave an allowance for gluing), cut off the semicircular base, glue it, check whether it is level. On this basis - a cone - you can make several different versions of Christmas trees. You can make a large paper tree if you make a large cone, and a small one on a small cone. And different methods of making needles will generally be misleading: it may seem that these are different Christmas trees.
The first version of the Christmas tree-cone
To make the blank cone look like a Christmas tree, we make needles from colored paper. Traditionally, the needles are green, but you can assume that there is snow or frost on the branches - the choice of color is yours. We outline the rectangles: for the lower needles, the width of the rectangle is 7 cm. From the rectangle we make a trapezoid: the upper side is cut off. The wide side is folded into a triangle and fastened with a stapler or glue, the upper side is convenient to stick to the cone.
Bulky needles can be replaced with circles glued to the top. If you cut out circles of different shades of green, the tree will look more original.
The needles are glued in rows  start at the bottom. To make the tree look beautiful, reduce the size of the needles every three rows. That is, we draw rectangles at first 6.5 cm, then 6 cm and 5 cm. We decorate the top of the tree with a small cone, the bottom of which we cut off with triangles. If desired, the Christmas tree is decorated with sparkles. You can use ready-made sequins, you can finely chop the tinsel. Apply glue to the needles and sprinkle glitter on them.
The second version of the Christmas tree-cone
 We build a frame, cut thin short strips from colored paper, wind each strip on a pencil. The stripes take on a twisted look. With a certain skill, you can twist the strips of paper with scissors: we carefully draw the blade of open scissors from one end of the strip to the other, while simultaneously pulling the strip. Glue the twisted strips to the cone. You can decorate the Christmas tree with anything: sparkles, bows, balls, stars.
The third version of the Christmas tree-cone
Glue drop needles onto the prepared frame. We make the needles from strips of green (or any other) paper, glue their ends - a drop is obtained. At the bottom of the cone we glue larger drops, at the top - smaller ones.
The fourth version of the Christmas tree-cone
 Wide strips of paper cut into fringes are glued to the base. Again, at the bottom of the strip is wider (respectively, the needles are longer), at the top of the strip is narrower. The color of the needles can be any: green will make it natural, multi-colored - decorative. We cut the strips into small "needles", without cutting to the end about 1.5-2 cm. After the glue dries, the needles can be bent upwards - carefully draw with a scissor blade from the base of the needles to the ends. Such a Christmas tree made of corrugated paper will look beautiful.
Model No. 2. Christmas tree made of paper and cardboard

Double-sided cardboard is required. We fold a sheet of cardboard in half, draw the outline of the Christmas tree. Draw the exact same contour on another sheet. We cut out both contours, then along the axis we make cuts to the middle: on one Christmas tree on top, on the other below. We insert parts into each other. We decorate with tinsel, balls (glass or paper), sparkles - whatever. In the photo - slotted toys.

A similar Christmas tree can be made from colored paper. It will require 4 sheets. We fold each sheet in half, cut out a triangle. We glue the resulting parts together and cut the needles at an angle. You need to twist them before the glue dries.
Model No. 3. Christmas tree made of colored paper

This model requires heavy paper. It is done simply: we cut out a triangle, fold it with an accordion, make a through hole into which we insert a stick-rod. To keep the Christmas tree stable, the stick can be inserted, for example, into an eraser. Such a Christmas tree can become a small souvenir or decorate a workplace. She will definitely create a New Year's mood.
Model No. 4. Christmas tree in papercraft technique
 How such a Christmas tree is made of paper, the diagram clearly shows. It is necessary to cut several circles of different diameters (the bottom of the tree - from circles of a larger diameter, the top - from circles of a smaller one). The circles are drawn and cut, the needles are folded. The finished tiers are strung onto a rod. We decorate the Christmas tree with sparkles, beads, foil bows - the imagination is endless.

Model No. 5. Folding herringbone

For such a Christmas tree, several circles of different diameters are cut out. The diameter and number of circles depends on the desired size of the herringbone. Fold each circle in half 4 times, unfold and straighten the circles. The trunk of the Christmas tree can be made from an old pencil, a cocktail straw, a wooden stick - all this is wrapped in colored paper, the tip is glued. In the center of each circle we cut a small hole (it should be less than the diameter of the trunk in order to hold it tight). We string circles-tiers on the trunk, starting from the bottom. A stand for a Christmas tree can be made from a wooden coil, cork, plastic bottle cap, plasticine, glued from thick paper.
Model No. 6. Origami from paper - tree
In this popular technique, you can make any figurines, including Christmas trees. How a Christmas tree made of paper is made using the origami technique, the video will demonstrate better than any words. We offer two options.
Another beautiful Christmas tree made of paper and is done very simply and quickly! We just need to take a sheet of colored paper and scissors. such a Christmas tree made of paper will become a beautiful craft for the holidays.
Craft: DIY Christmas tree
Today in stores you can see a large variety of Christmas trees. However, it is not at all necessary to buy a Christmas tree, it can be made with your own hands from almost any available means. Of course, you simply cannot do without a live Christmas tree at home on New Year's holidays, and a handmade Christmas tree will perfectly decorate the house or be suitable as a gift to friends and family.
Craft: DIY Christmas tree
Christmas tree from magazine pages
To make a cute Christmas tree from magazine pages you will need:
- old magazine;
- PVA glue;
- cardboard;
- pen or pencil.
First of all, you need to make a cone out of cardboard and fasten it with glue. Neat circles or flowers of the same diameter should be cut out from the pages of an old magazine.
The resulting circles need to wrap a pencil. Thus, they will turn out a little twisted. Then you can start gluing the circles to the cone, starting from the bottom. The circles should be glued by pressing them tightly together so that the cone itself is not visible. You can make a small cone out of one circle and stick it instead of the top. The tree is ready.

New Year tree from old magazines.
Video: DIY Christmas tree craft
Christmas tree made of wrapping paper
It is very easy to make a Christmas tree from wrapping paper.
For this you need:
- wrapping;
- cardboard;
- Scotch;
- scissors;
- decorations.
As with most Christmas trees, the first step is to make a cone out of cardboard or thick paper. If the wrapping paper you are going to use is thick enough, you can make a cone out of it.
The resulting cone can be secured with tape. Then you need to cover the cone with wrapping paper. To do this, put the paper on a flat surface with the beautiful side down. Then tape the end of the paper to the cone, and slowly turn the cone completely wrap the wrapping paper around it.
Cut off excess paper with scissors. It remains only to decorate the paper tree. To do this, you can cut stars and decorate them with sparkles, you can glue buttons, beads, tinsel, stickers or lace to the tree.

DIY wrapping paper herringbone
Crafts with children: glowing tree for the new year
The glowing tree looks very original and beautiful. In order to make such a Christmas tree with your own hands you will need:
- floristic mesh;
- floristic wire;
- cardboard;
- scissors;
- cellophane;
- PVA glue;
- pins;
- decorations.
First, make a cone out of cardboard. Wrap the finished cone with cellophane. Then cut the floral mesh into small pieces and coat with glue. Glue the resulting mesh pieces onto cellophane. Secure the resulting structure with pins and wait for the glue to dry completely. After the cone is dry, repeat this process one more time. After the glue is completely dry, remove the cellophane from the cone. Secure the garland inside the cellophane with pins. You can decorate the Christmas tree to your taste.

The process of making a glowing Christmas tree

DIY glowing Christmas trees
Original Christmas tree made of pasta
In order to make an original Christmas tree from pasta you will need:
- foam cone;
- gouache, acrylic paints or spray paint;
- pasta of various sizes and shapes;
- PVA glue;
- brush.
First paint the styrofoam cone any color you like and let it dry. Then glue the pasta well to the cone. The design can be absolutely anything. Then paint over the pasta, carefully painting all the details. It is better to cover the pasta with paint in two layers. Let your tree dry thoroughly.

The process of making a Christmas tree from pasta

Fluffy Christmas tree made of colored paper
A Christmas tree made of ribbons of colored paper turns out to be very elegant. To independently make such a New Year's beauty you will need:
- a cone made of thick cardboard;
- colored paper;
- PVA glue;
- double sided tape.
First, you need to make a base for the Christmas tree, for this we take a thick sheet of cardboard, fold it into a cone shape, securing it with glue. Then we make thin strips of colored paper, the same length and width. Christmas trees made of green, red, silver and gold paper look very impressive. With the help of glue, we glue the stripes along the edges, obtaining loops from them. We attach the resulting loops to one side of the tape, and attach the other side to the cone in the direction from bottom to top. Thus, it turns out a funny fluffy Christmas tree.

The process of making a Christmas tree from strips of colored paper

DIY fluffy Christmas tree
Craft Christmas tree: 40 photos and master classes

Decorated homemade Christmas trees made of tinsel and balls

Children's craft: green Christmas tree made of cardboard or paper

New Year's craft with children: a tree made of cones and balls made of fabric or yarn

Diy multi-colored Christmas trees made of yarn

Children's craft: Christmas tree made of felt and buttons

Flat Christmas trees from dishes - an unusual idea

How to sew an elegant Christmas tree - an idea for the New Year

How to weave a beaded Christmas tree with your own hands

Flat Christmas tree made of twigs for wall decoration

Beautiful Christmas tree made of lace with your own hands

Master class: volumetric paper tree using quilling technique

Stylish Christmas tree made of jute and beads

Craft a Christmas tree from plastic forks and other dishes

Miniature beaded Christmas trees

Beautiful Christmas trees made of ribbons

How to make a Christmas tree from yarn and buttons with your own hands - master class

Small Christmas trees made of lace

Crafts - Christmas trees from burlap and spices

Christmas tree made of coffee, beads and satin ribbons

Two Christmas trees made of pine cones

Knitted Christmas tree - photo

How to sew a Christmas tree from scraps of fabric

Unusual Christmas tree made of plastic spoons

Gift idea: Christmas tree made of sweets and tinsel

Christmas tree made of beads - a beautiful craft

Decorating a bottle of champagne in the form of a festive tree

Christmas tree made of satin ribbons for the new year

Flat Christmas trees made of twine and lace

Bright Christmas trees from colorful balls

Homemade Christmas tree made of wrapping paper

DIY fluffy yarn trees

Small Christmas trees made of fabric and buttons

Christmas tree crafts made from natural material: cones and feathers

Simple Christmas trees made of yarn, beads and buttons

Transparent Christmas trees made of Christmas balls suspended in the air

DIY Christmas tree made of wine corks

Funny Christmas trees made of twine and ribbons

Simple children's craft - paper Christmas tree

Curved sisal Christmas trees

DIY paper tree instead of a fluffy forest beauty? Why not, such crafts will decorate your home and office, you can give them for the New Year to friends and acquaintances. How to make Christmas trees from scrap materials, is it difficult? We offer different options, and you choose the one that you like best.
How to make a Christmas tree out of paper with your own hands?
What is good about a DIY paper Christmas tree? She just has a lot of advantages: by showing imagination, you can come up with original models and create small masterpieces with your own hands.
In addition, your craft does not require special financial investments, because cardboard, colored paper, glue and scissors can be found in any home.
And also making Christmas trees is an exciting activity for both adults and children, plus it is extremely useful, developing and uniting.
It's such a great joy when beautiful crafts are obtained in the process of joint creativity. Even the smallest family members can actively participate in preparing for the New Year.
For example, it's funny and fun to make Christmas trees using children's hands:
Who would have thought that DIY colored paper Christmas trees could be so different. See what beauties you get if you make them using the origami technique:
And here is a beautiful do-it-yourself Christmas tree from modules:

How do you like such a tree with your own hands? The paper craft turns out to be delicate, airy and weightless, although we use a dense material - cardboard.

Such beauty can be made using self-made templates, or you can find and print ready-made ones. First, cut out the patterns with a clerical knife inside the openwork Christmas tree, then the outline and stand.
DIY paper tree - master class
If you have not been fond of crafts before, then it is better to start with simple options. And if you like it and get a taste, then you can choose a more complicated technique.
Let's learn how to make a New Year's beauty - it will do-it-yourself volumetric tree made of paper.
What you need to cook:
- green paper;
- pencil;
- compass;
- ruler;
- scissors;
- glue;
- wire;
- a needle.
Here are our steps step by step:
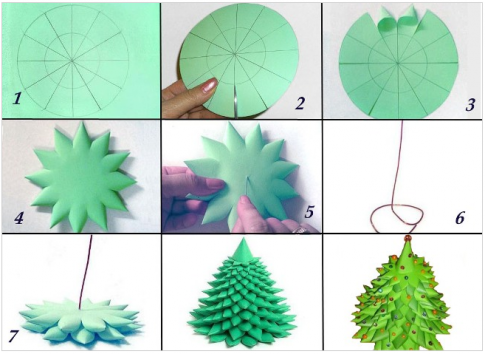
- We draw a circle of the required size on a sheet of green paper using a compass, depending on whether you want a large tree or a smaller one. The circle will be the bottom tier of the herringbone.
- Draw another circle inside it - you need to retreat from the outer contour a little more than half the radius. Divide the circle into 12 sectors with a ruler.
- We make an incision along the lines - from the edge to the inner circle.
- We fold the sectors with a cone and fix them with glue.
- Using the same scheme, we will make all the other tiers of the tree, each next decreasing in size.
- In the center of each workpiece, use a needle to make a hole.
- We roll the bottom of the wire in the form of a spiral - this is the base of our craft.
- And now we collect the tree, stringing the tiers on the wire, fix our tree on top with a cone, this will be the top.
That's it, Christmas decoration for your home or office is ready. It is done simply, but it looks pretty cute. You can decorate the Christmas tree with beads or sequins.
Quilling to help us!
Haven't heard of the quilling technique? Don't be scared by an unfamiliar word, there is nothing super complicated in our next craft. This will be a cute DIY Christmas tree made of colored paper.
Let's prepare for work:
- several green paper strips 5 mm wide, 10, 15, 20 and 30 cm long;
- 4 green stripes 1 cm wide;
- stripes of yellow and red colors, their width is 3-5 mm;
- toothpicks;
- instant glue and PVA.

The sequence of actions will be as follows:
- Pre-cut narrow strips (5 mm wide) alternately twist with a toothpick, remove, let them unwind a little. We glue the PVA to fix the tip of each strip, giving the resulting spirals a droplet shape. To do this, you need to pinch and pull one of the ends of the spiral up.
- We wind wide strips of green color around a toothpick tightly enough, gluing the tip so that it does not bloom. So we get the trunk of the future tree.
- We make a drop from a green strip 30 cm long - this will be the top of the tree.
- We insert a toothpick into the tree trunk and start attaching the branches using instant glue.
- First we glue the smallest branches at the top of the tree, there will be 4 rows of branches in total, on four sides of the trunk.
- A do-it-yourself Christmas tree made of colored paper is almost ready. It needs to be decorated - we will make toys by twisting pink and yellow stripes. You get small cylinders if you twist them tightly and glue the tips, or you can give them the shape of droplets and stick them on the branches.
- Each tree has a crown - carefully glue the drop at the top of the craft.
- The final touch - at the very top of the crown, we fix the decoration with glue and admire our creativity.
And if you also want to make a stand for the Christmas tree, then you can make it from nine curls of white stripes. We glue the curls together and fix the Christmas tree with glue.
And here is another version of the Christmas trees
New Year is a holiday loved by both adults and children. A hand-made Christmas tree made of paper will become a unique home decoration for the holiday.
In addition, such a craft can be created together with the baby, who, of course, will be happy to help, because bringing a fairy tale into the house is so easy!
You can decorate the interior not only with a living, but also with a cute paper tree. You can make several of them, placing them in different rooms, put small trees on the windowsill, decorated with a flashing garland. In the festive hall, Christmas trees will look elegant, suspended from the ceiling or a chandelier.
Idea: after making several paper trees, present them to friends as a souvenir, who will surely appreciate the efforts.
Such crafts are even suitable for creating a garland that can be used to decorate stair railings. There are a lot of options. What materials to use? First of all, you need paper.
It can be ordinary white, then you need to paint it with gouache, thick cardboard of all kinds of green shades, corrugated paper and colored thin are also suitable.
For decoration: all kinds of ribbons of different shades and widths, beads, beads, small glass balls, polystyrene, cotton wool, pieces of lace, fabrics and everything that can be found in the needlewoman's basket.
Even such unusual things as wooden skewers and cocktail tubes can be used. From the tools you need to prepare scissors, glue and paints will come in handy.
Manufacturing master classes
When all the necessary materials are prepared, you can start working directly. It is not necessary to strictly follow the tutorials below.
It is encouraged if the craftswoman will add her own flavor to the product, changing the stencil pattern, decor, color and texture of the paper, taking, for example, from each lesson only the moments she liked. As a result, you will get a unique volumetric tree made of paper, unique of its kind.
Lesson 1
For work you will need the following materials:
- green paper;
- compass;
- cocktail tubes;
- glue.
Using a compass, draw 5-7 circles on paper. Each next circle should be 1 cm less than the previous one. Fold each blank in half three times.
Spread them out and make a hole for the tube in the center of the circles. String all the circles on the barrel (tube) from largest to smallest. Decorate the top with a bead.
Lesson 2
For work you need:
- green double-sided paper;
- needle, scissors;
- a piece of wire;
- glue;
- compass.
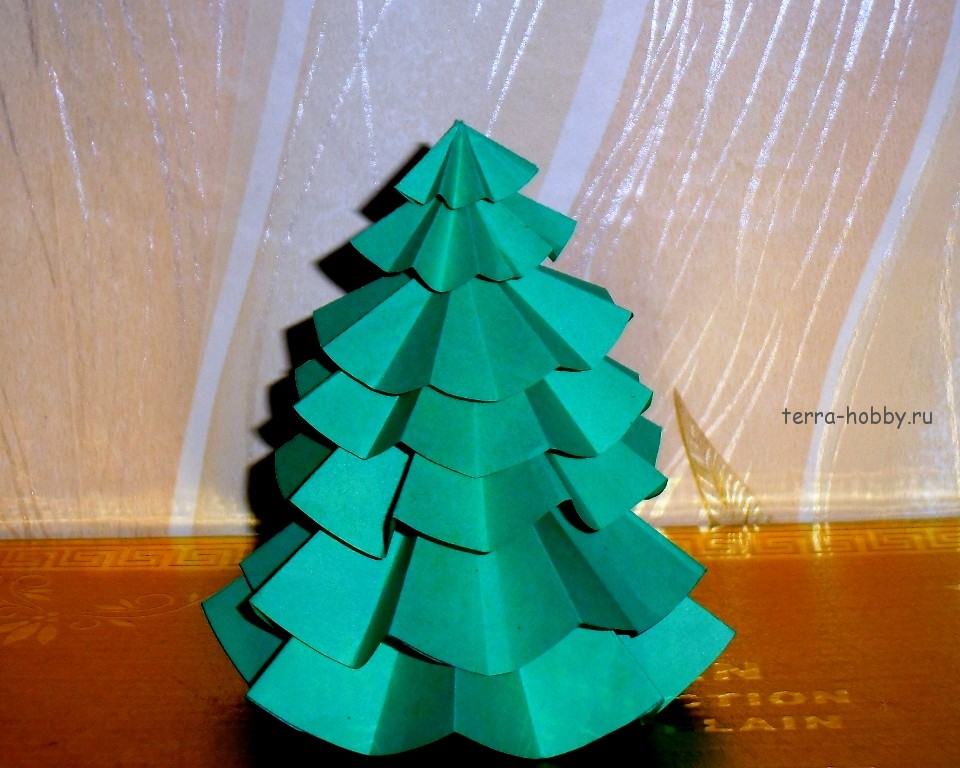
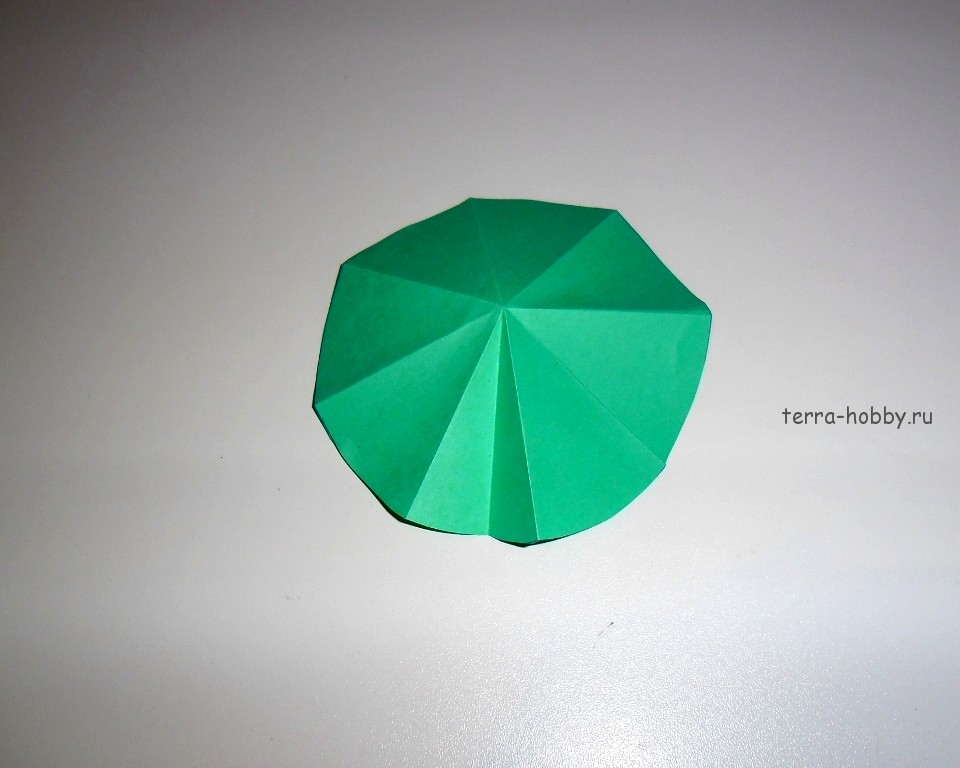
Draw a circle on paper. This is the lower tier of the tree. Draw another circle inside it, stepping back from the edge about 2.5 cm. Divide the circles into 12 halves (like a cake). Roll each half into a cone, glue. Thus, you need to make 12-15 blanks, gradually reducing the size of the circles.
Punch a hole in the center of each tier with a needle, string everything onto the wire. Roll the bottom of the rest of the wire so that the Christmas tree becomes stable. Roll up a suitable cone from the same paper and secure it at the top.
Lesson 3
Everyone probably made a Christmas tree in this way in kindergarten or school, so the process will not take much time, but will only be a joy!
 For work you need:
- thick green paper or cardboard;
- scissors;
- Scotch;
- additional decorations (bows, beads, cotton wool, sparkles).
Cut a sheet of cardboard in half. Next, fold the halves again, and on one of them draw a part of the Christmas tree. Carefully cut the blanks. There should be two trees. Make incisions. Assemble the Christmas tree, holding the halves together, using tape for greater strength. Decorate the finished craft with cotton balls, bows, sparkles, stars cut out of paper, circles.
Lesson 4
An unusual origami Christmas tree can be made from an old magazine. It looks very nice and cozy. For work, you need to take a regular magazine. If its cover is hard, it should be removed.
For each page, do the following:
- Bend the upper right corner by 45 degrees.
- Bend the sheet diagonally again.
- The corner that goes beyond the border of the magazine - bend inward.
Lesson 5
You can even create a cute Christmas tree from paper napkins! For work we take:
- cardboard;
- glue;
- scissors;
- green napkins.
Tip: The tree will look better if you use napkins in several shades of green as well as white (for snow).
Construct a cone of the desired size from cardboard. Cardboard can be replaced with plain paper, since the napkins are light, then the craft will be stable.
Cut the napkin into four parts and glue it with an asterisk, as shown in the photo. Lightly crush each workpiece and glue the cone. Steal to your liking: a laconic bow at the top, a garland of beads - there is no limit to imagination.
As a result
How wonderful it is to create something with your own hands! On New Year's Eve, creative thinking wakes up, under the influence of imminent magic you want to create!
Pleasant chores, preparing gifts, decorating the house - all these are integral attributes of the holiday, and a voluminous Christmas tree made of paper, made with warmth, will be a great addition to a cozy interior.
For the New Year, everyone decorates a Christmas tree at home. But if you do not have it, then you can easily make a Christmas tree out of paper with your own hands. Moreover, these Christmas trees are so easy to make that even a child can easily cope with it. Depending on your baby's age and skill, you can choose any of these options. For each Christmas tree, you need to prepare a wire that will serve as a frame for it, circles of different diameters, cut out of green paper, and rolled up pieces of paper 5 mm long, they are put on the wire between all layers of the tree to add volume and height.
Simple do-it-yourself paper tree
 The first option: a simple paper tree
Cut 6-7 circles of different diameters out of green paper.

Fold each circle in half, then fold it two more times in half.

Expand. You will have a circle with eight sectors.

Iron each fold well so that it protrudes to the right side. Now bend each sector in half, making a hollow.
You will have 16 sectors, 8 protruding folds and 8 hollow folds.
Each circle has become like an umbrella. Make a small hole in the center of the circles (except for the last circle).

Put a paper tube fastened with tape on the wire. Make it 1.5 cm long. It is needed so that the lower circle keeps its shape and is not flattened.

Put on the largest circle, then the paper tube, and the next circle on it. Thus, collect the entire tree.

How to make a Christmas tree out of jagged paper
 Second option: paper tree with jagged edges
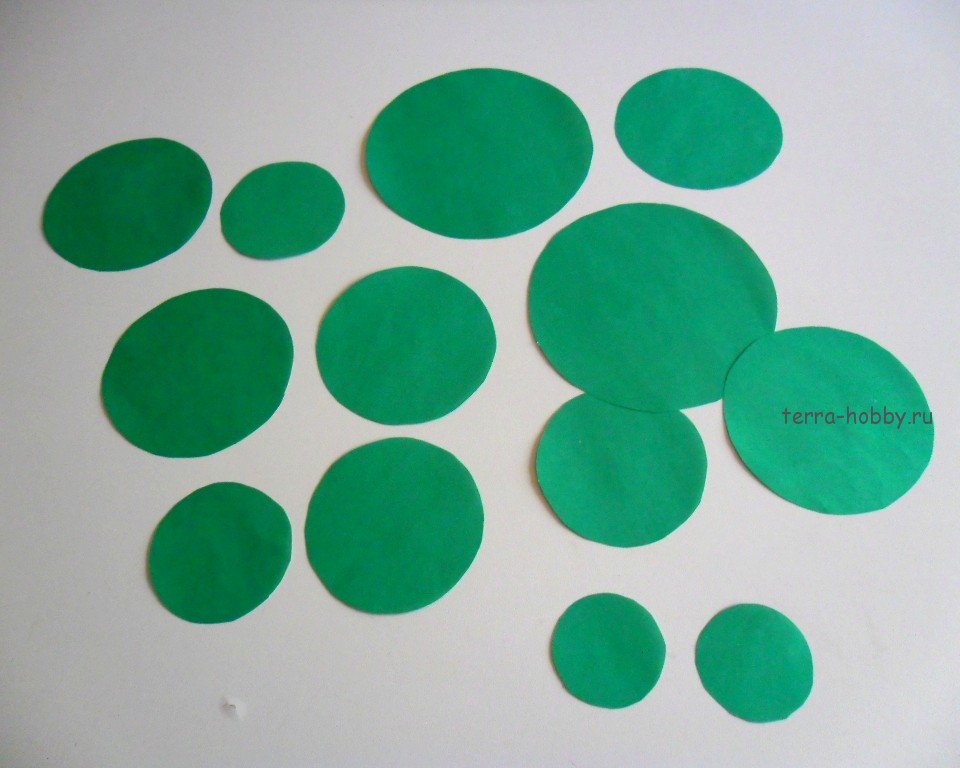
Cut 7-9 circles of different diameters out of green paper.

Fold them as in the first option. Without unfolding, use scissors to make the edge in the form of teeth. Cut off the very tip of the corner.

Expand. Press all folds to the right side. Fold each of the eight sectors in half, making an additional fold that should look inward.
Put a paper tube on the wire, and the first "umbrella" on it.


Collect all the parts from the largest to the smallest. Hide the end of the wire under a small narrow cap.

How to make a Christmas tree from snowflakes
If you did a good job with making the first two trees, then you can also make this tree without much difficulty.

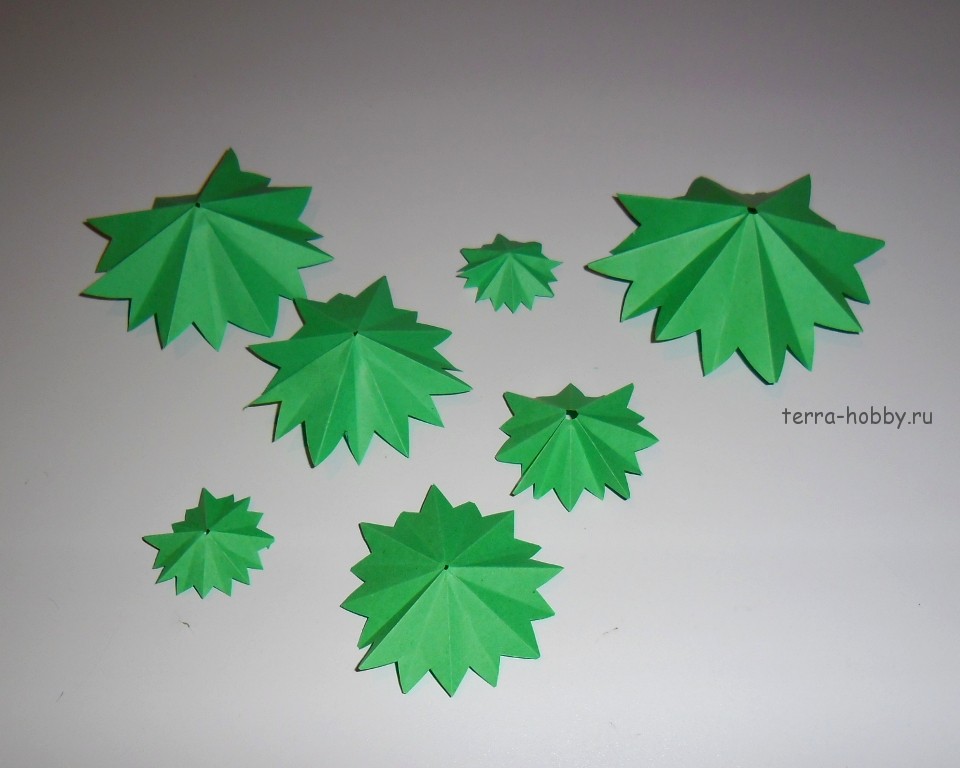
Cut out 13-15 circles of different diameters.
Fold each circle in the same way as in the previous cases: first in four, and then in half again.


Now you should cut out the snowflake. Practice on white paper to figure out which pattern you will get. The photo shows an approximate example of how to draw a blank and cut it out. The places that are cut out are painted over. You can make another drawing according to this principle, but the corners in the pattern should be sharp, because they imitate needles. Try to keep all the snowflakes similar to each other, the final look of the Christmas tree will depend on this.
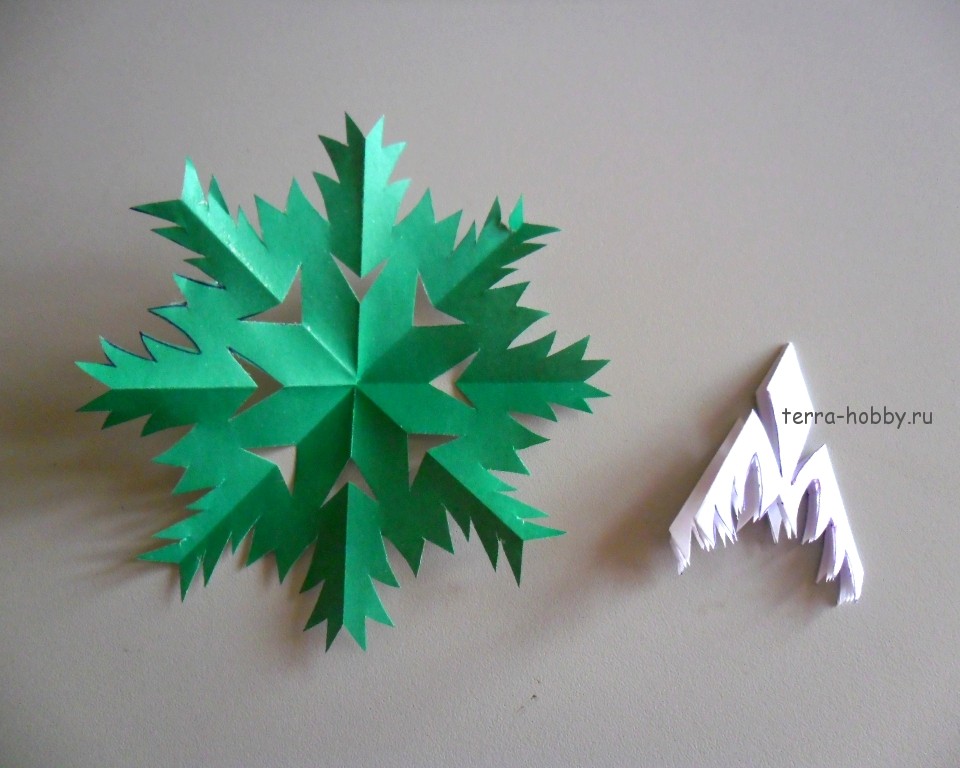
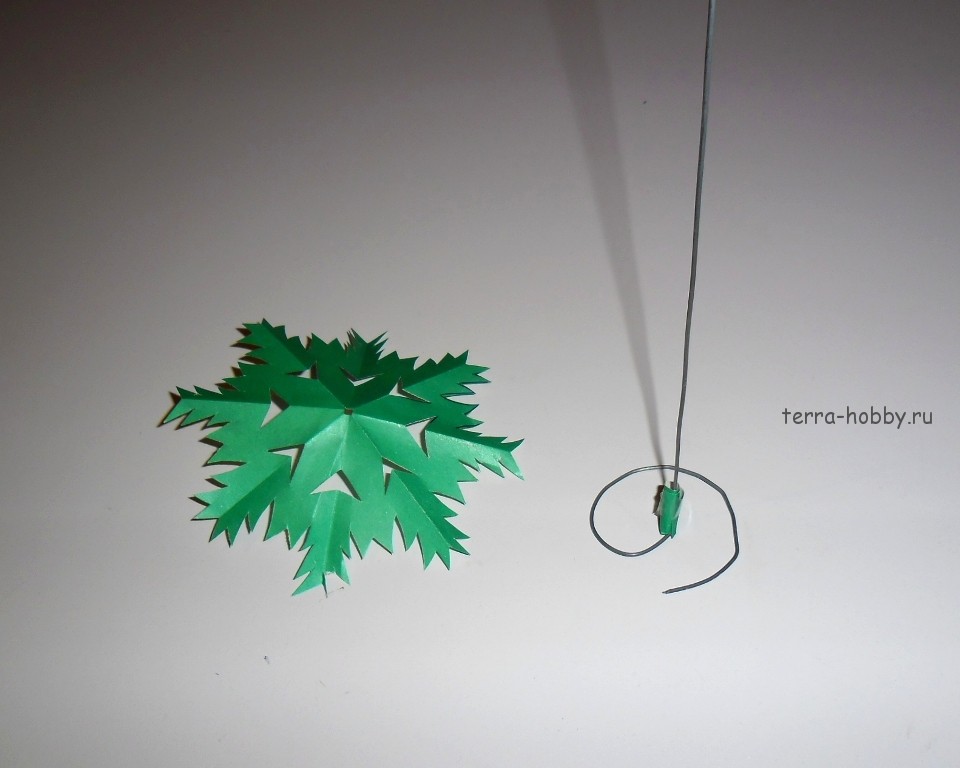
Cut out all the snowflakes. Do not forget to make a small hole in the center.

First, put a paper tube 1.5 cm long on the wire. Then put all the snowflakes on the wire, alternating with short (5 mm long) paper tubes.

Here's a Christmas tree you can get.

Each of these trees can be decorated with "rain", balls cut from colored paper, or serpentine.
To create a festive mood on New Year's holidays is very important in the family and at home. Various decorations of your home will definitely help to tune in to the New Year's motive. Tinsel, garlands, candles and other trinkets are perfect for this role. But what about handicraft lovers? They just should not sit still, because the winter holidays provide a huge scope for ideas and hand-made crafts. In our master class, options for ideas for a festive beautiful Christmas tree made of paper will be considered. How is a volumetric Christmas tree made of paper on your own at home? You will find out by reading a master class with photos and diagrams.
There are a lot of ways to do this, so we need:
- Paper (depending on the method);
- Pencil;
- Ruler;
- Glue;
- Stapler;
- Scissors;
- In some models, compasses.
Model No. 1 - Volumetric Christmas tree made of paper
To begin with, we make a base in the form of a cone. If you plan to make a very large one, then make a diagram of this idea from Whatman paper. In the center of the wide side, we find the center and mark it, from this point we draw lines to the two lower corners, mark and cut off, not forgetting to leave allowances for gluing, cut off the semicircular base and glue it. Be sure to check if the edges are even. On this basis, several options can be performed.
Option number 1.
In order for the cone to look like a Christmas tree, it is necessary to make needles from colored paper. The choice of color depends on your imagination. We mark the rectangles: for the lower layers, the width of the rectangles is 7 cm. Cut out and make trapezoids from them, cut off the upper sides. We fold the wide side with a triangle and fasten it with glue or a stapler, it is convenient to glue the top to the base. Glue the needles in rows from bottom to top. Every three rows of needles, we reduce their size. The top can be decorated with a small cone. Further, you can decorate it at your discretion.
Option number 2.
We make a cone base. Then, from colored paper, we cut strips that are not very long, and wind each of the strips onto a pencil. After this action, the stripes become twisted. If you have the skills, you can twist the strips with scissors. After twisting the strip, glue it to the cone. We decorate the Christmas tree at will, relying on our imagination.
Option number 3.
Glue droplet needles onto the cone. We make them from strips of green or any other paper of your choice, glue the ends of the stripes so that we get a drop. We begin to glue from the bottom up, from the bottom more, and up we reduce their size.
Model No. 2 - Papercraft Christmas tree
It is necessary to cut circles of different diameters, they must be drawn and cut. We align the needles and string the finished tiers onto the rod. We decorate at our discretion.
Model No. 3 - Folding herringbone
We cut several circles of different diameters. Fold each circle in half 4 times, unfold and straighten. As a barrel, you can use an old pencil, a cocktail straw or a wooden stick - we wrap the chosen one with colored paper. In the center of each circle, cut a hole smaller than the diameter of the trunk. We string the tiers onto the trunk starting from the bottom. The stand can be made from cork, plasticine, or any item that fits in with the size.
Model No. 4 - Origami Christmas tree
In the modular origami technique, assembling a Christmas tree is not at all difficult. Due to the fact that it consists of separate branches, it looks very beautiful.
We make the module according to the scheme:
![]()
Then we start connecting the parts:
- We need to take modules of one or more colors. Parts-modules measuring 38 * 60 mm. We need 637 of these parts (391 dark green, 246 light green).
- We collect. Take two modules (long side up), insert two near corners into two pockets of the third module.
- It turned out that there are two modules in the first row, and one module in the second. If the branch is short, then you can start it with one module, and if it is long, then we recommend starting with two modules.
- We make the third row, put two modules on the corners of the second row module. We insert the corners into those pockets that are closer to each other. The outer corners should stick out freely to the sides.
- We collect the twig further, alternating, then one module, then two.
- We collect 12 rows of dark green modules, the last two rows of light modules. Tip: if you put on the modules not too deep, then they will hold better. In places, it is advised to squeeze the connection on the sides, bend the finished branch.
- To make lateral processes - collect a twig from five rows.
- We retreat from the beginning of the three modules-needles and put on the fourth two resulting lateral branches.
- We collect the bottom row from 5 such branches, each branch contains 35 modular parts, they are connected - if you take another module and insert it into the nearest pockets.
- We connect the entire row, we close it in a ring. In the same way, only by connecting 6 branches, you get a snowflake, but for it you should use cold white and blue colors and their shades.
- The row spacing of large branches will be divided by intermediate rings, for which it is necessary to connect 7 modules of the first row and 7 of the second row, thus we close it in a ring, we need four such rings.
- The next row will be made up of smaller branches. 12 rows - central branch, and 3 rows each side.
- We connect 5 branches in a circle and the next circle is again smaller (10 rows plus side of three)
- Two small circle without side branches, 8 rows and 6 rows, we also connect
- The herringbone ends, of course, with the top of its head, it is assembled like a twig of eight rows, on the sides of which two modules are inserted for splendor.
- We get a set of blanks (and if it were white paper, it would look exactly like snowflakes)
The tree is assembled in the following order:
- We take a wooden skewer for the base trunk;
- We fix the barrel in an upright position (for example, insert it into an eraser);
- Big circle;
- Intermediate ring;
- Next circle;
- Intermediate ring;
- … Circles and intermediate rings in decreasing sizes;
- We put on the top of the head;
Conclusion
Such easy-to-manufacture, but beautiful volumetric Christmas trees will be a wonderful decoration for an apartment or a festive table, they can serve. the role of a cute symbolic present, or they can simply become an exciting pastime for those who have a lot of free time. creative people are always looking for inspiration and fresh ideas, I hope this master class will be useful. Also, I recommend watching the videos below, because they clearly depict the creation of a voluminous New Year tree made of paper.
It's hard to imagine New Year's fun without a forest beauty. However, not everyone has a place or opportunity to put a real Christmas tree. The artificial one looks unnatural, as a result of which the entourage and individuality are lost. To make this New Year the most beautiful and original, needlewomen come up with interesting design solutions to replace the holiday symbol.
There are many options available. The most common question is: "How to make a Christmas tree out of paper with your own hands at no extra cost?" The answer is simple - use the materials at hand and what you can find at home. Get creative, think about what you want to do and appreciate the items in the bins. Surely old magazines, newspapers or even colored paper will be found there. Colors, felt-tip pens, buttons, bells and everything that your ingenuity prompts will be useful.
It is up to you to decide how to make it, but try to follow the general rules for creating such toys:
- Decide on the form you want to receive. Most often, Christmas trees look like a traditional triangle and cone. But if you want to create a unique designer item, then pick up interesting models. For example, with a slope, with an unusual tip, in several tiers, round, etc.
- The color scheme does not have to be standard. Few people can be surprised with a green Christmas tree, but yellow, blue, white or blue - please.
- Once you've outlined what the toy will look like, think about the technique. How to make New Year's so that it will withstand all the holidays and not fall apart under its own weight? There are many mounting options: on a frame, on tape, on glue, monolith.
- The final chord is the decoration of the top. Today it is fashionable to attach symbolic things to the top. So, a family expecting a child puts an angel there, wishing to expand their housing - a house, etc.
Creating the base for the Christmas tree
As a basis, you can use a purchased rolled-up part of a bottle and a paper sheet. Here we take a look at which will be the basis for almost all masterpieces.
To do this, you will need thick cardboard, tape or glue, scissors and a pair of compasses. Measure the height of the future beauty on a compass and draw a quarter circle on the prepared cardboard. Leave a small allowance for easy fastening. Now connect the two straight lines and secure with glue or tape. This will be the foundation. How to make a Christmas tree out of paper. The photo below will tell you where to start.

One or more glued wooden skewers can be used as a wood leg. Now you can start decorating the cone. The easiest way is to wrap it with tinsel with a slight tilt and fix it with glue.
Herringbone made of toilet paper
Today, few people are surprised that the tree is made of paper. Few know how to do such unique things. Imagine the surprise of your guests when they see a beauty made from toilet paper!
Instructions for creating:
- Cut a piece of toilet paper.
- Cut out four semicircles so that the radius of the next one is 0.5 centimeters less than the previous one.
- Form four cones out of them.
- To make the trees splendid, cut the bottom of each tree with a fringe.
- Place one on top of the other, starting with the largest.
- Place them on a suitable foot.
An uncomplicated and affordable way will allow you to create an original and funny decoration that will surprise your guests.
Herringbone with paws in the form of cones
Draw a circle with a compass and divide it into 12 identical sectors. Cut them along the marked lines so that you can easily form cones from them. Hold them together with a drop of glue or a small piece of thin tape. You will need at least 10 such details for the smallest Christmas tree. For big beauties, much more is needed. Start your creativity with a small copy, and only then swing at the masterpieces of the "world scale". Each next circle should be slightly smaller than the previous one. Continue decreasing until work becomes impossible.

Use thick wire or a skewer to fasten them together. The big advantage of wire is that you can create a small base from it, which will give the tree stability. Many are interested in how to make toys for a Christmas tree out of paper, because it is not able to withstand massive decorations. Consider gluing rhinestones and sequins, in some cases plastic buttons. The surest option, suitable for any beauty, is decoration with paper toys, or which can be purchased in stores with hand made goods.

Herringbone with pointed ends
To create this design version, you will need heavy colored paper. It is necessary to cut out even circles from it, which will differ in radius by about 0.5-1 cm. After that, roll each of them in half. The workpiece must be folded in half as long as possible. Carefully iron any creases with your fingernails or scissors. It is important to achieve rigidity and understand the principle of how to make a Christmas tree out of colored paper. Now gently straighten the tier without straightening the resulting accordion. As a result, you should have a cone that looks like a wavy skirt. Do this with all the circles.

You can collect the resulting tiers on a skewer installed in a cork and fixed there with a solution of alabaster or ordinary plasticine. Attach beads, rain, or other lightweight decor to your paws. As a star, you can use a large shiny bead that will hide the tip of the wire or skewer.
A Christmas tree that even a child can handle
Crafts with children are the best pastime in a quiet family circle. A modern 2D Christmas tree made from prints of children's pens is very easy to design, even schoolchildren can handle how to make a Christmas tree out of paper. Give your child colored paper and have them circle their pens. The more prints you get, the more magnificent the Christmas tree will be. You can do this with the whole family: circle the palm of a child, mom, dad. Get your grandparents involved in this business. Think of the activity not as decoration, but as a family reunion.
Cut out the resulting prints and place either on a large piece of Whatman paper, or clinging with glue one to one in the form of a cone with your fingers down. A Christmas tree made of paper looks very nice on the wall. How to do it, figured it out, now let's talk about how to decorate it. To make it a masterpiece, use multi-colored paper, buttons, bows, hairpins, and more.
Christmas tree from the magazine
Surely everyone has a stack of magazines hidden somewhere that you are unlikely to use for their intended purpose. Fold all the pages into triangles, then turn out the magazine and glue the two outer pages. A big plus in such a Christmas tree is that it does not need any decor. Aesthetic appeal is achieved by the beautiful drawings that have been on the pages.

The second option is also made from an old magazine. Instead of folding the pages, cut them in the same pattern, such as several traditional triangles, for example.
Quilling herringbone
Thanks to the quilling technique, a unique carved Christmas tree made of paper is obtained. How to make adorable curls, they will tell in master classes on this art. You can comprehend the secret in a few hours, a specialist will help you create a unique designer beauty.
Get creative with your kids. After that, they will be able to take her to school and participate in the winter crafts competition.