How to put a bruise on the arm. How to quickly reduce a bruise? What effective measures exist to quickly reduce a bruise on the face or body. How to make a bruise go away
Everyone should independently take care of the security of their data. And the more technology develops, the more important the literacy of users in this matter becomes. Indeed, today the phone can store not only important contacts, but also personal photos or even access to payment systems. To help protect your money and data on Android phones, a password is pre-installed on the device. But there are times when the code is forgotten, and the device needs to be unlocked. Simple instructions will help you solve this problem.
About the need to set a password on a mobile device
Many underestimate the importance of a password on a device, believing that they have nothing to hide.
In fact, the password allows you to:
- Be sure that no one but you will use the phone - even at home, family members can take the phone. And this can lead to controversial situations or even spending money, for example, if a small child gets to the device;
- In the event of a theft of the phone, complicate the work of criminals - a phone with a password, of course, can be hacked sooner or later. But it is not a fact that they will be able to save the data, which means that the attackers will not receive important information. Well, besides, while they are busy with a password, you will have time to block the payment systems tied to the phone.
- An important argument for setting a password is that this is a mandatory requirement for some applications, for example, the Sberbank-online service.
Types of security codes
Although there are different ways to password protect your phone, it's not difficult to identify the main ones. This is a graphic key and a regular password.
Graphic key
The graphic key protects your phone with a password, which is a serial connection of several dots on the screen. That is, you must repeat a predetermined sequence.
You can install the graphic key as follows:
- Open your phone's settings and scroll down the screen until you reach the "Personal Information" section. There you should select the line "Security".
Scroll through your phone settings and find the "Security" section there.
- The very first item will be setting up a screen lock. Go to this section.
 Select "Screen Lock" in the security section
 - And then you should select the line "Graphic Key".
 Select a pattern as the screen lock method
 - A screen with dots will open. It is here that you should set the same graphic key. You can specify any sequence of points, but it is important to remember it. Let the combination have a clear association for you.
 Set the pattern on the screen of your device
 - The last item you need to specify is whether to display notifications on the lock screen. It's up to you to decide, but in order for the information to be hidden as much as possible, it is better to ban them.
 Choose how notifications appear on the lock screen
 - The pattern has been created and the next time you try to access the phone, you will need to enter it.
 The next time you turn on your phone, you will be prompted for a pattern
There are also applications that can replace standard pattern creation solutions. But the procedure for creating or using a key in such applications is almost completely identical to the standard one.
Regular password
A normal password consists of letters or numbers and can be anything. Theoretically, it is more difficult to pick it up than a graphic code - but in practice it all depends on the ingenuity when creating a password. The password is set as follows:

Modern phones use a fingerprint scanner to unlock the device, which is certainly more convenient and safer than setting a password.
How to unlock the phone when the pattern is forgotten
Each password, unfortunately, can work both for intruders and for yourself. And if you forgot which graphic key you have installed, then you will have to try to gain access to your device.
Removing blocking via Google account
If you remember the data from your Google account, which is linked to the phone, then accessing the device without knowing the picture password is not so difficult. It is enough to do the following:

Pattern bypass by calling devices
There is no need to unlock the phone to receive a call. It can be used like this:

Of course, this solution is temporary, but you can at least save the necessary files before the more rude methods of getting rid of the graphic key. Correctly, this trick only works on older versions of Android, but no one bothers to try this option.
Similarly, you can cause the top bar to appear, for example, by draining the battery of the device.
Removing the lock by resetting the device
You can reset the device either by going to the phone menu using the previous method, or otherwise. Most importantly, remember that when you reset, you will lose all data on your phone. Be careful and make sure that there is nothing valuable among these data. You can reset your phone as follows:
- Turn off your device before resetting. To bypass the pattern, we will perform a reset from the phone's recovery menu.
- The most common way to access the recovery menu is to use the volume up key along with the home key. But there are other combinations, such as power + home + volume up, power + home alone, or volume down + power. You can find the exact combination for your model on the Internet, but with a high probability one of the already indicated ones will help you.
 Simultaneously press the volume up key and the home key to access recovery mode
 - In the recovery menu, select clear data, factory reset or similar. The exact name depends on the phone model. To switch between items, use the volume keys - touch control will not work in this menu.
 Use the volume buttons to select Wipe data/factory reset
 - The confirmation of the line you have chosen will be pressing the power button of your phone. Do it.
 The Power key on the side of the phone is used to confirm selections in device recovery mode
 - Switch the line to yes and confirm the entry again with the power button.
 Confirm resetting your device
 - And after the reset is completed, choose to restart the device (reboot system).
 Select Reboot system now and confirm this item with the Power button
 - After the reboot, your device will start up without data or contacts, but without a pattern. Reset completed.
If you got into the phone settings, then the reset can be done through them:

Removing the graphic key in the service center
If you do not feel sorry for the money, then they can remove the blocking at any service center. Their methods are not too different from those mentioned in this article, so it's up to you to decide which resource is more important to you - time or money.
Sometimes you can just guess the graphic key, in addition, look at the screen carefully. From frequent key entry, a trace remains on the screen.
Video: a way to bypass the graphic key on the phone
Deleting a pattern file
When creating a pattern on the phone, a file is also created for its operation. Therefore, when deleting this file, the device will no longer ask for a key to unlock it. But this action should be performed only by an experienced user, since intervention in the device at this level can be dangerous, you must be extremely careful. And it's done like this:

Using the app to reset the lock
SMS Bypass application that can be used to unlock. It must be pre-installed on your device, but if you have not done this, you can download the application remotely through the linked Play Market account (although in a situation where you remember the password for your Google account, there are easier ways to recover).
By itself, resetting through this application is very simple:

Features of removing the graphic key for different phone models
The instructions above are suitable for any model of Android device. But at the same time, there are also a number of features for removing the pattern key for specific phone models.
- For Samsung phones - Samsung Kies will help you. With its help, you can find out your login, which in the future will help you fully access your Google account (password recovery is carried out using the Google service). The necessary information will be in the "About the device" section when the device is connected to a computer with the installed program. And also this program will help you access your phone data, which will be useful if you still have to reset the device to factory settings.
- Sony Xperia phones have a number of features regarding system reset - the transition to recovery mode is called by simultaneously pressing the volume up button and turning on the phone, but this may sometimes not work. In this case, you just need to hold down the power button for about twenty seconds. This will reboot your device and then you can try opening recovery mode again.
- And also for Sony models, the Sony Update Service program will help you - it will not remove the graphic key, but it will simplify the device reset procedure.
- For Huawei phones, the HiSuite program will help you - with its help, you can also make it easier to reset the device, which, in turn, will save you from the problem with the graphic key.
Resetting a digital password on an Android device
A number of methods for resetting the digital key are the same as resetting the graphic key. It will help you the same way:
- contacting a service center;
- reset device data;
- signing in with your Google account information;
- and other methods mentioned above.
But there are other possibilities as well. For example, the Lock Screen Removal program can help you get rid of a digital code without losing data:
- Download this program from the official website and run it. Connect your phone to your computer and then, on the first screen, click Start.
 Launch Lock Screen Removal and press start
 - Turn off your phone and then put it into download data mode. To do this, first simultaneously hold down the power button, the volume down key and the home key, and then, when the device recovery menu opens, hold down the volume up key. After that, your phone will be in download mode. Click Start in the program.
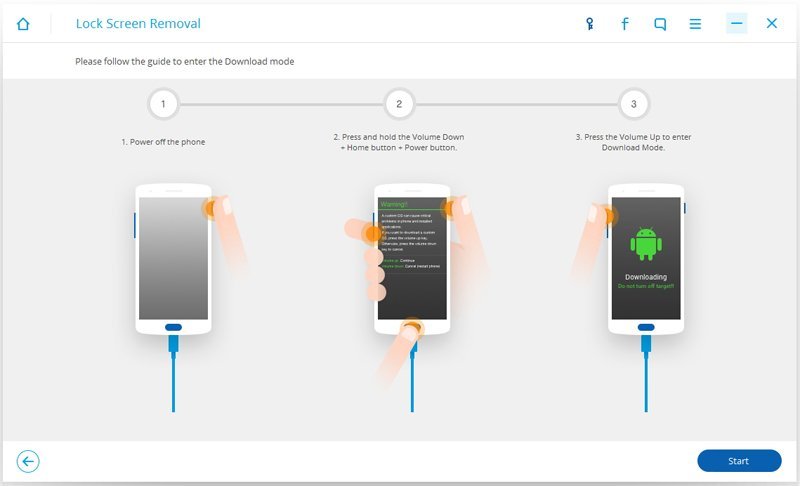 First, hold down the Power + Volume Down + Home keys, then release them and press the Volume Up key
 - The download of data will begin, you are required to wait for it to finish.

Now you know the various ways to reset a pattern or number password on your phone. This is certainly good, because you can return access to your device. But still, it’s better not to forget the lock code, because it is designed to protect your gadget, and not create unnecessary problems.
Whether you're gearing up for Halloween, a play, or just wanting to prank someone on the first of April, a little makeup can help you simulate the aftermath of a bad fall or a bad bruise. To create a realistic bruise, you can use ordinary cosmetics or specialized stage makeup.
Steps
Application of cosmetics
- Position the bruise in an easily accessible place where makeup can be applied without too much difficulty.
- The shape of the bruise should depend on what you think caused it.
- Try to draw a bruise on your forearm, as if you were hit with a blunt object, such as a bat (in this case, the mark will be oval). Make the bruise slightly elongated and with smooth rounded contours.
- You can also draw a black eye for yourself, as if someone had punched you in the face.
-
Base the bruise with red eyeshadow. Paint over the entire area of the bruise with red eye shadow. Give the bruise an appropriate size and shape. Redness will mimic irritation of damaged tissues.
- For example, if you are drawing a black eye, draw a crescent of red under the eye, starting from the inner corner of the eye and moving in an arc to its outer corner. In the widest part at the outer corner of the eye, the redness should be about 2.5 cm wide.
- You can also add some redness around the edge of the upper eyelid to show irritation.
-
Add purple shadows to give the bruise rich color and depth. Violet should highlight the inner and most affected area of the bruise.
Age the bruise with yellow and green shadows. If you have yellow and green shadows on hand, and you want to reflect the healing process of a bruise, you can blend some green shadows around the outer perimeter of the bruise, as well as an area in its center. Apply yellow shadow around the perimeter and in the center of the green areas as already brightened areas of the bruise.
Dim bright spots with black eyeshadow. If green and yellow shadows stand out too much on the skin, look too bright, or give the bruise an unnatural look, these areas can be muted with black shadows to dilute the resulting color a little.
- You can also tint the purple zones with black shadows if they are not dark enough, and also if you just want to highlight them more.
-
Blend the contours of the bruise on the skin and fix it with powder. Take a large makeup brush to apply powder. Powder the entire area of the bruise to bring the tone closer to the natural tone of the injured skin and remove excess eyeshadow shine.
Prank your friends. Let them notice your bruise on their own, instead of bragging about it. They will quickly believe that the bruise is real if you do not say anything about it. Let them start the questions themselves and prepare a fictional story for them in advance.
- If you are not asked about the bruise, you can "accidentally" touch it or hit it lightly and pretend that you really hurt.
Use of stage makeup
-
Choose the age of the bruise. Bruises go through a whole cycle of transformations on the way from injury to complete healing. Each stage of this cycle is characterized by different colors of varying degrees of intensity.
- A fresh bruise will be dark red due to bruising under the skin.
- Further, the bruise will begin to lose iron and turn purple.
- As soon as the healing process starts, the contours of the bruise will turn green.
- Before the bruise disappears, it will first turn yellow.
- And then the skin in the injured area will finally acquire its natural tone.
-
Buy a stage makeup palette. There are various brands of stage, or theatrical, make-up, ranging from inexpensive carnival to professional brands. In Russia, the most popular make-up from the "Theatrical Cosmetics Factory".
- Make-up of this brand can be purchased as a whole palette, as well as jars of individual colors.
- For the bruise, you'll need red, purple, yellow, green, and blue make-up paint.
- Try to choose darker, more muted makeup colors, such as red-brown, mustard, and olive.
-
Apply base red. Take a makeup sponge and dip it in red make-up paint. Paint over the area of the required size and shape on the skin.
- Apply paint in a thin layer. The skin should be visible through it.
- A layer of red makeup will simulate irritation on the skin.
-
Give the bruise depth with darker makeup tones. Take a non-uniform porous sponge to complement the bruise with purple and blue tones. Work from the edges of the bruise to the center.
Choose a site for the bruise. Decide where the bruise should be based on what might have caused it. This will help you decide where to place the bruise and determine its size and shape.
There are different situations in life. Sometimes even a simple bruise can help us in some business. For example, a bruise is needed to perform on stage, or someone decided to prank friends. How to make a bruise? There are several ways.
First way
You will need chalk and foil.
- It is necessary to rub with chalk the place where you want to make a bruise.
- Then you should rub this place with foil, which must first be rolled into a ball.
- The top must be soaked with water.
Such a bruise will not last long, so prepare it right before the demonstration. But you can make a bruise quickly.
Second way
You will need a pencil lead and a piece of paper.
- It is necessary to crush the stylus onto a sheet.
- Then you need to rub it, attach a leaf to the body and rub it a little again.
Third way
All you need is matches. It will be necessary to rub the place necessary for the bruise with the sulfur head of the match. This method will take more time, but the bruise lasts longer.
Fourth way
This method is more difficult, but the bruise will be very natural. You will need blue, yellow, burgundy and black paints, a sponge and a brush. Apply the paint with light movements with a sponge.
- First of all, you need to determine the shape of the future bruise.
- Then you need to put blue paint in the center and shade it.
- Next, with your finger, you need to apply yellow paint around the edges, shading it both to the center and along the edges.
- Then you need to add a little burgundy paint to the center and mix it with blue.
- If you need a darker bruise, then you need to saturate it with black. To do this, use a brush to make light strokes closer to the center.
- If pinpoint hemorrhages are needed, with light touches of a sponge, add a mixture of scarlet and burgundy paint to the center.
Mix paints until you see a real realistic bruise. This method is suitable if you need to make a bruise on your arm.
Fifth way
You will need iodine and shades of blue.
- It is necessary to apply iodine to the site of the bruise.
- Next, shadows should be applied over the iodine.
This method is suitable to make a bruise on the face, but to make bruises under the eyes, it is better to use the following method.
Sixth way
You will need a black eyeliner, yellow, blue and purple shadows, a napkin. Shadows must be matte.
- First, smear the area under the eyes with a black eyeliner.
- Then blend with a tissue. This is done to give more softness.
- Next, apply a layer of matte purple eye shadow.
- Add dark blue along the eyelids.
- Finish the bruise with yellow shadows - apply them over the entire bruise.
Seventh way
You will need an aluminum button and a pencil.
- It is necessary to paint over the surface of the button with a pencil.
- Then, with effort, rub the place of the alleged bruise. It is necessary to rub until a slight redness appears on the skin - then you will get a real bruise with redness.
Eighth way
All you need is two aluminum spoons.
You should rub the spoons together, and then rub the skin with one spoon where you want to make a bruise. It will look very natural.
We told you about eight ways to make a bruise at home. Choose the most suitable for you.
When you don't feel like writing a test, or going to some class, a good bruise will always help you get rid of it. It always looks more convincing than any words, so you need to know how to do it just in case.
How to make a bruise with your own hands?
There are several ways to make a bruise, false or real. It is best, of course, to make a false one, because the real one comes only with pain and discomfort.
How to make a real bruise?
There are also two ways here:
Hit yourself;
- do everything to hit someone else.
But none of the methods will work, as already mentioned, it brings pain.
How to make a false bruise?
False bruising can be done with many different methods, consider them.
Bruising with chalk and foil.
1
. We take a piece of ordinary white chalk and foil.
2
. We determine the place where the bruise is needed.
3
. We rub the place very well with chalk.
4. We squeeze the foil with our hands and make a ball out of it.
5
. Three of them in the place where we plan to make a bruise.
Just do not try to deceive the doctor with such a bruise, because they will be able to distinguish it from the real one, but a simple teacher cannot.
Bruising with shadows.
A bruise can be drawn, and it will turn out very realistic. The main thing is to choose and mix colors correctly - you need to use yellow, purple and blue. Before applying shadows, you can lubricate the place of the future bruise with iodine.
How to make bruises under the eyes?
If you need to make bruises under the eyes, you can use the following methods:
1. We take a sheet of paper and rub the pencil lead on it. Next, we wipe it under the eyes with this piece of paper, and we get very realistic bruises.
2. We take a brush and gouache paint. We select the color and begin to transfer it to the bags under the eyes.
3 . Iodine and shadows are also good for bruising.

How to make the bruise go away?
Now, we will tell you what to do so that the bruise disappears as quickly as possible. This method is valid only from a real bruise. Many people can advise different ways, this is all because different things affect the disappearance of bruises.
Experienced doctors advise - on the first day of the bruise - to apply something cold, and on the second day - something warm. Here's a simple tip.
You can also use pharmacy products, such as: troxevasin, lyoton, lifeguard, badyaga, ambulance for bruises and others.
Do not forget about folk remedies. It helps very well - fresh cabbage (attach to a bruise), raw potatoes (rub a bruise), laundry soap (rub into a bruise), butter (rub into a bruise) and others.