Original potholders for the kitchen do-it-yourself patterns. Do-it-yourself kitchen potholders made of fabric with patterns, photos and explanations
For most housewives, potholders in the kitchen are simply an indispensable attribute. Many prefer an accessory in the form of a mitten, but you can’t sew it quickly. Literally in 10 minutes you can sew a comfortable square tack, if you know the nuances of the process.
More about materials
Since the oven mitt will often come into contact with hot dishes, it should be made of natural fabric. The quality and density of matter is very important. Synthetics can melt or self-ignite when exposed to high temperatures, so choose the most natural fabric. Equally important is the density of the material, as this is an additional factor that helps reduce the risk of hand burns.The following fabrics are ideal:
- jacquard;
- gabardine;
- cheviot;
- coarse linen;
- thick jeans.
If you did not find the aforementioned fabric in your shreds, then you can choose another option. In the list below, fabrics that are also suitable for sewing potholders, but in terms of their characteristics, they will be inferior to the options in the first list.
You can use fabrics:
- linen of soft structure of medium thickness;
- dense cotton;
- felt;
- calico.
Thin fabrics that stretch and contain more than 35% synthetic additives are absolutely not suitable. Also, do not use fluffy woolen fabrics. With the choice of filler, everything is much simpler than with materials.
For sealing, you can use:
- synthetic winterizer;
- batting;
- drape;
- felt.
The synthetic winterizer is the most undesirable option, since it allows heat to pass through and is a fire hazard. But it should be noted that with a reasonable use of potholders, nothing dangerous will happen. By the way, the filler can be made from old warm sweaters or other warm clothes.
We sew a tack
When you decide on the choice of materials, you can begin the sewing process.For work you will need:
- dense natural fabric;
- synthetic winterizer;
- threads to match the material;
- scissors;
- tape measure.
As you can see, the list of necessary things is minimal, but sewing will be really fast if you use a sewing machine. Take a piece of fabric 44 cm long and 24 cm wide. Of the indicated sizes, 4 are an allowance for the edges, that is, 2 centimeters on each side. The size of the final product will be 20x20. The filler should be a few millimeters shorter than the outer fabric, so it will be easier to sew. From the padding polyester, cut a square of 20x20 centimeters.

The edges of the fabric must be processed so that the threads do not lick out during washing and operation of the product. From the wrong side, fold 2 cm and sew in a zigzag. Repeat the process with each side. First, the zigzag will secure the fabric stronger than a regular stitch. Secondly, such a seam will be additional protection against thread shedding on sections.


Now put the filler into the processed piece of fabric. So that the synthetic winterizer does not move out during the stitching process, and the figure does not deform, fasten all layers with sewing pins. Immediately insert a string or ribbon, forming a loop, between the fabric and the filler.

Sew both edges of the pillow with a simple seam. Make sure that the edges do not move apart, otherwise the potholder will look sloppy. It is the stitching of the pad on top that saves time, since in this case it will not be necessary to make an additional edging to hide sloppy edges.


On the side where the fabric simply folded, i.e. where there is no seam and tucked edge, you also need to make a line for symmetry.


The final touch is to make the seams crosswise diagonally, as in the photo. Such an addition will allow you to conveniently bend the tack and securely fasten the padding polyester.

You will not spend more than 10 minutes on the entire process of creating such a kitchen accessory. As you can see, even a beginner who does not understand anything in sewing can make a simple and convenient tack. By the way, by choosing an interesting fabric, you can make many different options that will delight you not only with benefits, but also with beauty.


Since kitchen mittens and potholders are always in sight, they must be neat and beautiful. Therefore, it is better when there are a lot of them on the farm, so that from time to time you can change them.
- In addition, to sew potholders for the kitchen with your own hands, you do not need to have serious experience and needlework skills, so you can sew them together with your child.
- And also original homemade potholders are a great idea for a gift and even ... a small hand-made business on sites like the Crafts Fair or Etsy.
Choosing fabric and filling

The main thing in sewing potholders with your own hands is the right choice of fabric and filler.
- The best fabrics for potholders are natural fabrics such as linen, chintz or cotton. But try to choose dense fabrics - they will last longer.
Tip: You can also use scraps of old jeans.

- You can choose not only original fabrics, but also shapes - hearts and mittens, strawberries and Christmas trees, squares and stars. Also keep in mind that different forms of pot holders differ in functionality, which means that it is best to make a complete universal set: a few squares, a long pot holder, a mitten.

- Filler must be inserted inside the tacks. Most often it is a synthetic winterizer, batting, felt or drape. Batting and other dense, thick natural materials for sewing tacks are more suitable, since the synthetic winterizer has a high thermal conductivity and, at the same time, a low melting threshold.
Tip: You can use an old terry towel folded in several layers as a filler.
- Embroideries, appliqués, ruffles, etc. are used as decoration.

How to sew a potholder-mittens
So, how to sew a potholder quickly and easily? Let's first sew such a traditional mitten with a fringing and an eyelet.

There are many ways to sew mittens, but the principle is about the same - using 6 layers - 4 pieces of fabric and 2 pieces of filler.

- First we need to make a tack pattern. Place your palm on the paper (or directly on the fabric), indenting 2.5-4 cm from it, schematically draw the outlines of the mitten as in the photo on the right, and then cut out the resulting template.
- Cut out 2 pieces of lining fabric and 2 pieces of front fabric according to your pattern. You can cut all 4 pieces from one material, but it is better to choose a soft, natural, pleasant to the touch fabric for the inside of the mittens, and a dense, beautiful, colorful fabric for the front side so that the spots on it are less noticeable. We chose different types of cotton fabrics for the inside of the mitten and its front part - for originality and clarity of the example.
- Now, also in the shape of a mitten, cut out 2 pieces of filler. We remind you that it is better to refuse synthetic materials. In our case, ordinary white fleece is used, but it is better to take a denser and thicker fabric, for example, the same batting.
- And now you need to put all the details in a puff sandwich in the following order:

- We fold two blanks from the facial fabric to each other "face" as in photo No. 1.
- Now, on top and bottom of the already folded front parts, we put blanks-mittens from the filler (photo No. 2).
- And finally, we apply the purl fabric in the upper layer “face” up, and in the lowest layer we put the last blank (purl) “face” on the table (photo No. 3).
- Now let's start sewing. All edges are sewn with an indent of 5-7 mm, and as a result we get an inverted tack.

- Now we cut off the excess fabric at the edges (about 3 mm from the seam) and make cuts in all the fillets (photo below) so that our mitten turns out neatly.

- Now we turn the product inside out and decorate the sleeve with a piping - an oblique trim (preferably not satin, but cotton), a strip of fabric, braid or ribbon. Since our goal is to show the easiest and fastest way to sew potholders with our own hands, we use a ready-made bright inlay and simply wrap our mitten with it, fasten with pins and sew. If you are using fabric, then it must be attached with a folded edge. At the end, we sew a loop from the same inlay and our mitten is ready.

Here is another cute potholder, sewn according to the described method.

If you want to complicate the task a little and make the mitten quilted, then you need to slightly change the sewing process as follows:

First you need to “quilt” one three-layer blank simply from rectangular fabric cuts, folded in the same order as described in the instructions in paragraph 4, and then the second. Keep in mind that the threads should match the front material of the mittens. You will get 2 quilted rectangular parts of the future potholders, which need to be folded together so that the wrong sides look outward from the bottom and top of the “sandwich”. And finally, we sew the folded parts along the contour of the mitten template (see paragraph 1). Next, we process the edges of her sleeve with braid or fabric and sew on a loop.
We sew a square pot holder or a hot stand
Now let's start sewing a square potholder, which is very, very easy to sew - unlike mittens, here we use: 2 pieces of batting and 2 pieces of face fabric. Patterns are made for all parts measuring 20x25 cm (or any other). You also need a strip of fabric for the loop - 8x15 cm, and of course an ironing board, iron, needle and thread, a sewing machine and scissors.

Work is carried out according to the following algorithm:
- Again, a “sandwich” is made from the fabric: 1st layer - batting, 2nd layer - fabric face up, 3rd layer - fabric face down, 4th layer - batting. Such puff blanks need to be made 2 pcs.
- Two blanks are sewn together from 3 sides, while the lining should still be outward.
- The tack is turned inside out, ironed.
- The loop is sewn and takes root.
- The fourth side is stitched.
- a square tack can also be quilted if desired;
- you can also sew a pocket to one side;
- by the same principle, you can sew potholders in the shape of a heart, a circle, stars, etc. with your own hands.
Here are some ideas for sewing potholders with your own hands according to the basic principle described above (scroll the photo to the right).

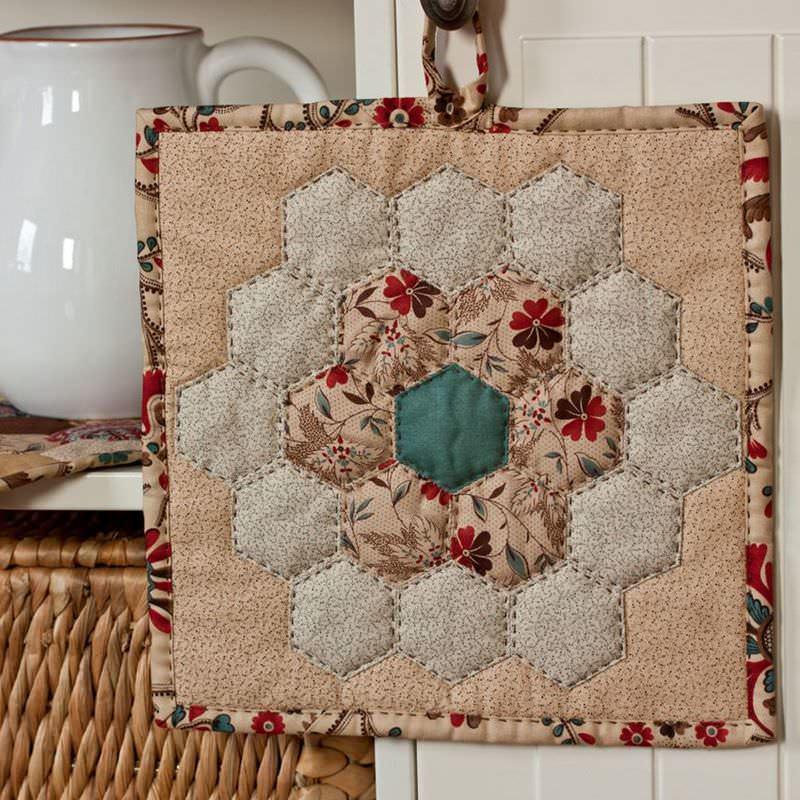
Patchwork potholders

Patchwork potholders look unusual, but before you start sewing, you should decide on the technique of connecting patches. Here are 3 main ways:
- Building Blocks- you will need to make square elements, and then process them on a typewriter.
- Pattern sewing - pieces are cut according to special patterns. These are elements such as birds, leaves, hearts.
- Sewing on the base - here the elements are not sewn together, but sewn to a pre-prepared base.
To make a simple patchwork product, you need to prepare three colors of fabric, a knife, threads that match the color of the fabric, pins and a ruler. Then we prepare shreds - squares with a side of 10 cm. Each of the squares is cut into triangles, and they are already stacked as required by the schemes. All triangles are sewn together, and one side of the product is obtained. The second side is made according to the same principle, and lining material is placed between them. Then the edges are carefully sewn up, and a loop is attached to the corner - that's it, the tack is ready.
And here is a selection of fresh tack ideas for experienced and beginner needlewomen using the patchwork technique (scroll the photo to the right).
Potholders are an accessory that any family member can hardly do without. After all, it is the tack that will save your hands from burns and injuries when cooking. Whether you need to heat up water or heat up a bowl of soup in the microwave, a potholder is an indispensable tool. And it should be in the most visible place. In addition, these kitchen attributes can be not only functional helpers, but also an aesthetic decoration of any kitchen. A bright, original potholder will become a bright stroke in the interior, adding a special charm to it. A potholder made by hand (from a pattern) is unique and inimitable.
Potholders for the kitchen: what are they for?
Potholders are essential in every kitchen. It is she who will save your hands from burns when cooking. With the help of an oven mitt, you can remove a baking sheet and other hot dishes from the oven without the risk of getting burned. The tack will not protect only from boiling liquids - oil or water. But here you just need to be more careful and not be distracted when in contact with boiling water.
Product types
The shape of the tack can be completely different.
- The most common types of potholders are square potholders and mittens.
- If you show imagination, you can find a use for funny curly tacks in the form of rabbits, berries, Christmas trees, stars, hearts, butterflies and the like.
- A set in a single color scheme looks harmonious with, consisting of towels, pot holders, and hot coasters.
- Silicone tacks are also popular.
- There are large pot holders with pockets along the edges, which are convenient to get pots for roasts, as well as pastries.
If we consider these kitchen attributes with regards to their use, then potholders are divided into:
- Single. It has a high thermal conductivity. Ideal for small surfaces. It can be a lid from a pot, pan.
- Double. Thermal conductivity is average. She can get a hot pan, pan.
- Mittens are best used in pairs. Thermal conductivity is low. Suitable for pots, large containers, pans.
Own unusual, original ideas can be put into practice, it is enough to learn how to make potholders with your own hands. The scope for creativity is limitless.
A great idea is to create several sets of different accessories and change them depending on your mood.
How to sew
In order to create a beautiful and neat potholder, you need to take your time. Each stage of the work is very important.
Necessary materials
- To effectively protect your hands from burns, the tack must be tight. For its manufacture, insulating materials should be taken - felt, batting, synthetic winterizer or fabric from an old coat.
- From above, the insulation is covered with a beautiful cotton fabric. It is safe when heated and ignited, melting is excluded. This means that the risk of burns is minimized. In addition, natural materials (cotton, calico or linen) are much more comfortable for the skin than synthetics.
- An excellent solution for edging the potholder will be a slanting inlay. You can choose any of the dozens of shades that are in the needlework departments.
- The product must be comfortable. To do this, you need to correctly calculate the dimensions of the tack so that the hand fits completely inside. Ideally, not only the hand, but also the wrist should be protected.
- The choice of color should be taken seriously. The potholder should be made with soul and decorate the interior of the kitchen and be combined with.
- To create kitchen accessories, you can use both new materials and old scraps of expressive fabrics. Of these, you can sew the outer part or lining. In every closet there are many well-preserved things that are a pity to throw away. The pattern will give them a second life.
Before stitching the individual parts of the tack on the sewing machine, they should be connected to each other with a pin or needle.
How to make a pattern (diagram)
Let's consider the creation of a pattern using the example of the most popular three-layer mittens. Measures to take:
- thumb length;
- index finger length;
- wrist volume;
- palm length (10 cm is usually added to this number);
- palm width.
The pattern is made on special paper. The next step is to cut out the pattern and place it on a piece of textile. We turn the material with the outer part inward, lean the pattern, lay snares along the edge of the pattern. We cut carefully.
Do not forget about seam allowances, this is very important! If it is decided to process the edges of the tack with a piping, then only 1 cm should be left for allowances. If the edges are simply hemmed, then 2 cm.
Next, the edges of the pattern are bent. The threads are pulled, so the snares become basting. We cut the basting in the middle. As a result, we have two patterns for one of the sides of the tack. Everything is repeated again to make the second side.
After making patterns of the outer side, we proceed to two patterns of insulation. Repeat all manipulations again. Allowances to do the same.
Fabric work process
An insulating fabric is applied to the inside of the cotton pattern. The edges of the basting are aligned. The basting stitch will help to temporarily connect the elements. One side is finished. Parts of the tack are usually sewn together with some kind of. The same manipulations will allow you to build the second half of the tack. It also consists of two patterns of outer parts and insulation - a total of three layers. 
Next, you can connect the two halves of the tack to each other to get the finished product. First, you can sew them with a basting seam, then sew them on a typewriter or by hand. Now it's time to finish the edges with a piping.
The final step is to make a neat and small loop.
Design and decor of potholders
When making potholders for the kitchen, it is important to remember that this is not just a piece of cloth. This is an important interior detail, an interesting element.
Remarkably shows itself in everyday life double-sided tack. Its owners have no questions about which side to hang it to make it beautiful.
The size of the potholder is chosen individually by each hostess. Too small tack, the working surface of which is less than 15 * 15 cm, is unsafe. And too big - it will cause a lot of inconvenience.
Choosing a pattern for a tack is not an easy task. A large drawing must be able to correctly and beautifully position. If you are sewing a set of identical mittens, you need to place the pattern on both mittens symmetrically.
Beads, lace, braid and similar details can be used as decorative elements. The matter is limited only by your imagination. The main thing is not to overdo it. Still, the main function of the tack is to provide protection against burns. It is also important to firmly sew the decorative elements to the tack. No one likes to catch buttons or beads in soup.
Read about other DIY kitchen design ideas in ours.
How to sew a bright and good potholder in a few minutes, a master class:
Interesting ideas for original potholders (mittens) with your own hands
Extraordinarily cute and practical potholders - those that are crocheted or knitted. They are made quickly and easily. Even a beginner needlewoman will be able to master such a tack. Colored straws will additionally decorate the outer area of the pot holder.
Several options for how to tie a potholder:
The tack is easily and quickly sewn according to the scheme from the drape. There is no need to add an inner layer, since the drape itself is a fairly dense material. It is necessary to cut out two identical drape parts and connect them with an overcast seam of colored thread. Sew on button eyes at the end. Such pot holders can be made together with the child, or you can make a knitting, patchwork method.
Whatever your potholders are, do them with your soul, fantasize, experiment! Then they will give home comfort, warmth and comfort to your kitchen.
How to choose curtains for the kitchen can be found in this.
How to decorate the kitchen and at the same time ensure that all things play a practical role and are used? The most correct thing is to make potholders that always find application and are used daily. With the help of tacks, you can emphasize the style of the interior and create a unique design. How to make do-it-yourself potholders in the kitchen - interesting tips.
This question can be asked by many - why sew potholders from fabric with your own hands, if you can buy them in a store. There is a simple answer to this. As a rule, fabric accessories now sold in stores are mostly made in China. And so many of them are sewn poorly and part at the seams a few days after purchase. And it is better to sew them with your own hands and be completely sure of the quality and long service life.

Moreover, do-it-yourself tacks perform a number of functions:
- They play a practical role - they serve to pick up dishes standing on the stove;
- Decorate the kitchen;
- Create a unified style.
Original potholders are especially appropriate if the kitchen is made in folk eco-style - Russian, country, Provence. In some interiors, potholders sewn from fabric are not very appropriate. It is so difficult to imagine them in high-tech interiors.
Potholder from old jeans (video)
What grips can be
From the fabric you can make very interesting potholders in the kitchen. At the same time, the style in which they are made and the technique can be completely different. This is where their charm lies: kitchen potholders can be sewn in different ways and they will also look completely different.
Potholders sewn using the patchwork technique look very interesting. It is not difficult to make them even for a beginner craftswoman, and they look very original. Similarly, potholders with appliqués, embroidery, screen painting look very interesting.


What materials will be needed
In order to sew potholders for the kitchen, you will need:
- the cloth;
- synthetic winterizer;
- threads;
- needle;
- scissors.
Depending on what decorative elements are conceived, you may need:
- floss threads for embroidery;
- beads;
- adhesive application.
Tack patterns can be developed by yourself, or can be downloaded from the Internet.
Patchwork potholders
You can make potholders for the kitchen using the patchwork technique - patchwork. To do this, you need to choose fabrics that are in harmony with each other in color and pattern.
Important: A win-win option is a combination of plain fabric and fabric with a pattern. You can try to combine striped fabric and fabric in a small pattern. Such beautiful potholders look especially good in Provence-style interiors.
The easiest way is to cut the fabric into squares and sew a canvas out of them. A pattern is applied to the resulting canvas and a tack is cut out. From a plain fabric, according to the same pattern, the inner parts of the tacks and part of the padding polyester are cut out.

After that, we sew tacks: a synthetic winterizer is applied to the patchwork part, and then a plain lining is one part of the tack, on the front side of the hand. In the same way, you need to make the second part of the tack - the back side. Then both of these parts are sewn together with each other - it turns out a mitten - a tack. A loop is attached to its edge, after which the edge is processed with a piping.
Potholder - mitt (video)
Square potholders
You can sew potholders not in the form of a mitten, but in the form of a simple square. Making them even easier, as there are no curly edges. The sewing principle is the same. You can make them from multi-colored fabric, plain fabric, patchwork style. We sew a loop in order to hang potholders on the corner.


Application can be:
- flat;
- voluminous.
The applique is cut out of pieces of multi-colored fabric. To do this, you need the initial pattern of the application. Further, its individual details are transferred to the fabric and parts of the appliqué are cut out. All details are sewn on the front side of the pot holder with a decorative seam. And only after that the front part is sewn with a padding polyester and the reverse side.
Important: You can make the task much easier and cut out the finished appliqué motif from the fabric. To do this, take a fabric with a printed large pattern. The motif you like is cut out, duplicated with interlining and sewn to the front side of the pot holder.
We sew voluminous applications in approximately the same way. Only to the end, the application is not sewn at first - pieces of holofiber are put under the application to add volume. As soon as the application acquires volume, it must be sewn to the end. Cloth potholders with voluminous applications are especially beautiful. And it's not hard at all to make them.
Master class on how to sew a potholder (video)
Potholders with painting
It is not at all difficult to sew such potholders with your own hands. Take pieces of any monophonic fabric you like. A drawing is applied to it using a stencil. Stencil patterns can be made independently with your own hands or downloaded from the Internet. In principle, any drawing you like in a magazine can be turned into a stencil.
Drawing on the fabric is applied with acrylic paint with a brush or sponge. To prevent the paint from leaking under the drawing, the stencil must be firmly attached to the fabric - this can be done with adhesive tape. When the pattern on the fabric dries completely, you can sew parts of the potholder from the fabric to the kitchen.
original ideas

You can turn your handmade potholders into a real work of art. It is enough to sew a couple of dolls out of fabric and attach them to the front side of the potholder. Such a potholder becomes mostly a decorative element of the kitchen.
You can do it differently - parts of the tack are knitted and sewn together by individual elements. Thus, you can make potholders in the form of vegetables, fruits, figures of people, animals, fish in the kitchen. Such potholders become a real decoration of the kitchen. Especially if they are supplemented with embroidery.
From the fabric, you can make various figures of animals, vegetables, berries, duplicate them with synthetic winterizer and sew potholders for the kitchen. They will create a special mood and positive in the kitchen.
We sew a tack - heart (video)
It is not difficult to sew potholders with your own hands. Tastefully selected fabric, a couple of interesting ideas and ready-made things that can make the kitchen cozy and original. Handmade potholders can make any interior unique.
Do-it-yourself kitchen potholders (photo)


Since kitchen mittens and potholders are always in sight, they must be neat and beautiful. Therefore, it is better when there are a lot of them on the farm, so that from time to time you can change them.
In addition, to sew potholders for the kitchen with your own hands, you do not need to have serious experience and needlework skills, so you can sew them together with your child.
And also original homemade potholders are a great idea for a gift and even ... a small hand-made business.
Choosing fabric and filling
The main thing in sewing potholders with your own hands is the right choice of fabric and filler.
- The best fabrics for potholders are natural fabrics such as linen, chintz or cotton. But try to choose dense fabrics - they will last longer.
Tip: You can also use scraps of old jeans.
- You can choose not only original fabrics, but also shapes - hearts and mittens, strawberries and Christmas trees, squares and stars. Also keep in mind that different forms of pot holders differ in functionality, which means that it is best to make a complete universal set: a few squares, a long pot holder, a mitten.
- Filler must be inserted inside the tacks. Most often it is a synthetic winterizer, batting, felt or drape. Batting and other dense, thick natural materials for sewing tacks are more suitable, since the synthetic winterizer has a high thermal conductivity and, at the same time, a low melting threshold.
Tip: You can use an old terry towel folded in several layers as a filler.
- Embroideries, appliqués, ruffles, etc. are used as decoration.
How to sew a potholder-mittens
So, how to sew a potholder quickly and easily? Let's first sew such a traditional mitten with a fringing and an eyelet.
There are many ways to sew mittens, but the principle is about the same - using 6 layers - 4 pieces of fabric and 2 pieces of filler.

- First we need to make a tack pattern. Place your palm on the paper (or directly on the fabric), indenting 2.5-4 cm from it, schematically draw the outlines of the mitten as in the photo on the right, and then cut out the resulting template.
- Cut out 2 pieces of lining fabric and 2 pieces of front fabric according to your pattern. You can cut all 4 pieces from one material, but it is better to choose a soft, natural, pleasant to the touch fabric for the inside of the mittens, and a dense, beautiful, colorful fabric for the front side so that the spots on it are less noticeable. We chose different types of cotton fabrics for the inside of the mitten and its front part - for originality and clarity of the example.
- Now, also in the shape of a mitten, cut out 2 pieces of filler. We remind you that it is better to refuse synthetic materials. In our case, ordinary white fleece is used, but it is better to take a denser and thicker fabric, for example, the same batting.
- And now you need to put all the details in a puff sandwich in the following order:
- We fold two blanks from the facial fabric to each other "face" as in photo No. 1.
- Now, on top and bottom of the already folded front parts, we put blanks-mittens from the filler (photo No. 2).
- And finally, we apply the purl fabric in the upper layer “face” up, and in the lowest layer we put the last blank (purl) “face” on the table (photo No. 3).
Now let's start sewing. All edges are sewn with an indent of 5-7 mm, and as a result we get an inverted tack.
Now we cut off the excess fabric at the edges (about 3 mm from the seam) and make cuts in all the fillets (photo below) so that our mitten turns out neatly.
Now we turn the product inside out and decorate the sleeve with a piping - an oblique trim (preferably not satin, but cotton), a strip of fabric, braid or ribbon. Since our goal is to show the easiest and fastest way to sew potholders with our own hands, we use a ready-made bright inlay and simply wrap our mitten with it, fasten with pins and sew. If you are using fabric, then it must be attached with a folded edge. At the end, we sew a loop from the same inlay and our mitten is ready.
Here is another cute potholder, sewn according to the described method.
Also see our other articles:
If you want to complicate the task a little and make the mitten quilted, then you need to slightly change the sewing process as follows:
First you need to “quilt” one three-layer blank simply from rectangular fabric cuts, folded in the same order as described in the instructions in paragraph 4, and then the second. Keep in mind that the threads should match the front material of the mittens. You will get 2 quilted rectangular parts of the future potholders, which need to be folded together so that the wrong sides look outward from the bottom and top of the “sandwich”. And finally, we sew the folded parts along the contour of the mitten template (see paragraph 1). Next, we process the edges of her sleeve with braid or fabric and sew on a loop.
We sew a square pot holder or a hot stand
Now let's start sewing a square potholder, which is very, very easy to sew - unlike mittens, here we use: 2 pieces of batting and 2 pieces of face fabric. Patterns are made for all parts measuring 20x25 cm (or any other). You also need a strip of fabric for the loop - 8x15 cm, and of course an ironing board, iron, needle and thread, a sewing machine and scissors.
Work is carried out according to the following algorithm:
- Again, a “sandwich” is made from the fabric: 1st layer - batting, 2nd layer - fabric face up, 3rd layer - fabric face down, 4th layer - batting. Such puff blanks need to be made 2 pcs.
- Two blanks are sewn together from 3 sides, while the lining should still be outward.
- The tack is turned inside out, ironed.
- The loop is sewn and takes root.
- The fourth side is stitched.
- a square tack can also be quilted if desired;
- you can also sew a pocket to one side;
- by the same principle, you can sew potholders in the shape of a heart, a circle, stars, etc. with your own hands.
Here are some ideas for sewing potholders with your own hands according to the basic principle described above (scroll the photo to the right).
Patchwork potholders

Patchwork potholders look unusual, but before you start sewing, you should decide on the technique of connecting patches. Here are 3 main ways:
- Building blocks - you will need to make square elements, and then process them on a typewriter.
- Pattern sewing - pieces are cut according to special patterns. These are elements such as birds, leaves, hearts.
- Sewing on the base - here the elements are not sewn together, but sewn to a pre-prepared base.
To make a simple patchwork product, you need to prepare three colors of fabric, a knife, threads that match the color of the fabric, pins and a ruler. Then we prepare shreds - squares with a side of 10 cm. Each of the squares is cut into triangles, and they are already stacked as required by the schemes. All triangles are sewn together, and one side of the product is obtained. The second side is made according to the same principle, and lining material is placed between them. Then the edges are carefully sewn up, and a loop is attached to the corner - that's it, the tack is ready.
And here is a selection of fresh tack ideas for experienced and beginner needlewomen using the patchwork technique (scroll the photo to the right).
