How to make an origami paper tulip step by step. Craft - paper tulip: master class, diagram, templates, photo, video. How to make a volumetric tulip flower from paper, origami, from crepe, corrugated paper and sweets: step by step instructions. How to fold and
Spring is a real miracle! Nature wakes up and fills the world with the sun, picturesque colors, flowering and a handsome tulip. That is why the tulip is associated with this magical time of the year. But what to do if there is another season outside the window, and you would like to let a drop of spring into the house?
Spring is a real miracle! Nature wakes up and fills the world with the sun, picturesque colors, flowering and a handsome tulip. That is why the tulip is associated with this magical time of the year. But what to do if there is another season outside the window, and you would like to let a drop of spring into the house? You can not wait for this wonderful time, but make paper tulips with your own hands. For this, nothing special is required, of course, except for inspiration and creative mood!

DIY paper tulips are an interesting, creative activity for children and their parents that can keep the whole family busy. Sit comfortably, now we will tell you how to make a paper tulip or even a whole bouquet of flowers with your own hands. So, let's begin.
Muse is such a fastidious lady that it is worth letting in even a drop of doubt, and everything will disappear without a trace. Therefore, "seize" the moment and do not fall into the traps of mind games.
Materials:
We take a regular (or corrugated, that is, whatever the “muse” wishes), but always a thick sheet of A4 colored paper and note the dimensions - 20cm by 28cm. Note. If this is not done, but simply add up what is, i.e. A4, then the tulip will come out too big and awkward, checked.
Tulip color. There is such a thing as the "language of color". For example, red - love, strength of feelings, etc. In other words, if you need to express feelings or your mood, then it is better to take the appropriate tone.
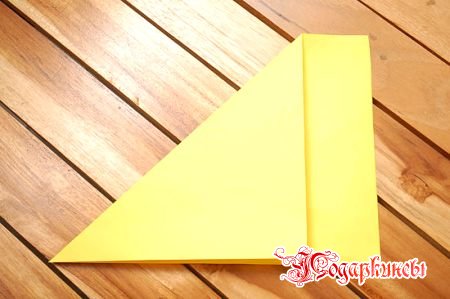
Next, fold it into a triangle.

The rest is cut off (it can be used for the stem). It turns out a square folded diagonally into a triangle.

We unfold the square and again turn it along another diagonal (folds in the shape of an X sign).

The folds should be deep enough. Turn the square over so that the center is at the top, like a pyramid.


After checking the folds, repeat the same with the other side of the workpiece.

We fold, as shown in the photo above.

Align the sides of the triangle.

Turn the corner down.

We turn the corners from the base of the triangle to its top.

Repeat the same on the reverse side.

There are four triangles. Take one and turn right.


Another turn left.
Next, insert the vertex one into the other.
Fold and smooth out the folds. We repeat the same on the other side. The blank should resemble a tulip bud.
We take an unfinished tulip, supporting the peaks rolled into each other so that they do not open.

At the base of the flower, where the stem will be, you need to make a hole. We apply a cotton blow to the center of the base so that it is filled with air. If the blow did not work out, then you need to blow sharply into the hole.

We open the petals of the bud.


Video: handmade tulip master class
The same technique for creating a tulip from paper as described above, but from plain paper - white. If suddenly at some of the steps you had a hitch - peep a master class in a short video and it will immediately become clear to you how to make a tulip out of paper with your own hands.
This paper flower master class will give the joy of creativity not only to children, but also to adults. We are all children, regardless of age, status and position in society. And in this case you can get into that feeling of children's enthusiasm and joy, which, although not one hundred percent, but at least very close to the real feeling of childhood. Remember that joy of the first creativity, novelty. Joy not only for your successes that you could, but also, first of all, because you gave a piece of yourself and gave pleasure to the recipient of the gift. And it's doubly nice!
Such a bouquet will be a charming gift by March 8 for a grandmother, mother or any other woman. Discard doubts about the choice of flower, because. tulip is a symbol of love and happiness, it will be appropriate in any setting.
We often lack warmth and gratitude. Let's break the "shackles" of the adult world for a moment and become who we really are - the children of our universe.
We offer you a do-it-yourself origami master class - how to make a beautiful paper tulip. This wonderful flower personifies spring and femininity. Origami Tulip will be a suitable holiday gift for a woman. You will learn how to make a tulip out of printer paper, crepe paper, or corrugated paper. We do not recommend using sets of colored paper, as such paper tends to crumble and tear.
To get started, you need a sheet of paper, scissors and the desire to create origami.
Do-it-yourself paper tulips are a popular pattern.
1. To embody a spring flower, we choose a sheet with sufficient density and paper color in accordance with your imagination, it is desirable, of course, to choose an origami color close to a real tulip.
2. We begin to fold origami so as to get a triangle with equal sides. The edge of the leaf, which remains superfluous, in the resulting triangle, is cut off and left in order to later make a stem out of it for our flower. You will need it at the very end of the master class.

3. We take a triangle and fold it in half in the opposite direction - we should get a square with folds forming four triangles.

4. In order for us to have a high-quality tulip bud, we iron the folds well with our hands and turning the sheet over we get a pyramid, that is, the center looks up.

5. Now we bend the paper in half - we see two rectangles when the sheet is unfolded.

6. We turn the corners so that we have four more triangles on the sides of each rectangle.

7. In order for our tulip to end up neat and beautiful, each fold should be ironed with your own hands so that it is perfectly visible, as in the picture.

8. We connect the inner sides of the rectangle with our hands. After that, you will see a triangle with two diamonds at the bottom of the sheet. Once again, carefully iron all the folds on the origami.

9. Flip the triangle upside down. To get a bud, you need to fold the edges of the triangle so that they touch their outer corners.

10. Now turn over and duplicate the same work on the other side of the sheet.


11. We turn the edges of the paper to the right and do the same with the next side.


12. Accurately and carefully place one edge of the rhombus into the other. Do not forget to carefully iron each fold of the future tulip with your hands.

13. On the other side of the rhombus, the same algorithm of actions. At this step of the master class, our original triangle is already starting to look like a flower bud.

14. Now we take those edges that are placed into each other and hold with the index and thumb.

15. Now is one of the most difficult moments in our master class on creating a paper tulip with your own hands. In the lower part of our design, where the corner is closed, it is necessary to sharply but clearly hit the center with a pencil or similar object with a sharp end so that the tulip bud becomes voluminous.

16. Then we begin to dissolve the petals of the tulip, bending each corner from four sides.

17. Now we return to the strip of paper that we had at the very beginning of work - from it we either twist or carefully fold the stem for our flower.


18. We insert the stem into the hole formed at the bottom of the bud.

19. Now you know how to make a paper tulip and you can conduct your origami master class.

Video master class.
Our wonderful flower is ready to please you and the one for whom the gift was prepared. At any time of the year, getting a flower for a girl is so nice. Most often, of course, tulips are given on International Women's Day, but now that you have completed our master class, you can surprise your loved ones just like that. Do-it-yourself paper origami Tulip is pleasing to the eye and can decorate a workplace or home for a very long time. Give a smile to your girls and women, mothers and grandmothers!
- 9 or more flowers will look wonderful and magnificent together, the more, the more spectacular.
- When you form a bouquet, then glue the sheets cut out of paper to the stems of the outer tulips. To do this, make flower stems specially from green paper, and next to the hole for the stem (the so-called leafy part of the flower), you can glue a cup - a sepal, for a more realistic look of tulips.
- The resulting bouquet is tied with a silk or other ribbon for decoration. We choose the color of the ribbon in contrast to the color of the tulips. For example, yellow buds go well with purple; red with blue and green; bright pink with yellow; orange and blue and so on.
- For a more original design, we wrap (by analogy with real flowers): in felt, in an artificial or jute net, or in a package that is now popular - sisal. Such a bouquet will look charming in a transparent small vase.
- To make your tulips look even more interesting, use the decor in the form of ladybugs, dragonflies, butterflies and other stickers or clothespins that a florist uses to decorate flowers and bouquets.
Tulips are spring flowers loved by many. But, unfortunately, the flowering time of tulips is quickly coming to an end. Yes, and cut flowers soon lose their appeal.
But paper tulips will remain in their original form for a long time and will delight you and your loved ones at any time of the year. If you want to make an original gift that will never fade - give a handmade tulip. Or make a whole bouquet and decorate the room with it. Today we will look at several techniques for making flowers.
Lesson number 1: voluminous tulips from paper triangles 
The first lesson is the most difficult to implement. But that only makes it more interesting! To assemble this flower, you will need a large number of triangular parts (95 for each flower). They are done as follows:
1. Cut an A4 sheet into 16 identical squares. 
2. Take one of the squares and fold it in half horizontally. 
3. Fold the square vertically again, then unfold. 

4. Fold both edges of the rectangle along the center line and carefully smooth out both folds. 

5. Turn the figure over and cut off the ends protruding from below. 

6. Fold the bottom edge of the figure up and smooth the fold. 
7. Fold the figure in half towards you. 
8. Repeat all these steps on the remaining squares. 
Having made the required number of parts, you can start assembling the flower:
1. Form rows 1 and 2 by connecting the parts through the slots in the end. 
2. Make a circle of 15 pieces in each row. 
3. Add a third row. 
4. Turn the workpiece over and squeeze it into a bud. 

5. Add rows 4 and 5 with 15 pieces each. 

6. Next, build the structure on one side so that you get a triangle: 
Row 6 - 4 pieces Row 7 - 3 pieces (on top of row 6) Row 8 - 2 pieces Row 9 - 1 piece
Repeat the add-on on the opposite side of the flower, opposite this triangle. 
It remains to make the stem. To do this, take a sheet of thick paper and, folding it into a hard thin tube, wrap it with green floral tape. 
Apply some glue to the end of the stem and insert it into the tulip. 
Cut and glue 1-2 oblong sheets to the stem. 
Tulip is ready! 
Master class number 2: tulips from tissue paper 
In this lesson you will learn how to make very delicate, airy, thin and graceful tulips. At the same time, they will be quite simple to manufacture, you only need perseverance and a little skill in working with watercolors. They can be a great gift not only for a mother from a child, but also for a beloved girl.
Materials:
White, yellow and green tissue paper
Watercolor paints
Several pashotnitsa (stands for boiled eggs)
Drinking straw
Glue
Operating procedure:
1. Cut out identical petals from white tissue paper with slightly wavy edges.
2. Stick two petals on top of each other (one layer of tissue paper is too thin, it will be difficult for you to work with it).
3. When the glue is dry, spread the petals on a flat surface, such as a tray, and paint with watercolors.
4. Without waiting until the petals are completely dry, carefully lift them from the tray and place them in the plow boxes to give a curved shape.
5. Place the tillers near a heat source to dry the paper. 
6. Cut a wide strip of yellow tissue paper, fold it in half lengthwise and make a small fringe along the double edge.
7. Wrap the strip around the edge of the drinking straw and secure with glue - this is the core of your flower.
8. Remove the dried petals from the arable and glue them to the tube around the core.
9. Cut a strip of green tissue paper and, securing its edge under the flower, wrap the entire tube. Tape the opposite end of the tape. 
Instruction number 3: thick colored paper tulips 
The easiest way to make flowers. It is perfect for small children.
Materials:
Thick colored paper (about 270 g/m2)
Wooden sticks for stems
Green acrylic paint
hot glue
Stationery glue
Green soft tip pen
Flower template which can be downloaded here
Cardboard sheet
Operating procedure:
1. Print or draw on cardstock and cut out the flower and leaf template.
2. Cut out 4 flowers and 1 leaf for each tulip. 
3. Fold the flower blanks in half along the center line (if the paper is one-sided, the colored side should remain inside). Iron the fold and unfold them to their original position. 
4. Glue two pairs of blanks, as shown in the photo. 
5. If the edges of the pieces do not match perfectly, cut off the excess. 
6. Paint the sticks green and let them dry. 
7. Now glue two pairs of flower blanks by inserting the edge of the stem stick between them. While the glue dries, the parts can be pressed together with paper clips. 
8. Cut out leaves from green paper and draw center lines with a green felt-tip pen.
9. Glue the leaves onto the stems. 

Lesson #4: Classic Origami Tulip with Stem 
Not the easiest, but far from the most difficult option for creating a paper tulip using the origami technique. This lesson can also be implemented with the child. For this project, you will only need square sheets of paper - green and yellow.
flower head
1. Lay the yellow sheet with the colored side up, fold it in half vertically and horizontally, then return to its original position.
2. Turn the sheet over and make two diagonal folds, then unfold it again.
3. Fold the square into a triangle so that the two side points converge on the bottom. 
4. Raise the side corners of the top layer of the shape up along the center line. Then turn the shape over and do the same on the other side. 
5. Flip the right side of the diamond over to the left, then flip the shape over and do the same on the other side. You will get the same rhombus, but with a smooth surface. 
6. Bring the edges of the top layer together and nest one inside the other. Smooth out the folds around the edges and make sure that A and B are equal. 
7. Repeat the same on the other side of the figure.
8. Grasp the cones that have turned out on both sides, slightly spread them apart and inflate the bud through the hole that has opened in its base.
9. Bend the edges of the petals at the top of the bud. 
Stem
1. Lay the green square on the table with the colored side down, as shown in the diagram, and make a vertical fold. Then return the square to its original position. 
2. Fold the corners to the center along the first fold line. 
3. Next, again bend the resulting corners along the same line, and then again. 
4. Turn the figure over and fold in half lengthwise, raising the bottom corner to the top.
5. Fold the resulting figure in half in width.
6. Bend out the top edge of the outer side of the figure.
7. If you did everything right, you will get such a stem that you can put on the table: 
Now just slide the tulip head onto the vertical rod.
Origami is a fun and rewarding activity. A popular figure that many had to fold with enthusiasm in childhood is a tulip. This is one of the simple and interesting origami models. We offer to remember how to make a tulip out of paper and teach this to children.
Folding different shapes from paper with your own hands develops fine motor skills, concentration and attentiveness. Children and adults should stimulate these qualities. If you want to captivate a child with something, then offer to make paper crafts.
To make flowers out of paper, you do not need to use scissors and glue. Therefore, even restless kids can be attracted to an exciting activity.
Show them how to make a beautiful tulip out of paper, collect a whole bouquet and decorate the room with such a spring gift. For these purposes, you will need white or colored (preferably double-sided) paper.

If you forgot or don’t know how to make a flower out of paper, then we offer a simple step-by-step instruction:
- Take a sheet of A4 paper and make a square out of it: fold it diagonally, and bend and tear off the remaining segment.
- Expand the square and bend along the second diagonal.
- Unfold again and fold in half. Draw carefully along the fold lines. On a piece of paper, you should get 8 triangles.
- Turn the workpiece over with a transverse fold up and bend the side triangles inward. Focus on the fold lines. A two-layer triangle will come out.
- Wrap the edges of the workpiece to the top point. A rhombus will come out with parts cut in the center.
- Expand the workpiece with the uncut part. Wrap the corners so that they cover 2/3 of the shape and form an overlap on the center line. To do this, step back from the top point by 0.3–0.5 mm.
- Pass one corner into the pocket of the other. Repeat the same on the other side.
- Take the design in your hand, straighten it. Inflate through the hole created during the folding process. The figure will gain volume.
- Fold back the petals.
- Form a stem from the rest of the paper and put a flower on it.

A paper tulip is a simple and interesting figure that is easy to model. Children will easily grasp the sequence of actions and will enthusiastically create their own paper flower greenhouse. Try to make such a flower out of crepe paper. It will come out original and unusual.
Remembering the super hit of the popular singer "Yellow Tulips", not everyone will agree that spring primroses are the messengers of separation. Let's leave creative fiction on the conscience of songwriters, because in fact, graceful buds symbolize the arrival of warmth, the awakening of blooming nature and the thrill of sensual relationships. But it is not necessary to wait for spring to enjoy this beauty, because today we will share with you how to make a paper tulip to decorate your home with bright colors at any time of the year.
For connoisseurs of the basics of origami, a paper tulip will not particularly complicate the folding technique, and for beginners to master oriental art, below is a step-by-step instruction that will help you fold a flower the first time in stages. We will complicate the task a little and suggest that you make a tulip from modules - two separately folded parts (bud and stem). In general, any improvised twig or wire can serve as a flower leg. Thus, apart from colored paper and, possibly, alternative materials for the pedicel, we will not need anything.
Modular origami: Dutch tulip
The Netherlands is rightly considered the country of tulips. Here they are presented in a limitless variety of colors and varietal varieties. If you are going to make a tulip out of paper in the image of a classic Dutch flower, make it from colored, even corrugated, paper of any shade (except green, so that the bud does not merge with the stem). The natural colors of Dutch tulips number in the hundreds of overflows, so you can't go wrong with the color.
 We fold the paper bud according to the scheme
- Fold the square sheet inward one by one, and then along the second diagonal, adhering to scheme 1. Then make another sheet fold line - in half. Expand the workpiece;
- According to the intended folds, fold the sheet into a regular triangle, tucking it inside the plane from 2 sides (see how to do it in Fig. 1);
- Bend the free corners of the workpiece to the top of the triangle (to the right corner) on both sides. The assembly scheme will help to cope with this accurately;
- Soon the paper flower will open in its splendor, but for now, unfold the blank into the second plane, closing the folds on both sides. You will get an even square both from below and from the “face”;
- How to finish an origami tulip? Elementary: wrap the diagonally opposite corners of the workpiece towards each other, making the base of the flower an acute angle. It is necessary to overlap one corner on the other, and then fill one limb into the pocket of the other.
You managed to fold a flower and comprehended the intricacies of how to make a paper tulip with your own hands. But your flower has not yet blossomed. Carefully inflate the bud from the base and arbitrarily bend the petals. Now everything is ready, and now you have something to decorate the room, what to give moms and grandmothers for the holiday and what to do with your growing daughter for a long time. By the way, if you liked making paper flowers, then pay attention to the usual or.
We promised you that it will be a tulip made of modules - more complicated than simple paper crafts. Let's plant the prepared buds on a curly pedicel. We can make it from a green sheet of a suitable size:
 Carefully make a stalk, connect it with a bud and get a paper tulip from the modules!
- Press the square sheet diagonally. To one of them, bend 2 edges, bringing them in the center. One corner of the workpiece will be sharp;
- Now bend the lower sides of the workpiece to the center (arbitrarily, inaccurately - the proportions are not particularly important);
- Re-tuck the lower parts of the workpiece inward, turn the bundle over and fold it in half across;
- Now fold the bundle lengthwise away from you. Turn the upper petal of the craft outward and squeeze, then straighten the flower pedestal, put the bud on the stem with a spectacular petal. The tulip from the modules is assembled together - a gift for mom for March 8 is ready. (It remains only to make a postcard yourself and put it in)

Modular origami: Tien Shan tulip (Fig. 2)
Look at fig. 2, if you want to understand how to make a craft similar to the real flowers of the Tien Shan foothills. These origami tulips are no more complicated than the previous ones - they differ only in the way the corner is folded into a pocket (see Fig. 2).

After making these paper tulips on your own, do not forget to fold the pedicels for them. They, as you have already learned, can also be made from green paper. The technique is elementary: if you have mastered the "Dutch" scheme, then fold this flower even faster.
These crafts look great. Especially from afar - it is quite possible to confuse with real primroses. But do not limit yourself to one bud! Is it better to fold whole bouquets, where each flower will complement the overall composition? After all, a large armful of tulips is much more pleasant to give than one bud. And in the interior, the bouquet will play in a completely different way. And don't forget to show the kids how to fold a square leaf tulip for their grandmother for an anniversary or International Women's Day on March 8th.
 Large bouquet of paper tulips