Do-it-yourself drawing from natural material. Crafts from natural materials for children
Hello subscribers!
It's bad weather outside, maybe the sun is shining? It doesn't matter, because we have an unforgettable time of the year ahead of us. It will be in multi-colored colors and with many surprises, because autumn always presents us with its gifts. But, besides this, it also opens up its natural wealth to us. That is why in schools and kindergartens crafts are immediately made from natural materials, together with other components. It can be vegetables, as well as paper or plasticine, and more. other.
Children, well, just love all this creative work, because they get different funny toys that they can then play with.
In addition to all this, you can even take autumn leaves and fold them into masterpieces or bouquets and insert them into or make something. Well, that's not all, cool souvenirs come out of ordinary cones. So, if you're interested, take a moment and scroll through the entire note from beginning to end. I am sure you will find a lot of interesting ideas of what can be made from natural materials.
Well, if you have any thoughts on this topic, please share below the article and write your feedback and comments.
I would like to start this conversation with something that you do not even mean and cannot imagine that everything is much simpler than you think. It turns out that to make masterpieces, you can take the most ordinary sticks, twigs, or maybe you have pebbles or shells. In general, we always have all this at hand, so why not use it.
I propose to focus on products made of stones, which are always available in any area. If you were somewhere on vacation, you could bring these with you. It is advisable to take, of course, smooth pebbles. Take a log or plank and carefully glue the intended composition with a glue gun. Here you can make flowers for example. And to make the craft brighter and more aesthetic, paint it, for this use acrylic paints.

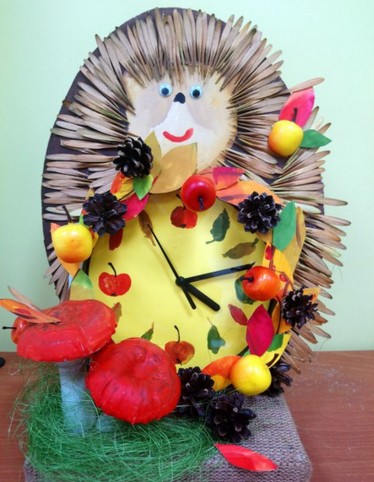
Quite popular is the product in the form of a hedgehog, take a look. In my opinion, there is still not enough mushroom or autumn leaves. So it's easy to fix, take colored paper and cut out the desired image.

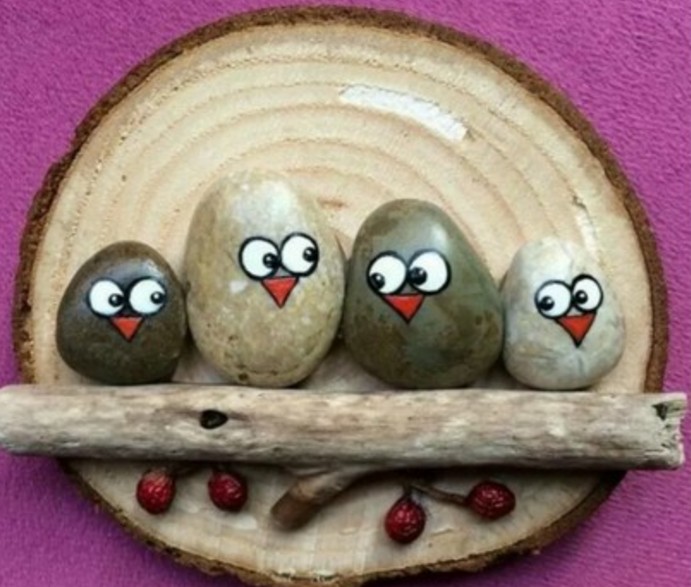
You can decorate the whole picture, make such a cheerful family in the form of birds on wood. As you can see, ordinary sticks are also involved here.
Oh, and by the way, do a still life.

For the smallest kids, take the following composition as a basis. Draw a maple leaf or some other on a piece of cardboard or A4 and then decorate it with multi-colored stones.

And if it's even simpler, then choose this minimalist picture. Which do not forget to decorate with multi-colored paints.

A bird's nest made of straw can be a great idea. You need to cut a circle out of cardboard.

And twist the flagellum from the straw.

And then twist a nest out of it along the diameter of the circle and fix the ends with threads.

In this way, wind in a spiral, so that in the end you get a bed in the form of a cup, glue the straw on the glue.


Then fill the souvenir with fluff or feathers and lay eggs, cones.

If you are a lover of pumpkin or sunflower seeds, then you can create something fantastically beautiful. Take a look at this photo. It was awesome! The author took and decorated a hedgehog, and his spines with ordinary seeds and painted autumn.

But here pumpkin seeds were used, by the way, you can come up with a lot of all kinds of masterpieces from them. In I have already shown you several of these works. Now I'll show you this one. Who knows, the seeds are painted with paints, gouache or acrylic, and then glued.

Here the artist did not use glue, but planted everything on plasticine. The tree trunk is made of buckwheat grains.


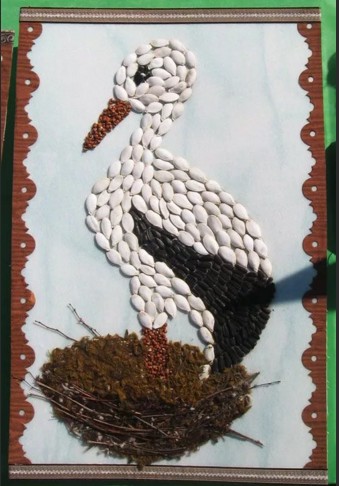
A stork is also made from pumpkin seeds, such a panel comes out, or hang it like a picture on the wall and admire.
I was shocked by another amazing and cool craft, I mean a chicken from which the author made different seeds. For this masterpiece, you need pumpkin and sunflower seeds, as well as plasticine.

1. From plasticine, mold the base, that is, the head and body of the bird.

2. Then start decorating the chicken by sticking the seeds one by one, as shown in the picture. First there will be wings.

3. And then the ponytail. It already looks funny.
Do everything carefully and take your time, it is from your efforts that success will await you.


5. Make a crest from red plasticine, and a beak from yellow.


I also really liked such trees made of beans and watermelon seeds.

And you can also combine several types of natural material and get a picture. For example, how oats are also used here, and the rim is made from corn kernels.

And remember, in childhood, airplanes were allowed, so I also recommend making souvenirs from them. I mean maple.

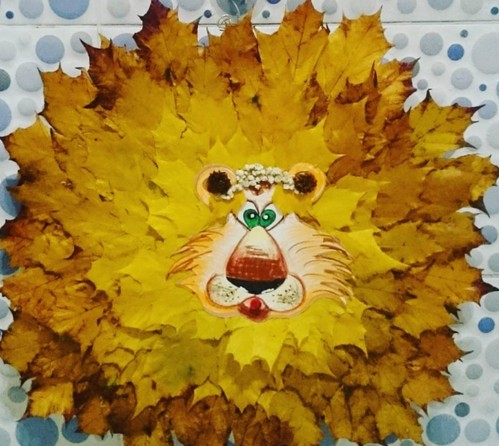
This also includes crafts made from dry materials. Such a radiant sun.

Or a clearing and a woodsman.

Above all, use straw or acorns.

You will get not only paintings, but also little men and insects from chestnuts.

At school, I always remember that at labor lessons they made such cheldobeks.

Well, if you have a handful of pistachios lying around, or rather a peel, then imagine you can become a real decorator. Make this topiary.

Well, or a vase and insert dried or fresh flowers into it.

Well, in conclusion to this chapter, I want to impress you. I found one fun pattern that you can easily follow. All you need is a board, nails and woolen threads.
Circle the maple leaf on the plywood and drive in the carnations along the contour.

Walk along the contour with an orange thread.

Then begin to confuse in a chaotic manner, as if applying patterns, a spider's web. Great, did you do it?

I also like such a funny story in which the author took ordinary logs and laid out such birds.

These friends are somewhat like snowmen.

Crafts for elementary school "What autumn gave us"
Of course, to make compositions on this topic, it is enough to have everything you need at hand. This means you need natural material, and improvised means. Plus your desire, imagination and of course fantasy. If it’s really hard and inspiration doesn’t come, then take these ideas and create.
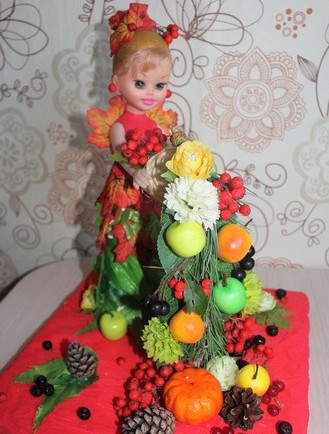
I suggest that the girls take their favorite doll and decorate her with such a golden outfit.

So it turns out you can go to the park and collect dry leaves and you are already a magician).


Brilliant, isn't it? Such a queen came out of an ordinary toy.

Do this work from physalis.

Or, for example, build an alarm clock or watch from twigs.

A sprig of mountain ash and cones will help you decorate.

Well, not in last place, probably the most popular will be crafts using seeds. I always see such creations at exhibitions in kindergarten and school competitions.


Everyone knows that autumn is rich, so make wonderful masterpieces.


By the way, decorate your class awesomely by making garlands of acorns, chestnuts and rowan berries.

Or here's an idea.

Make a gossamer and bring it to school.

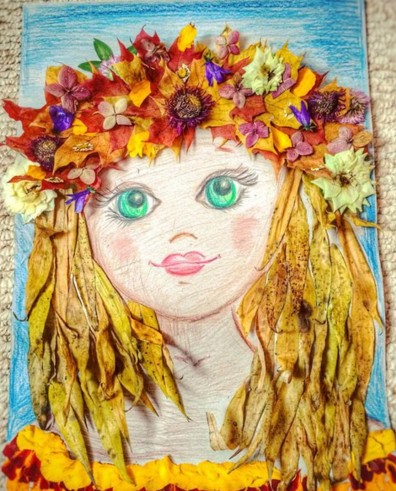
Probably the most enchanting will be such a charm, well, a direct symbol of this time of year in all its glory, this is the face of a girl. Take any flowers, plants and create.


You can make such a portrait. I think elementary school students and even preschoolers will cope with such work with a bang. Well, especially high school.


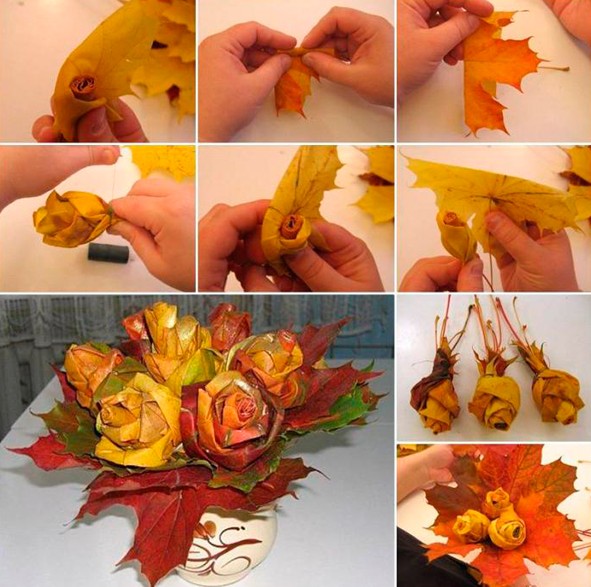
Such a gift looks superb, these are roses, but unusual, and from maple leaves.

You need to learn how to fold the leaves correctly, here is the sequence of actions. Watch this short tutorial:
On this topic, how to create such a bouquet, I found this video on the Internet on the YouTube channel. Maybe it will be useful for you too. Enjoy watching.
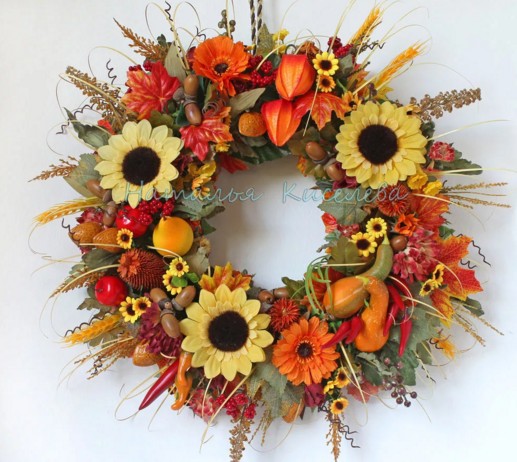
You can make a beautiful wreath.

Do not forget that it will not be difficult to build a lot of creations from spruce branches.


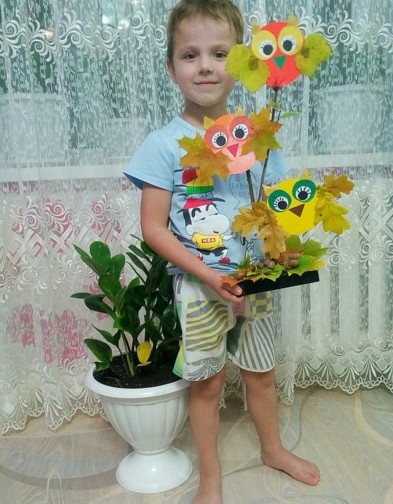
What a cute owl came out, you can't take your eyes off.

You can build an oak, look how wonderful it turned out.

Here's another idea, take note.

Autumn work in kindergarten from natural materials
I think the kids will like the work called the application. Cut the leaves into squares and stick on the landscape sheet in the form of any character.

Also such an unusual tree can be a good idea. I would say magical, on the one hand it has winter, snow or hoarfrost, and on the other - foliage.

You will need to make a trunk out of plaster, like a stand, and stick the collected branches into it. Let your kid decorate it now as shown in the picture above. Make a snowball from cotton wool, and greens from dry grass and leaves, flowers.

Or you can make spiders or a hut on chicken legs with Baba Yaga. After all, children are very fond of fairy-tale characters.


And if you want to go in a non-traditional way and take shavings from simple or colored pencils as a basis and create such beauty.

Also create figures from walnuts in the form of a bear.

And here is such a little mouse.

Here are a couple more mice.

The panel with the use of rowan berries also looks great.

You can take the following option as a basis, make the leaves out of paper in the quilling style, and glue the mountain ash.

Here is such a funny kitten, well, it will obviously cheer everyone up.

I also want to invite preschoolers to make a smart owl.


It is easy to build the following from tree cuts.

Or make a lion cub or a lion.


Also willingly stop at simple models that are carved as follows.

You can also draw, take dry leaves of trees as a basis in the form of stencils and simply dip them in paint to make prints.

Or this is how you can draw a picture with birches.


The next work, draw the image of a woman or girl, and offer the child to make hair.
Connect your imagination and build little animals or animals.

It is interesting to make a boat.

Or make a peacock or a firebird.

Toys and souvenirs from cones: fast and beautiful
Well, now I present to your attention all the most interesting of acorns, cones and probably plasticine. Because it is this component that will help to recreate new toys and souvenirs.
Before you is a picture that is made with the help of paints, a background and multi-colored cones are drawn, which are also painted with acrylics.

The next work, this is such a cute topiary, from all that was in the forest. Here are sprigs of Christmas trees, cones, berries, even acorns.

Love Masha and Misha from the cartoon, then you will like the next idea.

On this topic, I found for you the news of this year in this video from the YouTube channel. So don't miss out!
Well, a couple more ideas that you can translate into reality.
These can be birds, such as an owl or a swan, as well as a basket of cones.

It is easy to make an angel in the form of a doll, or a pendant.

They even make squirrels, but also, in addition to plasticine, felt fabric is used.


In addition to all this, you can also take any fruits and vegetables and arrange any composition using natural material.

Original crafts from leaves on the theme of Golden Autumn
If you have absolutely nothing to create from, then take and collect foliage in the parks and you won’t believe it, you can make such creations from it. Even kids 2-3 years old can handle it. Well, especially schoolchildren. I have one child in our house lives and studies in the third grade, so he painted the collected leaves like this.

And my son and I, who is already 5 years old, will almost be 6 soon, we will do such a miracle. Here is a butterfly, he chose the second one, and which one do you like better?

To be honest, I also really liked the hare and the fox. Look, even the bark has been adapted.


And what is this bird? Peacock, wow, and her tail is beautiful!

Well, the next composition in the form of an aquarium and fish can still be a great idea.


In addition to all this, you can easily and quickly create insects.

But probably the most beautiful and charming will be crafts in the form of maple leaves, they are folded in an unusual way, in the form of roses. Here is a tutorial on how to make this beauty. Repeat all the steps as shown in this picture.
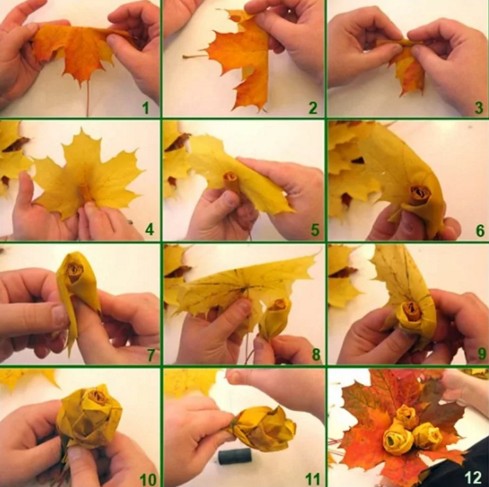
Here is what should come out in the end.

It is possible to make flowers of absolutely any kind of leaves. This video will help you, watch the master class.
In addition, take an ordinary vase and place dry branches in it and decorate with foliage.

And also any photo frame can be presented in an unusual way.

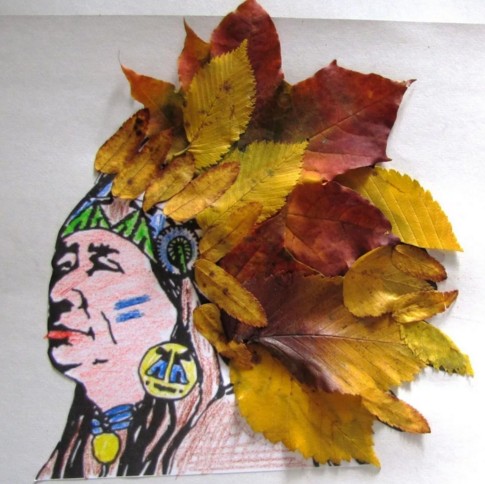
Well, make a leader for the boys who love the Indians.
And here are some more cool ideas on what you can think up and do from leaves. Here are the children's creations.


As you can see, there is nothing here. Turtle, snail, helicopter and even a mischievous parrot.


Or lay out the fabulous Petya cockerel.

In addition to all this, you can go in a non-traditional way and make paintings.

And if you do not have enough sun, then here is an idea for you.

To decorate the interior, and well, you can also bring a vase of maple leaves to an exhibition in a school or kindergarten. How to make it? You will need PVA glue and a balloon.
In short, you can look at these steps and build such a creation right today.

Or consider these stages of work.
1. Inflate a balloon, apply PVA on it with a brush and immediately apply the leaves.

2. Here's what should happen.

3. On top of the leaves, also apply glue without sparing.

4. Now let the blanks dry completely, and then pierce the ball with a needle. Now fill it with fruits and vegetables and quickly for the holiday.

I think that after reading and viewing this note, you no longer have questions about what can be made from natural material, I think I have found enough ideas. Just take it and do it.
All the very best and positive. Bye!
Best regards, Ekaterina
Nature gives us a huge amount of materials for interesting crafts. Having fun in the forest, in the park or on the banks of the river, you can collect countless treasures - twigs, shells, pebbles - and then create real masterpieces from them.
A variety of textures, colors, shapes of objects give many reasons for inspiration. In your hands, these little things can turn into a fairy tale character, a cute trinket or an original home decoration.
You only need additional tools, a little time and a boundless flight of fancy. And our lessons will help you gain skills in making unique crafts and recharge with new ideas.

We will need:
- over 60 pine cones
- two pieces of thin and thick wire, preferably brown
- thick cardboard, hot glue

Step one. We make a circle from 11 or 12 cones, connecting them with a thin wire. First we fix the wire on the first bump, as shown in the photo.

Step two. We attach the remaining cones, wrapping around each subsequent wire and forming a ring equal to the size of the bottom of the basket. In this case, the bases of the cones form the outer edge of the ring.

Step three. We make a second circle of cones, the diameter of which is slightly smaller than that of the first. It will take from 8 to 10 cones. Our basket consists of two rings of cones. To make it deeper, you can make a third ring.

Step four. We glue the finished rings together. For the handle, we make a semicircle of cones, fastening them with wire in the same way as the rings. So that the handle does not lose its shape, we attach it to a thick wire frame.
Next, we make the bottom of the basket out of cardboard by gluing it to the bottom ring of cones. Such a basket will decorate any interior. You can put dry twigs or flowers made from feathers or paper into it, which will give our creation even more originality.

Bunches of grapes from acorns - master class

We will need:
- dried acorns
- awl, wire, corrugated paper
- brushes, acrylic paints and varnish
Step one. Using an awl, we make holes in the acorns on both sides with gentle twisting movements. We pass the wire through the holes in the first stomach, then bend its tip in the form of a hook, which we stretch through the lower hole. At the same time, the hook remains inside the acorn and firmly holds the nut on the wire.

Step two. In the same way, we prepare all the other acorns for turning into grapes. Next, we glue the wires with pale green corrugated paper and paint half of the acorns with green paint, and the other part of the nuts with dark purple. After the paint dries, cover the acorns with varnish.

Step three. We collect bunches from grapes, intertwining their stems with each other in the same way as weaving wreaths of flowers. Grape leaves are made in the following way: we print the leaves on cardboard (you can take them from the Internet), stick corrugated paper in green shades on the reverse side, cut out the leaves, squeeze the veins on them and varnish the surface. After the varnish dries, we attach the leaves to the berries with the help of a wire.

Grapes from acorns are ready. They will be a wonderful decoration of the kitchen interior. In the same way, you can make an olive branch.

Feather flowers - master class


Such amazing beauty can be created with your own hands from bird feathers. To do this, we just need: feathers, insulated wire, white and green threads.
Operating procedure:
- Bleach feathers with hydrogen peroxide. Next, we take a few of the smallest feathers and wrap them with white thread at the base. As a result, we get a small bud, which we tie to the wire.
- Wrapping the thread around the wire, add larger feathers to the flower, and a few small feathers at the base of the flower.
- We wrap the stem with green thread and fix its tip with glue. Luxurious flower is ready. If desired, using spray paint, you can give it any color.
Bouquet of roses from maple leaves - master class


Here is a very simple tutorial on how to create a beautiful bouquet, for which you only need maple leaves and threads.
Operating procedure:
- We make the core of the flower. To do this, we roll a sheet folded in half into a roll, as shown in the diagram.
- Next, we wrap the core with another leaf folded in half so that the edge of the “petal” rises 1 cm above its upper part. We bend this protruding edge outwards. The fold is not smoothed out.
- In the same way, we wrap the next sheet around the resulting bud. After that, we tie the base of the flower with threads. In the same way, we make 4 more flowers and get a luxurious bouquet of roses.
Hedgehog from natural materials - master class


We will need: pine cones, a piece of foam, PVA glue, toilet paper, hot melt adhesive, white and black gouache, eyes and a mustache for a hedgehog.
Operating procedure:
- We cut out a hedgehog body in the form of a large drop from a piece of foam plastic. We form a muzzle for a hedgehog using papier-mâché technique from toilet paper. To do this, we impregnate the paper with glue and from this mass, as from plasticine, we form a nose, ears and eyebrows.
- After everything dries, we cover the body of the hedgehog with gray gouache, and paint the nose black. Next, using hot glue, we attach bumps to the back of the hedgehog, and eyes and a mustache to the muzzle. The hedgehog is ready! You can add charm to it by decorating with fruits.
Some more interesting ideas for crafts made from natural materials
From a variety of shells, amazingly beautiful photo frames are obtained
Another option for using shells is beautiful panels and paintings.
Very cute crafts are made from pine cones - the most popular natural material.


Making crafts from all kinds of natural materials is an exciting and useful activity that develops creative abilities and, importantly, is very budgetary. Make crafts yourself and involve children in creativity - and joy will have no boundaries!
Tatiana Titova
Explanatory note. Crafts made from natural materials help the child to discover the wonderful world of nature: to see a funny gnome in a spruce cone, an animal or a bird in a dry knot. Any work on the manufacture of crafts from natural material is not only exciting, but also informative. The child is involved in observing natural phenomena, learns to take care of the environment, pays attention to the beauty of flowers, fruits, leaves. Almost at any time of the year, you can introduce preschoolers to nature and find natural materials for making crafts. Natural material is a pantry for the development of fantasy, creativity, and imagination. Making toys, crafts from natural material is painstaking, exciting and very pleasant work, and the process of making crafts from natural material will not only have a positive effect on the development of aesthetic feelings, replenish the skills and abilities necessary for children, but will definitely develop fantasy, imagination, fine motor skills of hands , attention, intellectual and creative activity.
Purpose of development:
The use of crafts made from natural materials in games, classes, joint activities, when designing layouts, didactic aids.
Target: mastering the methods of designing from various natural materials through artistic manual labor.
Tasks:
To form the interest of preschoolers in artistic manual labor;
Develop cognitive, constructive, creative and artistic abilities in the process of creating crafts from natural material;
Develop manual skills, fine motor skills;
To develop the emotional responsiveness of preschoolers to their productive activities;
To cultivate diligence, accuracy, the desire to bring the work begun to the end;
To cultivate an attentive, careful attitude to the natural environment, its riches.
Methods and techniques:
Visual (showing a sample, looking at illustrations, performing a sequence of work).
Verbal (explanation, description, encouragement, persuasion).
Practical (independent and joint implementation of crafts).
Material for making crafts:
natural material:(cones of pine, spruce, larch, alder, chestnuts, acorns, nuts (walnuts, cedar, earthen, seeds, rose hips, mountain ash, moss, straw, bird feathers, shells, pebbles, dry twigs.
Additional material: paper, foil, plasticine, wire, colored patches, foam rubber.
Tools: scissors, awl, knife, needle, paper clips, brush, etc.
Way of connecting parts: plasticine, matches, sticks, wire, thread, glue.
Scheme of the sequence of work on the manufacture of crafts from natural material:
1. Sample analysis.
2. Step-by-step manufacturing sequence.
3. The choice of the method of connecting the parts of the toy.
4. Preparation of material and tools.
5. Practical work: making a toy.
6. Analysis and evaluation of productive activities.
Preliminary work: preparation of natural material.
Activities: lessons, workshops.
1. Master class "Klenovichki, Dubovichki and other Listovichki"
In autumn, a huge number of opportunities for making crafts from natural materials open up. In this case, from fallen, multi-colored, dry leaves. To make Leaflets, you will need the following materials: toilet paper rolls or home-made cylinders made of colored thick printer paper, leaves of oak, maple, linden, aspen and other trees, scissors, felt-tip pens, an awl, a stapler, PVA glue, adhesive tape.


2. Patterns from autumn leaves
Autumn leaves, with their availability, variety of forms, are a unique material for creativity. Bright, beautiful leaves attract attention, develop fantasy, imagination. From the fallen multi-colored leaves, you can lay out a variety of patterns. In dry weather, patterns can be laid out directly on the ground. And in rainy weather, you can engage in collective creativity in a group, only the leaves need to be prepared in advance. After all, the time of golden autumn passes quickly. These are the patterns we laid out from the leaves of oak, maple, birch, linden, mountain ash.


3. Master class on making an amber tree from a pine cone
Pine and spruce cones are an excellent natural material for creativity. This time I propose to make a miniature amber tree from just one pine cone. Material: pine cones, amber chips, universal polymer glue, branch cuts.

4. Patterns from autumn leaves. Continuation
This year we had a beautiful, warm, dry golden autumn! Autumn leaves are the best gift from nature for creativity. I bring to your attention the continuation of our creative fantasies with leaflets. When creating patterns, plot compositions, children combined leaves of different tree species.


5. Master class on making flowers from natural material
Cones are an excellent material for children's creativity, environmentally friendly and safe, from which you can create interesting and original crafts. I propose to make flowers from pine cones.


6. Master class on making a model "Swans on the Pond" from natural material.
Autumn is a great time to create crafts from natural materials. I propose to make a model of a pond with waterfowl. Materials: Pine cones, feathers, white chenille wire, green foam rubber, styrofoam plate, blue paint, universal glue.

7. Master class on making a wreath from natural material
I propose to make an original wreath of pine cones with your own hands, which can be useful as an attribute for a dance, performance, game, or for the autumn decoration of the group's premises.


8. Master class on making paper crafts using natural material "Sleeping hedgehog"
Funny crafts made of colored paper and cardboard are more common in children's art. They are easy to make, so the kids, without getting tired at all, spend their free time usefully. For joint creativity with children, I propose to make an autumn paper craft "Sleeping Hedgehog".

9. Making crafts from natural material. Photo report
Acquaintance with nature and making crafts from natural materials develops imagination in preschoolers, awakens the desire to fantasize, invent and create with their own hands. Making handicrafts from natural material is painstaking, exciting and very interesting work.


10. Master class "Grass Dolls"
I bring to your attention a master class on making grass dolls beloved and popular among children. For the manufacture of pupae you will need: fresh grass, multi-colored threads, scissors. Preparatory work: Collection of grass and acquaintance with its properties.

11. Master class on making crafts from natural material "Autumn Ball"
In autumn, nature itself provided us with a rich choice of material for a variety of creativity. You just need to not be too lazy to collect this material and dream up a little. And the result is a wonderful variety of crafts! I propose another author's idea to create the composition "Autumn Ball".


12. Master class on making jewelry from natural materials
Acorns are an excellent material for making all kinds of crafts. I propose to make original jewelry from acorns: beads, bracelets, earrings. You will need material: acorns without hats, nail polish, thin wire, an awl.


13. Master class on making jewelry from natural materials. Continuation
I propose to make original decorations from acorn caps. Material: acorn caps, toilet paper roller, PVA glue or universal glue, scissors, thin wire.

14. Master class on making autumn compositions from natural materials
Autumn compositions made of natural material look original. They are bright, durable and can decorate the interior of any room. I bring to your attention a master class on making compositions from branches and acorns.


15. Workshop on making crafts from natural material and colored paper "Autumn Park"
I propose to make three-dimensional trees from twigs and colored printer paper to design a group for the autumn holiday. Material: ready-made leaves cut with a hole punch from colored printer paper, twigs, base from toilet paper rolls, brown corrugated or crepe paper, universal glue or PVA, scissors.


16. Master class on making a vase from autumn maple leaves
In continuation of the autumn theme, I propose to make a vase from autumn maple leaves. Material: maple leaves, PVA glue, balloon, bowl, brush.

17. Master class on making crafts "Peacock" from natural material
The craft "Peacock" is made of pine cones, feathers and chenille wire. The DIY toy is easy to make and attractive to children. Material: Pine cone, colorful feathers, chenille wire, ready-made eyes, plastic cap, nail polish.

18. Master class on making forest birds from natural material
I bring to your attention a simple version of making birds from pine cones using creative material. Birds made in this way look elegant and original. Material: pine cones, chenille wire of different colors, ready-made eyes, glue, scissors, plastic caps, pine branch.


19. Master class on making swans from cones using chenille wire
Cones are an excellent material for making volumetric crafts with your own hands. I propose to make beautiful swans from pine cones using chenille wire. The craft is easy to make, but it looks original. The craft is available for older preschool children.


20. Master class on making miniature toys from natural materials
Nature gives us rich material for creativity, the possibilities of which are endless. And due to environmental friendliness, crafts made from natural materials are especially popular. I offer a master class on making miniature crafts from acorns. To make crafts you will need: acorns, hats, pine cones, acrylic paints, markers, nail polish, plasticine, old CDs, plastic plates and some free time.


Crafts from acorns belong to a simple and fascinating type of creativity and represent a rich field for imagination. Acorns are easy to paint or draw patterns on them with felt-tip pens; you can stick various parts on fruits, fasten several acorns with matches or toothpicks, use in combination with plasticine. I suggest that those who have made a stock of natural material for the winter make soldiers from acorns as a gift to dad or grandfather by February 23. Such unique gifts cannot be bought in a store, but can only be made with your own hands.

22. Didactic game-allowance from natural material in the form of a game layout based on the fairy tale "The Gray Neck" by D. Mamin-Sibiryak
I bring to your attention a didactic manual made from natural material, material for creativity and waste material based on the fairy tale "The Gray Neck" by D. Mamin Sibiryak. The relevance of this manual lies in the fact that it has a developing, teaching and educational value.


23. Pictures from stones. Photo report of children's creativity
The whole life of a child is a game. In a children's game, tactile sensations, fine motor skills, mental operations develop. Pebbles are one of the most accessible, free and useful materials for the creative development of children. It is interesting to experiment with pebbles to study the concepts of "big - small", "smooth - rough". Pebbles can be sorted by color (pearl, red, white, size (large, small, medium, shape (oval, round, long, short). Using pebbles, you can fix the ordinal and quantitative count with children during a walk.


24. Heart stone. Master Class
Babies love surprises and gifts. It can be simple, unpretentious crafts made by hand at no material cost. For example, it is nice to receive a beautiful mother-of-pearl stone with a heart as a gift.


25. Didactic manual on mathematics from natural material for outdoor games
Mathematics is one of the most difficult subjects especially for kids from three to five. Children at this age are dominated by objective thinking. Children should visually represent one or another number of objects, they could hold them in their hands, perform various actions with them. A didactic manual made of pebbles will help children consolidate their knowledge of mathematics acquired during the year during their summer holidays.


26. Didactic manual for FEMP "Funny crabs"
Teaching mathematics in a playful way develops and forms the cognitive interest of the child. This will help interesting and exciting tasks and exercises in mathematics for preschoolers. I bring to your attention the didactic manual "Funny crabs".


27. "Funny gnomes" from natural material. Master Class
Making crafts from natural materials is a fascinating activity. I propose to make funny gnomes out of spruce cones together with the children. Gnomes are fabulous creatures, very small, hardworking. Purpose: crafts can be used to decorate the room, as a souvenir for a gift.

28. Portraits from stones. Master Class
Nature gives us rich material for creativity. You just need a little imagination and you can create funny portraits with different facial expressions from stones. I offer a master class on creating portraits from sea pebbles. This does not require special costs or skills. And the result is worth it.


Creating crafts from natural materials gives the child the opportunity to look at the world around them through the eyes of a creator, not a consumer.
Thank you for attention!
Making crafts from natural material is a good hobby not only for children, but also for adults. Making something beautiful out of what you can find literally under your feet is a real miracle. Moreover, despite the simplicity of execution, such crafts often look very impressive and fit any interior.
Crafts made from natural materials are different. If the production involves working with tools, such as saws or pruners, the child should not be allowed to do this. However, working with materials like cones, twigs, or dry leaves for a herbarium is perfect for kids.

Eco-style flower vase
- You will need branches and a regular glass vase.
- Cover the vase with branches. Branches can be slightly deviated from the vertical position, cross each other.
Roses from apples
- Slice the apples as thinly as you can.
- Gently boil them in sweet syrup (0.5 l of water per glass of sugar).
- Roll up the slices like a bud. The caramelized sugar will cause the apple pieces to stick together.
- Store the resulting craft in a cupcake mold. You can simply serve apples as a dessert or decorate a cake with them.
