How to make bracelets with your own hands at home. How to make a fashionable bracelet with your own hands: a master class. Original volumetric decoration
Since then, as soon as a person guessed to wrap his body in animal skins, bracelets began to appear. At first, like the belts, they had a purely pragmatic task: they supported the clothes. Then the clothes became more elegant, sleeves appeared, and the bracelets on the wrists changed their meaning. They continued to support their clothes and became more and more beautiful. Men wore leather and steel cuffs to protect their wrists. Girls and women preferred silver and gold. Poor people, most of them, tied up their sleeves with leather straps or thread bracelets. The color and pattern on the bracelets, like a heraldic coat of arms, spoke of a person's belonging to a certain clan - a tribe. This is the depth from which thread bracelets came to our age. In those days, every girl knew how to make a bracelet from threads with her own hands. Now this art has come into fashion again, and beauties are happy to wear bracelets on their wrists.
Thread ornaments
They are worn by young girls and very young girls.
The pattern depends only on the imagination of the needlewomen:
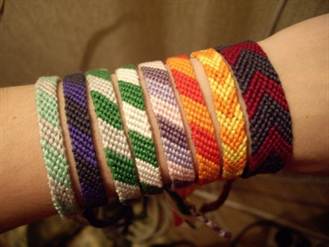


Weaving bracelets from threads is an activity for the patient and attentive. Usually in any home there are several skeins of colored thread. But from thin, ordinary threads, faded, impractical jewelry is obtained. Moreover, it is difficult to work with them.
For those who first decided to tackle weaving, it is better to start with cords or thick threads.
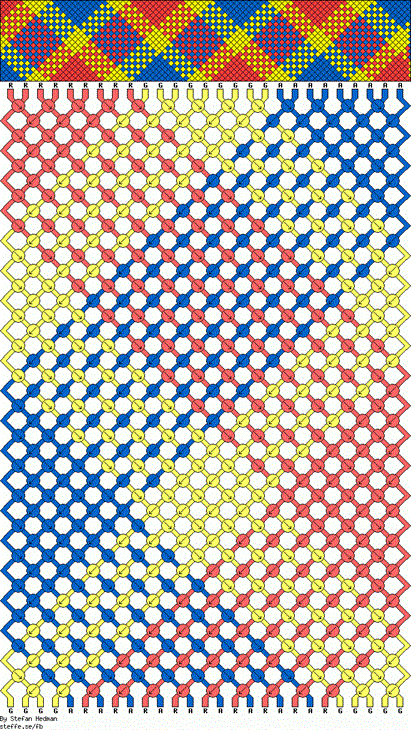
In order not to get confused, you need to choose two colors. In addition to threads, you will need some kind of fastener to fix the workpiece: a clerical clip, a pin, an adhesive tape. And, of course, scissors. Both threads are folded in half and a knot is tied, leaving a loop. The loop is attached to the surface and the weaving process begins. How to weave is shown in the diagrams:


Variety of colors and patterns
Needlewomen prefer floss to all other threads. Before buying, you should ask what threads are on sale. The spatula threads are fragile; for bracelets, you need to take cotton or silk. Floss threads are good because for work, the thickness of the strand can be chosen as needed. Iris strings work best. They are thicker than the rest, ribbed and the decoration looks more beautiful. A wide range of colors provides a huge scope for patterns on floss bracelets. The highest quality things are obtained from floss threads.


As a rule, floss threads do not shed, but still need to be checked. To do this, a strand of thread is moistened in hot water and applied to a white fabric. If there is no color stain left on the fabric, you can start working, otherwise, when wearing the bracelet, ugly stains will remain on the skin.
Schemes for those who have already mastered the weaving technique:


The most common among young people is the wish bracelet. As you know, color has its own properties, and you need to take this into account when choosing.
- Red - from damage and the evil eye;
- Light green - harmony, protects love;
- Dark green extinguishes quarrels;
- Pink - tenderness and love;
- Orange - sunlight, helps to find friends;
- Blue - intuition, insight;
- Purple - protection from trouble, creativity;
- White - spiritual purity;
- Yellow - training;
- Crimson is power.
Intertwining the selected threads, you need to imagine the desire in all the details and details, and then it will certainly come true. The simplest bracelet is woven into a braid of three strands. To enhance the effect of the talisman, you need to weave 7 beads into it. At the end, you need to tighten the knot at the end and ask a loved one to tie it on the wrist of the hostess. The remnants of the threads are burned so that everything bad is burned out, like this thread.

Red, the color of fire and blood, is revered throughout the world as a symbol of vitality. By adding a red thread to the wrist, a person seems to be adding another vein, strengthening and saturating the energy of his heart. Bracelets of desires on a red thread have been protecting people from evil for a long time.
Always in price, sometimes they look more impressive than jewelry


Learn to make 10 beautiful bracelets
Summer bright bracelet.
Pairs well with blazer and jeans

you need a brown leather cord, a blue waxed cord, a chain of metal balls and a golden bolt.

Fold the leather cord in half (each side should be at least 50 cm if you want to make the bracelet in two turns). Secure the blue cord.

Now fasten the metal chain with a blue cord, and then thread the chain beads between the turns of the blue cord. If you could not find a metal chain with beads (usually sold in jewelry stores selling jewelry, you can string the beads on a thread and use it instead of a chain).

Measure the diameter of your wrist, add 2-3 cm and wind the blue cord around the leather one to this length.

8.
At the end, fasten the metal chain with several turns of the blue cord (as in the beginning), tie a knot with the leather cord.
Put the bolt on the resulting cord in the knot area, secure it again with a knot.
Cut off the excess cords, the bracelet is ready!


Imitation pearl bracelet

You will need two leather cords about 50 cm long (you can buy them at any hardware store to create jewelry).

Now we sew artificial beads between two leather cords with a needle and thread.

So we continue to sew bead by bead gradually.

We sew in beads to the amount that you think is necessary. Don't worry about the stitching threads visible, we'll hide them now.

Now tie each cord with an openwork braid (0.5-0.7 mm wide). So you and the threads will hide under the cord. 
This is what you should end up with - in the middle of the bead, and lace around the edges.
At the ends, knot both the braid and cord together.

TURQUOISE BRACELET
Jewelry with turquoise always brings back memories of the blue sea, sunny beaches, hot evenings and even a little “oriental”.
I don’t know what it’s connected with, and for each person different objects cause completely different emotions.
But one thing I can say - jewelry made of turquoise leaves indifferent a few.

For a bracelet made of artificial turquoise, we need 2 brown leather cords 80 m each, artificial turquoise 0.5 mm (about 100-120 pcs), a thin brown leather thread 100 cm, a needle, a decorative button, and Moment Crystal glue.
1.
We put the leather cords on a flat surface parallel to each other at a distance of 1 cm. Thread the leather thread into a needle, fix it on the cord and begin to sew the cords, and insert turquoise between the cords.

When the entire length of the cords is trimmed with threads and beads, glue the leather thread gently on the seamy side (to prevent it from shifting). Wait until it is completely dry.

On one side of the leather cords, make a ring at the end, and on the other, sew a decorative button - this will be the clasp on the bracelet.

5.
Chanel style bracelet
Perfect with a little black dress


We need artificial pearls, jewelry fishing line, two types of chains, two connecting jewelry rings, a piece of satin black ribbon (1 cm wide, 20 cm long), scissors.
String the faux pearls onto the jewelry line. How many beads to string is up to you, but it depends on the diameter of the beads and the width of your wrist, usually from 18 to 24 beads are enough.
.
Now slide one end of the chain onto the line.

Measure the length of the pearls, cut the same length of the chain, and slide the second end over the second end of the fishing line.
Repeat the same procedure with 2-3 more types of chains.

Now put the edges of the chains on the jewelry connecting rings (the rings can be from 0.8 to 1.4 cm in diameter).


Thread a satin ribbon through the rings.

Smart bracelet
Sometimes, for a festive occasion, our outfit is rather modest, but there is no time, no money, and no point in purchasing any bright accessory. DIY this accessory like this bracelet.
We need:
- A watch or bracelet with a fixed base.
- Satin ribbon (2 cm wide, 1.5-1.8 m long).
- Brooch.
- Wire.
1.
From the satin ribbon, we begin to make a beautiful large bow with a lot of petals.

We fix the petals at their intersection with a wire. We attach a brooch in the center of the flower. We fix the bow on the watch (or bracelet).


A universal decoration for military and casual clothing style is a denim bracelet. It can be easily combined with both denim and white cotton and natural linen.
DENIM BRACELET

To get started, take a small piece of brown leather and stamp out any inscription in printed letters (although this requires special metal printed letters). If you do not have them, then just cut a 5 * 2 cm segment from the skin.

Cut off the belt from old jeans, measure the width of your wrist. From the side of the belt where there is a hole for the button, cut to length the width of the wrist. Sew a piece of leather in the middle of the workpiece, sew a side seam.

Sew on a beautiful button (preferably in the same color as the piece of leather).


Bracelet in 15 minutes
Fast, cheap, attractive - all this can be said about this guipure bracelet, which can be sewn in just a little less than 30 minutes.

We need:
- Guipure.
- Spandex.
- Beads.
- Thread, needle, scissors.
- Sewing machine.
Sew on the spandex to the guipure (if the width of the wrist is about 20 cm, then cut off the guipure 40 cm), and only then sew on the spandex.
Sew the edges, wrong side in.
Sew on decorative items and beads.


Victorian bracelet
The Victorian style, both in architecture and in dress, was distinguished by luxury and beauty. in some quarters of London (and of course the English colonies), entire quarters of the Victorian era have been preserved. The clothes included velvet, lace, shades of gold and warm pastel colors, precious and semi-precious stones. And even today, some jewelry like Victorian bracelets are more relevant than ever.
We need several types of braid in gold and pastel colors (guipure, satin, velvet), a thread of beads, gold-like metal buttons, superglue.

.
We take a cotton base 20 * 10 cm.Fold it in half in width, determine the middle.

We put the braid on one part of the base of the bracelet: in the middle in a fold, golden velvet on one edge, and bodily guipure on the other. We wanted to sew on a dark pink imitation pearl, but it doesn't fit very well.

We settled on white beads. Sew the tape with blind seams to the base. Sew white beads on bodily guipure.
.
Now we fold the edges of the braid, glue it on the seamy side. Now glue the edges of the base inward along the width. Sew the edges by hand with a blind seam.

On one side of the bracelet we sew a metal button for gold.

And on the other side there are two strips of bodily guipure braid. 

Bracelet ready 
FABRIC BRACELET
The transformation of old grandmother's beads into a modern accessory is what the next master class offers you.

We need:
- Wooden or plastic beads (it is even possible to buy them at the "flea market").
- Chintz fabric with floral print.
- Threads.
- Satin ribbon for ties.
We release the beads from threads, fasteners, fasteners. Cut a strip from the fabric 7 cm wide, 20 cm long. The length is the length of your wrist + the volume of each bead, but the width of the strip is the width of the widest bead multiplied by 2.


Sew the strip from the seamy side along the length, turn it out on the front side, iron it.

Now we insert a bead into the inside of the fabric tube, first threading a satin ribbon for tying into it (into the core), then we tie it with a thread. So we continue until the fabric tube is completely filled with beads.

At the end of the bracelet, cut off the excess fabric (if any), carefully sew the fabric by hand on the last bead.

Creative success!
Knitly.com
The summer season is the time of long-awaited vacations and trips to warmer regions. And we always think about how to create a new bright image. Stylish accessories are your faithful assistant. And today you will learn how to do the most-most ...
Let your favorite beautiful buttons no longer lie in the box, but finally see the light of day! Spectacular do-it-yourself button bracelets are made of scattered buttons. Do you think this is too difficult for you? Not at all, if ...
A DIY bracelet is always an adornment according to your own taste for any life events. Beach decorations are especially relevant during the summer holidays, because this is the only time when you can flaunt ...
You should not forget about summer jewelry, especially since August has not yet begun and there are enough warm days ahead to adorn yourself with what is, alas, inaccessible on autumn and winter days. The most democratic piece of jewelry is a bracelet. ...
Denim bracelets - stylish, trendy, youthful! They look great with denim clothes and boho dresses. And making that decoration is as easy as shelling pears! Our selection of lessons will help you with this ...
Looking for interesting DIY decorations for your graduation ceremony? So that it is youthful, fashionable and budget? For romantic girls, lace is suitable as decoration for prom, on the basis of which you can make jewelry ...
No gift ideas for your beloved man on Valentine's Day or February 23rd? Take a closer look at the paracord survival bracelet that will appeal to any man looking for an active holiday. Made by their own ...
Macrame bracelet is an original piece of jewelry that you can make yourself. Of course, making a macrame bracelet from the end will not work, since the technique requires certain skills and attention. However, anything is possible ...
Bead bracelets- an inexpensive and affordable decoration for anyone that will complement a suit in any style. Beads are very diverse in shape and material from which they are made: glass and stone, plastic and wood, metal and bone - just to name a few. And if you use various additions: accessories, ribbons, lace, leather, etc., then the possibilities to create something beautiful and very individual become almost endless. Humanity has been making and wearing bracelets since ancient times. But they did not become an ornament at once. Their first purpose is amulets, protectors from influences hostile to man. Somewhere this is preserved even now, if the bracelet is made of natural stones. After all, their beneficial influence and energy are undeniable. But it is enough that the decoration is pleasant to you and improves your mood.
The most simple DIY bead bracelets available for making even for a child. And many, probably, made them themselves, having reached their mother's reserves. You just need to string the beads on a string. In general, this option has a right to exist even if you are no longer a child. If the beads are very decorative, and the thread is elastic, then why not. Using fittings, departments with which can now be found even in small towns, you can complicate the design and add decorativeness. As a last resort, the range of online stores selling jewelry accessories is quite extensive. And it's not a problem to find ribbons, lace, cord, chains at all.

Bracelet made of beads and ribbon has many variations. For the simplest, nothing but a narrow thin synthetic tape and beads with a sufficiently large hole, we do not need anything. Cut the end of the tape obliquely at an acute angle and lightly scorch it over the flame of a lighter so that it does not get tousled. Do not overdo it - if you burn it too much, it will form build-ups that will thicken the edge. Stepping back from the edge of the ribbon opposite to the melted one at a distance of 15-20 cm, so that you can tie a bow later, tie a knot, then put a bead on the ribbon close to it, make a knot again and repeat this until the bracelet is finished. Finish the work with a knot. Trim both ends of the tape and melt them. Your bracelet is ready.

Another way is to sew the beads to the ribbon. The distance between them is equal to the diameter of the bead. Having strung a sufficient amount, we glue the tape on a thread. We've got a very nice piece of jewelry. Narrow lace can be used instead of a ribbon. And if you increase the distance between the beads three times, making three stitches, then the appearance of the jewelry will become even more decorative.
For the third option, in addition to beads and ribbons, we need accessories: hugs, pins, a carabiner and a round-nose tool. We will make roses from a narrow ribbon. We put on hugs on the beads with the help of pins and make a loop with round-nose pliers. From the seamy side, we sew the roses to the beads with imperceptible stitches, alternating them with each other. We attach a clasp to the outer beads. The result is a glamorous bracelet. Its only drawback is that the lower part of the flowers does not look very aesthetically pleasing. This can be easily fixed using bracelet connectors, which can also be purchased from the hardware department - just mugs with eyelets on both sides. Sticking roses on them with a glue gun or instant glue is not difficult. At the same time, the assembly of such jewelry will be much easier, it will look better, and it will be more pleasant to wear it.

Bracelets made of beads and beads can be quite simple if you string beads and beads on a thin silicone elastic band, alternating them with each other. More complex designs are made using weaving and require sufficient perseverance and skill. But it is not the gods who burn the pots; if you wish, you can learn everything, gradually complicating the products.
The sequence of actions can be seen in the diagrams. If the assembly is done on a silicone rubber band, then you will not need a fastener. Jewelry with a clasp looks more elegant. Do not forget to properly fasten the ends of the threads so that your product is not only beautiful, but also durable. You can hide the cut ends inside the beads if the hole diameter allows. If not, cut them short and melt them lightly with a candle or lighter.

Very unusual and beads are obtained if we weave a net of small pink beads with the usual monastic weaving and sew an "air" on this net diagonally. How this very air chain is made: take a thread or fishing line and string beads on it. With a crochet hook, knit a chain from the fishing line with free loops so that each loop of the chain contains 1-2 beads.
Together with beads, you can include larger decorative beads, pieces of crystals, shells, etc. in separate loops. For one bracelet, the chain length should be 5-7 meters. The hardest part is not to get confused. Attach the first loop of the chain with a pin to the pillow and as you knit, wrap the "air" around the pillow so that the loops lie side by side without running over one another. You can secure yourself with pins. When sewing, gradually unwind the chain by removing the pins.

To sew, sew the end of the air chain to the corner bead, string three to four loops of the air chain with an accordion on the needle and attach them through 2-4 beads. That is, string the loops on the needle that comes out of the bead and pull the line through 2-4 beads. At the exit point, re-type the air loops on the needle and pull the thread through the next beads. Move diagonally along the grid lines. Do not cast more than two stitches at the edge. After going around the edge, move in the opposite direction along the adjacent diagonal line. Large irregularly shaped beads can be included in the "air", or you can sew them separately in any order or string on a needle along with the loops of the air chain. When finished, attach the chain toggle clasp to the garment around the edges of the bracelet. You can simply make an air loop on one end of the bracelet with a needle and thread or fishing line, and attach a button or large bead of a suitable color on the other.
How to make a bead bracelet

How to make a bead bracelet and chains. We need the following materials: about a meter of chain, beads of two colors (you can take contrasting ones - black and red, or, on the contrary, choose a tonal combination), beads for the central row are slightly larger than for the extreme ones, silicone thread with a total length of about 3 m, scissors and three needles. We divide the chain into segments of 5 links.
We pull the thread into the needles so that it is doubled, and temporarily fix the ends of the thread. Further, according to the scheme: first we string a large red bead onto the middle thread, then we thread the threads through the links of the chain: the extreme ones - through the first and fifth, the middle one - through the third link. The next step is to string small red beads on the extreme threads, put on a piece of the chain, again a large bead on the middle thread and a piece of the chain behind it. After that, we string small black beads on the extreme threads, and behind them a chain. Thus, we alternate on the extreme threads after the large bead, either red or black. We finish with a chain and tie the threads of each row, carefully tightening them so that there are no gaps between the beads. We hide the ends of the threads in the holes of the beads.
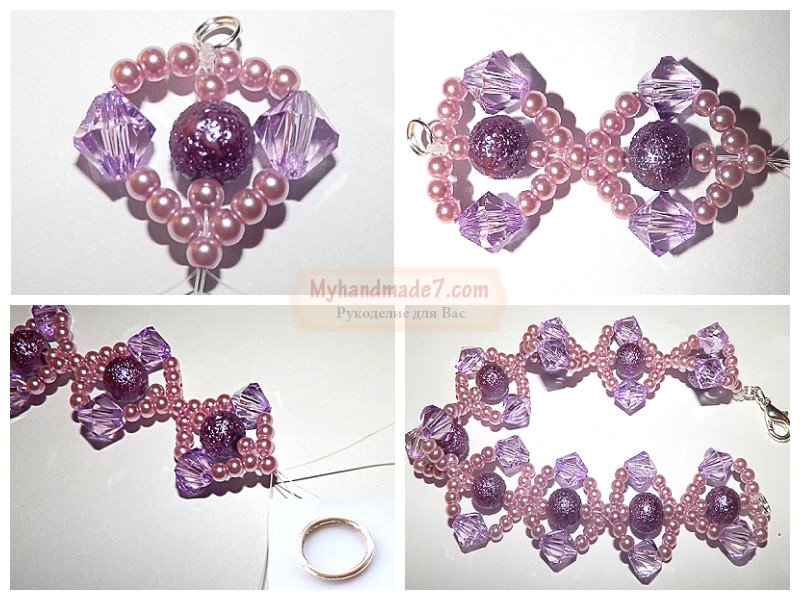
Bead bracelet master class

First, we will prepare the accessories: plastic purple beads with a textured surface with a diameter of 8 mm, artificial pearls with a diameter of 3 mm in a pink-lilac shade, faceted transparent crystal beads of lilac color, silicone thread or fishing line, 2 ring-shaped connectors and a carabiner. Cut two pieces of thread about a meter long and tie them on a ring so that 4 free ends of the same length hang down.
Of these, two ends will be a double middle thread and two will be single extreme. On the central double thread, string a pearl, a large bead and a pearl again. On each of the side threads we string successively 3 pearls, a faceted crystal and again three pearls. We connect all the threads together and pass them through one pearl. We repeat this sequence of operations again until the product is of the desired length. Having finished the work, we tie the bundle of threads to the ring, cut off the excess and slightly melt the remaining ends. We attach a carabiner to one of the rings.
Weaving bracelets from beads- an exciting and exciting experience. And if you also attract imagination and use various auxiliary materials, sometimes completely unexpected, then you can create original and unique products. See how beautiful and feminine jewelry is created by using lace and beads together. Of course, such a decoration cannot be created in five minutes, but the result is worth it. In addition, they are not so difficult to perform. We need lace: machine or handmade. It is up to you to choose a base made of synthetic or natural threads, but keep in mind that the fragment should consist of a whole number of motifs.
Synthetics can be melted around the edge to keep it from slipping, and cotton or linen may have to be swept in problem areas by hand or machine. You can knit the necessary base with a crochet or on bobbins specially, then such problems will not arise. When the base and matching beads are prepared, first place the beads over the base without sticking to find the best fit.
Only then sew them on. Part of small beads or rhinestones, if they are also used, can be glued with instant transparent glue or a glue gun. In the example, selected white lace and imitation pearls. Such a bracelet can decorate a wedding dress. If you choose linen or cotton lace in natural colors, then wooden, bone or ornamental stone beads will do. For a fastener, sew a button or bead on one edge, and make a loop on the other.

Leather goes well with beads. An elegant bracelet is made of beads and leather cords. Its production will not take long. This type of jewelry is unisex, it can be worn by representatives of both sexes, only the beads must be selected individually. Take about one and a half meters of leather cord, beads with a diameter of 8-10 mm, strong thread to match the cord or, conversely, contrasting. Fold the cord in half and tie in a knot at such a distance from the edge so that the prepared button passes through the resulting loop. Fasten the loop securely, for example, using a clip-clip on a sheet of thick cardboard. In order not to damage the skin, the loop can be previously wrapped with a cotton pad.

Tie the thread with a strong knot to the lower cord and 2-3 cm from the knot, just braid the cords so that the thread lies on top of the cord, bends around it and from under the bottom lay on top of the second cord. It turns out, as it were, an eight from a thread. Then start stringing the beads. The thread tension should be sufficient, but not excessive. The thread must pass through the bead twice: first in the forward direction, then in the opposite direction. On one of the cords, you can make a locking loop around the cord each time. When all the beads are strung, fold the loose ends of the cord and the end of the string together and tie them in a knot. Pass one end through the button and tie a knot from both ends and thread. Cut off any excess. You can additionally secure the ends with glue. Such a bracelet can be made short for one turn around the arm, or made long so that you can wrap the arm 2-3 times.

Sometimes a schematic drawing is enough to get the job done. Bead Bracelet Patterns very easy to find on the internet. Browse the relevant topics in LiveJournal or on specialized resources. If, nevertheless, you have difficulties in the manufacture of a particular model, look video bead bracelets, of which you can also find a huge variety on youtube. having mastered various techniques, you will be able to make exclusive jewelry. Headsets from a bracelet and or earrings look very good. And you will not have problems with gifts for relatives and friends either.
Of course, you can choose a ready-made bracelet as an adornment, but today "stamped" adornments are out of fashion, and all used about Exclusive things are gaining popularity.
A DIY bracelet is always fashionable, exclusive and original. Such a little thing will emphasize your style, and you can make exactly the decoration that you dreamed of!
Our topic today is about creating beautiful bracelets with your own hands. At first glance, this is difficult, but we will prove to you that things are much easier!
1.Leather bracelet
Leather is a noble material, durable and easy to work with. So, you can easily make a romantic bow bracelet from a piece of leather.
You can buy a piece of leather of any color for making a bracelet at. We have described in detail for you on eBay and the product.
So, we measure the volume of our wrist, and cut off a piece 4 centimeters longer (approximately) from the flap. Round the edges of the bracelet and insert a button into it, which will serve as a fastener. Strictly in the center we collect the bracelet in a bow, and sew it with a small piece of material. The bracelet is ready!
For its individuality, you can add rhinestones to the bracelet. We have found a chic assortment of iridescent stones for you.
2. Several bracelets in one
Very often celebrities dictate fashion to us, and judging by the latest releases, multilayer bracelets are in trend. When you put a lot of thin bracelets on one hand, it is elegant and bright!
But today we are talking about originality. Therefore, we suggest that you take over the baton only partially. To do this, you will need all the same medium-sized bracelets, which you can beautifully weave into one, and get an exclusive model.

So, first you need to buy a set of bracelets! Choose the color, shape and width at your discretion.
Different bracelets can be ordered in the online shop for hand made. You will also need a satin ribbon. A huge assortment of plain satin ribbons and with prints can be viewed in the online store.
Now all that remains is to weave the bracelets together with the help of this very ribbon.

Girls love everything delicate, and a bracelet with a bow is a great option! Several identical or even different bracelets, whichever you like best, can be tied with a ribbon and secured with a bow.
Even bracelets that you decide to tie with a ribbon can be made by yourself by stringing different beads on a thin elastic band or by wrapping the smooth rim of the bracelet with a silk ribbon. It's fast, easy, but effective.
Many beautiful beads for bracelets can be purchased from the online store.
3. Shambhala
The fashion for Shambhala jewelry began last summer, but over the year it has not passed, but on the contrary has only intensified! Celebrities are happy to show off Shambhala bracelets from their collection at important events.

Of course, many of the same type of jewelry are sold in stores, but as we said earlier, a self-woven bracelet can be made exclusively to your liking, satisfying your creative desire one hundred percent.
Shambhala can be woven from special beads for her, or from any - those that you like are suitable for your outfit.
You can order a variety of beautiful beads on the Alibaba online platform. and - the choice is yours.
The principle of weaving shambhala is simple:

4. Bracelets made of natural stones

Natural stones are a valuable material, and they look expensive and sophisticated. There is a wide selection of such bracelets in the store today.
You can present your own bracelet in any form - you can simply string natural or artificial stones on a string, or you can supplement this combination with various pendants.
Natural stone sets are commercially available, and many beautiful precious metal pendants are sold in.
5. Vintage splendor

Vintage is a special trend in fashion that not everyone understands. But those of us who accepted it were able to appreciate all its magnificence.
A vintage bracelet is not easy to make, but well worth it.
To do this, you will need:
- Bracelet base. It is best done using the papier-mâché technique. It should be flat.
- Next we need a piece of lace. Decorative lace can be purchased at the site.
- Satin ribbons.
- Beautiful beads. Better to take Czech - then each bead will be the same size and without flaws. You can order such beads at a reasonable price at.
- Hot glue gun available on request