How to present a craft from natural material. Crafts from natural materials with their own hands: interesting, cheerful and useful passion for children and adults
Production of crafts from natural material is a good hobby not only for children, but also for adults. Make something beautiful from what can be found in my own literally under your feet is a real miracle. Moreover, despite the ease of execution, such crafts often look very effectively and are suitable for any interior.
Crafts from natural material are different. If the manufacturer includes work with tools, for example, with saws or secateurs, you should not allow a child to this. Nevertheless, work with materials like cones, twigs or dry leaves for herbarium - what is ideal for children.

Flower vase in eco-style
- You will need branches and ordinary glass vase.
- Purley vase with branches. The branches can be slightly rejected from the vertical position, cross each other.
Roses from apples
- Cut the apples so thin as soon as you can.
- Gently boil them in sweet syrup (0.5 l of water on a glass of sugar).
- Fold slices like bud. At the expense of caramelized sugar, pieces of apples will stick together.
- Store the resulting craft in the form for cupcakes. You can simply feed apples to the table in the form of a dessert or decorate them cake.

Hello everyone!
Greetings on the pages of the blog "School"! Autumn courtyard. And what kind of "school" fall yes without autumn crafts? That's right, no) all sorts of different crafts from natural materials to school children bring annually in approximately in September - October. That is, specifically now! Therefore, it is now on the blog and comes out about these crafts dedicated.
Most of the works that you will see were found by me on the Internet. Their authors want to convey a big hello and say thank you for their magnificent creativity and wonderful ideas that I hope will inspire many small schoolchildren and their parents for their own arms.
Lesson plan:
From chestnuts
Great chestnut grows right with us before the entrance. And when in the morning you leave the house, then no, no, and you will get a chestnut on my head. It does not hurt at all, just suddenly happens) So you don't have to go far behind the chestnuts, they literally fall from the sky.

Last year, we made some kind of "checkers-bugs" from chestnuts, which then presented to the kindergarten's garden.

The master class for the manufacture of this game is planted.
And from Chestnuts, you can make such amazing snails. Very easy handicraft, which does not require much time.

Charming and not a terrible spider. True, done in the chestnut hole is problematic. Here, the child will surely need help someone from adults.

If you add plasticine and a little fantasy, you can make a whole Africa!

Well, or a bird courtyard.

And this caterpart is just a look!

I am sure that she could decorate not one exhibition and get a victory in some autumn competition.
From the cones
And for cones, we walk with a basket in the Victory Park. But there you can dial only pine cones.


The gaming field from the branches is done, and the chips themselves are from pebbles, but they can be built of chestnuts, and even from halves of walnuts shells.
From leaves, colors, berries
What, and beautiful bright leaves in the fall of a lot. Collect - I do not want. However, like berries, rowan, for example.

I remember when Sasha went to the first class, it was still in another life (before the blog), we with her for school did roses from autumn leaves. I did not work in any way, tried many times. As a result, they coped. It came out about it.

Of the leaves and colors you can do various applications.


Use them with other natural materials.

And you can try to create a real work of art.

Rowan berries are perfect for the manufacture of jewelry, beads, for example.

From something strange
And still walking along the autumn parks and the streets you can find something strange and, at first glance, absolutely not suitable for crafts. For example, here is a piece of birch. How to call it? Cooked, what?

We found it and took with you. Brought home. Wash, walked. And decided to turn it ... in watermelon! Very suitable form. See what we did.

We needed:
- birch;
- acrylic paints (white, green, black, red);
- tassels;
- acrylic lacquer;
- pVA glue;
- plasticine.

First, the PVA glue was primed by our entire future watermelon.

Then they painted the "crust" into the dark green color.

And spent the dark strip on the middle.

The "watermelon flesh" was covered first with white paint.

And then, a little retreating from the crust, so that white rims remained, everything painted with red juicy.

To make the transition from white to red more smoothly added a pink strip between them. When our watermelon drop, we covered it with varnish. After this, he became even more.
There is not enough bones! We were blinded from black plasticies and glued to the places.

Now this birch watermelon stands in our room in the most prominent place and pleases us and our guests, which are still lying to touch this bit of summer.
That's how many different crafts can come up with and make for primary school with your golden hands. Nothing difficult, but how exciting!
And right now, singing kids will share with you your beautiful golden autumn mood)
And what have you already done to build from natural materials this fall? Tell? We are waiting for comments)
Enjoy your creativity!
Your, Evgenia Klimkovich.
Spruce and pine cones are a wonderful material for bulk toys and entertaining homemakes. It follows all sizes of cones - from small to the largest.
Sorted rock, magnitude and volume (elongated, round, open and closed, old and young, pine and firing) cones decompose into separate boxes.
In the spring, when they collect old, dried, with the bump seeds dropped, you can not be afraid that they are deformed from time to time. The autumn bump to avoid deformation, proof: lower the joinery glue into the liquid solution. The glued scales after drying the bumps will not be revealed and diverge in different directions, and the product shape will be saved.
From pine and spruce cones can make various animals, birds, all kinds of figures, attracting plasticine, clay, sticks, matter, feathers and other finishing material. Each toy consists of several parts that are at the heart - shishke. Such a toy is either attached to the board-at the rate, or hangs like a Christmas tree toy, on the loop. The most difficult to sculpt the head toys. To make it right, you should stock photos of this or that beast or bird.
Starting work, you should first take care of a solid fastening of toys, that is, a stand, if the toy is not supposed to be hanging (christmas). The stand can serve as plywood or thick cardboard, carved on any rectangular or round form. The stand should not be cumbersome, but it is necessary that the toy makes it freely, taking into account additional finishes: moss, cotton or other finishing materials.
Fasten the bump on the stand is best on the nail, driven into its middle the edge up. In the cishe is pierced with a sequel hole, and it is put on a nail. For a more durable attachment at the base of the nail, it is necessary to smear the stand with a joinery glue or lay a lump of soft plasticine.
Toys from cones can be given to a supreme kindergarten, they can make fairytale performances of the desktop theater, layouts, illustrate the fables and poems in the lessons of the Russian language. Pa branches of the Christmas tree Such toys suspend the looping either they set them around the Christmas tree, at her foot. Toys from cones for suspension make it lighter so that the branches from their weight begged. Therefore, the head and all additional parts for them should be made from cotton, cardboard and paper, and not clay or plasticine.
Duck, chicken, goose, rooster - All poultry is made from cones one by one. For the head and neck, the required length of the segment of the soft wire is bent, which is fixed at the cutting of the bumps with winding between the rows of scales. The ratios of the sizes of the head, neck and feet are made by referring to drawings or with live birds. Cepeclen and swan focus to the stand with a joinery glue. Stand can be arranged in the form of a river or a pond, putting the base painted blue paint cellophane or glass. Beach will cross moss and dry herbs. For fastening on the stand of roosters, chickens, bruisies use small pieces of plywood, fly off with moss; From the copper twisted wire, make the birds legs.
Heads and beaks on all birds do from Berriest, Cardboard, Sukna or Celluloid. Tails and wings have a rooster from feathers, wings of geese and swan from pieces of white Beresta.
When modeling the neck and head of plasticine or clay, it is necessary to separate well and smooth all the roughness of the shape. There are no irregularities on the neck of the birds, and smears imposed plasticine or clay will give a toy ugly, sloppy look.
Fox, squirrel, bunny. Made from different cones, the principle of assembly and fastening the same.
Tails, except for the tail of the bunny, make an added cone, strengthening it on a wire.
Forers, fused out of clay or plasticine, are strengthened on the cushion of the bump.
Fastening to the stand is made by attaching a bump on a nail. The beasts standing on the paws are attached to the stand on the nails.
Cachets cones facing animals from the muzzle to the tail will be like a fur. The tail is attached to the scaly up.
Chanterelle and proteins are a tire for a tail should be long and fluffy. At the bunny, the tail is cut out of the part of the bumps.
Eyes in beasts are lined from beads on plasticine. Beads can be replaced by fragments of black graphite from a pencil.
The paws are made of matches, wire, placing them with scales or stuck plasticine. Good on the paw to stick over plasticine on one flake. Paws thanks to a wire basis can be bent as you like, giving this tilt figure.
Crawling several animals, you can create whole pictures, illustrating the fables, fairy tales, puppet performances.
Fish telescope. Made from short, thick pine cones. The eyes of the telescope - two convex balls. They are removed from beads or just put out of plasticine. The tail is lined with curved feathers of different lengths. If the fish make for the Christmas tree, it is painted silver or gold paint.
Chick. The tire is selected on the form of the selected pattern. Registration of the other parts of the bird depends on the existing material and taste. Head and neck birds are made on a wire frame.
Such birds can be made somewhat and paint with colored ropes. Separate with feathers and varnish.
Humor chicken. Pine bump strengthened obliquely on two twisted wire legs. From the twisted wire is strengthened under the scales of the cervix cone and the ball of the head with the beak. On a wire cozo, plasticine is slaughtered a round head, onto the beak well on top of the wire to put a red cloth or celluloid. The tail can be made of feathers or cut out a curly image of feathers and paint them with a barrel. Excellent eyes will turn out of black beads on the white bases-circles.
Zhuravlik. Between the scales of the pine cones firmly strengthen the wire frame for long legs of the caravlik. No less than a long neck. The figure shows how to bend the wire to give it the shape of the head, beak and neck. Everything else is the design of the bird as usual.
Pay special attention to the strength of the attachment of the cones to the frame and to the stand. Carelessly made frames of paws, neck and heads easily disappear.
You can still enclose the flakes of the roof of a small house on the layout. She will be similar to the tile. Scales can be painted with colored varnishes or oil paint. One-color scaly roof is covered with varnish.
Children's carnival costumes can also be decorated with cones scales. They can be sewed, rolling, glued to matter and paper, make up different applications from them.

Bear. For this toy you will need six old, exposed fir bumps: one big and wide for the body, four smaller - for the paw, and one small, if possible, spherical, for the head. To attach a paw to the body, a thin soft wire wrap the cone from its very base, passing the wire between the scales, and tighten its ends alone with another. Then, pulling the lip-paw to the body, wrap the two wire around the bumps, passing the wire between the scales, but so that it is not seen anywhere else, tighten the ends, bite them off with nippers and hide the bumps under the scales. At attaching this way all four bumps and paws to the body, just as attach and the bump head.
From pieces of old, unnecessary skin, suede or dermatitin cut off the scissors by the attached patterns of claws for the paws, two mugs for the eyes, two ears and the nose of a bear. In the center of the eye mugs, the sew two shiny black beads or small buttons. Separate four scales from the bump and stick them on both sides to the ears of the joinery glue.

To the chiske-head, the trick, if possible, unnoticed, black thick threads of the eyes, nose and ears. The ears can be glued and glued, smeared the base of the ears and tightly adding them into the depths of the bump head. Also a trick of the cunning bear and pressing your fingers. Cover the nose and claws a bear with black varnish or paint them with black paint, and then cover with colorless varnish.

Squirrel. It is done on the same principle as a bear. Take three spruce cones: medium size for the body, small for the head, large, fluffy - for tail. Connect them with each other. From trimming of old leather or suede cut on the attached patterns of the paws and ears of the squirrel. To keep the legs better, make them on a wire frame, cover the frame of the frame then with a brown matter strip or wrap a brown ribbling threads. Attach the paws to the wire so that the wire is not visible. In the front paws of the squirrel, put the nuts, acorn or a small born, attaching to the legs or another with a black thread or a thin wedge. Squirrel eyes make black beads. Ears, as well as a bear, stain between the flakes of the bump or the trick. When the protein is ready, attach it to the wire to the stand round or rectangular shape. Hide wire or nails with small bunches of green moss.
Fabulous bird. Prepare a large pine bump with highly discontinued flakes, legs for legs and feathers of different sizes. Feathers better pick up the goose, as they are better painted. Before painting feathers, lower them first in the soap soda solution, and when they dry, paint aniline paints in bright colors: yellow, blue, red, green, orange. For the tail of the birds you need long feathers, small feathers with the flock will be needed for the neck. Feathers attach to the bid like this: Pulse the bump triangular seer, squeeze the end of the pen with a joinery glue and join the pen into the hole. Sprigs are attached to the bid-torso in the same way as feathers.

Make the head of the bird from cardboard, leather or cloth. Between two patterns of leather and cloth, be sure to stick a piece of cardboard or wire so that the head holds.
Now come across the Khokholkom: pick up some bright, beautiful, shiny beads or beads, slide each bead on a piece of thin wire. Tighten the wire with a nodule and climb in the middle of the bead so that it is not visible. Enter the wires of the wire on the first pattern of the head, creek them with pieces of paper. Then squeeze the second pattern, fold them together and put under the press. When the head dries, stick it to the bishke-torso.
Now it remains to paint the head, glue her sequins-eyes and strengthen the bird or on a wooden stand, or on the bitch of the tree. Bird is ready.

Cockerel. Draw the loop (without a tail and crest) on the cardboard and cut down two copies of the cockerel case. Then pick up feathers for the tail and paint them into the right colors. From a small piece of red velvet or cloth, cut off the scallop and a beard, also two copies, and glue them with each other.
Spread the first and second pattern of the cockerel case the first and the second patterns, put on one of the gridiron and the beard, and the second pattern cover the first and put under the press. So that the cockerel was in bulk, lay the wire inside the cuttings. The ends of the wire can serve as a rootier with their feet and attached to the stand. When the patterns are dried, fierce the tail feathers with threads.

Take straw, cut it along and plunder the rooster legs; They will be very similar to the legs of the living rooster. You can wind up the legs of the cockerel of the darling threads of suitable color, and you can simply paint.
Color the keys and the top of the head of the cockerel and plunder the neck and the whole body of the rooter with flakes of the fir bump, having flakes so that the top covered with a slightly bottom.
At the place where the rooster should have wings, stick a few feathers.
You can attach unscreased, natural chicken peas of brown or yellow. Make your eyes a rooster from beads. You will get very interesting, bright rooster. Cockerel can be made more voluminous.
Flying bird. Pine cone omit in glue solution. Then make the head head. Make the head as the head of a paradise bird, only without a hokholka. Then cut out of the thin cardboard the base for the wings and enter to these pieces of cardboard feathers. Top glue fluffy feathers to cover the base of large aces. In the same way, make the tail.
When the wings and the tail will be ready, a triangular seer drill in a bump of holes and, hagging the base of the wings and the tail of the joinery glue, join them tight into the holes made in the chish.
Stick the head of the bird and small sprigs-legs.
Pries for such a bird can be colored, but you can use natural - white, yellow, motley feathers.
So that the bird can be hanging on the Christmas tree, make a long loop on the back.
Hedgehog. Take a large unwashed firing bump and plunge it into liquid carpentry glue so that the scales do not revealed it. Cut two strips from a brown tissue in a half-meter width and a little less than the length of the bump. Put one strip on a sheet of paper and stick to her spruce needles one next to the other. Stripe with needles stir up on a bump. When the glue dries, lubricate the needle row passed by you at the base with joinery glue and at the same time densedly to flash the strip on the shishke itself. Stick the second strip of fabric so that it sticks to the first row of the needle and at the same time to the chish. So stick the rows of the needle, alternating them with strips of fabric until you get a round hedgehog. On the tummy hedgehog needle do not glue. Leave non-stitched stripes with needles muzzle items. Then attach the head of the paw from the bitch of the tree, make a spout and eyes from black beads.
You will get a wonderful barbed hedgehog, very similar to the present. Hedgehog from the needles can be made in another way. Carefully look at the drawing, and you will be clear the second way. Tension a piece of old fabric by scoring with cloves, between two bars or boards. Then, dipping the needle into carpentry glue, stick it into the tensioned fabric so that only a small tip remains at the top. And so run the needles into the fabric one after another, having them as close as possible to each other. Then remove the fabric, cut it out in the form shown in the figure, and stick to the bump, thickly greased glue and the bump and matter.

Summer and autumn crafts from natural material - the most popular theme of the development of creative skills from preschool, younger schoolchildren. Some adults are also keen on the manufacture of dry bouquets, panels, three-dimensional compositions, jewelry, christmas decorations, creating real works of art. Justice and needles are in progress, pine cones and chestnuts, feathers and eggshells, moss and birch bark, buckwheat cereals and walnuts shells, wood shells, river pebbles and yellowed maple leaves.
Tools, additional materials for crafts
In addition to freshly coloned natural gifts, herbaries, to create all sorts of souvenirs, they will need some tools available in each house. These include:
- sewing needles;
- pencil;
- line;
- acute awl;
- scissors;
- tassels for glue, paints;
- stacks for plasticine, plastics;
- clamps or clothespins;
- thick books for drying leaves.
Additional materials:
- plasticine;
- plastic;
- threads;
- pVA glue, adhesive pencil;
- white and colored paper;
- corrugated cardboard, ordinary cardboard;
- flexible wire;
- fishing line;
- toothpick;
- matches;
- gouache;
- varnish in the canoe;
- wool;
- ribbons;
- beads, sequins;
- felt.

Kids are advised to give special scissors with rounded ends, adhesive pencil, instead of liquid glue. Needles, other sharp items are used only under the control of adults, toxic, hasty paints and varnishes are prohibited.
How to prepare natural materials for crafts
What can be used to create crafts:
- vegetables, fruits, berries;
- "Helicopters" of maple, "earrings" ash;
- poplar fluff;
- grape vine;
- flowers of immortelle, roses, lavender, yarrow;
- the fruits of Chestnut, oak, Physalis;
- cones of coniferous trees;
- lupine seeds, sunflower;
- whole peas, beans, corn;
- oatmeal, buckwheat cereal;
- ears of cereals, straw, reed, sisal;
- shells of pistachios, walnut, forest nuts;
- coconut, peanutsor shell;
- shells of mollusks, snails;
- czech, air bubble of large fish;
- feathers, Silver Eggs of wild, Poultry;
- embeded hedgehogs, dickening;
- maple leaves, oak, lilac, aspen, fern;
- alder bumps;
- pumpkin bones, apples, watermelon;
- lemon peel, orange, grapefruit;
- wood mushroom;
- birch birch, willow, oak;
- moss, algae;
- twigs, sticks, squigs, roots, wood, sawa;
- pebbles, large sand.

So that ready work for a long time had a beautiful appearance, not covered with mold, was not deformed, the materials for it are required not only to collect, but also to prepare properly - dry. Leaves, cereals dried between pages of thick books. Beresto, oak bark, other elements that should be flat, dried under a sheet of organity, with cargo set on it. Spreads with hawthorn berries, rowan, stems with poppy boxes, fruit fruits, Helicurizum flowers, yarrow, Mordovnik, dried in suspended. Floral heads can be dried and jumping into a container with sand. Soloma, stems of the manner, Borshevik, dried under a canopy outdoors, turning from time to time. Forest moss, acorns, bumps, chestnuts, fir legs, unfolded on a newspaper in a dark cool place, turn over every day. Fish bubbles, scaly, egg shells, snail shells are washed, dried in the shade.

The original look has compositions, crafts made of seeds of exotic plants brought from distant countries.
Chestnuts
The fruits of Chestnut Konsky is easy to find on the streets of any city, they ripen in August-September. For crafts, windshields are selected for different sizes, but preferably the right, rounded shape, dark brown. You can dry them, laying up a thin layer on newspapers, without access to sunlight, in a cool place. The process will take 10-15 days.

The drying of chestnuts in a hot oven is categorically not recommended - their peel is cracking, the fruits almost lose their appearance.
Justice
Acorns are oak fruits, in different breeds, they differ slightly in shape, size, painting. Collect them at the end of August - early October, it is necessary to choose the whole, not damaged by insects, without signs of germination. Freshly planes are washed under running water, if necessary, clean the brush, dried on a towel, paper. Next, it is necessary to heat the oven to 50-70 degrees, lay out acorns on the baking sheet, leaving the door ajar. The process will take 90-120 minutes, during this time they need to mix at least three or four times.

From the acorns you can make the funny figures of men, animals, draw the photo frames. The "scattering" curtains from oak fruits, wreaths on the wall, a puppet house, look original.
In the village of Justice, some other vegetable materials are dried on top in a Russian oven.
Cones, needles
Pine cones, ate, cedar, larch, alder collect in spring or in the middle of autumn. If the seeds are still closed with scales, it means that they are wet, after drying they will reveal. Before drying, the fruits are soaked in a solution of vinegar with water to remove insects, cotton sticks and alcohol are used to get rid of the resin. If it is required that the bump is closed, before drying it is completely dipped into carpentry glue.

You can dry the bumps:
- on the street under a canopy - the raw thin layer laid on the newspaper in the lattice boxes, grids, baskets, leave for 15-20 days;
- in a pan either, the oven is heated to a small temperature, but the door is not closed, time is about an hour;
- in the microwave oven - a large plate is taken, covered with a paper napkin, the cones are stacked on top, the process will take less than five minutes, the process must be controlled.
Hiversal ate dried straight with branches, in the form of "fir legs", in suspended form. Pine needles can be cut if only they are needed for crafts. Preferred slow drying under a canopy.
Orekhi
Walnuts are usually sold already dried, their shell is used for crafts, which is separated from the nucleus with the help of scissors, since the hammer crumble almost completely. Fresh fruits purify from the peel - it is better to do in gloves so as not to stain your hands. Nuts are dried under the open air on the tarpaulin, for two or three days, if the weather is dry, sunny, in bad weather - in the attic, lattice racks, but the process will take up to the week. Faster way, no more than two hours - oven, rustic stove, special vegetable dryer.

For the manufacture of crafts, forest, cedar nuts, peanut shells, pistachios are also used.
Leaves, Flowers, Seeds
The leaves of various trees are collected in summer or autumn in dry weather. Surride within a week-two, putting into the old book, tightly pressed on top of several more. You can dry quickly, invested between two sheets of tight paper, sobrive the hot iron on both sides. The most commonly used maple, rowan, oak, birch, oxine, currant, ferny, ropeful, flipodnic, fern.

Dill seeds, badyana, peas pepper, coriander, mustard, pumpkins, zucchini, sunflower, watermelon, apples, wild cucumbers, apricot bones, peach, dried on the newspaper, in a dark ventilated place. Peas, beans, beans, lupine pre-deliver from the pods. All seeds are permissible to process in a vegetable dryer or on the oven.
Volumetric flowers, such as roses, asters, garden immortals, dried in the sand - it is preliminarily preliminarily rolled in the oven or in a frying pan. Then the sand is poured into any container, the buds are placed on top, carefully fall asleep by the remaining sand, leave for three to seven days. Flowers for panels (valley, daisies, lilac) are dried as leaf.
Grass, moss, poplar fluff
The poplar fluff is collected at the beginning of summer, but in a dry, cool place he is able to be kept all year round. It is important to carefully take it away from the possible fire ingress - the material is very easily flammable. From the flock make snow for panels, volumetric compositions for the new year.
Moss (Sphagnum, Cucushkin Len et al.) Gently pressed, eliminating extra moisture, dried on the newspaper at room temperature either on the street, under a canopy in dry weather. Grass, straw, lichen dried almost the same.

Moss most often make a miniature forest edge, grass thickets.

Bark

Cut the bore is better with healthy, strong trees for which such manipulation will not be overly injured leading to death.
Spreads, wands, Wooden Spike
Woodwood is recommended to harvest when the juice movement is minimal - from October to February. Then the drying of the wood will not leave a lot of time. For the speedy removal of the intercellular juice, the bores are digested, after which they decompose in the cool room to concrete floor or several layers of newspapers, once a couple of days turn over, in two weeks they are in the oven or on the battery. Immediately put on a hot medium it is impossible - the spears crack. Previously need to remove the bark.

The branches, sticks, squigs after the collection carefully examine, remove damaged by rot, pests, after which they are dried in a warm dry place, without access of direct rays of the sun. The twigs with the kidneys are harvested in the spring, the roots dig up, trying not to damage, purify from the ground, dried from one to three weeks, depending on the thickness.
Pebbles
Stones are cleaning from sand, lands with a rigid brush, washed with water, sorted in shape, color, size. Dry pebbles are allowed in any convenient way - on newspapers, battery, in the oven, hair dryer, etc. Stones with natural holes are used for the manufacture of jewelry, all kinds of amulets.

The shells of sea, river, lake, grape snails, bivalve mollusks are brushed, cope in water to remove all organic remains. You can dry them on the newspaper, at room temperature. Shells are perfectly suitable for creating marine compositions, framework, mirrors.

Sand
Sand for crafts is preferable to large river, but if it is so getting problematic, anyone is suitable with the nearest construction site, from the sandbox. It is sifted through a fine sieve to remove everything too much, washed in water, dried, decomposing a thin layer on the oven in the oven, mixing periodically.

Eggshell
To create crafts, chicken eggs, ducks, ostrich, quail, droinding, parrot, etc. are suitable. To prepare shells, they are required to get rid of the protein and yolk. For this, small holes are done on both sides of the egg, after which the contents are blown into a cup or suused with a large syringe. Then the inner part is washed with water.
An excellent mosaic will be released from the broken egg shell if the pieces are painted in different colors, stick on a predetermined surface.

Feathers
Breeding bird feathers preferably take from home, as wild crows, pigeons, ducks, other feathered often sick infectious diseases. Wash feathers not necessarily, dry can be dried by an ordinary hairdryer, while simultaneously having fun. Often on sale there are already processed features of exotic birds - Pavlinov, parrots.

Fruits, Vegetables, Berries
Rowan berries, rosehip dried on a branch, hiding on the rope, or putting in one layer on the newspaper in a well ventilated place. In the pumpkin, zucchka, the patissone cut through a small hole, wipe from inside with alcohol, stuffed with newspapers, leave for 10-20 days, depending on the size. Dry vegetables, fruits, citrus crusts in the oven at low temperatures, in the shade on the tarpaulin, newspaper paper.


How to Store Natural Materials for DIY
- rag bags;
- carton boxes;
- thread mesh;
- woven from the vine, newspaper tubes baskets;
- plastic containers (for stones, fragile seashells, egg shells).

Ideas for kindergarten
In the manufacture of panels, it should take into account the color of the leaves, colors, herbs and other things - on a dark background, light details look good and vice versa. Here are a few simple ideas described by step by step for the smallest:
- owl from beans - on a sheet of colored cardboard, the contour of the owl is drawn, its inner part is placed by beans. From dry daisies, eyes are made, on the one hand, a piece of cortex is glued - it will be a tree, a sprigs with oak leaves are attached to it, rowan. Wings and paws of the Sovice are also made from the leaves;
- hedgehog - made from fir bump, to which plasticine legs, eyes, nose, mushrooms are attached;
- chamomile - you need to take cane stalks, pumpkin seeds. Seed seeds are made from plasticine, petal seeds are inserted on the sides, then the head is attached to the stem;
- matryoshka - to work need pebbles, in shape resembling a nesting, gouache paints, which draws face, handles, handle pupae;
- forest in the box - a box of suitable size is taken, moss, pebbles, pebbles are glued to the bottom, trees are made, which are fixed with plasticine. From a large, medium and little "fluffy" cones make three bears, plasticine eye sticking, noses, ears made of halves of the heats of the acorns;
- autumn bouquet - you will need a bank with a lid. A snag, a twig, to which multicolored maple leaves, birch, oak, all kinds of dryers are attached to the internal part of the lid, tighten with a jar, twist;
- horses and donkeys are their torso, heads are made of acorns, legs - from matches that are attached to the holes made by a seboard. The ears are made from the "earrings" ash, eyes-nose - from Lupina seeds;
- spheres - are performed from chestnuts, angry hats bent in the middle of the toothpicks. If desired, boots of plasticine or plastle are excited by eight spoy legs;
- dragonfly - wings are created from maple "helicopters", peeks from lupine, the body itself is from plasticine or a suitable stick;
- turtle - For the manufacture of crafts, you need a walnut chat, plasticine, from which the body is performed, eyes from small seeds.

Hello subscribers!
On the courtyard of bad weather, and can the sun shines? It does not matter because there is an unforgettable time of year ahead of us. It will be in multi-colored paints and with many surprises, because autumn always presents us your gifts. But, in addition, it also opens up its natural wealth. That is why in schools and kindergartens are immediately made crafts from natural materials, together with other components. It may be vegetables, as well as paper or plasticine and MN. Other.
Children, well, just adore all such creative work, because different funny toys are obtained in which they can then play.
In addition to all this, you can even take the autumn leaves and compose masterpieces or bouquets from them and insert them into or make something. Well, this is not all, cool souvenirs come out of ordinary cones. So, if you are interested, stay at a minute and scroll through the note from start to the end. I am sure you will find a lot of interesting ideas of what can be made of natural materials.
Well, if you have your own thoughts on this topic, please share below an article and write your feedback and comments.
I want to start this conversation with the fact that you do not even imply and cannot imagine that everything is much easier than you think. It turns out to make masterpieces you can take the most ordinary sticks, twigs, and maybe you have pebbles or shells. In general, all this we always have at hand, so why not take advantage of it.
I propose to stay on stones products that are always in any terrain. If you were somewhere on vacation, they could bring such with you. It is advisable to take certainly smooth pebbles. Take a log or skid and neatly with the help of a glue gun glue the planned composition. Here you can make flowers for example. And so that the caretaker turns out brighter and aesthetically, paint it, for this use acrylic paints.

Pretty popular is the product in the form of a hedgehog, here look. In my opinion, there is still not enough mushroom or autumn leaves. So it's easy to fix take the colored paper and cut the desired image.

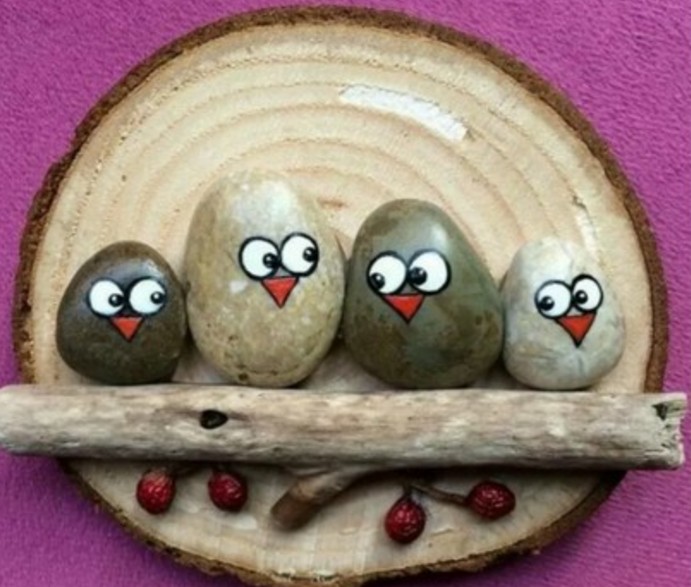
You can make a whole picture, make such a cheerful family in the form of birds on wood. As you can see, ordinary sticks are involved here.
Well, by the way, do still life.

For the smallest kids as a basis, take the following composition. Draw on a sheet of cardboard or a4 maple leaf or any other and then decorate it with multi-colored stones.

And if it is even easier, then choose such a minimalistic picture. Which do not forget to decorate with multi-colored paints.

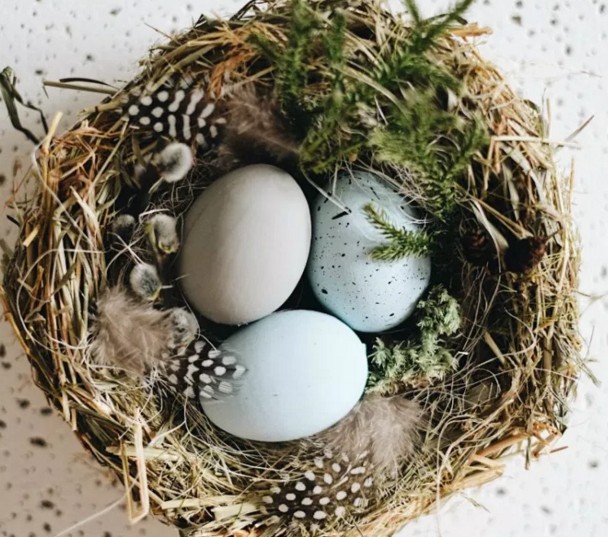
An excellent idea can be a bird's nest from straw. You need to cut a circle from cardboard.

And from straw twist the flasher.

And after twisted from it to the diameter of the circle the socket and fix the ends of the threads.

Thus, screw the spirals so that in the ultimately it turned out the bed in the form of a cup, glue the straw to the glue.


Then fill the souvenir by the fad or feathers and put eggs, bumps.
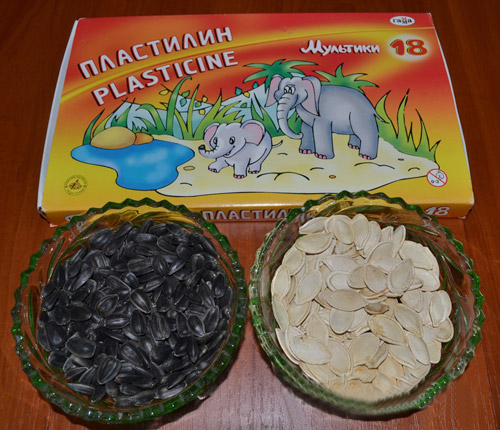
If you are a fan of pumpkin or sunflower seeds, then you can create nothing that is fantastically beautiful. See this photo faster. It was awesome! The author took and decorated the hedgehog, and his spines with ordinary seeds and drew autumn.


But here pumpkin seeds were used, by the way, you can think of all sorts of masterpieces. In I have already shown several such works. Now I'll show this. Seeds are painted, who does not know the paints, gouache or acrylic, and then stick.

Here the artist did not use glue, but adds everything on plasticine. The trunk of the tree is made of bunting grains.


From pumpkin seeds also make a stork, it turns out such a panel, or as a picture hang on the wall and admire.

I was shocked from one amazing and cool craft, I mean a chicken from which the author fulfilled different seeds. For this masterpiece you need pumpkin, and sunflower seeds, as well as plasticine.
1. From plasticine to cut out the basis, that is, the head and body body.

2. Then start decorating the chicken chicken alternately seeds, so as shown in the picture. First there will be wings.

3. And then the tail. It is already funny.
Do everything carefully and do not hurry, it will be from your efforts to be waiting for success.


5. Harshologists make from red plasticine, and beak from yellow.


I really liked more trees from beans and watermelon seeds.

And you can also connect several types of natural material and get a picture. For example, it is used here more oats, and the rim is made of corn grains.

And remember in childhood they allowed the airplanes, which also recommend to create souvenirs. I mean maples.

This also includes crafts from dry materials. Such a sun rays.

Or a clearing and a loving.

In addition, use straw or acorns.

It will turn out not only paintings, but also men and insects from chestnuts.

In school, I always remember the lessons of labor of such cheldobeks.

Well, if you have a hoodie pistachk, or rather the peel, you can imagine you can become a real decorator. Make this Topiary.

Well, or a vase and in it insert dried or fresh flowers.

Well, in conclusion to this chapter, I want to hit you. I found one funny sample that you can easily perform. It will take just a board, nails and woolen threads.
On the plywood, circle the maple leaf and take the carnations along the contour.

By contour, pass the orange thread.

Then begin to be confused in chaotic order, as if we put patterns, spider web. Wonderful, coped?

It is also sympathetic to me such a funny plot, in which the author took ordinary logs and laid out such birds.

These friends resemble something snowmen.

Crafts for elementary school "What the autumn gave us"
Of course, to make the composition on this topic, it is enough to have everything you need at hand. This means you need natural material, and remedies. Plus your desire, imagination and of course fantasy. If it is completely tight and inspiration is not coming, then take these ideas and create.
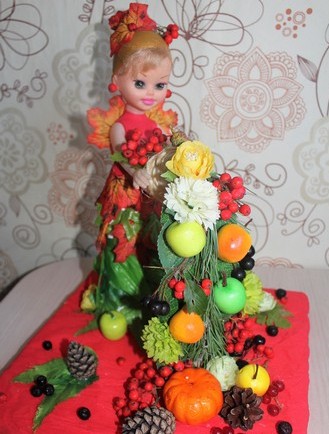
Girls offer to take your favorite doll and arrange such a golden outfit.

This is how it turns out to go to the park and getting driving dry leaves and you are already a wizard).


Brilliant, well, isn't it? From the usual toy, such a queen came out.

Perform such work from Physalis.

Or for example, build alarm clock or oxics from the twigs.

Rubber and bumps will help you decorate.

Well, not in the last place, probably the most popular will be an aircraft using seeds. We always see such creations at exhibitions in kindergartens and school competitions.


Everyone knows that autumn is rich, so make wonderful masterpieces.


By the way, decorate your grade awesome, while making garlands from the acorns, chestnuts and berries of Ryabina.

Or such an idea.

Put the web and bring it to school.

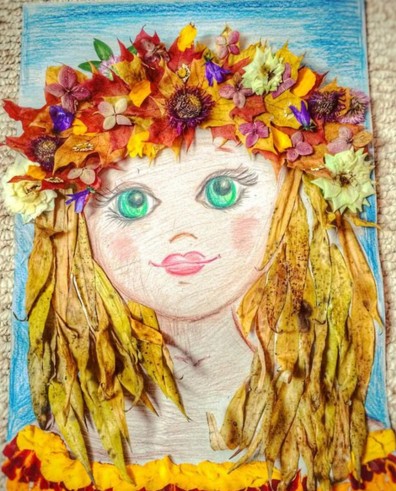
Probably the most intentive there will be such a charm, well, the symbol of this time of the year in all its glory is the face of the girl. Take any flowers, plants and create.


You can make such a portrait. I think elementary school students and even preschoolers with such work will cope with a bang. Well, the middle school all the more.


Super looks like this gift, these are roses, but unusual, and from maple leaves.

You need to learn how to scratch the leaves, here's a sequence of actions. See this short master class:
On this topic, how to create such a bouquet I found on the Internet on the Yutub channel here is a video. Maybe it will be useful for you. Happy viewing.
You can make a beautiful wreath.


Do not forget that from fir branches will not make much difficulty to build a lot of creations.


What a pretty owl came out, eye does not tear off.

You can build oak, see how wonderful it happened.

Here is another idea, take yourself a note.

Autumn work in kindergarten from natural materials
I think the kids will like the work called Applique. Cut on the squares of the leaves and stick to the landscape sheet in the form of any character.

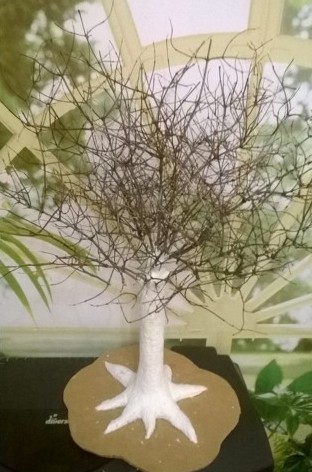
Also a good idea can be such an unusual tree. I would say the magic, on the one hand on it winter, snowball or frost, and on the other - foliage.

You will need to make a gypsum barrel, a stand-up stand and stick the collected twigs into it. Let your baby decorate now it is as shown in the picture above. Make the snow from the wool, and greens from dry grass and leaves, colors.
Or you can perform spiders or a hut on curious legs with a Baba Yaga. After all, children love fabulous heroes.


And you want to go not traditional and take as the basis of the chips from simple or color pencils and fulfill such beauty.

Also create figures from the walnut nuts in the form of a bear.

And here is such a mouse.

Here is still a couple of mice.

It also looks perfectly with panels using rowan berries.

You can mainly take the following option, make the leaves from the paper in the style of quilting, and ride the row.

Here is such a funny kitten, well, clearly raise the mood.

And also I want to offer preschoolers to make a smart owl.


Of the sleeps of trees, it is easy to build the following.

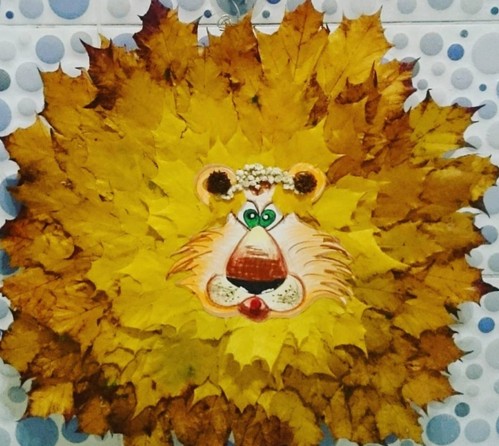
Or make lion or lion.


Also eagerly stop on simple models that are cut as follows.

You can also draw, take the basis of the stencils of dry leaves of trees as stencils and simply by dipping them to make prints.

Or then you can make a drawing with birch.


Next work, draw a picture of a woman or a girl, and offer to the child to make hair.
Connect the imagination and build animals or animals.

It is interesting to arrange a boat.

Or make a peacock or firebird.

Toys and souvenirs of cones: quickly and beautiful
Well, now I present to your attention the most interesting from the acorns, cones and probably plasticine. Because it is this component that will help recreate new toys and souvenirs.
Before you, a picture that is made with the help of paints is drawn background and multicolored cones, which are also painted with acrylic paints.

Next work, this is such a cute Topiary, from all that was in the forest. Here and the branches of the Christmas tree, bodies, berries even acorns.

Love Masha and Misha from the cartoon, then you will like the next idea.

On this topic, I found new items for you in this video from the YouTube canal. So, not miss!
Well, a couple of idea that you can embody into reality.
It may be birds, such as owl or swan, as well as a basket of cones.

Easy to make an angel in the form of a pupa, or suspension.

Even protein, but also besides plasticine, felt fabric is used.


In addition to all this, you can also take any fruits and vegetables and arrange any composition using natural material.

Original crafts from leaves on the topic Golden autumn
If you are not at all about something to do, then take and make the foliage in the parks and you can not believe such creations from it. Even kids will cope with 2-3 years. Well, the schoolchildren are all the more. I have one child in our house lives and studying in the third grade, so he painted the collected leaves like this.

And with my son, which is already 5 years old, will almost soon, we will make such a miracle. Here is such a butterfly, he chose the second, and what do you like more?

Honestly, I still liked the hare and fox. Take a look, even a bourge adapted.


And what is this bird? Peacock, Wow and the tail of her beautiful!

Well, a magnificent idea can still be the following composition in the form of aquarium and fish.


In addition to all this, you can easily and quickly create insects.

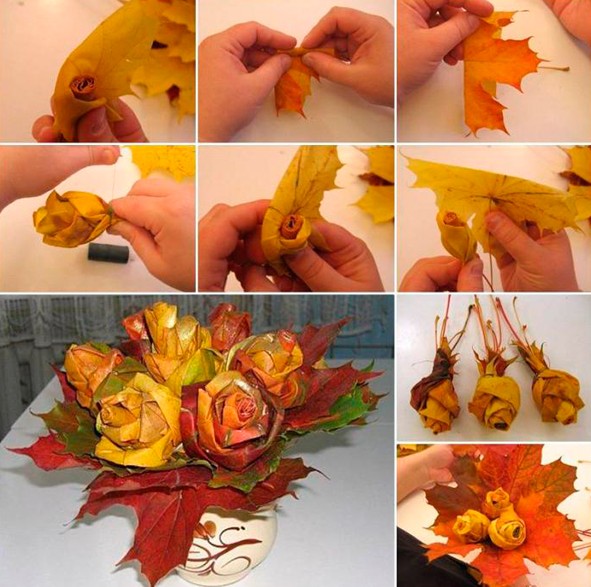
But probably the most beautiful and charming will be a handicraft in the form of maple leaves, they are folded in an unusual way, in the form of roses. Here you have an instruction for the manufacture of such beauty. Repeat all actions as shown in this picture.
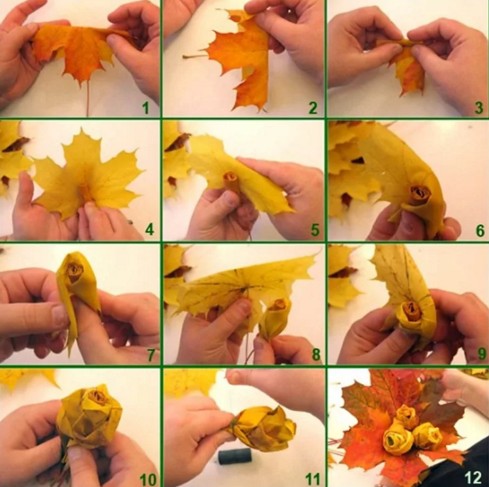
That's what ultimately should go out.

You can, make flowers absolutely any kind of leaves. This will help you with this video, see the master class.
In addition, take the usual vase and place dry branches in it and decorate the foliage.

And also any photo frame can be unusually present.

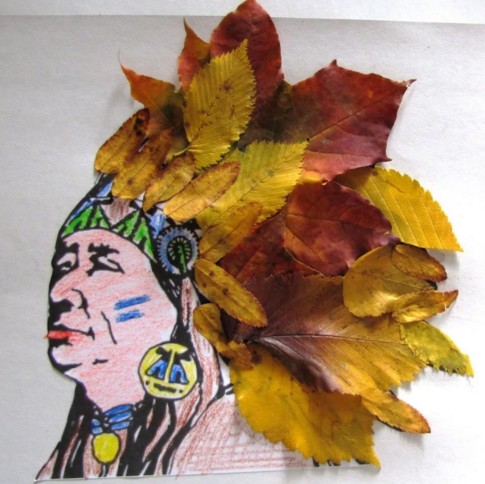
Well, and boys who love the Indians do the leader.
And here are some more cool ideas on the fact that from the leaves can be invented and executed. Here they are children's creations.


As you can see what is just not. Turtle, snail, helicopter and even a mischievous parrot.


Or lay out a fabulous pet and a cockerel.

In addition to all this, you can go not traditional and make pictures.

And if you do not have enough sun, then here is the idea.

To decorate the interior, and well, and to the exhibition in school or children's kindergarten, you can also bring a vase from maple leaves. How to do it? You will need PVA glue and air ball.
If in brief, then you can look at these steps and already today to build such creation.

Or consider these stages of work.
1. Inflate the air ball, apply a brush with a brush and immediately apply the leaves.

2. That's what should happen.

3. Top of the leaves, too, apply the glue without spare.

4. Now let the billets dry completely, and after the ball is pinched the needle. Now pour it with fruits and vegetables and faster for the holiday.

I think, after reading and reviewing this note, you no longer have questions on what you can do from natural material, I think ideas found enough. Just take and do.
All of all the most kind and positive. While!
Sincerely, Catherine