A4 paper toys. From paper. How to make volumetric Christmas toys out of paper
From early childhood to old age, there are toys next to us. At first we play with them ourselves, then with our children, and later with our grandchildren. At the moment, shops are filled with a variety of toys. Sometimes you get lost, not knowing what to buy. But each of us remembers the moment when he made a toy from the most ordinary paper at school in the classroom with his own hands. We offer to return to childhood and make his first product with your baby. To do this, you can use blanks, cut, glue and you're done. But it is much more pleasant to be smart and create something unusual. So let's get started.
DIY paper rainbow toy
We offer to make a bright multi-colored miracle that your child will like.
We will need : colored paper and scissors.
Print or draw a template.
We apply a template and cut out 10 multi-colored curls from paper.
The assembly instructions for this toy are very simple. We hook two parts to each other. Then we attach the rest one by one until we connect in a circle. We turn the product over. We connect the other side in the same way. The toy is ready.
We create original paper toys from templates
This type of toy is probably the easiest to make. You just need templates, a printer to print them, scissors and glue. The process is fascinating and your child will like it, because the end result is always interesting. Let's take a look at some templates.
Giraffe pattern
This unusual animal will definitely appeal to your kid.

Pet and Fruit Templates
Encourage your toddler to create a series of pets. Let's present some schemes.

You can also offer your child to "grow" fruits with their own hands.

We create with our own hands a volumetric butterfly in a minimum of time
It takes a minimum of time to make this toy.
You just need to cut out the parts according to the template and fasten them. This type of toy is interesting in that you can glue a magnet to it and hang it in the most prominent place in the house - on the refrigerator.
There are several options for butterflies for your consideration.

When your baby grows up, he has a need for educational toys. In stores, you can be offered a wide choice for not small, unfortunately, money. But before you go shopping, think, maybe you can make such a toy for your child yourself. Let's look at how to make an interesting product for a kid.
Parking lot, maze and cardboard house
For this we need a cardboard box with low sides and a felt-tip pen.
You can also draw roads, put a couple of cubes in the form of houses and get a city.
Maze.You will need several boxes for this toy. You need to cut holes in them, connect them one by one, so that you can climb through, and there will be no limit to your baby's delight.
Cardboard house.
Invite your child to make a house for him. Take a cardboard box, preferably a very large one. Cut out windows and doors in it, decorate it. It will be interesting for a child to hide in such a house.

For your little princess, you can make a dollhouse. Offer her to arrange the furniture herself (you can also do it yourself).
As a child, we all loved to fly paper airplanes and boats. These are the simplest origami toys. Try to make a couple of products and please your little one. He will enthusiastically watch the flight of an airplane or happily launch a boat in a puddle. If there is a body of water nearby, then you can launch a whole flotilla. Let's remember how these products are made.
Airplane and boat
For this product, we need a rectangular sheet of paper.
We take a sheet of paper and bend the corners from above to the center of the sheet.
We bend the triangle that we got to the bottom edge of the sheet.
Lower the top corners to the middle, so that there is a small triangle at the bottom of the bent corners.
We grab the folded corners with a triangle and turn the product over.
We bend outward in the middle and bend the wings down.
Bend the wings to 90 degrees.
The plane is ready. You have got a product like in the picture.
Making a boat.We need a rectangular sheet.
We take a sheet of paper and bend it in half, and also bend it vertically.
Bend the top corners in the middle of the sheet.
We bend the cuffs on different sides, turn them back to their original position.
Bend the bottom corners.

We bend the cuffs up and grab the product at the corner.
Turn the resulting pocket over. Take the central inflection points and stretch them to make a square.
Bend the bottom corners of both sides to the top.
Pull the points of the central bend and rotate the product.
We bend the cuffs up.
Grab the edges and stretch the shape.
The ship is ready.
Video tutorials on creating origami toys from modules
Modular origami allows you to make volumetric toys. Since this art is not quite simple and you cannot tell in a nutshell, we suggest watching video tutorials on this topic.
To decorate a Christmas tree with "precious paper stones", you just need to print ready-made templates, cut them out and glue the Christmas tree decorations out of paper.
Before completely gluing the craft, attach a loop from the inside, for which you then hang the toy on the tree. Finished paper stones can be covered with glitter for beauty.
Small patterns: Pattern-1 Pattern-2 Pattern-3 Pattern-4 Pattern-5
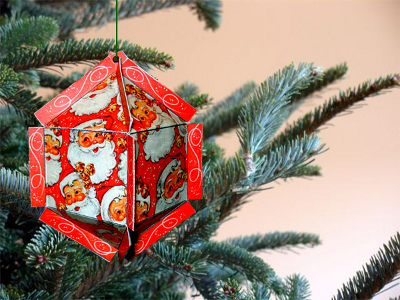
On the same site, you can download a template for another, more complex New Year's craft from paper - a paper diamond. It can also be used as a Christmas tree toy or Christmas decoration. Download template >>>>

Print out the New Year's diagram of the diamond on thick colored paper, cut it out. Before gluing the craft, carefully, using a ruler, scratch the fold lines (marked with a dotted line) with a needle to make the paper easier to fold. Note: if suddenly you printed a template using the link given at the top, but you do not see the dotted line on it, you can use this template. Everything is the same here, only there is no dotted line.

And more New Year's paper crafts from the site www.minieco.co.uk:
Christmas decorations made of paper

2. New Year's paper crafts. Christmas toys made of paper
Paper bells

3. New Year's decoration. New Year decoration
Canon's Creative Park site, probably already known to many, will help you decorate a Christmas tree with handmade paper toys. Christmas decorations - bells, hearts, candy canes, Christmas tree decorations in the form of Christmas boxes - all this and much more can be found on the Creative Park website.


4. DIY Christmas decorations. How to make New Year's
We suggest you make simple Christmas tree decorations out of paper, decorated with photos of family members. To do this, you need to download the templates for Christmas tree decorations from the link, cut out individual squares, bend their corners and glue them together. For a New Year's toy made of blue paper, you need to cut it off, round off the corners. See the photo below.

In the photo below, a Christmas paper toy with the image of Santa Claus is made in a similar way. You can download the template.
5. New Year's ideas. New Year's master class
Another interesting New Year's idea is the origami wreath decoration. To make such a paper wreath, you will need to cut beautiful paper into strips 4 cm wide and 8 cm long. A total of 8 strips are needed. Each strip must first be folded in half lengthwise, and then in half across. Holding the workpiece with its open edge up, bend its upper corners downward as shown in the photo. See the New Year's master class at the link >>>> From the resulting blanks, collect a New Year's wreath, inserting them one into the other.

6. Christmas decorations made of paper. How to make a Christmas toy
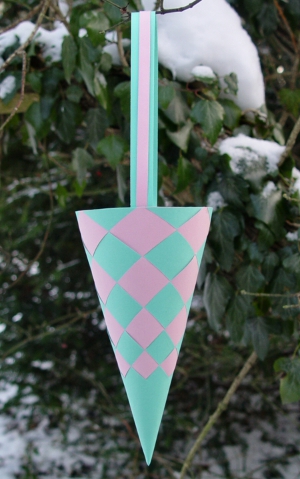
Most people associate ice cream more with hot weather and summer vacations; nevertheless, Christmas tree decorations in the form of waffle cups with an appetizing delicacy look very festive and original on the New Year tree. To make these Christmas paper toys, you will need Kraft paper (for cups) and corrugated paper of different colors for the ice cream itself.

Cut circles out of craft paper, cut them in half. Fold a cone from each semicircle, glue it. Crumple corrugated paper of different colors into lumps; for one Christmas tree toy, you will need two such lumps. Now you need to string "cups" and "ice cream" on a thread, making loops on top, for which you then hang New Year's paper decorations on the Christmas tree. See the New Year's master class at the link >>>>
7. Christmas decorations made of paper. New Year's schemes
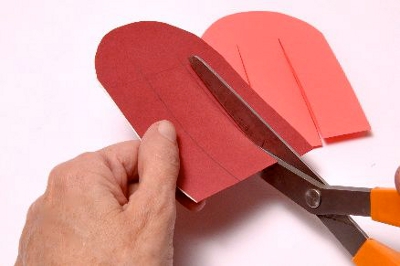
In Denmark, there is a tradition of decorating a Christmas tree with woven paper baskets in the shape of hearts. The photo below shows traditional wicker paper baskets. They can be hung on the tree empty or filled with small candies, nuts, cookies.

To make this DIY Christmas decoration from paper, you need to print the following template on two sheets of paper of different colors. Cut them out, fold them in half, make three cuts. You should have these two blanks.
Now you need to weave them together to make a paper heart-shaped basket. For a detailed New Year's master class on how to weave a paper basket, see the link >>>>


Here are a few more Christmas paper baskets on the Christmas tree:
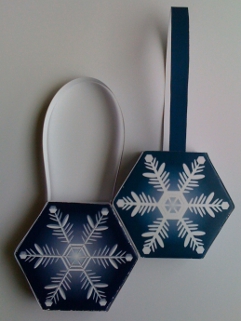
With snowflakes

Recently, people more and more often prefer hand-made decorations to store decorations for the New Year holidays. DIY paper Christmas toys will be a wonderful decoration for both the Christmas tree and the whole room. And the very process of making jewelry will help you feel the approach of the holiday and magic. Dekorin advises to engage in such creativity with children, because it will be an invaluable experience for them. Today we have prepared for you some interesting ideas on how to make DIY Christmas toys out of paper.
DIY beautiful Christmas toys made of paper
The New 2018 Year of the Yellow Dog is coming very soon and, of course, we all want to decorate our apartment in a special way. There are a lot of options for how you can make a New Year's toy with your own hands, but we will focus on the easiest and most affordable - festive paper decorations. Only unlimited imagination, a desire to create and a little free time will come in handy.


Paper balls
Balls can be attributed to voluminous New Year's toys made with paper. So, they will serve as a wonderful decoration for the Christmas tree and the whole house. You need to prepare:
- paper that you like;
- ordinary glue;
- scissors;
- compass.
The process is as follows:
Similar circles should be cut out of paper (21 pieces). Fold each circle in half twice, and then fold both sides of the circle back to form an equilateral triangle. We will be equal to it for the manufacture of the following triangles.
Now glue this strip into a kind of circle. Divide the remaining ten parts into five pieces, and glue them in turn in a circle (as in the photo). It turned out to be two kind of covers. Now they need to be glued to the base in turn so that a ball is obtained.
The finished decoration must be pierced with a needle with any thread (or rope / braid) so that there is something to fasten it to. Ready! It turns out that making a New Year's toy out of paper with your own hands is elementary.


Paper snowflakes: DIY Christmas toys
No winter holiday is complete without snowflakes. They are traditionally decorated with windows, walls and a Christmas tree. There are ordinary snowflakes, cut from paper, and there are more complex, but even more beautiful (using the origami technique). Today we will figure out how to make the latter. The manufacturing process is as follows:
- cut 6 identical squares out of paper. Next, fold them first diagonally, and then in half;
- make several cuts along the fold;
- unfold the square, inner tongues and connect them together;
- connect the outer petals to the other petals on the remaining squares (using ordinary glue or a stapler).
- An unusual and beautiful snowflake is ready! Now, if you wish, you can decorate it with various stars, sparkles, etc. Such a handmade paper Christmas toy will fit perfectly into any corner of the room, and its production will give you the anticipation of the upcoming holidays.


DIY corrugated paper Christmas toys
It turns out that there are tons of materials out there that can be used to make toys, and corrugated paper is no exception.
So let's make a cute green herringbone. You need to prepare the following items:
- green corrugated paper;
- standard A4 paperboard;
- regular glue and scissors;
- pencil;
- decorations for the Christmas tree (according to your taste: beads, balls or something similar).
How to make a craft:
- We make a cone from a sheet of cardboard.
- We wind corrugated paper around it.
- Now you need to make needles at the tree. So, the paper should be cut into long strips and make a kind of fringe.
- Wind the resulting fringed strips around the pencil. It turned out to be nice rolls that will later decorate the Christmas tree.
- Lubricate the base of these rolls with PVA glue and glue them to the cone of the Christmas tree.
- Using this method, it is necessary to glue the entire tree over and decorate it with prepared decorations.
The Christmas tree is ready!


It's time to think about how to decorate the door before the holidays. And corrugated paper will again help us with this. Everything is easy here. First you need to cut a circle out of thick cardboard and glue the same circle made of green corrugated paper onto it. Now you should make rolls of red and green paper and attach them to the wreath with glue (as in the photo). Cut out a large bow from red corrugated paper and decorate a wreath with it. That's all! Simple and beautiful!
DIY Christmas toys made of colored paper
The New Year 2018 is coming, which means it's time to make New Year's toys with your own hands. The Christmas tree must have the symbol of the New Year - the Yellow Dog. And it will be doubly pleasant if we do it ourselves. By the way, paper crafts in the form of DIY Christmas toys are an excellent option for parents and their children. In schools and kindergartens, a child will need to bring a craft for the New Year, and such a dog will definitely not go unnoticed. So, call the children and do this wonderful craft together. You will need the following materials:
- colored paper (a pair of sheets of yellow or beige);
- colour pencils;
- pencil and ruler.
Such a simple craft is guaranteed to interest your child, because a kind and cute dog will turn out from ordinary paper.

The manufacturing process is as follows:
- Bend the square sheet diagonally so that you get a triangle.
- Bend the edges down on the right and left sides of the triangle (these are the ears of the future puppy).
- Now step back a little from above and, grabbing the ears, bend the paper down.
- Next, bend the bottom triangle following the example in the diagram. We have prepared the dog's face.
- Draw a nose, tongue and eyes for the animal with colored pencils. Also draw some random spots if you like.
- To make the torso, take the second square piece of paper and fold it diagonally. Again we got a triangle.
- Rotate this triangle so that its fold is at the bottom. Now fold the sharp edge at the bottom (as shown in the diagram). Next, bend one side of the triangle forward, and the other backward, so that the edges protrude. So the legs and tail came out.
- Draw spots on the dog's body. Now connect the puppy's head with the torso.
By the way, other puppies can be assembled according to the same principle, the diagram for which can be seen below.


DIY Christmas toys from napkins
It turns out that even napkins can be used to make unusual Christmas tree decorations. What is needed for this:
- multi-colored napkins;
- PVA glue;
- paper;
- threads;
- multicolored markers.
Getting started:
- We are preparing a cardboard stencil for the toy you need. We have this frog.
- We take one napkin and fold it horizontally three times.
- Fold three more times (as in the photo). It turned out a square that needs to be fixed with a stapler.
- Now we cut out a circle from the square and straighten each layer towards the middle so that we get a fluffy ball.
- It remains to attach these balls to the stencil from both sides, as well as finish and glue the necessary details.
Voila! The frog is ready! In a similar way, you can make any other New Year's toy from napkins with your own hands. There would be a desire!


DIY paper garland
In this master class, we make a Christmas toy with our own hands from paper. Namely - a beautiful garland.
Paper garlands will surely bring a cozy festive atmosphere into your home, especially if they are made with your own hands.
This option is ideal for owners of a sewing machine. It is necessary to cut out the required number of circles (or stars, Christmas trees, snowflakes and in general everything that comes to mind) from the paper or felt you like. Then just sew all the details in one row. Ready! Perhaps this is the fastest way to make a New Year's paper garland with your own hands.
There is another original version of the festive garland. So, cut out future tags from cardboard. It's good if there are a lot of them. Now each of them needs to be decorated: write wishes, draw pictures, stick photos, stickers, pictures, etc. After registration, all that remains is to string the tags on a string. Ready!


Believe me, such a garland will definitely be original and unique.
Dekorin hopes that by looking at photos of New Year's toys made of paper with your own hands, you get inspiration and feel the New Year is approaching.
Hello.
How often do you spend time with your young children? Do you play games with them or build something together? I do not succeed very often. Work, daily chores and other routine take up a lot of time and, unfortunately, not a lot of it remains for the children.
The more valuable are those moments when you are together. And preparing for the New Year holidays, decorating the Christmas tree and the apartment is a wonderful occasion not only to play with children, but also to teach them something new. They love it so much!
Last year I made a small selection with my own hands for schoolchildren, and now I offer you several master classes devoted to making simple but cute Christmas tree decorations from paper for kids of kindergarten age.
Making them is not at all difficult. Spend 20-30 minutes teaching the children and then they will be able to cut and glue colorful toys themselves and, from my own experience, they will do this even after the new year, exactly until the house runs out of colored paper and glue.
DIY paper Christmas decorations: a ball on a Christmas tree
The most popular Christmas tree decorations are, of course, balls. They can be made in a bunch of different ways, but I offer the simplest ones that a child can handle. Naturally, after being taught by adults.
Such a figure is called shards.

To make it you will need:
- Colored paper (4 sheets of A4 size for 1 ball)
- Scissors
- Pencil
- Any cylindrical glass
Assembly:
1. Take a glass (or a mug), place it upside down on colored paper and draw a pencil to make an even circle.

For one ball, you need to draw and cut from 27 to 32 circles.
The paper can be taken in different colors and combined as you like.

2. Now you need to give the circles a volumetric shape. This is done in several stages.
First, bend the circle in half.

Then again in half. We squeeze the folds well.

The result is a "slice of pizza", which we mentally divide into three parts and wrap in a rectangle. First, fold over the larger side.

Then a smaller one.

With such simple actions, you need to fold all the cut circles.
This preliminary preparation allows me to distract the children and deal with urgent matters for about 20-30 minutes.
3. After the preparatory stage, the assembly begins. We unfold one of the circles and see that now it has become "ribbed".

4. Glue the second edge on the left and the second edge on the right on the lower half of the circle with glue.
It is better to use PVA glue in a tube with a spout to apply it more accurately.

5. Connect and press the halves so that they stick together. We do this with all circles.


And glue the next half to it. Similarly, we coat and glue all the halves.

As a result, you will get such a rather weighty piece that you need to press down with a book or something else and leave it for 15 minutes for the glue to dry.

7. After the glue has set, the halves can be unfolded like a fan. The last step remains: grease the upper side part with glue and glue the thread. We also grease one of the sides of the future ball with glue.

And, opening the ball, we glue it to the other side.

Let the glue dry and you're done!

Paper ball - master class for kindergarten
If the previous method is more suitable for the entertainment of one child, then this can be done together with a whole group of children. Making a ball is quite simple and will not cause any difficulty in explanation.
Only all the elements will need to be prepared in advance, because a needle is needed and children cannot cope with it.

So, we need:
- Thick colored A4 paperboard
- 2 beads
- Needle and thread
- Scissors
Assembly:
1. Cut the cardboard along the short side of the sheet into strips 1.5-2 cm wide. We do not need perfect evenness of lines and strict adherence to the width, so even using a ruler is not necessary.
In total, you need to cut 8 strips.

2. We put the strips in a pile and, having made a hole in the middle, we pass a dense thread with an attached bead. We take the length of the thread 15-20 centimeters.


4. Pull the ends of the strips together and make the same hole and pull the thread from the inside of the opposite end of the stack.

5. We stretch and measure the length of the thread so that we get a circle, then thread the second bead into the thread and tie a knot on top, fixing the shape of the circle.

6. The ball is ready, it remains only to "fluff" the strips.

Christmas tree toy in the form of a volumetric ball - a simple assembly diagram
Well, one more simple, but beautiful version of a paper ball.

1. And again, using a glass, a pencil and scissors, make circles of colored paper. This time you need 8 of them. Available in different colors.

2. On each circle, make a cut to the middle.

3. We coat with glue the places where the incision took place and first fold one side into a tube.

And then another. It turns out this is such an interesting figure.

4. Glue all the circles in the same way.

5. Then we take a thick thread threaded through the needle, pierce the top of the cone and string it onto the thread.

We do the same with all our blanks.
It is important to ensure that the figures are strung on the same side: either the front or the back.

6. And now all that remains is to tie and tighten the opposite ends of the thread.

And the workpiece will turn into a beautiful volumetric ball.
The simplest Christmas tree toy for children 4-5 years old
If your child has not yet mastered the assembly of a volumetric ball, then you can further simplify the work and make a simple round Christmas tree toy.

All you need is colored paper, scissors, a stapler and a hanging ribbon.
Assembly:
1. Cut 12 strips about 1.5-2 cm wide from colored A4 paper.

2. Then leave the first strip unchanged, shorten the second by 1.5 cm, the third by 3 cm, the fourth by 4.5 cm, and so on.

3. And we collect them in one bundle, aligned along the bottom edge. On the same bottom edge, we fasten the strips with a stapler.

4. We consistently twist the ribbons into rings, again aligning them along the bottom edge. As a result, it turns out that each next ring is larger than the previous one.

5. When all the rings are folded, we fasten them with a stapler at the base.
You can use glue instead of a stapler, but then each strip will need to be coated separately.

6. Done, all that remains is to tie the ribbon and hang the toy on the tree.

DIY paper flashlight
But this toy, I am sure, you yourself made in childhood. There is nothing simpler than this.

Assembly:
1. Take a sheet of A4 colored paper, fold it and cut it in half. For those who understand, you get the A5 format. We will continue to work with him.
Fold the sheet in half along the long side.

2. On the folded side, we make cuts at a distance of 1.5-2 cm from each other. The incisions should not extend to the opposite edge about 2 cm.

3. Open the sheet and glue the opposite sides to each other by rolling the sheet into a tube.

4. Done, It remains only to glue another strip of paper on top, for which the flashlight will be hung on the tree.

Video on how to make a Christmas tree toy out of paper
If all the previous toys seem trivial to you and you want something unusual, then watch this video on how to make a Christmas tree toy using paper and knitting needles.
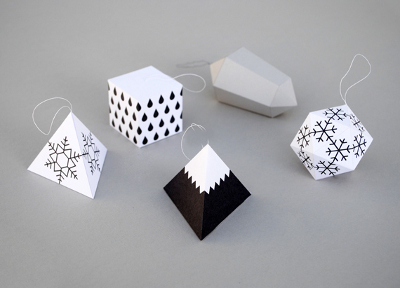
Christmas tree decorations patterns in the form of crystals
Now let’s step aside from the classic forms and offer you something really interesting. I'm talking about Christmas tree decorations in the form of crystals. Surely, many have already met these templates on the net, this topic has been popular for a couple of three years. But if not, then believe me, this is really the most interesting way you can make a Christmas tree toy out of paper.
All you need is to print the templates below, bend them along the dotted lines and glue them along the protruding flaps.
Short crystals:

Diamond:

Elongated Crystals:


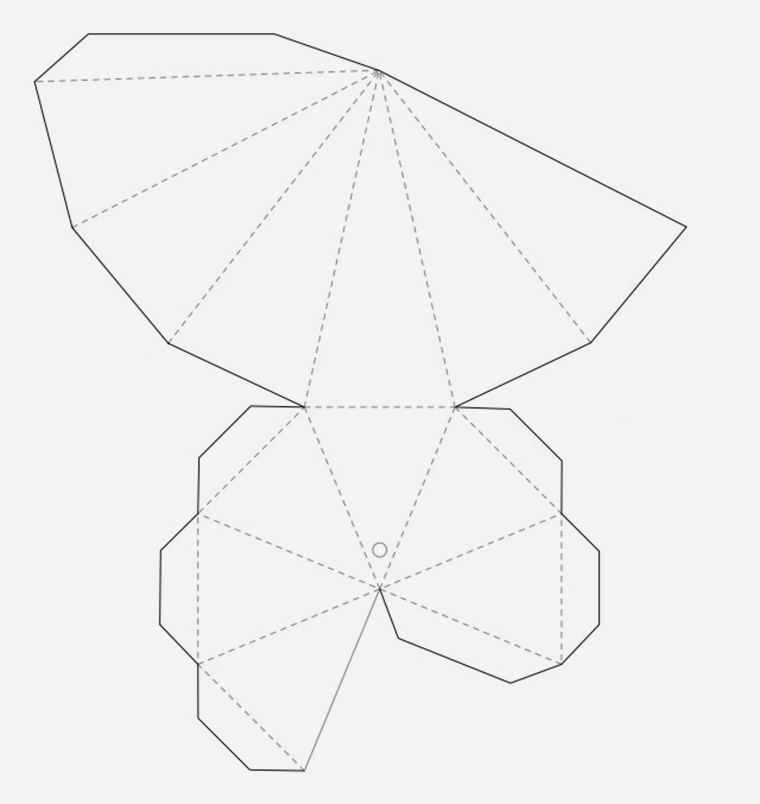
Important: when printing, make sure that the whole picture fits on the sheet and, if necessary, adjust the size. Most often, it is enough to uncheck the "Fit to frame" setting.
Well, this is where I will finish my first article this year, dedicated to preparing for the new year. There are still 2 months ahead, so check back often, I'm sure I can surprise you.
And that's all for today, thank you for your attention.
Someone is preparing for the new year, decorating the Christmas tree with expensive designer decorations, and someone with cheerful multi-colored electric garlands and glass balls from the store.
Such Christmas tree decorations will undoubtedly make the New Year's beauty stylish and beautiful, but, unfortunately, they cannot be compared with handmade toys. After all, the very process of their creation not only enhances the anticipation of the holiday, but also gives invaluable minutes of communication to all family members.


There are a lot of options on how to make Christmas tree decorations with your own hands for the new coming year, but the most affordable and not requiring special skill in manufacturing are New Year's toys made of paper. You only need materials at hand that can be found in any home, a little patience and creative imagination.
The most common and versatile toys for the New Year are Christmas balls. You can make them yourself from any thick paper: colored cardboard, colorful postcards or old magazine covers. Single-colored balls will add a uniform style to the room, and multi-colored ones - an atmosphere of fun and fairy-tale magic.

So, before you start making such paper toys, you need to prepare the following:
- thick paper with a pattern you like;
- scissors;
- PVA glue;
- a compass or any object, outlining which, you can reproduce a circle (jars, lids, glasses, etc.).
How to do:
- Draw 21 identical circles on paper and cut them out with scissors.

Prepare the mugs as follows:
- bend the circle twice in half (this is necessary to determine the center);
- unfold the circle and bend one side of it so that the edge of the circle is exactly in the center;
- bend two more sides of the circle to make a triangle with equal sides;
- cut out the resulting triangle, which will play the role of a pattern for the rest of the details;
- overlay the triangle over the rest of the circles, trace with a pencil and bend the edges outward along the lines.
- Glue 10 circles together with two sides so that you get a strip: 5 circles on top, and 5 - below. The strip must be glued into a ring. This will be the base for the balloon.

- Divide the remaining 10 pieces by 5 pieces and glue them in a circle. We got two "caps".

- Glue the top and bottom "caps" to the base in sequence.
- The loop for hanging the ball can be made from a thread threaded through the top of the toy with a needle, or from a beautiful ribbon. A ribbon loop is fixed with a knot and passed through the top of the ball cap before gluing it to the base. The knot remains inside the toy, and the loop is outside.
An original paper toy with your own hands is ready for the new coming year!
More paper balls for the tree


Volumetric snowflake
Another indispensable attribute of the new year is snowflakes. They can be the simplest, cut out of a sheet of paper with an arbitrary pattern, or they can be voluminous using the origami technique. We suggest making your own hands the last version of the New Year's snowflake.

To do this, you need to cut six squares of the same size, fold each one diagonally, and then in half. Parallel cuts are made along the fold. The square unfolds, the inner tongues are wrapped and fastened together.
The outer petals are connected to the same petals of the other squares. You can attach them both with glue and with a regular stapler.