Knitted hook hats schemes. Hat crochet: simple diagram. How to tie a hook hat
Hat is one of the universal accessories. This headdress may be sewn or connected from yarn. The last option is especially suitable for hot summer days or vacation pores. Summer Hats Crochet can master any needlewoman, so they are easy to manufacture.
How to tie a hat with a crochet?
All crochet hats knit one and the same principle. First you need to remove your measurements and consider the future model. Secure the measuring tape around the head. It should pass through the head and middle of the forehead. The resulting number should be remembered. This will be the size of the finished headdress.
Knitted hats can be completely different - with large, small fields, openings or a solid pattern. Also worth paying attention to the type of yarn. Often the summer hat crochet knit from cotton and linen threads. They greatly hold the form. In addition, they are easy to stumble. This processing allows you to make edges more rigid. It is best to use middle thick threads.
Knitting technique Hats to come down to the fact that they first knit Tul. For this, air loops are closed in the ring, and then begin to make an increase. After uniform knitting, the bottom is obtained, which has wrapped edges. After that, go to the fields. Possets and knit the same number of loops to the desired width.
Crochet Hat: Knitting Scheme

You will need:
- Measuring tape
- Threads of medium thickness
- Hook 3 (or any other, which is suitable for yarn)
Manufacturing instructions:
- Tie 3 air hinges and closer in a semi-solol. Check into each 2 column without a nakid.
- 2nd row Start with air loop lift. Then in each column of the previous row, in drawing 2 loops. Complete knitting by connecting the beginning and end of the semi-roll. This action should be repeated at the end of each row.
- In the 3rd row, start the repetition: 1 column without a Nakid in the 1st loop, 2 - in the 2nd. Rows begin with an air loop, and end with a connecting column.
- 4th row: 1st 2 loops - 1st column, and in the 3rd I check 2 columns without Nakid.
- Making the addition in this way, tie another 10 rows. We got a daily hats donyshko. Its foundation lies about 68-70 loops.
- Next, knit tool. To do this, perform 1 column in each loop. Thus, it is necessary to knit the cloth to a height of 12 cm. In the last loop of the row, they feed 2 columns.
- Start making adds. In the 1st loop, check 2 columns next to miss. Knit the cloth thus up to 18 cm (total height from the beginning).
- Next row: 1 loop in 1st column, 2 - in the next one. Repeat alternation to the end of the row.
- Continue knitting hats, tieting 1 column without Nakid. Knit in this way until the hats fields have reached the desired width. Cut the thread and stretch the tail through the loop. Then neatly hide it.
Girl Crochet Hat: Work Description

You will need:
- Thin yarn like "Iris" - 100 gr.
- Hook 2.
Manufacturing instructions:
- Tie 12 air loops and close them into the ring.
- 1 row: 1 Column with Nakid, 1 Air Loop, 2 Stake with Cathwear in 1 loop, 1 air loop. We repeat thus to the end of the row.
- 2 row: 1 Column with Cathoid, 1 Air Loop, 1 Stage with Nakud, 1 Air Loop, 2 Stage with Caid 1 loop, 1 Air loop.
- 3 Row: 1 Column with Nakud, 1 Air Loop, 1 Stage with Nakud, 1 Air Loop, 1 Stage with Cathide in 1 loop, 1 air loop. The following 3 rows thus knit.
- 7 row: to lie in each loop 1 column with nakid, and between them 1 air loop.
- Go to the fields. And each loop of the previous row is in line with 2 columns with Nakud. Between them - 1 air loop.
- The following rows - columns with an attitude into each loop. Knit this way until the fields have reached the desired width. Cutting a thread and stretch it with the help of a hook in the last loop. The tail is neatly hiding on the wrong one.
- You can decorate a finished hat with ribbon or hooked colors.
Summer Hats Crochet: how to knit?
This hat model is quite simple in its execution. At the same time it looks stylish enough. It can be put on the summer sundress, denim shorts or linen trousers. The headdress is universal and suitable for any style of clothing.

You will need:
- Cotton or linen yarn, 320 m. At 100 gr. - 1 Mokok.
- Hook 2.
- Leske for fixing fields
Manufacturing instructions:
- To begin with, we calculate the diameter of the subsidence of the future hat. To do this, remove the face of scalp. The resulting number is divided by 3. Then subtract 2 cm from it. This is done due to the fact that after washing the product will slightly sit down, but then during socks stretches.
- We begin to raise the bottom. For this, closing 3 air loops in the ring. Then he is in line with 6 loops.
- From 2 rows start adding. To do this, in each loop, I have 2 columns without an insection.
- 3 row: 2 columns without an inlets in 1 loop, 1 - in the 2nd. Alternate knitting thus to the end of the row.
- Knit according to the diagram while the diameter of the bottom of the hat with a crochet will not be equal to the number that we got due to the calculation at the very beginning.
- Go to the fulfillment of the Tulle of Our Head Up. To do this, in each loop of 1 column without a Nakid. The 1st range is tight enough. Thus, we continue to knit periodically trying on the workpiece. It is necessary to finish the Tulle when it reaches a height to the ear. At this point, it is necessary to create holes to produce a decorative tape. For this, the last row of Tuli we knit columns with 1 nakid.
- Next, go to the fields.
- 1 row: in each 10 loop of the previous row, they see 2 columns without Nakid. The following 3 rows do without adding, in the figure.
- 5 row: We make the addition in the form of 2 columns without an inch in each 12 loop. The following 3 rows knit without add-ons.
- 9 row: addition of 2 columns in each 14 loop. The following 3 rows unchanged.
- 13 row: adding 2 columns into each 16 loop to the end of the row. Next, knit 3 columns without additives. We have formed a little broken hats fields. Go to strengthening them.
- Sut off a long piece of fishing line. We press it to the last row and gently tie the column without a nakid. When we approach the end of the row, the fishing line should be cropped and combined its edges. To do this, they melt them with a lighter. Cut the thread and neatly hiding her inside the head. Summer Hat Crochet is ready!
- Almost all hats in finished form do not keep the form. They can be tougher in different ways. Usually use starch, sugar syrup. The gelatin solution is equally effective. Take and heat 1 tbsp. water. In the hot liquid, patch the package gelatin weighing 25 gr. Mix everything thoroughly. Then add to the solution of 0.5 h. Salts and 4 tbsp. l. 9% vinegar. Liquid should be poured into a large bowl. Then there put a knitted hat and give it to wet. Further, the product is pressed, the water is allowed to drain.
- Table as a lot of package or polyethylene. We put on it a three-liter jar. We put on with a hat. Give it a form. Special attention is paid to Tul. Let her sleep a little. Then remove the hat and leave it in a standing form on polyethylene. Fields wetted with a sponge and carefully smoothed. They must smoothly lie on the table. We give the product to dry. After that, the headdress is ready for the sock.
Hat crochet: photo


In order to tie a hat with a crochet, you need to remove the heart of the scuffing of the head. Knitting begins with the bottom. Usually, air hinges are closed into the ring, and then begin additions. So knit until the billet reaches the desired size. Then go to Tul. It knit without adding. For fields, you should perform a certain amount of double columns. They will help expand them. Then the fields knit without adding until they reach the desired width.
Hat - hit the season, and how she is more, the more modern enough. It is not difficult for it, it is possible to insert a thick fishing line in the field to insert a thick fishing line, or a thin wire, but such that it did not oxidize and did not break. Ready, starch strong, stretch, paste and everything! And as in the film "Vacation at your own expense". Judi!
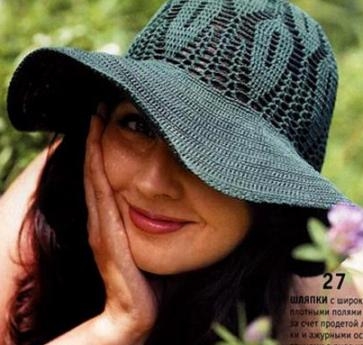
Hat crochet with wide fields
Size 54-56.
You will need: 120 g x / 6 yarn of red; Hook number 2; Wire with a diameter of 3 mm.
The size of the product is indicated in Fig.8. Start work according to Scheme 8, after the 8th row (the diameter of the bottom must be equal to 15 cm), check out another 5 rows directly without adding. Depending on the knitting density, the number of rows with add-ons can be increased or reduced. Further perform 3 rows of ISP on the perimeter of the Tool, then proceed to the encouraging of the fields. For the extension, divide the circle into 8 parts and perform the addition as shown in the 8 A scheme. Knit in the way as the width of the fields will not be equal to 21 cm. In order for the hat to keep the shape, it is necessary when the fields on the edge of the edge beside the crawl, lay along the working row of the wire and knit the workshop in the wire girth. Finished hat decorate brook.


Rose yarn (50 g - 150 m), hook number 1.6
Rodysheko knit under scheme # 1 to the desired diameter.
Next, knit without additives (to the ears)
Then there are 3 rows of columns without Nakid.
Hat fields:
Scheme number 2, knit without add-ons. Fields are obtained by the "cone". To tied up with bars without Nakid. In this series inserted a whale mustache (you can regulate or a thick fishing line).
In the last row of the flower strapping is inserted.
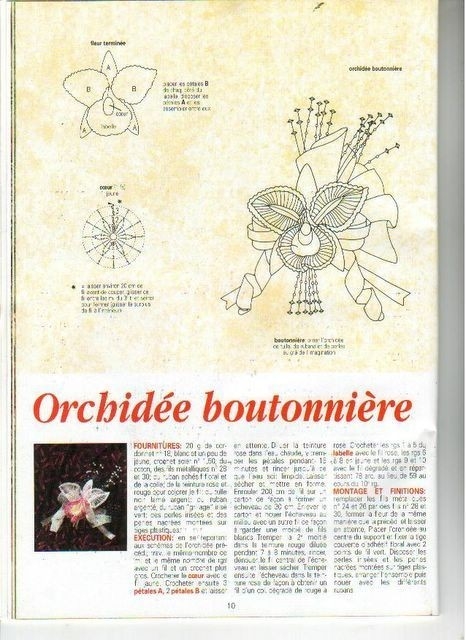
Orchid.
Threads No. 40, 5 g. Pale pink and a little pink, bright pink, pale yellow and yellow. Hook 0.75. Wire №26 and 24 simply thin wire).
Pale pink thread tie a chain of 30 V / n and knit according to the scheme A (3 petals). Pale pink thread type 20 loops for petal in (2 petal). . Knit direct and reverse rows. The first row: 1 V / n, 1 ST / BN in the second loop from the hook and in each of the following 5 loops (only 6), 1 semi-solitary in the next 6 loops, 1 column with Nakud in 8 loops of the base. Air loop, turn knitting, ST / BN with each loop of the previous row, and in the beginning of the initial chain. 3-4 rows knit according to the scheme. On the column diagram, respectively: with the 1st dash - St / CH, 2-meters with 2Kids, with 8 dashes - with 8 in the Caidis. Please note (I did not immediately notice), at the very top of the petal 3 column with the 10th Caidis!
Tongue. 1-5 rows. Pale pink thread knit straight and reverse rows according to the scheme, in the 5th row, picked the pico from the 4-loops over the central column. 6-8 rows. Attach the pale yellow thread to the central pico of the 5th row and knit according to the scheme using the connecting columns in the connection places. 9-10 rows. Attach the pink thread for the 9th, and the bright pink for the 10th continue to knit according to the scheme
Middle. Tie the thread tie 3 rows according to the scheme.
Assembly. Provine wire number 26 in the middle, as shown in the scheme. Press the shape of petals and turn the wire as shown in the diagram. Connect the petals, as in the picture, cut off the excess wire. 


Size 54.
Consumption of yarn: 100 g x / b white yarn and 20 g of yellow.
Hook No. 0.85 of the company 'PONY. Start knitting from one chamomile according to Scheme 1 and Scheme 2.
According to Scheme 1, perform the core of a yellow flower with a yellow thread. Next, tie 12 petals according to the white thread scheme. All petals Connect each other as follows: When the last petal is performed, then, without breaking the thread, take the i-and petal and reinstate it in three sides of the failure (one long side, rounding and the second long side). So connect all the petals between themselves sequentially one by one. When the chamomile is linked along the contour, perform the second row of strapping. In the center of chamomile, enter the core. Chamomile petals Refine around the edge:
1 r. - 10 VP between petals, 2 failures on top of the petal;
2 r. - 3 VP of the submarine, knit the fillet grid, alternating 2 VP and 1 CH across the row;
3 r. - 3 VP of the subway, 2 cn under the arc of the previous series, 1 CH in the column of the previous series, 2 VP, 1 CH in the same column of the previous series, 2 CH in the next arc of the previous row, 1 CH in the previous row column, 2 VP and so Repeat to the end of the row;
4 r. - Fileeus grid (as 2r.). Tulle Hats Knit pattern according to the scheme 3. The number of rows depends on the desired size of the cap. Tie approximately 16 p.
Crochet Hat Knitting Scheme
For the hats, tie 11 daisies. These daisies have 9 petals. Connect 11 chamomile for fields is needed in the process of their knitting. To make chamomile to lay correctly in a circle, make a template in size and connect chamomile on this template. When all 11 daisies are connected and interconnected, proceed to connecting the fields and Tuli Hats. Select a convenient method for you and connect the details of the crochet or needle with the thread. On the edge of the Hats, connect the petals among themselves with chains from the VP and IBB (see photo). 
To knit summer hats you will need: 200 g of beige-colored mixture tape yarn with gold lurex; crochet number 4; Wire with a diameter of 1.5 mm.
The sizes of the knitted cap see Fig_77. Before starting work, perform a sample and make the loop. Start work from a round bottom according to Scheme_77. Continue the work according to the scheme_77a, then 776. To make stiffery fields, take the wire, pave it along the working row and reinfeit it 1 p. ISP in grab fish 


At first, the ring of 7 air loops was closed and ridden by the columns without a Nakid (12 +). Further, a tick of 2 columns with Nakud knitted over each column.
The diagram of the bottom is drawn: 
Then knit the ranks in the following order: 10, 11, 12, 13, 1, 2, 3, 4, 5, 6, 7. 
In the next row of 3 columns with Nakud for each arc of 5 air loops.
Next - 2 rows of columns without Nakid to strengthen the edge.
Then - the fields according to the scheme, only in the first two rows of air loops, two less in each panochka, in the next two ones. The last row of the columns without a nakid fastens the Rieghelin. The edge is processed by the reverse side.
The hook-knitted hat will protect well from sunlight and give any elegance and charm along the sun. Tie, starch and worn with pleasure, hitting all the envious of your beauty and skillful handles. 
Troitskaya Astra yarn (610m / 100g) 100% mercercated cotton.
Stops on top, pancake approximately this scheme
Only I knitted with the columns with Nakud and made 12 wedges, two additions in each wedge through a row.
If you are very worried, you can reduce the number of wedges.
Further knit this pattern
Only instead of two air loops between st .S.n, I knit one air, instead of 5 - 3.
Rapport drawing in my case is 6 loops.
He started from the second row of the scheme.
After the drawing, knit the finishing strip for the ribbon.
I knit two rows * st .b.n, air *, in the second row of st .B.n knit over the air of the previous series.
A number of columns with Nakid (you can with 2-3 embedders, for a wide ribbon), and two more rows * st .b.n, air *.
The fields knitted st .S.Nakid (deep wrapped), 24 wedge, one insertion on the wedge. The gain did through the row. The last 5 rows knit without add-ons, increasing the hook number. But you can knit with the same crochet and with adding to the very end.
Regile entered the edge, I have 4 veins, folded it in half, twisted into the ring on the size of the fields, and knitted st.b.n. Capturing the last row of the hats between st .S.N.
Lily knitted this scheme
I knit along with the monoulion, but after an excrement, the shape was kept poorly, I had to tighten a little tightened around the edge, and for one knitted beads.
With beads beautiful, but it is very weighting the product.
That the petals would be better to hold the form on the edge to bind the line.
In my case, the flower on two buttons is unfastened, but you can seize capital, then everything will be well keeping the shape and without a fishing line.
First, 6 stamens are knit, I knitted in two threads just a pigtail made of air loops (tight) and at the very beginning I bodied 4 bispers. The sticky knitted approximately 5-6cm.
For the pestle knitting in the ring 6 st .b.n, the ring to pull, in the second row, bruise the beads with semi-brass with an attachment, then knit with a tube in a circle of Art Circle another 2-3cm, further add through each column of 1st. B.N, will be 12, and in the next row it is still added (in two columns or one by one, depending on how it is painted)
Ready pestle to bind to the center of the flower with connecting loops or to sew a needle.

Who would have thought that you can knit a hat with a hook! Despite the imaginary complexity, it is possible to do it within one day even beginners. This is an original women's accessory, so our article will consider various ways of knitting caps for girls and little girls who do not want to lag behind fashion.
Stock Foto Female crochet hats
Women's hats associated independently look incredibly exquisitely. With such a headdress, you definitely will not be unnoticed. Look at the photo of finished work from professional masters, perhaps very soon you will become the owner of such an original and cute hats.


Children's options are no less beautiful. Headdres of small fashionistas can be decorated as you like. Perfect pineapples, violet, roses, daisies and berries.


Workshop and Description Hats Crochet
As a child, many girls envied their dolls, because they had such beautiful hats. Now, you can embody your dream and become the owner of a trendy and modern headland.

Our master class is devoted to the creation of a small children's model with improvised fields and a satin ribbon in the form of an additional decoration. An openwork mold makes the product with air and soft - ideal in the summer season.
First, select the appropriate color of the thread. Schemes can take any, but we offer to use ours, if you still have no experience in knitting such products. Our description will help to figure it out if something is incomprehensible.

The amount of yarn depends on the size. But, considering that we knit a model for a girl, you will be enough to 100 s cotton threads. Use the crochet number 2 for work.
At the very beginning you need to tie a simple chain of air loops. Secure it in a circle. The following series consists of three lifting loops and 30 columns with nakidami. Then you need to rise again, and after - knit, alternating two air loops and one column with Nakud. In the third row there will be already 44 columns with Nakud.
Now pay attention to the scheme. It shows how to knit further. Just follow the instructions and soon you can enjoy the view of the beautiful pattern. You must have a large dome with connected openwork petals. It must be carefully stagnate and unscrew the fields outside. Then you need to sell the satin ribbon in the lace and tie it with a beautiful bow. On this, the work is completed, and you can already paint a new hat before girlfriends.
Create a hat with hook with large fields: Scheme and video
Hat in the previous master class has very small fields. If you like the model with large edges, you have to use a wire frame. The fact is that starch will not master the severity of the knitted pattern, and the fields can quickly fall, and the product itself will lose sight.

For knitting, you will need a white cotton yarn, at least 150 g. Work begins with the execution of 6 air loops that are connected to the ring. The following rows knit according to the scheme, which is presented below.

As soon as the hat is ready, attach to it a wire frame, giving the right outlines. It will be desirable to further statch the product and put on the form.
Another interesting lesson is offered on the video. To create this hat, you will not need a scheme. Its author comes up with patterns on their own. Just listen to recommendations and see how to properly knit the hat. The beauty of the finished product can be enjoyed in a few hours of relaxed work.
Stock Foto Hats in retro style, with large fields and from lace
Women's hat can be performed in any form. Recently, products in retro-style use special demand. We offer several options for hats of this type.

In the summer you need to carefully protect your face from the sun. This will help you a beautiful hat with large fields. In it, you will be like a real English lady at the reception at the queen.


Exquisite lace is the main decoration of the headdress for the summer. See the best samples of such models for inspiration.


Cook Hat Creation Video
Each of the moms will be interested to know how a children's hat fit. We have a special video tutorial. It will show the process of performing a beautiful model in the style of "Athena", decorated with bright colors. Babes are just delighted with such accessories.
To work, you will need cotton threads and hook №2. The video uses white and salad shades of yarn, but you can replace them with any other. Such a model looks gorgeous in the color of "turquoise", "Fuchsia", "Rosemary". If you already have experience in crochet, work will take no more than two hours. Carefully see how the process of creating a hat happens on video:
Threads - Begonia, hook 2.1. 1 Motchka was enough.
I'll try to write how I knit (by memory)
Tied around the circle of the head strip from the fillet mesh (4 rows) - in a circle - the dressing unit turned out
Then joined the thread and tied the lane with a lane that from above. Trusted to her daughter. Holes were big baked their fans, but at the same time corrected the pattern so as not expanded, but on the contrary
Fields:
When switching to the fields, it knit 1 row of SSN (I always knit 2-3 rows of scan, and then it does not bneil and the hat does not stick to the head so tightly - it made it intentionally so that the hat has been going to get on the sea)
Then 3 rows of arches out of 5 V. P.
And then fans on her favorite scheme
Then plugged the double ring of the PLILILY PLILD, then a rachy step.
Hat "Little Lady"
Schemmer and Description of the side
Scheme Punchka and Tuli on OG 49-50 cm.
My yarn
My connected 13 rows Punches:
Up to 13 rows inclusive to all sizes knit the same.
* * *
ATTENTION:
When the pattern is tied in those places where the hook is rolled into the column, it is desirable to apply the "deep" rigging method. The hook must not be administered under the two top of the column, but in the body of the column itself. This method will not allow the pattern to be shifted when we knit the Tool.
* * *
Starting from the 15th row for all sizes knit according to the scheme. Rows 15-20 repeat two more times.
From the 15-20rd, they differ only on the last side. His instead of CH, I was leaked.
33-38 rows also knit according to the scheme.
The 38th row is a closer to each column.
Fields begin with the 39th row.
Finish the Tool and insert the first regheline equal circle of the head. I made one veil. This is where we complete the work of the failure. We excite.
Knit hats fields.
In the 39th row, we make an increase in each 3rd column,
In the 45th row - in every 4th, in the 51st - in every 5th.
The meaning is that in each row with additives it is necessary to add 56 CH (7 reports). That is, in 39th 168/56 \u003d 3, in 45-m (168 + 56) / 56 \u003d 4, etc.
Field strengthening.
After the last row of fields is associated, they need to sip well.
On the horizontal surface of the table, the fields must be of the shape of a flat circle.
We take the second regill (two veins at once) and we are tied up. The length of Regina does not die in advance !!! Just then cut up too much.
Well refrigerability fields.
Eat!
We are tied up again the same series of ISS. And we assign the last row "rachy step" through the column.
On the field plane, there are still a flat circle shape.
Once again, we move the field with an iron through a wet fabric !!!.
To give rigging used salvitosis, which is used in felting.
Dried on a balloon.
DECORATION.
It is necessary to make a removable-on pin or button.
Chamomile knit very simple.
You dial a chain of 2nd. P. In the first of them, there are 8 semi-solids and closed in a circle in the 1st half-hearth.
When the whole chamomile is ready, reinforce each shelter with connecting columns. This will allow them to keep the shape and not roll.
For the middle of the daisies, we make small pompons with the help of a conventional dining room.
We wake on the teeth fork thread. Then we tie the extra thread in the middle, remove from the fork and tighten the node. Further flush and cut. Send to a middle chamomile.
Two daisies are small, and one is a little more. For her, the scheme is the same, only for the petals, do not type 7, and 9th century. P.
I made a decoration on a button-buckle for bags.
We will need a button and a knitted circle, which camomiles will fifty:
In the finished form:
Fresh button on a hat
Scheme (only for petals):
Designations: Drawn points on the diagram is a loop that is on the hook; Figures in brackets are the amount of loops that stretch out of the connected column (in order to be easier to count the loop)
Deaf (connecting) loop
I knit from threads Soso (50g \u003d 240m) by the usual crochet number 13 (without handle)
Step-by-step photo of the process:
1. In a moving loop, I check 6 columns without Nakid
tighten the string, closer in the circle.
2. Capturing only the rear half of the loops is tied by 11 columns without Caida (1 STBN in the first half and 2 STBN in the following), connect to the circle.
The smaller semi-clutch will be needed for upper petals.
3. Knit arches for the lower lutets: We recruit 5 air loops (p), we skip 3 circle loops, fastened to fourth; We repeat 2 more times, the last arch is fastened to that loop with which the first arch.
4. We start knitting the first lower petal: score 4 in. p. If you turn a little knitting, the rear (invalid) jumpers will be visible
on the hook one loop (painted the point in the diagram), stretch from the involve jumpers on one loop (4 sticks), stretch the last stretch from under the arc (extreme stick)
on the hook should work 6 loops
5. Close the row: Capture a working thread and in pairs of hinges on the hook (captured the working thread stretched through 2 loops, captured the working thread stretched through the following 2 loops). We got the first row (connected column)
6. If a little rotate knitting will be visible in the coming jumper,
Slip one in. P.; Pull the hinges from the invalid jumpers (1 on the hook + 5 with the jumpers + 1 of the arches \u003d 7 loops).
We close a row in pairs.
7. Next, begin to cut the loops. In the sixth row, we start knitting with a deaf loop (we enter the hook in the first jumper, we grab the slave and stretch it through the loop on the hook). From further jumpers stretch over the loop and the last of the arch
We close a row in pairs.
To finish the first lower petal, we have a deaf loop in each hovering jumper, and one under the arch
We make one deaf loop in the next arch and start knitting the second lower petal in the same way. After taking all three arches, it turns out so
To go to the top petals, make 1 c. P We enter a hook to half the loop of a small circle and tie a deaf loop
It is necessary for a small circle to impose 3 arches out of 4 c. P (2 Arches for petals and 1 for the core)
8. Scour 5 V. P and knit the first compound. Top petal column
The first top petal:
Two petal
We are tied up the top petals by columns without a nakid (by contour I laid a thin wire so that the form was better to hold). The lower petals reinforced STBN (without wire). It turned out
Send beads, you can petty beads, and admire
Shocking hats
1. The hat is erased in warm water (degrees 30-40). For washing white hats, I use whitening washing powder, for color - powder for color things.
2. Cooking starch. To do this, in a bowl, we embarked 2 tablespoons of starch and weeping it 1/2 cup of cold water (to avoid the formation of lumps). Then pour boiling water, approximately 1 - 1.5 l, stirring constantly. The mixture should be thick and transparent. Leave to cool.
3. Fixed caps carefully starch, press (not twisting), removing extra starch.
4. For drying caps, I use ordinary inflatable balls, pre-inflammatory them up to the desired size.
5. In the process of drying, it periodically gives the fields the desired shape, the fields of openwork hats ironing through the layer of fabric.
Still hats and flowers to them with schemes
click on the picture to enlarge