What can you make from ribbons with your own hands? We make beautiful crafts from satin ribbons. Pink flower using kanzashi technique
Crafts made from ribbons are easy to make, and such creativity is accessible to anyone thanks to the low cost of the source material. Most girls and women who are familiar with sewing techniques can quite easily switch to making a wide variety of accessories from them.
Children can also make crafts from ribbons with their own hands, which makes it possible to use them for developmental and educational purposes.
Despite the fact that ribbons are traditionally considered an auxiliary finishing material, handmade crafts from satin ribbons themselves can become decorations. The growing popularity of this type of creativity is caused by several circumstances. The first of which is the availability of the material, both in cost and in the technique of working with it. You can buy ribbons in almost any store that sells embroidery supplies, and anyone who knows how to handle a thread and a needle can create an original decoration or accessory from them.

DIY crafts made from satin ribbons can become decorations
The second circumstance due to which ribbon crafts have become very popular among needlewomen is the opportunity to create them in the family circle, spending time with children. At the same time, child psychologists and teachers note that children involved in handicrafts are usually more developed and active compared to their peers. This is due to the fact that in the process of sewing and creating this or that craft, the child has to independently solve a large number of related problems.
As a result, he learns not only to sew, but also to act independently. He develops fine motor skills and the following character traits:
- accuracy;
- perseverance;
- patience;
- attentiveness.
Having made crafts from satin ribbons several times, your daughter or son will acquire very useful skills in handling a sewing needle and thread. Agree, such a skill will be very useful in the army, at work and in family relationships.
As for adults, such ribbons provide them with the opportunity not only to decorate clothes in an original way, but also to create original decorations and accessories that can be used to decorate a room for a wedding celebration. At the same time, you will not spend a lot of money, and the place of the wedding ceremony will be decorated in an original, elegant and tasteful way.

Beautiful craft made from ribbons
Important! Beautiful crafts made from ribbons themselves are a very unusual and original gift that will be valued much more than any factory-made accessory.
As a result, by making and giving a “box” of ribbons for storing jewelry, you will forever leave a memory of yourself with your friends, family and loved ones.
What can you use ribbon crafts for?
Crafts made from ribbons have several areas of application. We have already written that working with them can be used as a pedagogical technique when working with children. So, for example, you can work with them to make toys, gifts for the New Year, birthdays and other holidays from ribbons. In addition, you can sew decorations and accessories for dolls and the dolls themselves from ribbons.
As for adults, they can use such crafts both in everyday life, for example, as a box for storing sewing supplies and jewelry, and as fashion accessories. For example, with your own hands you can do:
- a variety of flowers and bows that are used to decorate objects and clothing;
- bracelets, hairpins and headbands;
- animal figurines, garlands, brooches.

Decorating the headband with ribbon
In addition, modern designers often use ribbons to work in a variety of techniques, for example, kanzashi or “artichoke” to decorate interiors, women’s hairstyles, and wardrobes. For example:
- panels and paintings are embroidered with satin ribbons, and an aromatic sachet is also made with their help;
- they are used to decorate certain objects, for example, bottles of alcoholic beverages or cushions for rings;
- Baskets with flowers are created from ribbons and soap, which are used to decorate the interior and can act as a gift.
There are even interior options entirely based on the use of various crafts made from satin ribbons. For example, they decorate windows, niches, columns. As a result, you can get an 18th-century interior, which was characterized by the use of a large number of ribbons and lace in the decor.
Methods of working with satin ribbons
There are several ways to make crafts from ribbons. The first method is weaving. With its help, you can make a bracelet, pendant or blank for further use as embroidery material. At the same time, this technique is a great way to make crafts from ribbons with your own hands for beginners, since it does not require any special skills or knowledge of specific work techniques.
The second way to make crafts from ribbons is sewing. In this case, you will have to master at least the basic techniques of using a sewing needle and thread. Typically, when sewing, ribbons are used to create appliqués or to create individual decorative elements. For example, having made bows, flowers or vignettes, you can then sew them on clothes or a woman’s handbag.
The third method is the manufacture of various complex products using various additional elements. For example, you can make baskets with folding handles, various boxes and caskets. Some craftsmen make various dolls and moving figures in a similar way, which children really like.
Having learned the art of creating products from satin ribbons, in the future you yourself will be able to give lessons on how to make crafts from ribbons. At least, many famous decorators began their professional journey with home handicrafts.

Many famous decorators began their professional journey with home handicrafts.
Making artificial flowers
Important! You should start making accessories with relatively simple things.
Thus, crafts made from ribbons – flowers – are very popular among beginners. In terms of their simplicity, they come second after embroidery, which consists of sewing pieces of ribbon of one color or another along the contour of a pattern previously applied to the fabric.
Flowers are made slightly differently; a needle and thread are used here to secure one or another element of the product. If you have never made crafts from satin ribbons with your own hands, you need to learn this process step by step. It is best to watch a video tutorial suitable for the topic, posted on the appropriate thematic site, since only a clear example can make it clear how this or that operation is carried out.
So, in order to make a simple flower yourself, you need to prepare in advance a ribbon 6.5 cm wide and approximately 90 cm long. The prepared ribbon is folded in half, with the wrong side on the inside. The folded ribbon must be stitched, basting it along the edge from the fold line to the edges.

Satin ribbon flower
Next, you need to pull the basting thread at one end in order to carefully gather the tape along its entire length. As a result, its edge must be folded to obtain a central bud. To do this, you need to use the edge from which you started basting the ribbon. It is secured with a few stitches.
At the last stage, the tape is twisted around the central bud, and after each turn the tape must be secured along the edge. After it ends, you will need to hide the ends of the thread and straighten the finished flower. It can be sewn onto fabric, clothing, a handbag or any household item. If you want your flower to have a stem, you can make one from a green plastic tube and attach a “bud” to it.
Important! Having mastered the simplest crafts from ribbons with your own hands, you will be able to create other flowers.
To do this, you need to master the methods of folding and basting the tape. Experienced needlewomen know how to make not only roses, but also carnations, asters and other types of flowers.

Scheme for making a flower from ribbon
Creating original baskets
Crafts made from ribbons come in a wide variety; videos on the Internet of a master class on making baskets from ribbons are gaining popularity every day. The fact is that such baskets are very popular at weddings, birthdays and other events. Moreover, such a basket goes well with artificial flowers made from ribbon.
By the way, don’t be surprised if, while studying the process of creating such a basket, you learn that you will need a bar of soap for this. You will need it to create the base. So, we take a piece of aromatic soap and fasten safety pins on it in a circle in increments of 8 mm. It is important that their number is the same.
After the basket is woven, it is necessary to make a lush bow from the ends of the ribbon, and cut off the excess part with scissors. These remnants can then be used to decorate the handle of the basket, the base of which can be made of wire.
By the way, crafts made from ribbons in the form of baskets can be combined with other products, for example, the same artificial flowers. In this case, they will form a single design composition that can be used to decorate a holiday table or room. Such baskets are especially in demand at weddings, when there are not enough fresh flowers and the hall needs to be decorated.
Using the Kanzashi technique
Having mastered simple crafts from ribbons, you can move on to more complex techniques. For example, recently the manufacture of various accessories from ribbons using the kanzashi technique has become fashionable. The basis of this technique is the creation of artificial flowers from fabric to be subsequently placed on combs and other accessories intended to fix the hairstyle. Currently, this technique is used not only to decorate hair, but also to decorate clothes, bags, and other items.
The prepared petals are collected on a strong sewing thread - this is how a flower is formed. Next, the workpiece is glued to the base. Previously, rice glue was used for this. Now you can use PVC or regular office glue. A circle of felt or cardboard is used as a base.
If necessary, rhinestones, beads and sparkles are attached to the workpiece and left to dry. After the glue has dried, the petals are straightened, and the craft can be used for its intended purpose. At the same time, when creating complex products, the number of operations increases.
Content
Crafts made from ribbons turn out beautiful and original. Making them is quite troublesome and time-consuming, so such creativity is not suitable for small children. Older children, for example, primary schoolchildren, can do such crafts. If the child has an older brother or sister, he can directly engage in making crafts, and the younger child will be an “apprentice.” Select the material according to size and color, choose which ones you like best - the baby can do all this. By helping an older child, the baby will feel needed and useful, and working together will develop his organization.
If your baby is partial to ribbons, you can come up with simple products that he can make himself.
Herringbone
You can make an interesting and simple Christmas tree for the New Year holiday. For it you will need two colored ribbons - green and brown, for the crown and trunk, respectively.
Cut three pairs of pieces from the green ribbon. The first pair should be the longest, the second shorter, and the third very short. The brown ribbon will be the trunk. We fold a piece of green tape into a loop and fasten it to the trunk, and fasten the second paired piece opposite, crosswise. Having glued all three pairs, we get a Christmas tree. The top of the head can be decorated with a shiny bow.
DIY decoration
A decoration option made from satin ribbons that can be placed on a wall or used to decorate a gift box.
Necessary materials:
- The base is semicircular. You can take polystyrene foam or quick-drying clay.
- Satin ribbon
- Safety pins
Manufacturing:
The tape must be cut into pieces, rolled each into a ring and attached to the base. The craft is ready. It can be inserted into a muffin tin or glued to a gift box (only a foam base is suitable for a gift box).

There is another option:
The ribbon cut into pieces is strung on a thread rather than rolled into a ring. One edge needs to be stitched with a needle and thread, pulled into a bow and glued to the foam. The top will be lush and beautiful.

You can decorate a photo frame with a craft made from ribbons. To do this you will need a pink ribbon, from which we will make a butterfly. Cut a piece that is twice the length of the intended butterfly. Fold in half and stitch. Then you need to roll two eights, or maybe one double. Sew and attach to the base. Butterfly antennae can be made from threads.
Thick rapeseed ribbons also make interesting crafts. They can serve as a decoration for a hairpin or just a beautiful craft.
Animal crafts
To make a cute turtle, you need to prepare two ribbons: pink and green. You can also use satin if you first seal it with material (take two lengths and sew them on a machine, with a fabric or elastic band of the required width in the middle). Next, we make four rings of the same size and insert them one into the other, forming a ball. On each side we sew two loops of green ribbon - these will be the paws. At the front of the ball, a piece of green tape with a loop at the end will serve as the turtle's head. The eyes can be made from beads (ask your child to choose the right ones) or sew on toy ones.

The octopus is made in much the same way.
A ball is formed from four rings - the head, decorated with eyes. Now, to make tentacles, you need to take eight pieces of tape, twist them into a spiral and secure with thread. The curious octopus is ready. You can decorate it with a bow or a toy hat.

A variety of hand-made faces can be attached to a purse, notebook, photo frame or hairpin. By attaching a pin to such a face, you can get a keychain or brooch.
The whole principle of work is to create a base - a strip folded in half and stitched. Two loops are dog ears, a triangular muzzle, and a pompom for the eyes and nose. And, of course, an elegant bow for decorating the craft. You can give such a craft for the birth of a child, for example.
Another option for crafts that can be made from rapeseed tape:
Flowers
A school-age child may well prepare a gift for his mother or grandmother on March 8th.
Rose for mom
Take a silk ribbon of one or more colors and cut off a piece suitable for forming a flower. The edge of the tape needs to be sewn with thread and pulled slightly.

For stems, you can take a small diameter plastic tube or a knitting needle. We decorate the stem with green ribbon and glue. Then we apply its edge to the ribbon and twist the rose, securing it with thread. We repeat several times, the bouquet for mom is ready for the holiday.
Flower as a gift to grandma
Grandmothers always occupy a special place in the life of a little person. Children feel great love and affection and want to give back in any way they can. You can invite your child to make a beautiful craft from ribbons. It doesn’t have to be some kind of holiday, because the grandmother always loves the child.
So, we take multi-colored ribbons and cut them into small pieces, from which the petals of the future flower will be formed. Your child can help you cut the ribbon, or in extreme cases, he can find and hand you scissors. It is very important to ask your child for help; he will feel important.

Each piece is folded in half and stitched along one edge, resulting in a triangle on one side.

The edges of the stitched piece are bent slightly on both sides and turned in the other direction, as in the picture. It turns out to be a petal. Several such petals are made, depending on the size and splendor of the flower.


A universal selection of gift ideas for any occasion and occasion. Surprise your friends and loved ones! ;)
I welcome everyone gathered on my blog on this sunny (or maybe not so sunny) day. If you want to learn how to make cool flowers from ribbons, then I highly recommend reading this article to the end.
Flowers made from satin (and other) ribbons can be used both to decorate gift packaging and as a gift itself.
Especially if you collect such flowers in an elegant bouquet.
The most amazing thing is that sometimes the most beautiful of these plants are so easy to make with your own hands that it takes 10-15 minutes even for a beginner (trust my experience).
Recently I have been making different flowers quite often and now I will share with you excellent master classes on making them
DIY flowers made from satin ribbons
I'll show you 15 cool (and easy) ways to create amazing flowers. You can “take” each of the photos from the master classes with you by copying the corresponding image.
Let's start with, perhaps, the most romantic and popular plants among girls - roses.
Ribbon roses
Stop buying expensive store-bought roses! Let's learn how to make them ourselves and save the lion's share of the budget.
We will have several roses today. The first of these is a rose, obtained by folding triangles as you go. To make it, prepare a piece of ribbon at least 2 cm wide and at least 50 cm long.
Unblown
Form a center by bending one end as in the photo. Twist and secure.

twisted rose
In terms of the method of creation, it vaguely resembles the previous one (at least the beginning). After forming the center, alternately turn the ribbon, twisting it and applying layer by layer. Secure at the end.

Kanzashi
The peculiarity of this rose is that all its petals are processed separately.

From braid
Finally, a rose, which is obtained by intertwining two wavy ribbons. After weaving, they need to be swept along the edge so that they do not fall apart. And then just roll it up.

Flowers from kanzashi ribbons
In general, kanzashi is originally a “hair decoration” from Japanese. It dates back to the times of geishas, who were distinguished, among other things, by their ability to skillfully do needlework.
Kanzashi has two petal shapes - round and sharp. The rest are already subspecies. So all flowers, to some extent, can be attributed to this type of art.
Hibiscus
An exotic guest, for which you will need a wide ribbon (about 5 cm wide), a base and stamens.

Just a flower with 5 petals
To make pointed elements, sew the center. Fold the future petal in half and hem it from the inside. Prepare 5 pieces, then string them on a thread. Decorate the middle.

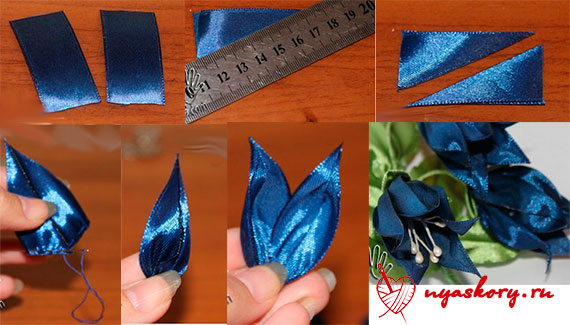
Bell
For the bell, prepare the petals according to the photo. To roll them, fold the petals with their tall, straight edges facing each other and sew around the edge (glue the top a little). Pull the thread, assemble the resulting parts, decorating with stamens or beads.
Semitsvetik
For it you need to prepare 7-9 petals using the classic method used in kanzashi. Then all the petals are collected on a thread and, if necessary, glued together on the sides.

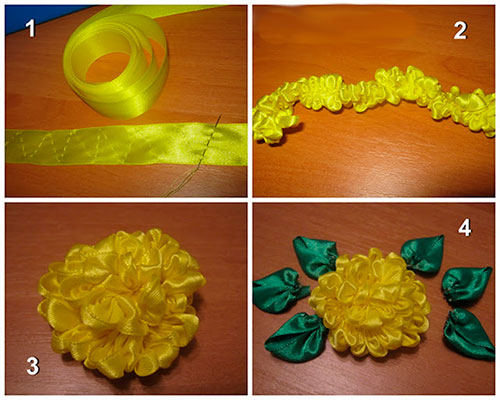
Aster
Just a dream, not a flower in terms of ease of execution. To make an aster, take a ribbon and sew a line of zig-zag running stitches across the entire width. Pull, roll. All
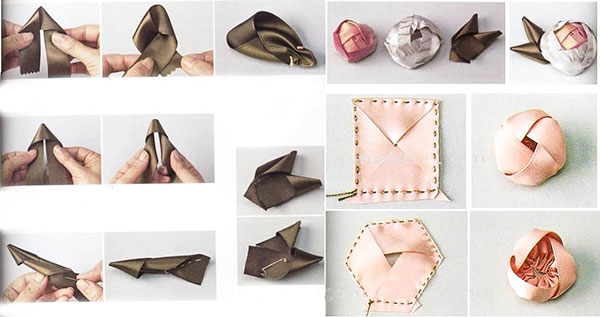
Peony
For the peony, take three ribbons: two for the petals, one for the green leaf.
Please note that the peony consists of two parts - a more closed bud and opening petals.
Master classes on colors in video format
Not everyone likes to study photographs, so I have prepared for you several flower-making tutorials in video format.
Chamomile
To create a daisy, you will need many, many burnt petals (pieces of tape 0.6 cm wide and 3.5 cm long), as well as a base - a circle of cardboard.
Calla lilies
One of the simplest plants in this article. The only thing easier, perhaps, is the aster.
Sunflower
According to the principle of creation, it is very similar to a chamomile, but here you will have to tinker with the petals a little more.
Star
An elegant flower consisting of 5 elements and a center.
Snow fairy tale
A flower of extraordinary beauty, made from a wide ribbon. It was difficult to attribute it to any species, so let it be called that
A wonderful effect will be achieved if you combine several types of ribbons from the same series. This is easy to do with the help of modern sets, including up to several dozen ribbons in the same style.
With this I say goodbye to you. See you soon! Be sure to tell us if you know any other ways to create flowers.
P.S. Subscribe and learn how to give cool gifts
Sincerely, Anastasia Skoracheva
Satin ribbons are one of the most affordable and effective materials, loved and used by many needlewomen. And this is not surprising, because satin, with proper care, can be very durable, which means that products made from it will delight you with its beauty for a long time.
In addition, its consumption during operation is quite small, and the process of making all kinds of original accessories, exclusive interior decorations, decorative elements or unusual gifts is simple and accessible even for beginners.
If you haven't worked with ribbons yet, give it a try and see how easy and beautiful it can be. Moreover, there are many master classes that instruct in detail how to make various crafts from ribbons with your own hands.


“Ribbon creativity,” in addition to its originality and beauty, also attracts with its diversity, because satin ribbons can be used both to make simple trinkets and to create real masterpieces or objects of art.
For example, here are the simplest options for crafts made from ribbon that even your child can make:
- bows or flowers - these can be hair clips, decoration for a hoop, brooches, etc.;
- baubles and bracelets;
- various decorations for decorating gifts or home interiors - flowers, figurines, animals.


Crafts made from ribbons can also be complex, made using various well-known techniques (“kanzashi”, “artichoke” and others):
- entire panels and paintings are embroidered with satin ribbons, and aromatic sachets are made from them;
- they are used to decorate Easter eggs and wedding paraphernalia - making bouquets, decorating wine glasses, gift bottles of champagne, pillows for rings, etc.;
- Using ribbons and soap with your own hands, you can create entire baskets with flowers that will decorate any interior or make an excellent gift.
And these are not all possible crafts made from this material. For inspiration, you can use existing ideas in master classes or come up with something special of your own.
Satin ribbon rose
Of course, you can start with the simplest thing. To easily make unusual and complex things, you need to understand the basic techniques for creating products from satin ribbons. And the best way to see this is step by step in the master class.


Step by step description
- Although tulips, dandelions, hyacinths, primroses, and many other flowers are rolled from ribbons, the most popular flower among craftswomen is the rose. Roses are most often made using the kanzashi technique. For the flower, choose a ribbon of the desired color five centimeters wide. Cut the edge of the tape evenly and melt it with a lighter so that it does not fray. After this, place the ribbon so that its wrong side is facing up.
- Fold the upper left corner down (in the pictures of the master class there are arrows and the fold lines are indicated by dotted lines), and fold the lower left corner to the right twice.
- Take a needle and thread of the same color as your ribbon. Secure the resulting fold (the thread should be long, because you will then have to stitch the entire tape).
- Connect the two layers of ribbon by stitching from the fixed place to the right (there should be about one or two millimeters from the edge) and stop at the edge of the top ribbon.
- Fold the long edge of the ribbon to the left (in the direction of the arrow), and then the entire ribbon up to the right at an angle.
- Make sure that the right sides match and you have three layers. Sew them together, working upwards from the bottom corner. Then stop, but do not cut the thread, but tuck the ribbon down, as shown by the dotted line in the photo master class.
- Then turn it at an angle to the left and stitch again, only to the left along the top edge. Having connected the three layers, turn the ribbon in the direction of the arrow to the right, then at an angle downwards, and continue stitching.
- When there are already enough pleats (this will take approximately fifty centimeters of tape), sew stitches along the edge of the last of them, capturing two layers. Trim off the excess material and melt it with fire, but leave the thread.
- Tighten the thread and you will get a whole row of petals. Start forming a bud. The first petal must be made from the very beginning of the ribbon, pulling the thread where you secured the two folds. Twist it around these folds and you will have the center of the flower.
- Take another needle and thread and pull the bottom edges of the petals together. Then form a second petal, twist it onto the bud and hem it at the bottom in the same way.
- Continue on the same principle, adjusting the petals using thread tension. If you get a larger bunch on the bud, then your rose will be larger, looking like a beautiful blossoming flower. Or you can do a little tension, and then a delicate bud will come out.
- Then twist the thread to the end and hem each petal from below. Carefully secure and trim the thread. Spread your flower.

Depending on how you want to use the rose, its bottom can be sealed with a piece of felt or ribbon, sewn to leaves, attached to a safety pin (for a brooch), a hairpin or hoop, etc. Such a delicate and beautiful product will be an excellent decoration or a gift for spring holidays like March 8th.
Little roses - simple


Ribbon poppy
In the master classes there are other ways to create different flowers with your own hands. For example, you can separately cut many parts from satin ribbon, shaped like leaves and petals. Then burn them, form a flower and glue the elements together, decorating them with beads or sequins.


Ribbon lily - photo MK


Bride's bouquet of ribbons
The made flowers can then be sewn onto fabric or embroidered with satin ribbons directly on the canvas, making various paintings and panels. Using the same technique, it is easy to make many roses for the bride's wedding bouquet. All that remains is to make the base on which the flowers will be attached.


Easter eggs with ribbon decor
If you want to decorate Easter eggs, you can either simply cover the blank with fabric and then decorate it with flowers or ribbon bows, or use the “artichoke” technique - fold ribbons of different colors in the manner of fish scales and glue them to the surface of the egg.
You can also paste over balls in a similar way, and then you will get original Christmas tree decorations or just interior decorations.

Ribbon basket for a bouquet
To make an unusual basket, take a piece of oval soap and attach safety pins on it in a circle at the top and bottom (their number should be the same, and they should be placed on the soap at a distance of approximately six to eight millimeters from each other - just stick them into the bar of soap ).
Then take a ribbon (not very wide - about one to two centimeters), secure one edge with a pin and braid the walls of the basket as follows: hook the ribbon to the top pin, then lower it down, hook it to the bottom one and lift it up, continuing further until all walls will not be braided.
You will have a long end left at the bottom - you will need it to braid the bottom edge and form the side. Then you will need to move it up to decorate the top edge. Use the remaining ends of the ribbon to create a bow. Use wire to make a basket and a handle and braid it with a ribbon of the same color or make an assembly out of it.


Attach the ends of the handle to the soap and decorate the basket. You can put primroses in it and give it to a friend or mother on March 8, or decorate it in any other way.
Making such beautiful and unusual crafts is a great way to show your imagination and creativity and make nice gifts for yourself or loved ones.
Video master classes
Content
What could be more unique than a piece of jewelry made with your own hands? Exclusive decoration items are made with satin ribbons. Any novice craftswoman can create flowers, and if you practice, you will get masterpieces. Find out how to decorate clothes and gifts in an original way.
How to make flowers from ribbons with your own hands
There are different methods for assembling flowers from satin ribbons. It will take perseverance, but the results will be amazing. Start with simple things, then use your imagination and create unique jewelry. To make flowers from satin ribbons with your own hands, you will need:
- lighter or candle;
- sharp scissors;
- needle and thread;
- glue gun;
- tweezers.
DIY flowers made from satin ribbons for a headband
Try decorating your headband using the oriental kanzashi technique. Experiment with colors, number of buds and petals. The creation technology will not cause any difficulties, but if in doubt, watch the master class: the video is below. To create a flower with five petals, you will need 5 pieces of 5x5 cm. You need to take the same number of circles with a diameter of 15 mm, burned around the perimeter. Make a headband like in the photo:

We create flowers from ribbons with our own hands like this:
- fold the piece at an angle three times;
- perform a fold;
- trim the end;
- burn, fix;
- trim the lower end of the petal;
- burn, fix with fingers;
- create all 5 petals in the same way;
- sew the petals into an inflorescence;
- glue a circle of fabric on the back side;
- attach to the rim;
- decorate.
How to make flowers - roses from ribbons
Making flowers from satin ribbons with your own hands is a fascinating craft. An original rose, as in the photo, can decorate a hairstyle or dress. They do it in different ways, we offer one of them. If everything is not clear, watch the video. For production you will need a tape measuring 25 mm. You need to cut 8 pieces 7 and 5 centimeters long, burn the ends.

Start work like this:
- make 4 petals from a 5 cm blank;
- bend one end at an angle of 45;
- the bent edge is heated with the base and fixed with tweezers;
- repeat on the other side.
How the middle and outer petals and leaves are made:
- 4 pieces of 5 cm each are also folded in both directions, but they should be sewn together with threads, making a seam with a slight gather;
- Using the same technology, 8 outer petals are made from pieces measuring 7 cm;
- leaves are cut from a green blank 2.5x5 cm;
- burn around the perimeter, making bends;
- veins are made by bending the leaf, heated, and squeezed hot.
Assemble the finished product in the following sequence:
- carefully roll the first piece into a tube and fix it with glue;
- sequentially glue the next 3 blanks around - this is the middle of the bud;
- secure the middle and outer petals, distributing them around the perimeter, forming a blossoming bud;
- All that remains is to glue the leaves and secure with a pin.
How to make a flower from a ribbon using the kanzashi technique - daisy
The decorations will be beautiful and elegant - flowers made from satin ribbons with your own hands. To create such a spectacular daisy as in the photo, you will need to make 40 small blanks.

If you have questions about technology, watch the video. The craft can be used as a hairpin or an elegant brooch. For production you will need:
- 1.2 m of white tape 12 mm wide;
- green, yellow – 6 mm wide – 0.3 m each;
- 2 pieces of white felt, shaped like a circle with a diameter of 20 mm;
- barrette.
Start making artificial chamomile like this:
- cut 40 white blanks 3 cm each;
- corners are cut off from one edge;
- melt with a lighter, making the petal rounded;
- the bottom is folded overlapping, right side inward, melted;
- on a felt piece, draw a circle 5 mm from the edge;
- the petals are glued along the mark, in a circle;
- along the inner circumference they are fixed in a checkerboard pattern.
To create stamens with your own hands, you will need a needle with a wide eye and a narrow yellow ribbon. Do it in this order:
- a needle and ribbon are inserted from below into the center of the flower;
- pulled out at the top;
- wrap the ribbon around the needle one turn, stick it down, fixing the loop;
- repeat the operation in a circle from the center to the edges until the weaving covers the inner surface;
- for leaves, cut the green blank into 3 parts, fold it in half, clamp the fold;
- the ends are crossed and fixed with fire;
- glued to the bottom of the chamomile;
- insert a hairpin into the second circle of felt;
- glued to the flower.
Lush flower made from satin ribbon with your own hands - peony
You can learn how to make flowers from ribbons for beginners using the example of peony. It will look like in the photo. You can decorate your hair or an elegant dress with peony. Make one large flower using the proposed technology; if necessary, refer to the video tutorial to clarify all the details. To make it you will need 25 mm satin blanks.

Strips needed:
- yellow – 1.4 m – cut 22 strips 6 cm long;
- pink - 1.3 m - make 27 blanks of 4.5 cm each;
- burgundy - 3.2 m - cut 18 strips 6 cm long and 38 strips 5.5 cm long.
A peony is made using the following technology:
- cut off the end of the yellow workpiece at a slight angle;
- both sides are burned;
- screw it onto tweezers, fixing it with glue;
- carefully remove - you get a stamen;
- take pink strips, cut off a semicircle (you can use a paper pattern);
- heat the edge with fire - it is better to use a candle; use your nails to make a wavy surface;
- the bottom is folded and fixed with heat;
- on burgundy blanks, the edge is rounded;
- held over the fire - it will bend outward - the front side is on top;
- Make a fold at the bottom, fixing it with fire.
The assembly is done like this:
- collect the stamens in 3 rows, fixing them with glue;
- glue pink petals, right side inward - in 3 layers;
- lay short burgundy blanks inside out, fix with glue;
- the last row is made of long petals, the glossy side is on the outside;
- decorated with green leaves.
Wedding bouquet of satin ribbons for the bride
A bouquet decorated with your own hands looks very beautiful and will remain as a souvenir of the wedding. The decoration was originally conceived using brooches, beads, lace, as in the photo. To make a bouquet, you first need to make 19 roses, from white and purple ribbons, as, for example, in the video tutorial, which you can watch for a better understanding.

To decorate the decoration, you must have:
- a blank foam ball with a handle;
- lace;
- thin lilac satin ribbon;
- wide – white, purple;
- decorative elements - beads, brooches.
In addition to a bouquet, using this technology you can make a topiary - a tree of happiness. The assembly is done like this:
- the handle is wrapped in white;
- lace is attached to the ball and fixed near the handle;
- in the lower part, thin lilac strips folded in half are glued - 12 pieces;
- lace - next row;
- then folded strips of white and purple ribbons;
- Roses are tightly glued to the surface of the ball;
- the bouquet is decorated with decor.