How to make a pencil case out of paper and cardboard. How to make a school pencil case with your own hands. Pencil case made of leather "Funny face"
I invite you to a creative workshop, where I will show you how to sew a pencil case for the school with your own hands.
In order for the craft to come out beautiful and practical, it needs to meet certain criteria:
- The size. It was suitable in volume for all office supplies, both for pens and pencils (pencils are longer). The number of items should also be taken into account.
- Ornament.
- Strength. In order for the craft to last at least a year, you should take a dense material or use any sealant, for example, from felt.
I will give examples.
simple rectangle
- The square of matter is conditionally divided into 2 parts. To each half in the middle, sew a rectangular piece of felt 1 cm smaller in size than half of the fabric in both width and length.
- Sew a rectangle. You don't even need a pattern for this. Just fasten the edges of the square and sew or glue the sides.
- Insert zipper.
You can decorate the pencil case with a bow. See the video for how to make it.
Flat pencil case made of felt
An incredibly simple pencil case made of felt - even a first-grader can sew or glue it.
Pencil case made of felt with a zipper
Also a simple, fast and very funny pencil case.
Pencil case roll made of felt
Pencil case in the form of ice cream from the Troom Troom Canal
Volumetric pencil case made of fabric and felt without sewing
From lightning
- 12 zippers of the same size (not less than 18 cm) are sewn together so that one is the clasp up, the second is the clasp down. The main thing is that the locks are nearby, in one line.
It turns out the canvas.
- Sew the edges of the canvas.
- Fasten along the edges of the "sleeve".
- Turn out!
The advantages of this device is that you can open it anywhere, and not even in one. And if you take zippers different colors, it will turn out very nice.
Cardboard or paper
From cardboard - the most easy option. It turns out any shape and more voluminous than a regular case for pens. It can be used for art supplies like brushes, or even make a large pencil case that can hold rulers, pens, and a notepad.
Pencil case without sewing

- a sheet of felt or foamiran,
- thread,
- lightning,
- the fabric is 7 cm wider than the felt.
Instruction:
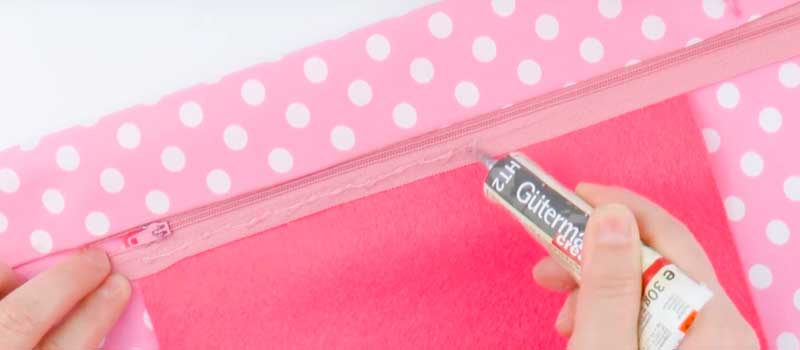
- Glue the edges of the fabric to the felt, bending them inward.

- Glue one half of the zipper to the finished edge. Do the same on the other side.

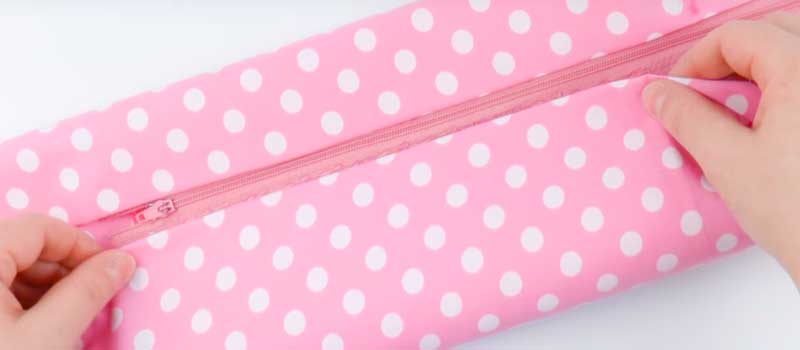
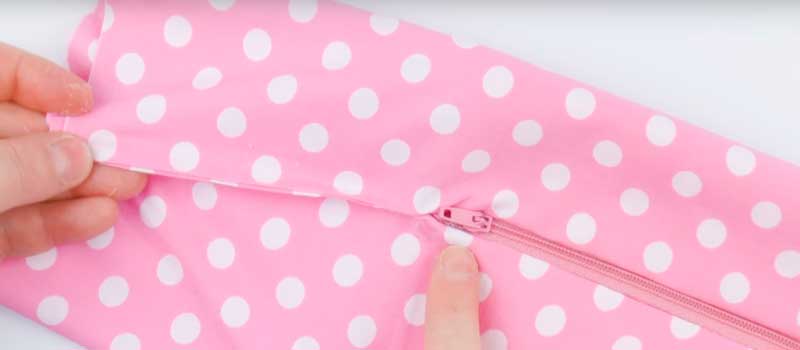
- Bend the ends of the fabric into a line with a zipper and glue together. Trim off excess zipper. On the other hand, also glue the ends of the fabric. We have a rectangle.


- Tie the formed tails of the fabric with threads or elastic bands, cut off the excess. Decorate with eyes or felt flowers.
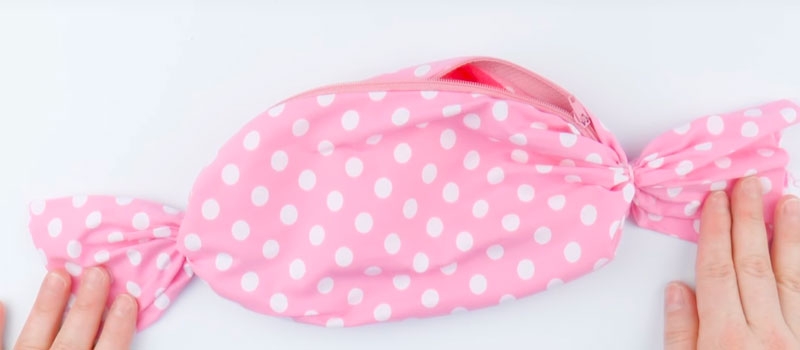
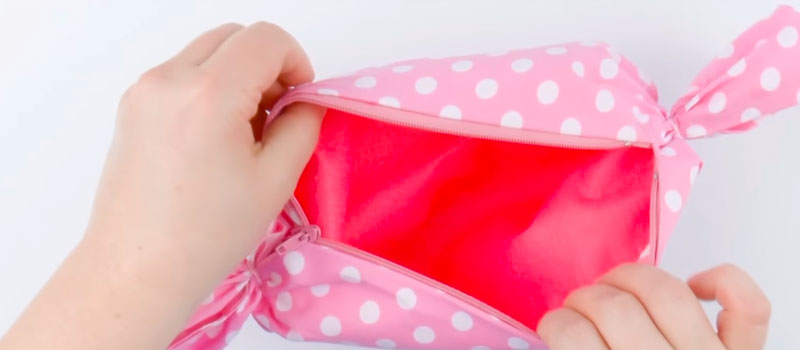

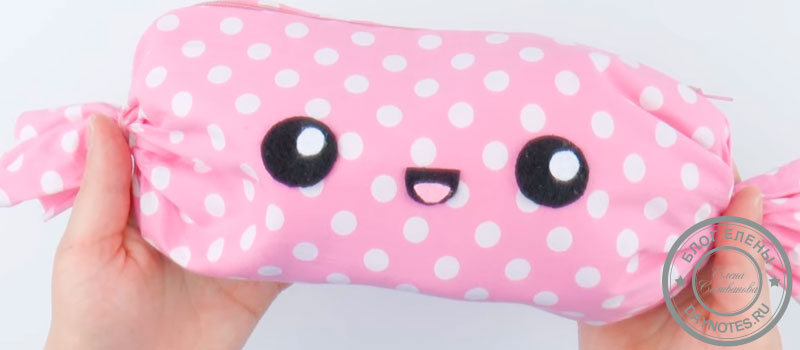
The view of such a pencil case is like that of a candy.
Paper tube pencil case
The same principle applies to cardboard. You just need to take the sleeve from paper towels. Cut it lengthwise or across, depending on how you plan to open the pencil case. Then everything is according to the instructions. True, the size of such a cover will be small.
You can also use leather and suede, felt, Plastic container etc.
Pencil case made of plastic envelopes
Colored cardboard pencil case
Master class pencil case by furoshiki type
This technique can be used if:
- Want variety, every day a new device.
- In case of emergency: torn School pencil case need a new one urgently.
- I need a temporary organizer.
And furoshiki has many advantages:
- Make it from a scarf or just from fabric.
- You can easily change the color and size.
- It's done quickly. It takes a minute to make.
- No pattern needed!
- Lightweight and doesn't take up much space.
- No zippers, no fasteners...etc.
All I needed was a handkerchief. I specifically took it with a simple ornament, so that everything that I do was more noticeable. You can take fabric with a brighter design. What and how I made from it:
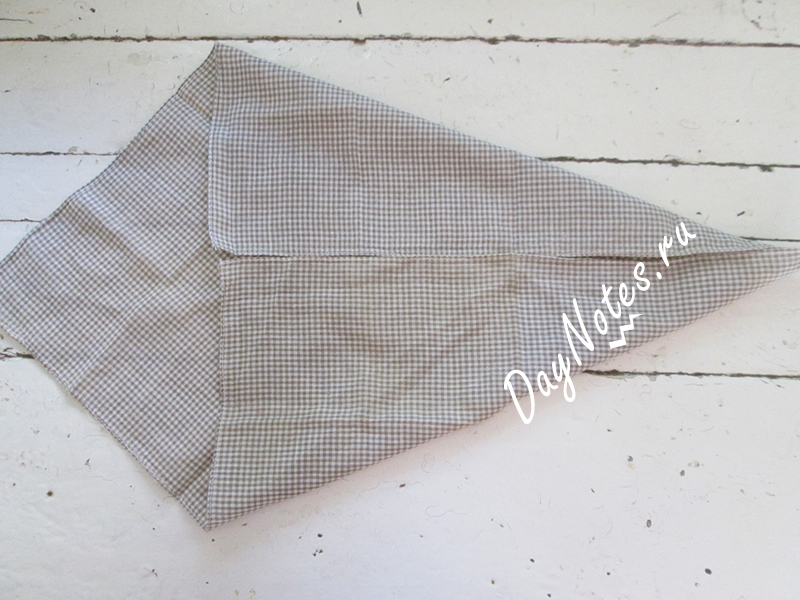
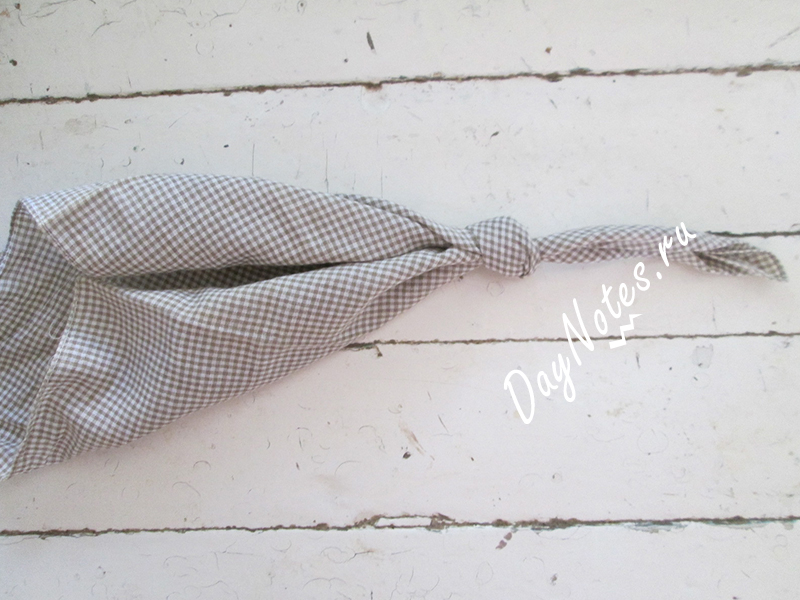
Such furoshiki can even be cut out of jeans. Just tie corners will not work. But to put on the edges, in places of knots, elastic bands, is quite real. Don't tie your hands either. They will need to be stitched. This fashionable stationery bag looks very cool!
Tell us what you can do with your children. Share what you learn with your friends. And don't forget to subscribe. You have the opportunity not to miss a single topic!
A pencil case is not just a school attribute, but useful thing to help organize workspace. You can put pens, pencils, felt-tip pens, erasers, rulers, sharpeners and other stationery in it. So that you or your child have an exclusive pencil case, you can sew it with your own hands.
How to sew a pencil case with your own hands?
You will need:
- Canvas, size 18x7 cm;
- 3 multi-colored cuts of the 1st and the same fabric, different sizes- 18x4.5 cm; 17x5 cm and 17x6 cm;
- Lining fabric, size 17x18.5 cm;
- Batting, size 17x18.5 cm;
- Zipper 17 cm;
- measuring tape;
- safety pins;
- Needles and notes;
- Scissors;
- Sewing machine.
Instruction:
- Lay the colored pieces of fabric and the canvas next to each other on the table. Sew all the pieces together with an open seam. Then sew along all the segments with the same seam. Place a piece of fabric for the lining next to it, align them and fasten with pins. Sew them on the 1st side.
- Turn the sewn fabric inside out and attach the zipper so that the zipper is on the right and the zipper is hidden by the fabric. The stripes on the fabric should be perpendicular to the lightning. Fasten with pins, then sew on a typewriter.
- Divide the fabric for the lining and outer part, bend each so that free edge touched the other, unstitched edge of the zipper. Fasten with pins, then sew on a typewriter in 3 layers. As a result, you should get a sharp cylinder with lightning.
- Open the zipper, turn the pencil case inside out. Lay it out so that there is an equal amount of fabric to the left and right of the zipper. Pin the open ends of the cylinder together. Be sure to sew the zipper tape with an overlock or zigzag on a sewing machine. Trim off the excess zipper.
How to make a pencil case with your own hands?

You will need:
- Tube from toilet paper or paper towels - 2 pcs.
- Scissors;
- Cutter;
- Lightning;
- masking tape;
- Fabric (fleece or felt);
- Threads and needles.
Instruction:
- Cut 1 tube. Tape the 1st and most of the 2nd with masking tape. A small part of the 2nd tube will serve as a lid. Now sew a cover for your pencil case. Suitable for the child bright colors- this will cheer you up, and the pencil case will not be lost in the baby's backpack.
- The cover must be freely put on the tube. Sew the zipper into the cover and sew the edges. For the lid and bottom, cut out 2 circles from cardboard, glue pieces of fabric to them (you can use other colors than the cover itself).
- Sew the bottom and lid in place.
Pencil cases for girls: options
simple pencil case

You will need:
- Bright oilcloth or beautiful fabric;
- Lightning - 20 cm;
- pins;
- Threads and needles;
- Scissors;
- Sewing machine;
- Decorative elements.
Instruction:
- Cut out 2 pieces from the base material, measuring 20x10 cm. Fold the fabric and snake with the right sides so that the material is located on top of the zipper and carefully align the edges. Temporary stitch the zipper and fabric to make it easy to sew on the machine. Using a sewing machine, sew along the basting without touching it. Do exactly the same manipulation with another piece.
- Open the zipper and sew the pencil case along all the edges. Turn it inside out and close the zipper. The finished pencil case can be decorated with funny figures, beads and flowers.
Beautiful pencil case for a girl

You will need:
- The main fabric for the pencil case - 38.1x43.2 cm;
- Overlay fabric - 38.1x43.2 cm;
- Batting - 25.4x43.2 cm;
- Harness - 115 cm;
- Pencil;
- Needles and threads;
- Scissors;
- Spray;
- Lightning - 40 cm.
Instruction:
- Apply any design on the main fabric. Make sure that the applied contours can be easily washed off. Fasten the fabric with batting and quilt along the applied contours. Rinse the contours with a spray bottle.
- Now you can make a frame for the zipper. Make limiters, stitch the main fabric and lining. Stitch the face of the stopper to the underside of the fastener frame. Treat the edges of the pencil case with a beautiful tourniquet.
- Make cuts on the folds - this is necessary so that the fabric does not bulge. Sew the outer and inner parts of the pencil case and the lining. Sew them face to face so that the seams are not visible. Turn out the pencil case.
- Pin and stitch 1 side. In the same way, issue the 2nd, leaving an unsewn segment. Turn the hole inside out and sew with a blind stitch. The finished pencil case can be decorated with flowers or beads.
Do-it-yourself pencil case: photo


Handmade is a fashion trend that recent times gaining momentum. Pencil case - stylish accessory that every student needs. Sewing it is not difficult, and the process of making it can be exciting game especially if you involve your child in it. Let him talk about his desires, choose the fabric he likes, or just think over the design.
Stationery and educational supply stores are full of various offers of school pencil cases. To understand among all this parade of colors and shapes sometimes becomes very difficult. However, after spending an hour or two of your time, you can make a pencil case yourself according to your own author's design. It can be decorated as you like, add additional elements emphasizing the individuality of the subject. This article will discuss how to make a pencil case for the school with your own hands.
Plastic bottle pencil case
To make a children's pencil case from a bottle, you will need:
- two bottles of the same size, preferably with denser plastic;
- glue (both hot glue and superglue are suitable);
- scissors;
- lightning.
To prepare a pencil case, you will need to use the bottom of the bottles. By connecting the two parts with a zipper, we get a single design.

Thus, in a few minutes, the original pencil case was ready. To give a finished look, you can decorate it. various elements based on your own taste.

Denim pencil case
Knowledge basic techniques patchwork - and voila - a practical accessory is ready. Old jeans will help create a unique cosmetic bag that will find a place for any girl, or a pencil case that takes pride of place in a schoolbag.

To prepare a school pencil case from fabric with your own hands, you will need to stock up on the following:
- pair of segments denim 26 cm X 12 cm;
- a couple of pieces of fabric and batting, as a lining;
- buttons, decorative beads and stripes;
- zipper 25 cm long;
- wax pencil, threads with needles.

Usage three layers fabrics will make the pencil case soft, reliable and dense. The pattern of the pencil case is extremely simple. To save time and make the seams durable and of high quality, it is recommended to use at least the most primitive sewing machine.

Paper pencil case
It's still better when pencils and pens are collected and neatly stacked than scattered inside a bag or briefcase. From the materials at hand, you can make an excellent pencil case for the school.

Necessary things:
- scrap paper;
- PVA glue;
- cardboard rolls (it would be better to take cartons from paper towels and toilet paper, because rolls of different diameters are needed);
- some foam;
- scissors, ruler, stationery knife.
Children often lose or forget pencil cases, and pens and pencils quickly stain backpacks and bags. Today I offer you one wonderful idea - to make a pencil case out of paper with your own hands. It is not simple useful craft, such a pencil case can also be used as a bookmark in books. This is a 2 in 1 idea. Drawn funny animal faces on the pencil case will add brightness to the craft and add a learning mood to you.
A small pencil case is quite suitable for several pens and pencils, and even a first grader can make it. All you need is a square of paper, glue and markers.
To make a pencil case, take a square sheet of paper measuring 17x17cm. The main thing is that the paper is thick. pencil case out too thin paper wear out very quickly.

Fold the square of paper in half, unfold and fold each side to the center crease.

Fold the corner of the paper on the right to the first vertical crease, and the corner on the other side to the 2nd vertical crease.


Fold the paper and you will have a pencil case. Glue with reverse side corner so that the pencil case does not open.


Watch my video on how to make a paper pencil case. Everything is very clear there!
On the finished pencil case, draw the face of a funny animal or color it to your liking. Now your pens, pencils and ruler will not get lost and will not stain the bag. And it is also easy to use such a pencil case as a bookmark in a book!
They didn’t lie scattered at the bottom of the backpack, but lay neatly folded with the child? Find out from our master class with a photo on sewing a school pencil case.
Back to school. And this means that they will again be piled up on the table, in a backpack or scattered throughout the apartment. But ? This will help bright, in which to put all the pens and will be a pleasure. Such a cool school pencil case will be another way, and in the classroom.
To sew a fabric school pencil case with your own hands, you will need:
- Fabric - 2 types for the front and inside (each 22 cm wide)
- Lightning - 23 cm
- Scissors
How to make a pencil case with your own hands: a step-by-step master class
Step 1. From each type of fabric for the inside and front of the school pencil case, cut 2 rectangles measuring 24 cm x 14 cm. You should have 4 small rectangles of fabric.

Step 2 Once the fabric rectangles are ready, grab the zipper. Place one piece of fabric for the inside of the pencil case (in our case, the black and white striped fabric) in front of you, front side up. Attach the zipper to the edge of the fabric with the fastener facing up.

Step 3 Then, on top of the zipper, attach one piece of fabric, which will be the front of the pencil case, pattern down. Fasten the zipper together with two pieces of fabric with sewing pins.

Step 4 Start sewing along this edge of the zipper that has two pieces of fabric attached to it. When you get close to where the zipper is, stop sewing, tie off the thread, and move the zipper out of your way by opening the zipper. Then sew everything to the end. Turn the pieces of fabric right side up. After flashing it should look like this:

Step 5 Now you have to do the same on the other side of the zipper. Unfold the fabric with the end of the zipper facing you. Take two other pieces of fabric. Lay the fabric for the outer part of the pencil case with the pattern down, and on top of it place another piece of fabric for the inside of the pencil case, right side up. On top of these two pieces of fabric, put the two to which the zipper is already sewn. So the fabric for the inside is on the inside, and the fabric for the outside is on both sides of the inside (one part facing you, the other facing down).
Sew along the zipper, inserting the side of the zipper to be sewn between the two pieces of fabric that are under it.

Step 6 Now take your pencil case fabric and lay it out so that front sides the main (outer) tissue touched each other, and the inner tissue was outside.

Sew along the long, raw edge at the bottom.

Step 7 Then fold the pieces of fabric from which you sew the school pencil case so that the zipper is in the center. Make sure all your layers inside lie flat.

Step 8 Open the zipper in half. Sew each of the raw short sides. You are sewing the ends of the zipper as well, so just make sure it closes properly and everything moves when you sew it.
Now make the side corners in the school pencil case with your own hands. To do this, take one of the four corners and flatten it with your fingers to form a triangle with the side seam just done, going straight into the center of your triangle. Sew along the base of the "triangle" and then cut off the sharp end. Do this on all 4 corners.

Turn the finished pencil case right side out and let your child fill it with their school supplies.
Now you know how to quickly sew a comfortable fabric pencil case for a child with your own hands. Such a wonderful pencil case can become not only an organizer for the office and other school supplies a child, but also a wonderful cosmetic bag for mom, sister or grandmother. It remains to choose the right fabric.