How to make a crown out of leaves. Do-it-yourself crown from various materials. Craft: maple leaf plate
In autumn, many girls make themselves decorations from leaves. One needs it in order to make nice pictures for social networks, others make accessories to go to a costume party like Halloween. Today we will tell you how to make a crown of leaves with your own hands.
Easy option
If the child has a matinee tomorrow, and you quickly need to make him a crown of leaves on autumn Ball, then you can use this idea. The headpiece is assembled from maple leaves: The decoration will be more magnificent. But if maple does not grow near your house, you can experiment with or mountain ash. But remember that a crown made of birch leaves will not look so impressive.
Many mothers collect leaves, make a crown out of them, and then are surprised that their masterpiece is deformed in the morning. There is nothing strange here, the leaves dry out and curl up, this is natural. To prevent such trouble from happening with your headdress, you must first prepare the material. Let's get started. We heat up the iron and take the newspaper. We lay several leaves between the pages of the paper edition, close them. We iron well. Never turn on steam mode. You need to dry the leaves, and not drive excess moisture into them.
When everything is ready, we proceed to the manufacture of the crown. As a basis, take a cardboard strip. We attach leaves to it with the help of a stapler. You can change their slope to make the headdress look interesting. When the work is finished, you can glue the ends of the strip, or you can fasten them with a paper clip.
Difficult option

Such crowns of leaves are rarely collected for matinees. Usually girls make them for a photo shoot or for a wedding. Moreover, in such a headdress can be both the bride and all her girlfriends. To create this crown, we do not need dried leaves, we will use live ones. But it should be remembered that the life of such a headdress is limited to 2-3 days. As materials for creativity, we need fern leaves, ruscus and gypsophila flowers. We take beautiful as a basis satin ribbon. For this purpose, a bezel may well be suitable. If you are making a durable crown out of leaves, then it would be wiser to sew on all the materials. But if you need to wear a hat only once, then you can use a glue gun. We beautifully lay flowers and leaves and sew them on. To extend the life of the finished garment, you can store it in a container with cold water.
crown on headband

The main accent of such a headdress will be a flower. For this purpose, you can use dried flowers, as well as leaves. Such a crown will be attached to the rim, and we will not glue it all. Therefore, it is worth thinking about purchasing an accessory in the color of your hair. Let's start making a crown of leaves. Glue the flower onto the glue gun. It could be dried flowers. It is recommended to pre-prepare flowers made from maple leaves. We place everything in the center of the composition, and surround it with maple leaves on three sides. the same leaves, but smaller we place a little further from our dried flower. For variety, add berries to the crown. It can be rowan or lemongrass. If it seems to you that the crown is not voluminous, add a couple more leaves. The crown is ready, now you can decorate the rim. Wrap it with a ribbon or rope to match, plant a few berries on it. In our version, we shifted the entire composition to the right. You can do standard version head decoration with an accent in the middle.
Crown with berries

This option will be similar to the previous one. You can make a crown from autumn leaves, and also make it from leather. For such a product, we need oak and maple leaves. If you chose the second option, then it is worth cutting and toning blanks. Glue to the rim first oak leaves. They set the width of the crown. Add maple leaves on top for volume. We will use berries as decoration. If you make a crown natural materials, pay attention to the mountain ash, wild rose and hawthorn. If your headdress is made of leather, then large red beads can be used as decor. From the berries we make the center of the crown and harmoniously distribute the decor throughout the product.
wreath of leaves

Such a crown was made by the ancient Greeks from laurel. Today, the wreath is popular among girls who like to be photographed. How to make a crown of leaves that looks like an ancient Greek decoration? The most difficult thing here will be to choose the material. Laurel can only be found in the south of our country. How Alternative option it is advised to use birch, willow or ruscus leaves. Beforehand, the material for our crafts needs to be dried a little. Let's start manufacturing. Using a hot gun, glue the leaves with a stick down to the rim. You need to glue in one direction to get a kind of ladder. If the end result seems boring to you, no one forbids decorating the product with berries.
paper leaf crown

To make a headdress for a child for a matinee without any hassle, you can use a regular or colored paper. Not all mothers want to collect leaves, and then also dry them. It's much easier to turn headwear making into a game. A young creature with the help of parents will be able to build a crown of leaves with their own hands. First you need to make blanks. Draw leaves or circle those that were brought from the street. The next step is coloring. If the leaves were made from colored paper, then there is no need to paint them. It remains to attach the result to paper strip. big leaves glue back, small forward. We fix the crown with glue, tape or a paper clip.
Olga Zhurbenko
Origami"Modules for autumn leaves ev"
1 step. Take colored paper this case Red. Cut out the square so that all sides are equal. presented here module size 9*9.


3 step. Then, bend along the fold line in the next photo.

4 step. Then we bend the right and left corner to the middle and bend the bottom corner, as in the photo.

5 step. We wrap this lower corner from step No. 4 inward and bend the lower right and left corner along the fold line as in the photo to the middle.

6 step. Then you need to try and turn the corners outward, as in the photo.

7 step. You should end up with the corners looking down, then fold them back up so they look up. As in the photo.

8 step. This is how it turned out module.

9 step. Then from three identical modules we glue a figure similar to autumn leaf.

10 step. Of such leaves I made a crown for the autumn holidays.

The idea is not mine.
The children were delighted!
Autumn
(excerpt)
October has already come - the grove is already shaking off
Latest sheets from their bare branches;
died autumn cold - the road freezes through.
The murmuring stream still runs behind the mill,
But the pond was already frozen; my neighbor is in a hurry
In the departing fields with his hunt,
And they suffer winter from mad fun,
And the barking of dogs wakes the sleeping oak forests.
Related publications:
Well, finally I decided to make the Crown Russian Empire, I went to this for a long time, I was afraid everything would work out or not, even the master did it.
Here comes autumn. The first signs of autumn have appeared. Yellow leaves are visible on the birches, a cool breeze blew, the sonorous subsides.
Yes, winter is just around the corner, and although it is beautiful in its own way. I don’t want to part with the most mysterious time - autumn. Like romantic.
To make a basket we need: a plastic bottle (large 5 liters, two types of glue, scissors, adhesive tape, "gifts of autumn" (.
Master class "Colors of autumn" Purpose: Show beauty autumn nature. Tasks: 1. To consolidate the ability of children to work in a team, to distribute work.
good afternoon Dear colleagues. Winter is a fabulous season. Every day either a blizzard, or a snowfall, or decorate the trees with frost. And all this is tricks.
Good evening! We want to show you a crafts master class from cotton buds"Autumn Flower" Autumn is a wonderful time. Leaf fall, Indian summer. Maybe.
Choose any of the options presented and go for it. See how easy it is to make a princess crown.
Here's what you need to get the job done:
- 2 types of wire: thick section for the base and thin, on which we will string decoration elements;
- pliers;
- beads;
- pearls;
- beads.
Attach it with thin wire to the base. This is the crown of a princess or queen you should get at this stage.

Next, string beads onto a thin wire. Attach these jewelry to the base by placing a pearl or large bead inside.

Here is such a pretty crown of the queen turned out.

If you do not have beads, but there are other materials, you can quickly make a decoration for a girl's head.

For it we use the following:
- various beads with a large hole diameter;
- tubes for cleaning - 5 pcs.;
- wire cutters.

Now you need to cut the 3 remaining tubes as follows:
- the first - in half;
- the second - into 3 identical parts;
- from thirds - cut off 2/3 of its length.

Fold each blank in half and fix them on the crown as in the photo. In this case, the longest tube will be in the center.

String beads on the decoration, and the princess crown is ready.
How to make a keychain with your own hands?
If you need a crown for a girl, but want to practice making a little jewelry, then start by making a keychain. This thing will also come in handy. You will be able to get the keys and admire the keychain, which will be made in a single copy.
Here is a list of what you need for such needlework:
- beads of three colors;
- fishing line;
- wire;
- pliers or round nose pliers.
Before buying a bead, check if it has a hole large enough for a 2-turn wire to pass through it unhindered.

Cut the wire to the desired length, string 18 red beads onto it. Then pass its end through their holes, tighten the loop.

Dial 18 more beads of the same color on this wire, also pass its free end through their holes, as a result, you will get such a figure eight.
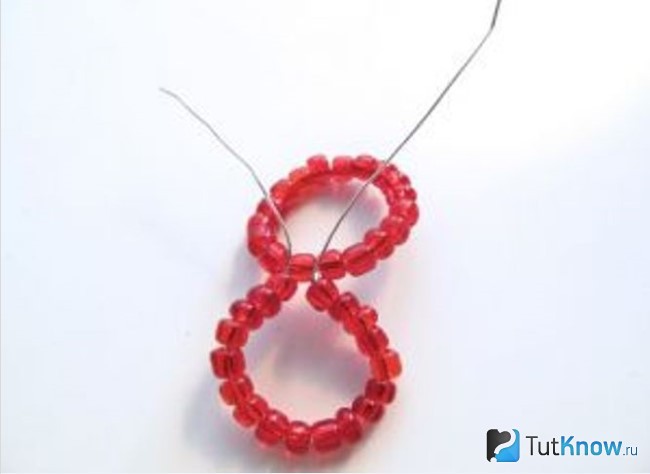
Overlay one circle of these small beads another. Tie them together with the ends of the wire, cut off the excess edge.

On the remaining one, string 7 white beads, then one red one, then again 7 white beads. Fold this section over opposite side rings, secure.

Now, to the place where there is one red bead at the top, tie 2 more identical pieces of wire crosswise. Since it is bent in half, you will get 4 more fragments of the crown, string 7 white beads on each of them, fasten the wire.

Attach another piece of wire to the top of the crown, on which put on 12 blue beads. If this is a keychain, then first thread the key ring, and then secure the wire.
Here's how to make a crown so that it becomes a small decoration or also a keychain.

Read how, literally, in half an hour to make a brilliant decoration on your head.
Paper crown - master class

It's amazing how this simple material it turned out to be such a beautiful product. Of course, in addition to this basis, you will need something else, namely:
- gold wrapping paper;
- necklace made of artificial pearls;
- glue;
- decorative large pebbles in the shape of hearts, rhombuses and small ones;
- glue gun;
- scissors;
- and, of course, thick white cardboard for the base.
You can first measure the child's head with a flexible centimeter tape, and then transfer the size to cardboard. Cut with an allowance so that you can connect the edges and glue.
But don't fasten them yet. Lay the cardboard blank on the work surface, apply a pattern that will be inside the crown and on top of it. Cut along these lines. If you want the work to be perfectly neat, then first apply the drawing to the template, then attach it to the cardboard, cut it out.
The same template will help you arrange the desired curls from gold wrapping paper. Lubricate it from the inside with glue, attach it to a cardboard blank, connect it. Glue the 2 pieces of the crown together and at the back.
Now apply melted silicone from the glue gun to the lower edge of the crown, place a bead necklace in this place. If you do not have one, then use separate beads, gluing them at the same distance.
A glue gun will also help to attach large and small pebbles. When the work dries, you can put it on the head of a girl or boy. After all, this product can be created not only for a young lady. The crown of the king for the holiday is also made.
The templates below will help you make the top cutouts on your headgear so that they are neat and even.

Choose the outlines that you like best and make a template according to them.

Jewelry from mastic
Housewives know that this sweet mass helps to decorate confectionery products so that they turn into works of culinary art.

At first glance, it seems that making such a cake is very difficult, but it is not. Cakes are baked from biscuit dough in round shape. If you don't have one, a frying pan will do. right size designed for cooking in the oven. You can even bake it in a slow cooker, in a bowl.
Then the biscuit is cooled a little, removed from the mold, cut with a sharp long knife into 3-4 cakes. When they are completely cool, grease with butter cream, put in the refrigerator. Mastic can be bought or made independently from marshmallow candies or powdered sugar. Food colorings help you get the right tone.
To keep the mastic better, grease the cakes with butter cream not only to connect with each other, but also the top and sides of the cake. Cool it down.
After you put the mastic on baking, you need to roll it out with a silicone rolling pin so that it lies on the cake evenly and stretched, and cut off the excess at the bottom. On this confectionery jewelry made from mastic Pink colour in the form of rhombuses. Them wrong side moistened with water and glued to the main layer, and then decorated with sugar pearls.
Making a magic wand from mastic is also not difficult to make, like a crown. Such children's mastic cakes will become a bright and unforgettable moment of the holiday. Let's take a closer look at how to make a homemade cake decoration in the form of a crown. There are several ways to make it.
Such a mastic crown, as in the photo, you will succeed if you stop at this method. For it you will need:
- plastic bottle;
- food film;
- tassel;
- kandurin;
- mastic.

Now sprinkle the board or table powdered sugar, roll thin “sausages” out of it and immediately place them on the bottle. Place the first one in the form of a diadem rim, the rest form and decorate it.

When the plan is implemented, you need to leave the crown to dry for 1-2 days, then cover it with kandurin and lay it on the cake.

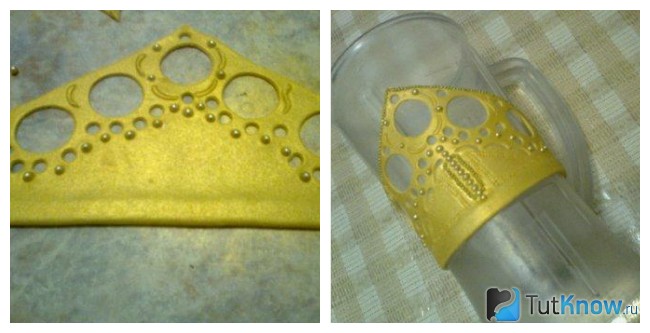
Jewelry from mastic this topic you can do it a little differently. For the second, you will need gold food paint. Roll out the mastic into a triangular layer. We cut it with a knife so that the workpiece turns out to be of such a shape and is even.

Now, applying a glass, cut the same round holes along top edge crowns, and with the help of a small stencil - small circles. We decorate the crown with sugar pearls and leave it to dry well for plastic bottle or jug.
What is icing and mold?
Very soon you will find out the answers to these questions and learn how to make incomparable cake decorations from fondant. This is the product you get if you use icing. For him, you need to draw a crown yourself or download an image you like from the Internet.

After that, it is removed into a transparent file, and then the real magic begins. We roll up sweet cords from white mastic and apply each fragment to the corresponding drawing in the file.

Now you need to carefully transfer the still straight crown to a rounded surface, give it this shape and dry it for 1-2 days.

You can leave the tiara white or cover it food coloring, then you get a golden crown.

You can get acquainted with molds - special forms right now. They will help to make a mastic crown, which will turn out to be very elegant; a cake with such decoration will look expensive, as if made by great professionals.

Here is a list of what you need for this creative work:
- silicone mold;
- glass wine bottle;
- glassine;
- food glue;
- mastic.
Lay the pieces of mastic in those elements of the mold that are most suitable for the crown. On the this example mold was used to create a rose, you can take another one.
Start laying out the elements of the tiara on glassine, fastening them with food glue.

After the crown is ready, it will remain with a brush to cover it with kandurin and dry it.
DIY leaf wreath
If you are walking with children in the autumn square, in the yard, invite them to make a crown. Such creativity will help children develop their imagination, learn to love the surrounding nature, and grow up as creative people.

You will need quite a bit of materials and equipment, here's what:
- Maple leaves;
- scissors or pliers.
Spread the leaves out in front of you. Cut off the thick ends with scissors or pliers.

Fasten the leg of the last sheet in the first, and the crown for the queen of the autumn ball is ready. It's time to start the holiday!

You can make a more magnificent decoration on the head.

Here's how to make a wreath with autumn maple leaves. In addition to them, you will need:
- thin willow branches;
- wire;
- ribbons.

Fold the willow branches into a ring. Secure with wire.

This wreath of leaves is woven in the same way as of flowers - the first petiole wraps around the base, then the second one is woven, and so on.

When all the branches are covered, you need to connect the petioles of the first and second leaves with a wire or thread and fix them. Such a wreath of autumn leaves can be worn on the head or hung on the door as a decoration. Then you need to make a loop.

Here's how to make a leaf wreath or home decoration. With others interesting ideas right now you will be introduced to the videos:
It is not difficult to make a crown for the Autumn Festival. It is necessary to measure the circumference of the child's head, cut the required length of a strip of cardboard. Cut out leaf templates, decorate and attach the leaves with a stapler to the cardboard rim.


You can also make a crown and maple leaves. For one crown you will need 10-15 leaves


My daughter and I made a crown like this last fall:

For the craft, it took a maple leaf, yellow, green, orange and red cardboard, paints and scissors, and a clutch. All we did was circle the maple leaf and make a cardboard template. Thanks to this blank, 12 leaves were designed (multi-colored, 3 pieces of each color), tinted a little. A rectangle with a width of 3-4 cm and a length = circumference of the daughter's head was cut out of cardboard, the ends were fastened with a coupler.
Then we simply attached the leaves with the help of a coupler and it turned out as in the picture. If desired, such a crown can still be decorated, for example, with small multi-colored leaves, but already real ones. As you can see, there is nothing complicated here.
A crown for autumn can be made from natural leaves, as shown above in the answers. But you can also use improvised materials from which to cut leaves, such as cardboard.
Cut out leaves from cardboard and attach them one to one in a circle, you get this beautiful crown from leaves:

And you can cut a crown out of cardboard, and glue or attach natural castings or made of cardboard to it, like this:

Can do autumn leaves from felt and decorate the frame of the crown with them:


Another example of an exquisite rim of autumn leaves. Suitable for the autumn holiday:

There are a lot of options! Let your imagination tell you the most successful one!
Everyone is probably used to the fact that the crown for Autumn's costume consists either of ordinary dry leaves, or of their imitation made of cardboard and fabric. I propose to make a real royal crown for autumn. Yes, the work is done in the Kanzashi technique (not everyone knows how to do this). But the result is amazing!
This is the most beautiful autumn crown I have ever seen. Spread detailed instructions creating this fabulous beauty in the form of a video in 4 parts. For craftswomen to help, and for everyone else as ideas for inspiration. Suddenly someone decides to make such a miracle for his daughter or for himself. Watch and learn!
A crown of leaves can be made very quickly and beautifully. Doing it is not at all difficult. To do this, you need to collect a lot of leaves, the most beautiful and bright maple. For each leaf, cut off the end of the stem, which is large, with scissors, then stick it into another leaf and so on in a circle, then if right size yes, you can connect their endings. More details can be seen in the photo.

Such a wonderful crown, we got it.

To keep the leaves more secure, you can fasten them to a ribbon that can be tied at the back. If you don’t have so many beautiful leaves, it’s okay, you can draw them on paper and cut out, color bright colors and fasten with paper tape.
It is not difficult, especially if it is really autumn outside the window.
The main thing is to come up with a base for the crown: cut and glued cardboard, wire, or an elastic band.
Glue over the base, and weave in colorful leaves (yellow, red, greenish), flowers and interesting plants. So that in the end you get a real reflection of autumn on your head.
Here good example foliage crowns strong text:


The easiest way to make an autumn crown from maple leaves is to cut the petioles from the leaves and use them to fasten the leaves together. Here small master class on making a crown from leaves with your own hands.

From maple leaves you can make a real crown for a girl.
Autumn with its bright colors just beckons to go outside. I want to collect a bouquet beautiful leaves and late flowers and build a herbarium. But from natural gifts you can make not only a bouquet, but also an ornament. For example, autumn crown. How to make such unusual accessory, read below.
Rowan Crown
It is not difficult to build such a headdress. We will need a headband, a glue gun, flowers, rowan and dry leaves. If you are preparing the autumn crown in advance and want it to last for a long time, then you will have to pre-prepare the leaves. They need to be ironed and allowed to dry thoroughly, preferably under pressure.
Let's start making the hat. First of all, glue the rowan branches. They are heavy and bulky. Under them it will be easy to hide the rest of the flowers and leaves. Now we place the main accents. We will make them with the help of large asters. They can be easily replaced with chrysanthemums or other flowers that grow in your country house or garden. When the accents are placed, we begin to glue the leaves. The main thing here is not to overdo it. 3-4 large sheets and 3 small ones will be enough. The final action is gluing small dried flowers. Autumn crown is ready.
Small flower head decoration

Such a simple and elegant decoration can serve as a crown at the autumn ball. It is quite simple to create such an accessory with your own hands. We again need a bezel, but this time - thin, wire. Our crown will be made of orchid flowers, barberry berries and willow branches. The picture shows a sample made from artificial flowers. You can design your headdress in the same way or decorate it with live plants. We select flowers and berries in one color scheme. If you are making crafts from artificial material, then it will be quite easy to paint it.
Let's start manufacturing. Glue flowers on the headband. Large in the center and small on the sides. The remaining space must be filled with willow branches, to the ends of which we will tie berries with wire. Weave can be chaotic and asymmetrical. The main thing is that in the end the flowers and berries are evenly distributed.
maple leaf crown

This is a rather non-trivial way to make a headdress. Our autumn crown will consist of a cardboard rim, maple leaves and gold beads. The first step is to prepare the material. We dry the leaves and make a cardboard rim 4 cm wide. First we glue the front row of leaves. We go around the rim and fasten them with a glue gun. In this way, cardboard strip on both sides turned out to be surrounded by leaves. Next, glue the second row. Now we fix the leaves on the back side of the rim. Thus, we make the “inside out” beautiful. The final touch is gluing gold beads. It is advisable not to mount them around the entire perimeter of the crown, it is better to make such an emphasis on the front.
crown cap

This headdress is simply adored by children. He replaces them with summer wreaths. Even a child can make a crown for the autumn ball from maple leaves. We will describe two methods for its manufacture. The first method is similar to weaving dandelion wreaths. Only here, instead of flower legs, we will bend and add leaf sprigs.
The second way is more time consuming. For such a crown, you have to do cardboard base in the form of a circle. We will tie ribbons to its ends, which will make it easy to remove and put on a hat. Maple leaves will need to be pre-ironed and dried. And then, using a glue gun, fix it on a paper rim. It is desirable to make the crown magnificent. Therefore, it is necessary to glue the leaves not in one, but at least in two rows.
gothic crown

This headdress looks pretty intimidating. But some girls achieve just such an effect. It is very easy to make autumn in this style. We need thick wire, branches, electrical tape, paint, chains, beads and autumn leaves. Let's start manufacturing. First, we twist the bezel from the wire. Then we wrap it with a branch. For this purpose, you can use soft and pliable willow twigs. Now, with the help of electrical tape, we attach branches to the crown. It can be branched branches of an apple tree or mountain ash. When everything is ready, paint our headdress black. It is advisable to use paint in a spray can for this purpose. This will evenly distribute the color pigment. After the crown dries, we attach chains and beads to it. You can repeat the version from our sample, where one bead is in the middle, above the forehead, and the other two are located in the area of the ears, or you can come up with your own version of the decor. The final action is the stringing of dried leaves on the crown.
Crown of flowers, butterfly leaves and ribbons

Such a headdress resembles the one we talked about in the first paragraph. But only this version of the crown is more complex. Here we will use both live and artificial materials. How to make an autumn crown in this way? Let's get started. To begin with, take a wide plastic bezel, it will serve as the basis. We glue asters and chrysanthemums to it with hot glue. We will complement the crown with both dried golden leaves and greenery of indoor plants. Branches of grapes will play a special role in our headdress. We glue them at the back so that they fall beautifully on the back of the head. They need to weave beads and real berries. You need to decorate the finished crown with butterflies, dragonflies and colored ribbons. And remember that such a headdress requires catchy makeup.