Origami from white paper in stages. Origami for beginners: diagrams, detailed instructions. Origami shuriken and transformer. Making a decoration from napkins
Paper figurines attract people. Many looking at paper boat or a flower, think about the technology for its creation and start looking for information on how to make origami. If we start with simple figures ok, gradually even beginners master this fascinating art.
If you first decided to tackle the technique of folding figures, then you can watch a video for beginners.
For example, how do you like this video tutorial?
They explain in an accessible way what action and how it is performed. Or use step by step instructions, where each stage is accompanied by a diagram or photo.
How to make origami out of paper: rose
- Take a square piece of paper. The paper should be thick so that it does not tear during work.
- Fold the square in four horizontally and vertically.
- Pull the top side and form a triangle.
- Turn the workpiece over and hide the right corner inward (4, 5 steps).
- Lift up the corners of the top layer.
- Layer the raised corners and form into small squares. Then tuck them inward (steps 7, 8, 9).
- Turn the workpiece over and hide the corners inward.
- Fold the top to the bottom.
- Cut and flatten the workpiece as shown in steps 13 and 14.
- Turning over, place the top perpendicularly.
- Unscrew the sides of the top diagonally (step 16).
- Grasping the top, gently rotate your rose clockwise. Straighten and twist the petals.

Paper flowers are mesmerizing and will delight you all year round... You can make a whole bunch of roses and give to a loved one... Imagine how much emotion you will bring him with your work.
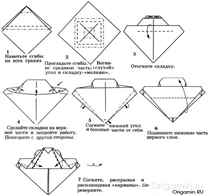
Ship for long voyage
- Fold the square diagonally and flatten it back.
- Bend the top corner to the bend line.
- Fold the corner up, then down again.
- Bend the workpiece vertically, with the bent corners inward.
- Fold the bottom corner outward and secure the fold.

You can fill the bathtub and let the boat sail. The lessons below will help you do the whole navy for your baby to have fun.
Romantic heart
1) Take an A-4 sheet. Fold the triangles on all four sides. Flatten the sheet.
2) Lightly connect with your fingers in the middle at the top and bottom. WITH right side form a triangle by pressing it against the base. Do the same for the left side (steps 6-9).

3) Unscrew the corner of the formed triangle and, having delaminated it, press down. Layer the corners of the resulting square again and press. Do the same for all the corners of the triangles (steps 10-14).

4) Bend the workpiece vertically. Connect the right and left parts, make folds (16-20 steps).
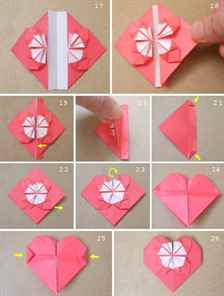
5) Unscrew the corners on the fold strip. Straighten the workpiece, bend the top and side corners back to make a heart.
Can your loved one do pleasant morning and leave such a gift next to a cup of coffee.
How to make origami out of paper: Swan
Bend the square diagonally and straighten it. Bend the two corners to the diagonal fold line.

Turn the workpiece over and bend the bottom corners to the center.
Flip and fold the top and bottom corners. Turn over again.
Fold in the top.
Flip and bend the workpiece vertically. Pull the swan's head. You can admire your craft.

More on video:
Flying airplanes
- Bend the rectangular sheet horizontally along the long side and straighten it.
- Fold the two left corners, joining and at the fold.
- Unscrew left side with folded corners at a distance slightly greater than the bottom of the folded corners.
- Bend the two left corners of the already made workpiece again. Wrap the small triangle that will look out.
- Fold the craft in half and unfold the wings. The plane is ready to explore the air.

And, of course, a tutorial:
Kitty scheme

Such a cat can be built to decorate your workplace in the office or play a child.
Tank
The boy will really like it if, in front of his eyes, you build from simple sheet paper tank:

Origami is great way distract from boring affairs, diversify your free time, find something new for yourself. And origami for children is a way of development.
During the creation of the figures you and the child need, the baby's fingers work, developing motor skills, thinking and imagination develop. Also, joint origami crafts are another reason to while away the time with your beloved child!
Translated from Japanese, origami is folded paper. But origami art did not appear in Japan, but in China and long time was available only to the highest ranks of the Celestial Empire. The ability to create figures out of paper was considered good form... In Europe, they learned about origami only after the Second World War.
Nowadays, origami is popular with both adults and children. In our article, you can find out which simple paper origami is best done with a child at a given age.
What will a baby learn faster at 3 years old? Origami for children 3 years old
At 3 years old, the child is not yet ready for long assiduous activities, therefore, from the variety of origami for children of 3 years old, it is worth choosing simpler figures. For a start, cups, an airplane, a grasshopper are suitable - these figures are the simplest and do not take much time to make. Also, a child can try to make a card for a gift himself. It's not difficult at all. You will need a piece of colored paper folded in half, cut out figures from colored paper and glue. Of course, your imagination will not hurt either, but it is best to give a child a splash of imagination.
At 3 years old, the kid will like to make simple animals out of origami, for example, a cat, a dog or a bunny. Can be done with a child of three years origami flower.
Origami making schemes


Origami for children 4 and 5 years old
For older children aged 4 or 5 years, origami is a little more complicated than the previous ones. Instead of the usual muzzle of a dog, you can make a well-known frog or build a house out of paper. A full-length dog or a fungus is perfect. Come up with your own fairy tale where different heroes will live together. The child will like such an activity, it will calm him down. nervous system and diversifies thinking.
Origami diagrams for a child 4 and 5 years old


In this article, we have told you about the most simple origami for kids. Take care of your children interesting activities such as origami. Create your own farms, houses, vegetable gardens. Such crafts will not be wasted, for example, they can be referred to different exhibitions in Kindergarten or school, or leave it as a keepsake for your child.
See also a photo with diagrams of various origami.
A selection of photos of the origami scheme


Only the uninitiated might think that the art of origami is just child's play. Not everything is so simple: to master this skill, remarkable patience is required, enough free time and stock of paper. By the way, about paper. Oddly enough, office paper is not best material, special miscellaneous colored paper for origami - only in this case the figure will be "correct".
One of the simplest shapes is a pancake. To do it, you need to bend all the corners of the sheet towards the center. The result is a square smaller... This is your pancake. The scheme is as follows:

The square is the basis for all classic figures. You need to make several folds on a piece of origami paper, then you need to bend the sheet twice in half. Having unfolded the paper, you need to make sure that the folds are cross-shaped. The same cross must be formed diagonally with the help of bends. Finally, connect the opposite corners diagonally. After that, our double square can be folded at the folds on its own (see diagram).

The spinner is a more complex figure that helps to master ancient art origami. Children especially love the turntable. First you need to make a pancake, then bends are made, in the same way as for a square. Next, you need to fold the paper in half, after which each half also folds in half. It turns out the semblance of the shutters. If you unfold the paper, you can see the folds in which the shape lies. She can be revived right now. Pull the opposite ends from the folds down the center of the square. You should now have a hexagon with four free corners. Opposite corners need to be bent. That's it - the turntable is ready. Detailed diagram with a description:

How to make origami out of paper: a swan
Origami - not only original toy but also a great gift. Despite the apparent difficulty, making origami is not so difficult. The basis of any paper sculpture is paper module... In principle, the parts that make up the sculpture hold by themselves, due to the frictional force, but for greater strength it is better to glue them together. Ordinary A4 office paper is perfect for their production. The paper should be medium to thick.
To make any origami figure you will need a large number of details. They must be prepared in advance. One A4 sheet can be used to make 16 modules measuring 53 by 74 mm or 32 modules measuring 37 by 53 mm. They can also be made from square recording blocks by folding them in half.
- We bend a rectangular sheet of 53 by 37 mm in half along the long side. Unbend it, we get a fold line.
- Now we bend the sheet along short side, do not unbend.
- Next, we bend it again along the long side, bend the corners inward.
- We turn the workpiece over.
- Bend the corners again - there should be a small gap between the upper triangle and the folded corner.
- Raise the edges up.
- We fold the triangle, we end up with a module in which there are two pockets and two corners. Now the modules can be connected by inserting the corners of one into the pockets of the other.

How to Origami: Swan
To make a swan figurine, you need 1 red, 136 pink, 90 orange, 60 yellow, 78 green, 39 blue, 36 blue and 19 purple modules. You can also make a white swan - from 1 red and 458 white paper parts.
- So let's get started. We take 3 red parts, and insert the right corner of one of them into the left pocket of the other, and the left corner of the third into the right corner of the second. Thus, you get the beginning of the top and bottom rows, which should close in a circle. Each circle should have 30 modules. The extreme ones must be closed in a chain.
- Next, start complementing the bottom row with one row, but already orange... In turn, this third row needs to be supplemented from below with 2 more rows of orange paper parts of the modules.
- Now you can even out these 5 rows a little by pushing the center inward.
- Turn the workpiece over so that the red parts are at the bottom.
- Start adding the sixth row (on top of the orange parts) - now with 30 yellow parts of the future swan.
- The seventh row will consist of two rows of 12 yellow modules, one gap between which will be 2 modules and the other 6 modules.
- The next rows will have 1 less part each time. 8th - from 22 green parts, 9th - 20 green, 10th - 18 green, 11th - 16 parts blue, 12th - 14 pieces of blue.
- 13th - 12 modules of blue color, 14th - 10 blue modules, 15th - 8 blue modules. 16th - 6 modules purple, 17th - 4 purple modules, 18th - 2 purple modules. Everything, the wings of the swan are ready, it remains to give them natural look- bent a little at the edges.
- We begin to make the tail of the swan in a long interval. The tail consists of five rows, three lower 5, 4 and 3 green parts and 2 and 1 blue ones. That's it, the tail is ready.
- We begin to collect the swan's neck. Attention, the neck of the swan is done differently than the rest of the sculpture. In order to make a neck, the details must be put one into one - both corners of one must be put into both pockets of the other. The swan's neck consists of 1 red, 7 purple, 6 blue, 6 green, 6 yellow modules. From the very beginning, you need to try to give the swan's neck a more graceful shape. Everything, the neck is ready.
- It remains to securely fix the swan's neck in a small gap of the 6th row. There should just be a place under the neck.
- The swan, if desired, can be installed on a stand consisting of two glued rows of 36 40 parts, fixed like a swan's neck. The swan can also be decorated with eyes and a bow.
The origami technique was very popular in antiquity. The history of its creation goes back centuries, but even today folding paper crafts is of interest to many people, regardless of their age. So, children really like to watch how a simple flat figure turns into volumetric model, artists express their Creative skills, researchers create new models of products, architects explore geometry. This article introduces paper origami crafts for beginners. Step-by-step photos will help you master the whole process of creating simple models. We decided to give here not diagrams (according to which it can be quite difficult to navigate), but photographs from detailed description... Well, stock up on square pieces of paper, choose the craft you like and start folding it. We wish you fun and creative inspiration!
Such a craft will become great gift by February 14. It is not at all difficult to make it, and even beginners can cope with this task.


Fold it in half.

Now fold the sheet in half again. Unbend.

Unbend. Fold the top side down to the center line.

Turn the workpiece over.

Fold the two corners towards the center.

Turn over.

Fold two opposite sides to the center line.

Fold the two lower corners up.

Fold the workpiece in half.

Fold the two corners towards the center.

Turn the workpiece over and bend the two upper sharp corners down.

Here is a heart that turns out in the end.

Origami "Rabbit"
Take a square piece of paper.

Fold it diagonally.

Now bend the figure in half, straighten it out. An additional line is obtained in the middle.

Fold the shape from the bottom, as in the photo.

Now bend the two corners towards the center.

Fold in the bottom corner.

Turn the figure over.

Draw the rabbit's face with a felt-tip pen. Ready!

Origami "Chanterelle"
Fold a square piece of paper diagonally and unfold. This will outline the center line.

Now bend the top corner downward.

Fold two opposite corners up.

Turn the figure over.

Draw the eyes and nose with a black felt-tip pen. I got such a simple but funny fox.

Origami "Dog"
You can make such a funny dog with your children. From it you can make original applique or a pretty postcard.

Start by folding a square piece of paper diagonally.

Now bend the two corners downward along the lines outlined in advance (see photo).

Ears are obtained.

Flip the shape over. Fold the bottom corner up.

Turn the workpiece over again. It turned out the head of a dog.

Now we will make the torso. To do this, fold the square diagonally.

Now wrap one corner - you get a ponytail.

Glue the head to the body with finger glue or PVA glue and paint with felt-tip pens as desired.

Origami "Dove"
For such a craft, it is better to take single-sided paper. But in general, this is not necessary.
So, add the square diagonally.

We unfold the workpiece and fold it along the second diagonal.

Now we outline the line, as in the photo.

Fold the corner to the right. We turn off one layer of paper.

Fold the workpiece in half.

Bend two corners up along the outlined lines.


We bend the left corner of the book, we get a beak.

Here's a dove turned out in the end.
These are the simple origami figures you and your children can make. This technique is also interesting in that the materials for construction do not take up much space. You can take paper with you even when traveling. On the train or on the bus, your child will never get bored anywhere. It can also be said that the art of origami is one of the most accessible to any person. Even if you have never done handicrafts or creative arts, origami will be available to you. All a beginner needs is just a square piece of paper. For coloring finished products you can use felt-tip pens, but this is not necessary. Also, scissors and other similar tools are usually not used in the work. Sometimes you need to cut something, but this is quite rare. Classical technique origami is just paper and nothing else.
What develops this technique in a person? First of all, it is accuracy and patience. Fine motor skills of the hands also improve, which is very important for young children. And if with simple crafts If a kid of 5-6 years old can cope, then complex products may be beyond the strength of even an adult who has long been familiar with origami. Therefore, all origami schemes can be divided into two main categories - for beginners and for "advanced" ones.
The simple origami crafts presented in this article are great for kids. preschool age... Some more interesting and simple models for kids you can see in the article. We wish you fun creativity!
Origami is called the art of folding all kinds of crafts through the use of paper. In most cases, the activity does not involve the use of glue and scissors. This trend originated in 610, when the secret of papermaking came to Japan from China. The monks learned to fold the figurines that adorned temples and were used in rituals. In the Middle Ages, this decorative and applied art became an element of the culture of the Japanese aristocrats. If you want to master this hobby, the article contains interesting schemes from origami paper.
ORIGAMI FOR BEGINNERS
This skill resembles a trick - a beautiful figure is born from a simple leaf in a few minutes. The lesson does not require large material costs absolutely safe even for small children. Origami gives create the whole world without special abilities. This hobby develops spatial imagination in beginners, fine motor skills, motor and spatial memory, concentration of attention, communication and play skills, outlook, creative skills. The paper diagrams below will help you make original, unusual toys, gifts, figures.
WHAT MATERIALS NEEDED
Before you start doing origami, you should stock up on the necessary set tools. First, it is worth picking up paper, preferably office paper, since it is not too smooth and its density is enough for folding according to patterns. For attaching small parts, gluing, you will need a glue stick or PVA glue, and an aerosol one is needed if you need to glue two multi-colored sheets of paper. The last technique allows you to create interesting crafts by combining textures and colors.
You can use a more convenient adhesive mass, with which any part can be easily attached inside or outside the craft, and then removed if necessary without leaving any marks. If the craft is made of white paper, then after that it is covered with spray paint. Sometimes several pairs of sharp blade scissors are required different shapes and length. In some cases, they can be replaced with a cutter. This tool is essential for trimming, cutting straight lines. The blade must be sharpened for a smooth, neat cut.

For marking according to the scheme when folding figures, cutting out the base, observing a certain assembly angle, symmetrical placement of the composition on the basis of the panel, triangles, rulers, and protractors are needed. You will need a mechanical pencil with a replaceable thin lead. Additionally, needlewomen use ready-made eyes for toys, leftover yarn, ribbons, fabric, beads, beads, sequins for decoration, threads with a needle to connect individual parts.
SELECTING PAPER
From the right choice paper depends on the result of the work, since the whole process of creating origami according to the schemes consists in folding, folding. The list below will help you decide which material is better and which is worse for this type of needlework:
- Office White paper- dense, not too smooth, therefore, when connected, the modules hold well. It is better to start doing origami with such material, since it is a pity to throw away the spoiled model. Its disadvantage lies in the fact that at the place of the fold, there is wooliness.
- Colored office paper - does not turn white on the folds, differs in density, is used in modular origami.
- Stickers, note paper - can be painted different colors, used to create kusudama, in modular origami.
- School colored paper - thin, friable, easily tearing, poorly suited for this hobby. Erased at the folds, white streaks appear.
- Foil paper - durable, does not tear, is used when creating complex schemes, twisted models, modules. When flattened, the folds remain in tight stripes.
- Pages of glossy magazines are dense, bend well, keep their shape.
- Banknotes are durable, do not wash on the folds, are suitable for small modules, gift making.
- Special origami paper - sold in sets, with various patterns, can be two-sided, monotonous.
- Rice, papyrus, craft, parchment, cigarette, mulberry, silk and others expensive species paper - each type has its own advantages and disadvantages, allows you to create interesting crafts according to schemes.
- Drawing graph paper, tracing paper - suitable for the first trials in the creation of complex work.

TYPES OF ORIGAMI IN PICTURES
Origami is a great opportunity to keep yourself busy with something interesting, useful, and have fun, developing new skills and abilities. In addition to the classical direction, there are many other alternative techniques:

HOW TO LEARN TO MAKE ANIMALS - CHILDREN'S CHART
Children's pranks, the inability to sit in one place is often associated with the fact that the baby has nothing to do, and the energy needs to be directed in a certain direction. Invite boys and girls to do origami, which will calm them down, enthrall them, make them feel like little wizards who work wonders. It is a useful hobby that develops attention, patience, artistic taste, thinking. Learning to make origami animals is simple: take a piece of paper, fold it according to the diagram below and get a funny little animal.


HOW TO MAKE A BOX WITH A LID

An origami box is an irreplaceable thing that comes in handy for a gift. You can collapse it in a matter of minutes. No glue or scissors are required to create, just a couple of pieces of paper. For a box, it is better to choose a colored one nice paper... When working, remember that the cover must be larger than the base. From above, you can decorate the box for the occasion: ribbons with New Year's prints, buttons, and other decorative items. Step-by-step instruction:
- We trace the sheet from one corner to the opposite diagonally.
- Bend one corner to the center.

- Let's do the same with the rest of the corners.
- Fold back two corners, fold the remaining ones flush with the center line in half, as in the photo.

- For the other two corners, we will do a similar procedure. The result is a blank, as in the photo.
- We make incisions.

- Bend the two corners to the center.

- Next, add up, as in the photo.


- It turns out Bottom part boxes. In the same sequence, we make the lid 5 mm larger on each side.
BEAUTIFUL FLOWERS - ROSE FROM PAPER

Origami rose - popular craft in this technique. It is done quickly and easily from one square sheet of paper, painted on both sides in red. Step-by-step instructions:
- Fold the sheet in half.
- Bend it in half again.

- Open and flatten the top layer.
- We turn the workpiece over, turn over the square.
- We repeat the third step.

- We bend two corners to the top.
- Bend the triangles in half, sketching out the lines.

- We open, flatten the triangles by pulling down the corners.
- We bend the upper parts of the resulting pockets down.

- Repeat steps 6-9 with the second side.
- We make a fold by bending the top corner.

- We open the lower part of the blank like a book.
- We take the places indicated in the picture, pull, flatten, so that we get two triangles on the side.

- Turn the workpiece over.

- We raise the triangle.

- Bend the lower right square from top to bottom diagonally.

- We turn the product 180 degrees. We repeat the previous stage.

- We put the blank on the left palm. Fingers right hand we grab the walls of the craft, twist it clockwise until we get a rose. We twist the petals beautifully with a pencil or a thin stick.

MODULAR 3 D WHITE PAPER ORIGAMI - SWAN
Modular origami allows you to create very beautiful, voluminous crafts... This workshop shows you step by step how to assemble beautiful swan... Such a product can be a decoration for your home. Instructions step by step:
- According to the scheme we make 458 white triangular modules... One orange or red for the beak.
- We take three modules, insert the corners of two into the pockets of the third.

- We attach two more.
- We add two modules in the same way.

- We place the structure as shown in the photo.
- We insert the corners into the pockets.

- So we collect three rows, each of which consists of 30 modules. We close in a circle.
- We put on the modules of the fourth and fifth row in the same way.

- We take the blank thumbs we gently press the center, turning the product inside out.

- Bend the edges up.

- We put on the sixth row, placing the modules in a checkerboard pattern.
- In the seventh layer we make wings: we put on 12 modules, skip two corners, attach 12 more. There will be a neck on the skipped narrow section, and a tail on the remaining wide section.

- In the next row, we reduce the wing by one module.
- Similarly, we reduce each row until one triangle remains.

- We make the tail on the principle of decreasing by one module in each new layer.
- We make the neck and head 10 white and 1 red module, on which you need to glue the corners so that the beak is not forked. The neck is assembled like this: we insert the corners of one into the pockets of another module.

- So we collect the rest, arching the neck.
- We put the neck in the right place.

WHAT ELSE CAN BE MADE FROM PAPER: ASSEMBLY DIAGRAMS
All kinds of origami techniques make it possible to do a lot interesting crafts... This is an ideal pastime for a child in the form of a game. Such decorative and applied art does not stand still: it gradually gained experience, was transformed, as a result of which there were many schemes for assembling various figures of snowflakes, cars, airplanes, furniture, animals, etc.
FIGHTER AIRCRAFT
In childhood, many folded airplanes from pieces of paper torn from a school notebook and launched them at recess, watching the flight. In the origami technique, there are a lot of options and forms of this craft, from the simplest to the most complex models. The diagrams below showcase the assembly of fighters, which will require a little patience and paper.