Knitting summer hats for boys. A hat tied with a "Braids" pattern. Knitted winter hat for a boy: scheme
Headdresses have been around since time immemorial. The first drawing of a man in a hat was found during excavations in the ancient Egyptian city of Thebes. At all times, hats have had two roles: one is utilitarian - protection from heat or cold, the second is symbolic. She was played various crowns, wreaths, etc. something that demonstrated to others the status of the owner.
The history of hats and caps is full of all sorts of funny and unusual moments. At the same time, over time, hats also had a decorative role, which remains popular to this day.
One example of a combination of decoration and protection is children's summer panamas... These are beautiful and convenient gizmos that you can buy, or you can create with your own hands.
This article will talk about wonderful crocheted panamas and hats for boys and girls.
For summer hats, choose light cotton threads and crochet hooks No. 2, No. 2.5. In order to create a beautiful summer hat for babies, it is enough to measure the circumference of the head and add 1 cm to the resulting number, for a free fit. To calculate the diameter of the bottom, and hats are usually crocheted this way, you need to divide the number obtained as a result of addition by 3.14. Now you have the required parameter for the bottom of the cap. Below is a table for the depth of hats for babies of different ages.
There is one more trick in stock experienced craftswomen... In order for the hat to fit the head more tightly, the knitting of the last 4 - 5 rows of the bottom should be done with alternating rows with and without increments. In any case, make a few fittings during the knitting process, so you will know for sure whether you need additional increases or enough.
Strawberry set from a hat, handbag and beads .

You will need:
- Cotton yarn in red, green, white and yellow;
- Wooden beads of different diameters for strapping (at least 15 mm);
- Small transparent beads and beads for decoration;
- String for beads;
- Stuffing material (quite a bit for the cores of flowers and strawberries);
We begin to knit a hat from the bottom. We knit red yarn.

First p. In an amigurumi ring of 8 loops, tie 3 vp. and 15 tbsp. s / n. finish 1 sec.
Second p. In each st. s / n we knit 1 tbsp. s / n and 1 vp
Third p. We knit this circle in 1 vp, in each we need to knit 2 tbsp. s / n, between the two columns we knit 1 vp each.
Fourth p. we knit similarly to the third, but not 2 tbsp. s / n with a common base, and 3.
Fifth p. we continue to knit in 1 vp. the fourth row of 3 tbsp. s / n, but in every 4th loop should be tied (3 sts s / n, 1 ch, 3 sts s / n).
Sixth p. knit similarly to the fifth, but the design of 1 vp. (3 tbsp. S / n, 1 vp, 3 tbsp. S / n) knit in every 5th vp. They should be arranged in a checkerboard pattern relative to the fifth row.
Continue knitting by analogy until the diameter of the circle is equal to the required one. After that, knit just 3 tbsp. s / n in each v.p. circle without increments to the desired depth - 2-3 cm. tie the last rows with st. b / n. you can even make 3 - 4 decreases in 1 loop so that the hat fits better on your head. The last row knit art. b / n with pico yarn in green.
Now we start knitting flowers.
Use yarn for cores yellow color... Knit art. b / n. in a spiral. Mark each row to properly increase the number of stitches.
First p. in a ring of 3 vp tie 6 tbsp. b / n.
Second p. Double the number of loops by knitting 2 tbsp each. b / n with a common base.
Third p. Knit in 2 tbsp. b / n with a common base in every second loop.
Knit the fourth row without increments. Fill the resulting blank with stuffing material and knit three rows, making decreases in the same way as for increases. The result is a pretty yellow core.
Now knit 5 arches of 5 vp with white yarn, securing them with st. b / n in the fourth row of the core.
We also knit the next row with white threads in the arches. In each tie 1 tbsp. b / n, 1 vp, 2 st. s / n, 5 tbsp. s 2 / n, 2 tbsp. s / n, 1 vp, 1 st. b / n.
In the example of such flowers, you need 3, but you can decorate the product with any number you want.
Now let's take care of the strawberries. We will knit them with red yarn as follows:
First p. Tie 2 vp and 4 tbsp. b / n in the 2nd loop from the hook
Second p. Knit art. b / n, in the second and fourth loops, tie 2 tbsp. b / n with a common base. There are 6 stitches in total.
Third p. Again, make increases in every second loop.
Continue adding stitches for 3 more rounds, and then knit 6 rows without increments.
Now you need to fill the workpiece with stuffing material and close the loops in 4 circles, making even decreases. You adjust the size of the strawberries yourself, you can knit more rows with increments, and your berries will turn out to be more juicy. After the strawberries are tied, they can be embroidered with beads.
Now we will knit the leaves with green yarn. We offer these 2 schemes, you can choose any that you like more. In the example, the leaves are linked according to the first pattern.


Cast on 12 vp with green yarn.
Then we knit 1 vp, 1 tbsp. b / n, 1 half s / n, 2 tbsp. s / n, 2 tbsp. with 2 / n with a common base, 2 tbsp. with 3 / n with a common base, 2 tbsp. with 2 / n with a common base, 2 tbsp. s / n, 1 half s / n, in the extreme loop we knit 3 tbsp. b / n and mirror-like knit the second half of the leaf.
The sepal is knitted from 5 leaves, connecting them in a circle with a ring. Knit in height in a circle st. b \ n. about 6 - 7 rows, we get a strawberry tail.
Now it was the turn of the wooden beads. 6 bigger size tie with red yarn, 6 smaller ones - green. Tie one big one with yellow yarn.
We will tie the beads to Art. b / n. First you need to knit a circle with a diameter equal to the diameter of the bead.
First p. In a ring of 3 vp tie 6 tbsp. b / n.
Second p. All loops must be doubled.
Third p. Knit in 2 tbsp. b / n with a common base in every second loop.
Fourth p. knit in 2 tbsp. b / n with a common base in every third loop.
Fifth p. and all the rest knit similarly to the previous ones. When the diameter of the circle will be the right size, it is necessary to knit rows without increments. They should be the same number as the rows with increments. Insert a bead and start knitting rows with decreases, in the same sequence in which the increases were made. Reduce loops by knitting 2 tbsp. b / n with a common top.
Now in the middle row of Art. b / n in a bead tied with yellow yarn, it is necessary to knit petals from white yarn, as well as in flowers.
Thread the string through the beads, placing the flower in the center.
Knit the handbag with the main pattern of the hat with red yarn. The last 4 rows are knitted with st. b / n and another row of art. b / n green yarn. Tie with green threads long chain from vp, thread it through the holes of the last row of st. s / n, fix one strawberry and one flower on it.
Decorate the hat with strawberries and flowers. Focus on the photo or come up with your own location.
Below are the knitting patterns for the handbag handle.

Next crochet summer hat for a little princess is decorated with a real crown.

To create it you will need:
- Yarn crimson and some yarn with methanite or lurex;
- Beads;
- Tape in tone;
- Hook of the corresponding number;

First p. In a ring of 6 vp. tie 3 vp and 17 Art. s / n, alternating them 1 vp. Finish 2 pp.
Second p. 3 vp, 1 vp, in 1 vp of the first circle, tie 1 tbsp. s / n, * 1 vp, skip 1 loop in the next. vp tie 2 tbsp. s / n and 1 vp between them, again tie 1 vp, skip 1 loop and in the next. tie 1 tbsp. s / n, 1 vp, skip 1 loop, 1 tbsp. s / n *, continue from * to the end of the circle, finish 2 s.s.
Third p. 3 VP, 1 VP, then tie 2 times in VP second round 1 tbsp. s / n + 1 vp, * in the next. vp of the second round we knit 2 tbsp. s / n with a common base and 1 vp between them, then 1 vp, in the next 3 vp. knit 1 tbsp. s / n + 1 vp *, continue from *.
Fourth p. knit not 3 times st. s / n + 1 vp, and 4, in the fifth 5 times, etc. do not forget to knit in the fourth row in every fifth ch. 2 tbsp. s / n with a common base and 1 vp between them, in the fifth row - in every sixth loop, etc.
Knit until the diameter of the bottom reaches the desired size, then knit 1 tbsp. s / n in each v.p. rows and 1 vp. between the posts. When the hat reaches the desired depth, knit a row of st. b / n.
Next, tie the arches from 5 vp. yarn with metallic, securing them with st. b / n in every fifth loop of the row. Second row: knit in even arches of 7 tbsp. s / n, odd 1 tbsp. b / n. Third p .: to tie the fields of art. b / n yarn with metallic.
For the crown, you need to take a hook of the minimum number suitable for the yarn, so that the product turns out to be more rigid and better keeps its shape. Knit with metallic yarn.
Close in the ring 30 vp. Tie 6 circles high. Then divide into 5 equal parts and knit each part separately. We will get 5 rays of the crown with 6 loops in each. Tie 3 rows with decreases. Knit 2 outer stitches in each row on both sides with a common top. Sew beads on the ends. Decorate the entire hat with bows made of small pieces of ribbon and beads.
Here is another example of the same hat, made in white.

Next charming crochet hat fit and for young sailors, and for the brave sailors, everything will depend on what kind of jewelry you attach to the cap.

You will need:
- White, blue and blue yarn;
- The hook is the correct size.

We start with white yarn. The first 11 rows we knit st. s / n according to the scheme of the usual circle.
First p. In an amigurumi ring of 6 loops, tie 3 vp. and 11 Art. s / n. Finish 1 sec. in the 3rd century pp.
Second p. Double the number of loops.
Third p. Knit 2 tbsp. s / n with a common base in every second loop of the circle. in the remaining loops, knit 1 tbsp. s / n. Finish all 1 sec.
Fourth p. Knit 2 tbsp. s / n with a common base in every third loop of the circle, in the remaining loops knit 1 tbsp. s / n.
Knit the next 7 rows by analogy.
12th p. knit art. b / n.
13th and 14th p. knit with yarn blue... 1 vp, * 5 tbsp. s / n, 5 tbsp. b / n *, continue from *, finish 4 st. b / n and 1 s.s.
15th p. knit st. b / n white yarn without increases and decreases.
16th and 17th p. 3 v.p., * 5 tbsp. b / n, 5 st. s / n *, continue from *. Finish 4 tbsp. s / n and 1 s.s.
18th row knit st. b / n white yarn.
Then knit the 19th and 20th rows with yarn of blue color similar to the 13th and 14th rows. Then again a number of Art. b / n white yarn and 2 more rows of blue yarn similar to the 16th and 17th rows. Knit the last row with white yarn. Knit in st. b / n st. s / n and vice versa - in art. s / n knit st. b / n. Thus, the edge of the cap will turn out to be even. Below is a diagram for an example. Focusing on it, you can connect the most different options waviness. You can start knitting such beautiful waves straight from the top of the head, making increments, as in the group of art. b / n, and in the group of art. s / n.
It remains to decorate the hat if it is intended for a little sailor.
We wish you straight loops.
Having bought a new suit for the summer for my son, I want to choose a suitable headdress. The store presents wide range of a wide variety of hats for babies. For boys, the options are slightly less, however, than for girls, but still there is plenty to choose from. However, at the peak of sales in stores, sometimes only dark hats remain, which are suitable for evening walks, but in search of white or just light caps or hats with brims, you have to run around more than one store.
If during such searches it was not possible to find anything suitable, then you can start creating a suitable panama with your own hands. A handmade crochet hook gives you a lot of opportunities to create almost any headdress with your own hands. For the baby, you can knit a cap, a bandana, or you can make a panama hat with fields that help protect the eyes from the sun's rays. To work on a summer knitted hat, you will need to buy everything you need. It is better to choose cotton yarn from materials. In the choice of color, it is better to give preference light shades or combine White color with other yarn colors. In terms of thickness, the yarn must be chosen rather thin to get a delicate hat.
In our master class, the selected yarn Seam "Anna 16" white, light green and green colors. The hook for them is selected for size 1.25. With this hook, it turns out pretty tight knitting but at the same time the final product remains quite soft.

The scheme chosen for a summer hat for a boy is quite simple. In it, there is an alternation of solid and sirloin rows with columns with 1 crochet (CCH).
Scheme

As you can see from the diagram, the beginning of work consists of 6 air loops, turned into a ring using a connecting loop (SP).

The first row will be knitted into this very ring. To do this, 15 columns with 1 crochet (CCH) are introduced into the ring. The first of 15 bars simulates 3 lifting VPs.

According to the scheme, 2 CCHs (check marks) are tied into each column.

The next row is sirloin - there is an alternation of 1 CCH and 1 VP.

In the next step, a yarn of a different color is introduced. First, a row of CCHs is knitted (1 column at the top of 1 CCH and 1 CCH in an arch of 1 VP). The next row is sirloin again.

Make the next 2 rows white again. There, a continuous row of columns and a sirloin row are repeated, where not 1 VP, but 2 VP are located between the columns.

In the green row following the white one, in a continuous row of CCHs in arches of 2 VPs, we knit 3 CCHs each, and in the sirloin row we also make 2 VPs between CCHs.

In the white row, in the arches between the columns, we enter 2 CCHs, and in the sirloin row we make 2 VPs between the columns.

The next green row repeats the knitting mechanism of the previous row.

The round bottom must be knitted until the desired diameter is reached. If it is not possible to try on a hat during knitting, then you can follow the recommendations from this table.
table

Using the same table, you can calculate the height of the hat. To obtain the desired height, alternating colors, we knit the same sequence of two rows - solid and sirloin.

To proceed to knitting the fields of the cap, you need to knit a row of single crochet stitches (RLS) in which the stitches themselves cling to the front half loop each time. We knit hats with knitting needles for a boy according to the scheme with a description (photo)
We knit hats with knitting needles for a boy according to the scheme with a description (photo)
You can simply buy a hat for your boy in a store, but it is much more interesting to knit it yourself. In addition, it will be possible to make a choice of materials and individual style for the child. Children's knitted things are delightful, so we propose to independently knit the most uncomplicated item children's wardrobe- a hat. A knitted hat for a boy is a very simple but weighty wardrobe item, which is presented in our unique selection. It would seem that the choice of hats for your beloved son or grandson is not so great, but the fantasy of the craftswomen is inexhaustible, so the selection provides a fairly wide range of models to choose from. interesting options knitting hats with descriptions and photos. 


Winter hat for a boy
In a cold period of time, the main thing for a baby is to keep his head warm, for this purpose it is suitable knitted hat knitting needles for boys. For knitting, it is advisable to use natural 100% wool yarn. Below is the course of knitting a winter hat for a boy. If you mix acrylic and wool, the hat will turn out to be autumn or spring. These hats for boys are the easiest to knit. 
To calculate the number of loops, you need to know the volume of the child's head. The dependence of the volume of the child's head on age is presented in the table, which also demonstrates, by the presence of a photo in it, the correctness of measuring the volume of the head.
Children's winter hats, as a rule, are insulated with a fleece lining. Before embarking on the implementation of a unique hat, we make a choice of tools and materials:
- straight or circular knitting needles;
- decorating elements (buttons);
- two-tone yarn;
- scissors;
- needle.
Now you can take measurements:
- measure the circumference of the head;
- we knit a sample measuring 10 p. × 20 p;
- we measure the length of the sample in cm and find out the number of stitches. for the cap using the measured value for the volume of the boy's head.

Knitting of a hat for a boy is provided with a detailed description. Use the needles to cast on the approximate number of buttonholes (80-100). If you have experience in knitting with circular knitting needles, then we use them. if there is none, then we will burn out with the usual stocking needles, which will give an equally interesting and high-quality result. We knit with an uncomplicated pattern - stocking knit, 15 centimeters from the beginning of work we knit with such a pattern (on the front side we knit with purl. Buttonholes, on the seamy side - with front). In order for the cap to fit snugly around the head, we make decreases. For this purpose, we divide into eight equal segments of the entire work, which we will call wedges. At the beginning of each wedge, we make decreases, making two stitches. together at the beginning of each wedge. We make such reductions in each strip of the front pet.
When there are eight buttonholes left on the needle, it is worth cutting off the tail of the thread with some margin. Time to use a needle and pull these 8 stitches into a small ring. Sew the edges of the work, hiding the seam with seamy side... The stitching pattern is located at the bottom. 
The main part of the cap is ready to knit the visor and ears. We knit the ears with a stocking knit. Having knitted 10 centimeters, you can proceed to rounding them. To do this, we knit two loops along the edges of the ears together with a front loop. We make such reductions in three rows, then we simply close all the loops. 
We turn to knitting the third element of the cap - a visor, for knitting which we use yarn of a different color. The length of the visor will be 10-12 pet., Which will simultaneously close in the last row.
So, the boy's winter hat is ready. The result can be viewed in the photo below. Winter hat will save your baby from bad weather and cold.
The link to the video gives an opportunity for talented knitters to visually familiarize themselves with a detailed description of knitting winter hat for a boy 2-3-years old.
Video: We knit a hat for the winter
A spring and autumn hat may not be knitted from wool, but according to the principle of a winter one. It is not difficult to knit such a headdress, make sure from personal experience!
Models of hats with a description of the knitting process


Knitted summer hat for a boy

It can be assumed that in the summer a hat is useless for a child, but this opinion is erroneous. Sometimes a summer evening can allow your baby's ears to freeze. A summer baby cap can prevent freezing. V recent times such useful accessory became very popular. Before you start knitting, you must familiarize yourself with the description of the sequence of work.
Many are accustomed to crocheting children's summer hats for a baby, however, a summer children's hat can also be knitted. In order to knit a summer hat for a boy with knitting needles, you can use simple pattern, which is performed with knitting needles, its demo photo is presented below.
For work, we need a pair of ordinary knitting needles 3-3.5 mm thick and a skein of cotton thread (composition 70% cotton and 30% viscose) with a density of 100 g per 300 m.You can take a multi-colored thread with a gradient, or you can use different threads, different color and then you will alternate them, knitting the pattern first with one, then with another thread. Below is a diagram that is relevant for summer hats for boys, as well as a photo of a knitted pattern.
As you can see, knitted summer hats for children are very simple to make with knitting needles! 
A hat for a baby should not only be warm, but also modern and fashionable. In addition, it must necessarily be combined according to colors with a jacket or overalls. Therefore, each child's wardrobe should have at least three hats for the cold season. Knitted things look extraordinary on young children, so this art is worth learning for all young mothers.
Do not forget that knitting is a rather painstaking task that requires a lot of patience and attention from the needlewoman. Our selection is suitable for both novice mothers and experienced ones. The above knitted
for boys, any needlewoman can do it with her own hands, albeit for more long period time. A knitting pattern with a detailed description will help every woman.
Video: Demi-season hat
Comments
Related posts:
 We knit a jumper male knitting according to the scheme with the description (photo)
 Beanie knitted for newborns with photo and description
How to knit a hat for a boy?
With the onset of the first cold weather it becomes topical issue purchasing warm clothes for children. But can anything be warmer than baby jumpers, sweaters, mittens or hats knitted from natural yarn? In addition, knitting for your son or beloved grandson is a pleasure.
The small size of things for children allows you to quickly finish work, and the ability to independently select bright colours and original style for children lead to better result than store offers.
If you knit a baby hat, then you can give free rein to your imagination! You can be sure that the baby is reliably protected from wind and drafts with a warm and comfortable hat... This article will show you how to tie for boy easy a hat for spring or warm winter.
Children's hat with knitting ears for a boy: description and diagram
If you think that knitting a hat for a boy is difficult and impossible, then you are wrong. The main thing is that there is a desire to please the baby with a beautiful and warm hat original design.

 It is better to knit a hat on circular knitting needles... Then in finished hat there will be no rough seams that can rub the baby's skin


Most of the schemes that will help you knit a unique hat are simple. It is enough to have only initial knowledge"Knitting art".
What should you look for when choosing a model and yarn for a baby hat?
- Buy knitting yarn only from natural materials so that the child's head does not sweat under the hat and does not cause discomfort.
- The finished product should not squeeze the head, slip or gather in the ugly folds.
- If you knit a hat exclusively from wool, then the baby will quickly refuse to wear it: such a hat will be very prickly. Therefore, choose wool with synthetic additives.
- Knit a cotton hat for summer, and choose wool and semi-wool for autumn and winter.
A hat for a child begins to knit after taking measurements. Read about what measurements you need to take and what kind of yarn to choose.


Count how many loops there are in 1 cm. Only after that you can start knitting a hat according to the chosen pattern.
Boy's hat with ears


After 6-7 rows, knitted with an elastic pattern, start knitting according to the pattern until the fabric reaches 12-14 cm.
We make the bottom: Purl 2 stitches together. After 2 rows, the decrease in the purl is repeated.
Ears fit like this: we cast on 23 loops and knit with a 5 cm "elastic" pattern.
We form corners: we make 2 decreases of the front loops on both sides each time we knit front row... The remaining 3 loops on the needles are knitted together with the front one.
Lilac hat for a boy


 Scheme and description of the children's hat "KILKENNY"
Boy's hat "Budenovka"

 Hat "Budenovka"


Video: knitting baby hat
Video: knitting a hat for a boy
Hat for a boy for spring and autumn with knitting needles: description and diagram
A hat for spring and autumn is knitted in one thread of yarn the following types: cotton with acrylic, only acrylic, merino wool, alpaca and microfiber.

Cap, patterned"Braids"
- To knit a headdress, take a 100 g skein of thread and circular knitting needles No. 4 and No. 4.5.
- We collect 108 loops on the needles No. 4 and close them with a ring. We constantly check if the loops are not twisted.
- We mark with a marker or a pin the loop from which the first row begins.
- We knit a 5 cm "elastic" pattern, alternating purl and front (2 through 2).
- Then we change the knitting needles (we take half a size more).
- We knit according to the following scheme: we collect 1 purl loop, add 1 front (pull it out of the broaches).
- We knit 15 more front loops and 2 purl. Add again the loop that is formed from the broaches and knit the front loops - 15 pcs.
- The next rapport: we collect 2 purl, add 16 loops, knitted with a front knit. Repeat 3 times and complete the row with a purl loop. We got 90 stitches.
Now let's start knitting the "braid" pattern. We will knit using the following scheme:

 Pattern of the "Braids" pattern
 - We reduce the loops using double-edged needles.
When the "braid" pattern is knitted according to the scheme, cut off the thread. Now it needs to be pulled through the loops. - From thread and cardboard circles in a standard way we will make a pompom. It remains to fix it on the top of the head.


A hat according to this scheme can be knit without ears.


For an older boy, it is better to knit a different hat model.


Knitted winter hat for a boy: scheme
In winter, the main thing for a mother is that her child is not cold or sick. Bound by mom's or grandmother's hands the hat will be much warmer than the one bought in the store, because only the best yarn is selected for it.
Alpaca and cashmere threads are suitable for a winter knitted hat. You can combine yarn with mohair, goat down. For a boy prone to allergies, buy voluminous acrylic.

Hat with a Scandinavian pattern on a soft woolen lining
- We calculate the number of loops for the volume of the head.
- We knit 7 rows from the typesetting edge with a simple elastic band.
- Add six stitches evenly and knit the main part of the cap using the front stitch pattern.
After 5 rows facial surface, let's start knitting a Scandinavian pattern on this scheme:


To make knitted ornaments, take the following colors of threads:
- on the lower triangles - burgundy yarn
- for zigzags - white
- for the upper triangles - bright blue yarn color
If, after knitting the pattern, there is a desire to decorate the hat, then draw another cat drawing. His the diagram is shown in the figure:

- After both the Scandinavian pattern and the cat are connected, we begin to evenly decrease six loops in each row.
- We connect back seam using a thread of the base color.
- We tie the ears, as shown in the photo: we collect 22 loops and knit 15 rows with an elastic band. At the same time, we subtract 1 loop from each row.
- It remains to knit the lining: we will make it like a hat, but without patterns.


Video: Double Beanie. Knitting
Children's hat with earflaps knitting for a boy: description and diagram
Schemes of suitable patterns:


Video: How to knit a hat with earflaps for a boy with knitting needles?
And here is the continuation:
Video: How to knit a hat with earflaps for a boy with knitting needles 2?
Hat for a teenage boy with knitting needles: scheme
A universal model of a hat, knitted with a zigzag pattern. How to knit it - see the diagram.

 Hat pattern


 Continuation of the scheme
 Another variant hats for boy adolescence:


If you decide to knit a hat for a teenager, then take yarn of restrained colors. Gray will do color, brown, black or blue.
According to the scheme suggested above, you can easily connect fashionable hat... The pattern is simple. Even a beginner knitter can handle it.
Other suitable patterns:


Hat for a teenager, knitted mesh pattern


Beanie hat for a boy with knitting needles: knitting pattern
For a long time you chose a knitted hat model suitable for a boy and settled on a beanie hat? Watch the video for details on how to knit it.
Video: Knitting. Beanie's hat.
Knitted stocking hat for a boy: description and diagram
The stocking hat is now a very popular youth model. How to tie it - watch the video.
Video: Knitting. Knit a stocking hat with knitting needles
Knitted hat helmet for a boy with a detailed description
To knit a hat-helmet for a boy, stock up on 100 g of yarn and needles No. 3.5. Scheme and detailed description presented below:


Another option helmets:


Hat helmet for a boy 2-3 years old

 Hat-helmet. You can knit this hat for both a toddler and a boy 2-3 years old
Children's hat minion for a boy with knitting needles: description and diagram
Both boys and girls like the minion beanie. Knitting it is not difficult, if you are careful and repeat all the steps strictly according to the description.


The hat is crocheted. The main pattern is a double crochet. Here's a diagram:


To prevent the cap from taking the shape of a skullcap, after tying the bottom up to 12 cm in diameter, the increments should be repeated every row.
We knit the bottom of the cap. We make a row without increments. We knit a row again with the addition of loops. The bottom gets the required diameter. Now, to the desired depth, you need to continue working without increments.

We knit the bottom (diameter 12cm)
After rows 10-11, make 2 rows with black yarn.


After the yellow and black rows, you need to knit 3 more rows of blue yarn.


We calculate the number of yellow rows


Add the canvas to the desired height with blue yarn.

 The middle of the back of the cap
The middle of the back of the cap is where the rows start and end.


Determine where the ears will be
We fold the hat in half and determine the place where we will knit the ears of the hat: it is located at a distance of 15 loops from the seam.


The outline of the hat is tied with a single crochet. The ties are 6 pieces of 100 cm per ear. For 2 ears - 12 segments.


We will tie the contour of the hat with a single crochet.


The ties are 6 pieces of 100 cm per ear. For 2 ears - 12 segments.
 Fold two segments in half
 Fold two single-color segments in half at once. We insert the loop into the extreme loop of the middle of the ear.


We stretch the ends of the segments through the loop. We repeat the same action with the remaining segments.
![]()
![]()
Eyes-glasses: scheme
- For knitting 1 row, use a brown thread.
- To knit 2 rows, you need white yarn. Knit at the back half loop.
- White yarn is used for row 3.
- The black stripe is a guide for sewing on the eyes.

 How to knit eyes

This hat can be knitted literally in the evening. If you need something unusual, and uncomplicated for your little son or granddaughter, then knit a light hat for autumn or spring. The pattern consists of obverse and purl loops, which are combined in different ways.
The instruction for the cap is given for sizes 46-48. For knitting, you need 80 g of 100% merino wool and knitting needles No. 4.
Cast on 74 stitches. We close the loops in a circle and knit 5 rows with a simple elastic band, alternating 1 front and 1 purl.
We begin to knit a pattern from the front and back: after the elastic, we knit a row face loops.
We knit the second row after the elastic with purl loops.
Then we knit 5 rows with front loops.
After that, a row of purl loops.
We knit the next row with front loops.
We knit again 4 rows with an elastic band, alternating 1 front and 1 purl.
Repeat the pattern 2 more times.
Knit a row with front loops and subtract 6 loops in a row.
There should be 20 loops on the needles, which need to be pulled together with a thread.

Below are the ideas of the original knitted hats for boys:


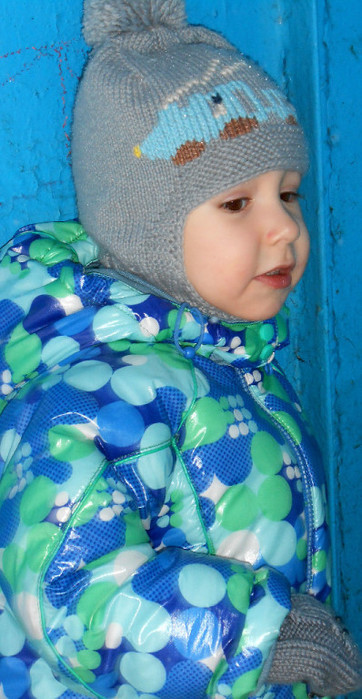
Gray hat for a boy with thermo stickers "cars"
For the hat, you will need three colors of yarn and thermal stickers. The stripe on the cap is the road. The automotive theme is complemented by cars.

You can pick up other stickers: cartoon characters, or robots. The strip can be knitted with brown or yellow yarn, then the strip will imitate a path. The hat is knitted with the usual front satin stitch.
Knitting pattern for a hat:


Knitted hat and scarf for a boy: scheme
Gray hat and scarf with a snowflake
Children's hat with a visor with ties
- We start knitting with garter stitch from the middle strip: this is a strip that runs from the forehead to the neck.
- Add loops around the edges by knitting squares while simultaneously removing two loops along the diagonal.
- How to knit squares? We recruit required amount loops and subtract in the middle, removing two loops untied at once: we dial 1 face loop and throw two over the knitted one.
- We decrease in each row until we connect the square.
- We decorate the lower part of the cap with an elastic band.
- Knit visor and strings separately and sew to the finished hat. The visor is knitted with a double stitch, starting from the front edge.
- You can knit such a hat with one cloth, so that later you do not sew the parts separately.


Video: Children's hat with ties on ears