DIY Christmas toys made of paper. How to make beautiful Christmas decorations for a competition, for a kindergarten, a large street Christmas tree? Do-it-yourself Christmas toys made of felt: a master class. How to make a Christmas tree toy out of color
To decorate the Christmas tree with "precious paper stones", you just need to print ready-made templates cut them out and glue them Christmas decorations from paper.
Before you completely glue the craft, attach a loop from the inside, for which you will then hang the toy on the Christmas tree. Finished paper stones can be covered with sparkles for beauty.
Templates small size: pattern-1 pattern-2 pattern-3 pattern-4 pattern-5
On the same site, you can download a template for another, more difficult to make New Year's paper craft - a paper diamond. It can also be used as a Christmas toy or Christmas decoration. Download template >>>>

Print New Year's scheme diamond on thick colored paper, cut it out. Before gluing the craft, carefully, along the ruler, scratch the fold lines (marked with a dotted line) with a needle to make it easier to fold the paper. Note: if you suddenly printed the template from the link above, but the dotted line is not visible on it, you can use this template. Here everything is the same, only there is no dotted line.

And more Christmas paper crafts from www.minieco.co.uk:
paper Christmas decorations


2. New Year paper crafts. Christmas toys from paper
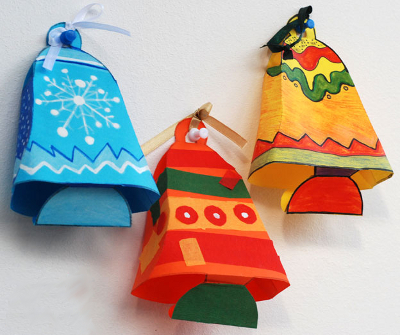
paper bells
3. New Year's decoration. New Year decoration
Probably already known to many, the Creative Park site from Canon will help you decorate Christmas tree handmade paper toys. Christmas decorations - bells, hearts, lollipops, Christmas decorations as Christmas boxes- all this and much more you will find on the Creative Park website.


4. DIY Christmas decorations. How to make New Year's
We suggest you make simple Christmas tree decorations out of paper, decorated with photographs of family members. To do this, you need to download templates for Christmas tree decorations from the link, cut out individual squares, bend their corners and glue them together. New Year's toys made of paper blue color need to cut, round off the corners. See photo below.

In the photo below, a New Year's paper toy depicting Santa Claus is made in a similar way. You can download the template.

5. New Year's ideas. New Year's master class
Another interesting new year idea- Christmas decoration origami wreath. To make such a paper wreath, you will need to cut beautiful paper into strips 4 cm wide and 8 cm long. You need 8 strips in total. Each strip must first be folded in half lengthwise, and then in half across. Holding the blank with the open edge up, bend its top corners down as shown in the photo. Cm. New Year's master class at the link >>>> From the resulting blanks, assemble a New Year's wreath by inserting them one into the other.

6. Christmas toys made of paper. How to make a Christmas toy
Most people associate ice cream with hot weather and summer vacation, nevertheless, Christmas decorations in the form waffle cups with an appetizing delicacy look very festive and original on the New Year tree. To make these Christmas paper toys, you will need Kraft paper (for cups) and corrugated paper. different colors for the ice cream.

Cut out circles from craft paper, cut them in half. From each semicircle, fold a cone, glue it. Crumple corrugated paper of different colors into lumps, for one Christmas tree toy you will need two such lumps. Now you need to string "cups" and "ice cream" on a thread, making loops on top, for which you will then hang new Year decoration from paper to the Christmas tree. See the New Year's master class at the link >>>>
7. Christmas toys made of paper. New Year's schemes
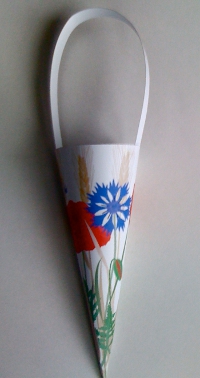
In Denmark, there is a tradition of decorating the Christmas tree with heart-shaped wicker paper baskets. The photo below shows traditional wicker baskets made of paper. They can be hung on the Christmas tree empty or filled with small sweets, nuts, cookies.

To make this Christmas paper decoration with your own hands, you need to print the following template on two sheets of paper in different colors. Cut them out, fold in half, make three cuts. You should get these two blanks.

Now you need to weave them together to make a paper heart basket. For a detailed New Year's master class on how to weave a paper basket, see the link >>>>


Here are a few more New Year's paper baskets for the Christmas tree:
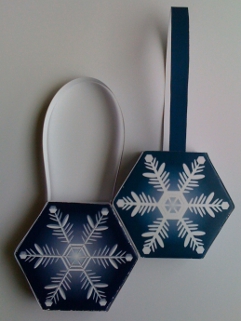
With snowflakes

An insanely fun activity is to celebrate the New Year, and even more fun is to prepare for it, decorate an apartment, make Christmas decorations, snowflakes and other crafts. Such moments are especially joyful for children, because children, as a rule, appreciate hand-made crafts much more than adults. Already in kindergarten, the baby can please mom, dad and teacher with a beautiful cut-off appliqué or colored paper appliqué and cotton pads almost without the help of adults. And in primary school The child himself can do such crafts that an adult cannot. Children, moreover, have a very developed imagination and, at times, they invent works of children's art of incredible beauty. Here are some ideas for you New Year's crafts for children, and most of them are also accompanied by master classes.
CLICK ON THE CRAFTS YOU LIKE TO LEARN HOW TO DO IT!
Children's Christmas tree toys made of paper
Decorate Christmas tree DIY toys have been fashionable at all times. After all, the manufacture of these toys unites the family, everyone helps, from young to old, even wayward teenagers, in anticipation of New Year's gifts, enthusiastically rush to help their youngest :) made with love.
New Year's toys from cones are the simplest and most original. cone - so magic figure that it can be turned even into Santa Claus, even into the Snow Maiden, even into the symbol of the year, and 2018 is the year of the dog.

Absolutely on the same principle, other crafts are made from cones. We glue the beard to Santa Claus on the cone, cut it and bend it. We draw a face. We attach the mustache. If you glue a rope on top, you can hang such a craft on a Christmas tree. The video master class will open after clicking on the picture with Santa Claus.

And you can make such children's crafts out of white paper and color them:

And without a Christmas tree in any way, but we will also have it from paper cones:

A little easier: stick green loops on the cone. We fold short strips of paper with a loop, glue the ends. We glue the loops on the cylinder, the tree is ready.

For junior group kindergarten let's simplify the tree even more. All you need to do is to stick all sorts of different stickers on the cone, so the impromptu Christmas tree is decorated.

And let's not forget about the angels, they will look just lovely on the Christmas tree, and the realization that they are made by hand will raise the already festive mood even more.

Still quite easy-to-make toys from paper strips:


More popular topic- make balls out of paper circles. We cut circles, bend in half, glue the halves so that we get a ball. Let's make a snowman in the same technique:

Children's origami
Well develops the motor skills of children's hands, no matter how old they are, the creation of origami figures. It’s difficult to do without a diagram, but if you print out our templates and invite your child to fold according to the diagram, he will definitely do it. What do we have from New Year's origami? First of all, Santa Claus

And it’s even easier to fold the Snow Maiden from two squares:

Christmas snowflakes for kids
Nothing is as mesmerizing as the beauty of a snowflake in the palm of your hand. Her clear, precise geometric shapes, identical rays, but at the same time, all snowflakes are different and there is not one identical in the world.
It is still difficult for children from kindergarten to cut a smooth, symmetrical snowflake, but it is easy to make it from paper loops. We cut the paper into short strips, glue the ends - the loops are ready. Now cut out a circle of paper and glue loops on it.

Decorating a Christmas tree or windows is not complete without snowflakes, especially since with the advent of plastic double-glazed windows in our lives, children stopped seeing bizarre Frost patterns on the windows of our apartments, it's a pity ... We fill in the missing snow patterns by cutting out snowflakes from paper or napkins.
No matter how difficult it may seem, but in fact a beautiful symmetrical Christmas snowflake make it very easy. The snowflake has 6 rays, not 8 by any means, keep this in mind when you make it. Cut out a square from paper. We bend it diagonally. Then we bend the resulting triangle in half. Bend the left and right corners to the middle. Here is the preparation of a snowflake with 6 rays. Watch step by step: how to make the correct blank for a snowflake with 6 rays from paper >> A diagrams simple snowflakes by clicking on the picture:

Now, no matter what you cut out of this folded triangle, you will get a snowflake anyway. The kid will need your help here, and the student should already figure out how to bend and how to cut. If you are too lazy to invent yourself, here are the snowflake patterns for you \u003e\u003e

The more cuts and cuts you make, the more airy and delicate your snowflake will be.
Children's New Year's application from colored paper
Give your child a sheet of colored cardboard and lots of different rectangles. colorful paper, including white (after all, winter is outside the window), and we are sure that he will create a masterpiece application. And the secret is simple. Rectangles resemble houses. A white paper cut into pieces and glue - here you have snow.

And if you add a few cotton pads to this whole set, then it will be difficult to keep you from wanting to make New Year's application:) Disks can be replaced paper circles, but take the trouble to cut them out for the child yourself.

Do-it-yourself children's New Year's cards
Well, the room and the Christmas tree have been decorated, now you need to think about your loved ones. It is necessary for them all to do New Year's card, but so sincere that on a frosty day it warms with its warmth when you admire it and remember the donor.
The child is still small - we make a postcard by analogy with the application. Already in senior group kindergarten? Then he can master the skill of creating a three-dimensional postcard!

First, fold a sheet of cardboard in half, this will be the base of the postcard. Now cut out 3 strips from colored paper, one smaller than the other. We bend them into an accordion. Next, bend each in half so that you get a fan. We glue. Glue the cards inside. Decorate the Christmas tree :)
And if you use unnecessary colored magazines or paper for creativity to decorate postcards, and cut them into triangles and stripes, then our Christmas trees will be very different and not a single one is the same.

Or this Christmas tree:


And if you combine in one children's postcard origami and a voluminous application of eyelets, and also remember how to cut snowflakes, a masterpiece will come out:

In any case, no matter what crafts are done with children, it is always interesting, and the result pleases. Do not scold the baby if it turned out not too neat. Praise and say that next time he will do even better :) Happy New Year!
Do you love needlework? Then you will love making DIY Christmas decorations! It's pleasant and an exciting activity for the whole family, which will not leave anyone indifferent - you will spend several evenings with pleasure making toys for the Christmas tree with your own hands.
What do we use for the material
What do you need to make DIY Christmas decorations? You can use almost anything that comes your way. If you want, you can buy special Consumables(sold in stores for creativity), or you can use what is in any home. So what to prepare:- plain paper (suitable for making patterns);
- pencils and markers;
- ordinary, white and colored cardboard (velvet can be used);
- sharp scissors and a dummy knife;
- glue (PVA or glue gun with rods);
- threads and needles;
- yarn of different shades;
- various decorative materials- it can be sparkles, sequins, confetti, colorful foil, stickers and more.
Simple crafts from improvised materials
Of course, you have probably seen how they are made from thread and glue. christmas balls with your own hands, but why not expand the range? We make different Christmas decorations with our own hands.From yarn
This is a simple and at the same time spectacular Christmas decoration that can decorate any Christmas tree.
For manufacturing you will need:
- yarn;
- tailor's pins;
- plate or bowl;
- porous material (for example, a disposable tray);
- cutting paper;
- marker.

The template needs to be attached with pins (or ordinary toothpicks) to the porous material, and lay out the pattern you need on top - first the outline is laid out, then the interior decor. Do not cross the threads too often, the toy should be fairly flat. After you are done, dry the product and remove it from the pins, and tie a loop in the eye. If desired, you can decorate with sparkles or rain.

From wire
How to make Christmas toys with your own hands in just a couple of minutes? Use wire!
To make toys you will need:
- two types of wire - thick and thin (thin can be replaced with bright threads, for example, floss. Pure white strong threads look very nice);
- beads, beads;
- colored tape;
- pliers.
The ends of the thick wire must be twisted. You need to string beads and beads mixed on a thin wire, tie the end of a thin wire to a future Christmas tree decoration, and wrap it randomly.

When the toy is evenly wrapped, you need to wrap the free tail of the wire around the toy, and tie the ribbon in the shape of a bow - your toy is ready.
Another original idea:

Ribbon and beads
Who said that do-it-yourself New Year's toys must be done for a long time and painstakingly? Not at all. Literally in five minutes you can, which will decorate and Christmas tree, and the interior.
You will need:
- beads;
- narrow tape;
- yellow, gold or silver cardboard;
- glue "Second";
- needle with thread.

The interior decor made in this way looks very attractive.
From cardboard - in a couple of minutes
Some Christmas toys made of paper or cardboard take a lot of time to make, but not in this case - here you really need a couple of minutes to make an elegant hand-made Christmas decoration.So, you will need:
- ordinary cardboard;
- some twine or thick yarn;
- glue;
- paints and brushes;
- napkin or cloth;
- varied decor.

With a free tail of twine we wrap the Christmas tree in different directions. After some pattern of threads appears on the Christmas tree, you can start gluing it with a napkin. You can tear the napkin into pieces, coat the Christmas tree well with glue, and glue it tightly with a napkin. This will give a nice texture to the future toy.

After the toy has dried, you can start painting - paint the Christmas tree in green color.

After the paint layer dries, shade the texture of the toy with a dry hard brush and white paint, and then decorate as you like.

From bright patches
Here you will need sewing machine, but with a special desire, you can cope without it. This The best way make Christmas toys from cotton wool and fabric - just choose a fabric with a Christmas ornament, or use the one you have on hand.
Prepare some paper patterns - for example, deer, stars, gingerbread men, cubs, letters and hearts. Cut the blanks out of the fabric with your own hands, sew them in pairs, leaving a small gap (for stuffing), and through this small hole, stuff the toys tightly with cotton wool or padding polyester. It is most convenient to fill with a pencil.
Patterns can be downloaded here:


By the way, do not forget - we sew on a typewriter from the inside, but if you decide to make toys from thick fabric, it is better to stitch decorative seam over the edge - a do-it-yourself toy will look simply charming and is suitable even for a home Christmas tree, even for a kindergarten - usually children make decorations for kindergarten trees themselves.
From twine and cardboard
New Year's toys made of paper and cardboard will be much more interesting if you add a couple more to them. simple materials. To make such a toy, you will need ordinary cardboard, simple paper or natural twine, a little felt or any other fabric, as well as plain paper, a pencil and a ruler, a drop of glue.
The star pattern can be downloaded here:

First make a pattern on plain paper and then transfer it to cardboard. Do not forget that the star must be double. Do not make the star too thin, it is better to make it from a centimeter or more. The tail of the twine is glued to the cardboard, then you need to gradually wrap the entire workpiece.

Lay the thread as tightly as possible so that there are no gaps. In order to decorate the star, make a couple of leaves and berries out of fabric and decorate one of the rays. Your decoration is ready.

From yarn and cardboard
Do you want to make original and at the same time charming Christmas decorations with your own hands? Then it's time to make small gift hats with your own hands from improvised materials. It's wonderful new year gift which looks cute and will keep you warm all winter!
To make Christmas tree decorations in the form of hats, you will need:
- a couple of bushings from toilet paper(you can just glue cardboard rings);
- remnants of colored yarn;
- beads and sequins for decoration.

The threads need to be cut into segments of approximately 20-22 centimeters. We fold each piece in half, draw the loop through the cardboard ring, and stretch the free edges of the threads through the loop. It is necessary that the thread is firmly fixed on the cardboard base. So you need to repeat until cardboard base will not hide under the threads.

All thread tails need to be pulled through the ring so that our hat has a “lapel”.

And now we drag the free ponytails tightly with a thread and cut them in the shape of a pompom - the hat is ready! It remains only to make a loop and decorate your Christmas tree toy with sequins and sparkles.

From beads
Making a New Year's toy in the style of minimalism is easy and simple - you will need wire, beads and beads, a ribbon and a coin (you can replace it with a small candy, but it looks much more spectacular with a coin). Try to make this Christmas tree toy with your own hands, a very simple master class.
Make a loop on the wire and string green beads mixed with large beads on it - they will play the role of New Year's balls on our Christmas tree. After the wire is filled, give it the shape of a Christmas tree, folding in a spiral.
When your tree takes shape, bend free edge in a loop.

We cut off a piece of ribbon, form a loop for hanging from it and stretch it through the Christmas tree, and decorate the free tail with a coin (the easiest way is to stick it on double-sided tape). We tie a decorative bow on the loop for hanging - your decor is ready!

Christmas balls
How to make a Christmas ball of thread? As easy as shelling pears, watch our master class about spectacular lace balls on the Christmas tree.Required:
- several balloons;
- cotton threads;
- PVA, water and sugar;
- scissors;
- polymer glue;
- spray paint;
- decor.

First you need to inflate the balloon - not completely, but according to the size of the future decoration. Mix two tablespoons of water, two teaspoons of sugar and PVA glue (50 ml), and soak the thread in this mixture so that the thread is saturated. Then you need to wrap the ball with a thread randomly. The balls need to be dried for several hours. After the glue is completely dry, you need to blow off the ball and take it out, and gently paint the thread ball with spray paint and decorate with sequins and sparkles.
Do-it-yourself thread Christmas balls will turn out to be very, very spectacular if you make them in different tones - for example, red, silver and gold. Try to make your own Christmas balls in different technique- you can sew or knit balls, make them from cotton wool with your own hands or, for example, sew them from felt - there are never too many such toys.
From paper
Christmas decorations made of paper enjoy big love both big and small fans New Year's miracle- Try to make paper Christmas balls with your own hands.
Do-it-yourself New Year's paper toy is done like this: 
Decorating such a toy is not additionally required, it is already expressive.

Another version of the ball:

Or you can make such a ball according to the master class:


From felt
Do-it-yourself Christmas toys made of felt look very warm and cozy, and making them is very, very simple. To make your own charming Christmas toys made of felt, you will need:- red, white and green felt;
- threads of red, white and green;
- glue Crystal;
- scissors and needles;
- cardboard;
- some satin ribbon;
- soft filler (cotton wool, holofiber, synthetic winterizer).

First make sketches for your future toys. It can be anything. After the patterns are ready, transfer them to the felt and cut them out. What is good about this material is that it does not crumble, you will not need to additionally process the edge of each workpiece.
Make the same decorative elements- for example, holly branches (by the way, did you know that this is a symbol of joy and Christmas reconciliation?). Berries need to be glued to the leaf with glue, and then make a decorative knot - this will add volume to the berries.
We sew each blank in pairs. By the way, sewing is best contrasting threads, it will be fun and elegant. And how to make Christmas decorations voluminous? Stuff them with holofiber before sewing them up completely! Spread the product well, so the Christmas tree toy will be stuffed more evenly. For stuffing, you can use the back of the pencil.
Sew on decorative elements and your Christmas toy is ready!


Try sewing felt decorations not only for the Christmas tree, but also for your home - for example, a Christmas wreath decorated with felt toys, looks very stylish. Look at a selection of DIY Christmas decorations photo workshops - and you will understand how much interesting things can be done from ordinary felt of two or three colors.

Master class on how to make a Christmas garland with your own hands from felt:

Below you can download templates and patterns different Christmas trees for crafts from felt.
DIY crafts for the New Year. Beautiful bright stars are done very easily. Even the most Small child, or rather, to assemble, and already cut it out, decide for yourself how small it is and whether scissors can be trusted with it).
Draw identical stars on colored cardboard or use our blanks. If there is a desire, then decorate them with some kind of pattern, or entrust this activity to a child. Cut out paper stars. Make a cut on each star, as shown in the picture. And connect them. Everything turned out to be very simple, and how much this activity will bring pleasure to your child. And how he will show off to the guests the Christmas tree decorations that he will make with you.
 |  |
Depending on what color of cardboard you will cut out your stars, they will acquire their own individuality and originality. And throughout all public holidays will delight you and your family with their brightness.

ribbed toys do the Christmas tree with the children

For crafts for the new year use colored paper. Christmas decorations are made from pieces of paper folded in half. Their options can be very different: geometric shapes, fruits, and much more.
For one toy, six to eight blanks are cut out, folded with the painted side inward, glued, halves of two parts together, gradually adding the remaining parts. Before gluing the latter, a thread is inserted into the middle so that it can be hung paper toy on the tree
The sun is a Christmas tree toy made of paper

For this New Year's crafts use paper, yellow color. First, cut out a rectangular sheet of paper, fold it in half. 1 cm recede from the edge of the double side and draw a line. From the side of the fold, cuts are made every 5-10 mm. The last strip is cut off completely. The uncut part is folded inward and glued. The workpiece is folded in a circle, the craft is glued together and hung on a thread. So our paper sun is ready, which can be hung on a Christmas tree.
DIY Christmas tree lantern

To do christmas lantern take colored paper. The beginning of making a toy is the same as the sun. Prepare a rectangular sheet of paper, fold it in half and make cuts every 5-10 mm.
Align the sheet and make folds of the uncut part to the outside. Then prepare a sheet of paper several smaller and make a cylinder out of it. The cylinder can be made from paper of a different color. A blank with cuts is glued onto it. A strip of paper or a thread is glued to the craft to hang the toy.
We make our own Christmas toy - voluminous star made of colored paper

A star can be one-color or two-color, it already depends on your imagination and the availability of color, or maybe wrapping paper. You need to cut two such blanks. Redraw the star diagram without forgetting the gluing points. The dotted lines indicate the places of the folds, which will give the finished star volume. Together with your child, make several small and large colored stars and decorate the Christmas tree with them, and possibly the wall, or hang a few stars from the chandelier.
New Year crafts for children “Balls”

To make this cute pendant you will need:
Colored thick paper (2 colors), Lace or thin ribbon, Glue (PVA), scissors.
Prepare your child with colored circles with a diameter of 6-8 centimeters. Have your child fold each circle in half. Next we glue. Unfold one circle and spread it entirely on one side with glue. Glue two bent circles to it and spread it with glue again. Glue two more bent leaves and spread with glue again. Then lay a string in the center and stick an unfolded circle. Make several of these lanterns on a cord. Straighten the paper petals of the balloon.
If you have the patience to make a lot of these paper balls, you get a whole christmas garland for interior decoration.
To prevent the balls from rolling off when they are actively used, you can string pasta on a cord between the flashlights.
 Making garlands from paper |
New Year is a time of magic, fairy tales and festive atmosphere with which the frosty air is impregnated. And, of course, everyone, without exception, is preparing for an exciting moment - decorating the Christmas tree. But, despite the rich selection of toys in stores, many people prefer to decorate the Christmas tree on their own and with their own hand-made decorations.
Most popular material for the manufacture of New Year's toys - paper. This material is affordable and easy to use. But you can see how to make Christmas tree toys with your own hands from paper in this article. It will be much more interesting if you involve your children in this activity, because children are able to create something that an adult simply does not have enough imagination for.
How to make a Christmas tree toy out of colored paper
Colored paper toys will bring in festive interior bright accents. The main thing is to take high-quality and thick enough paper so that ready product it turned out durable and pleased you with its appearance for a long time.
New Year paper toys
The most traditional New Year's toy is considered christmas ball . So why not try making it out of paper. It is very easy to make similar paper Christmas tree decorations with your own hands, but you need to stock up the right materials and tools.
To make it so interesting christmas ball you will need the following materials:
- thick paper of any color;
- scissors;
- compasses or any round object;
- PVA glue;
- satin ribbon or thread.
When all the tools are at hand, you can get to work. It does not take a lot of time. Similar paper fakes for a Christmas tree are made in several stages:
- Draw identical circles on paper using a compass or, for example, a coffee lid, and cut it out. As a result, the number of circles should be 20.
- In each circle, draw an isosceles triangle with a pencil or fold the circle in half on both sides to mark the center with a cross.
- Bend the edges of the circles along the lines of the triangles and iron the fold well with your fingers.
- From the resulting triangles, glue the base for the ball. To do this, lay out a line of triangles on a flat surface so that their bases form a straight line. Here you can notice that the “top” of the line is with spaces, so in the gaps you need to insert five more circles. The result is a strip of 10 triangles, which must be closed in a circle.
- From the remaining 10 circles, make the bottom and top of the ball. To do this, glue 5 triangles into a circle so that the tops of the triangles are together.
- Glue the resulting caps to the base. The ball is ready.
After the ball is completely glued, you need to take a ribbon or any dense thread and attach it with glue to any place. This is necessary so that the ball can be easily hung on a Christmas tree branch.
If you find it difficult to draw triangles in each circle, you can make a spare circle and cut out the desired triangle from it. This will serve as a template and greatly facilitate the process.
You can also do not round bead, but square. This requires 6 circles. Only the edges should be bent not in a triangle, but in a square. As a result, 4 squares will go to the base and 2 to the lids.
Similar paper toys New Year Can be made single or multi-colored.
It is important to understand that the larger the circles are in diameter, the larger the Christmas ball itself will be. Thus, it is possible to compose whole compositions from balls of different sizes.
Christmas tree toys made of cardboard
The simplest New Year's toys made of cardboard are Christmas trees from animals, which can be placed next to these Christmas trees. The principle of making animals and Christmas trees will not be explained, it is quite easy. Refer to the image below.
Christmas trees made of cardboard
But making a ball out of cardboard is not so easy. In addition, it is not always possible to find a ball with the desired pattern in the store, but we know that it you can always do it yourself. Such New Year's decorations made of cardboard can become the main and most bright accents on the tree.
Necessary materials:
- postcard with your favorite image or photo;
- scissors;
- hole puncher;
- thread or ribbon;
- small screw and nut.
A unique Christmas ball is prepared in three stages:
- A photo or postcard must be cut into an arbitrary number of strips.
- On each strip, at the top and bottom, you need to make a hole with a hole punch.
- Collect all the strips together by threading a screw through the holes and securing with a nut so that they can move. The toy is ready.
After the toy is assembled, you need to straighten the strips so that the pattern is visible. And in order to be able to hang it on the Christmas tree, you need to attach a thread or ribbon to the top screw.
It is not necessary to use a photo or a postcard in order to view the image: it is quite possible to use colored cardboard, in two or more colors. You can decorate the ball with a bow, beads.
The number of stripes should not be less than 5 pieces. If there are fewer of them, the ball will look awkward
From cardboard you can create beautiful "winter" toys. How to do it, see this video:
What New Year's toys can be made from corrugated paper
Paper Christmas decorations look especially interesting if not used. plain paper, but corrugated. Looks very nice herringbone from corrugated paper.
Necessary materials:
- green corrugated paper;
- scissors;
- PVA glue;
- sheet of cardboard of any size.
First you need to make the base of the Christmas tree out of thick cardboard, for example, a rolled cone. It must be secured along the seam with tape or glue. For stability, the cavity of the cone is filled with any material.
Strips of corrugated paper should be 10 cm long, 2.5-3 cm wide. The strip should be twisted in the middle and folded into a loop, pressing down with your fingertip. All prepared loops are glued to the cone, starting from the bottom row. The fluffiness and volume of the Christmas tree depends on the number of loops used. You can attach a bow or a large bead to the top of the finished beauty.
How to make voluminous Christmas paper toys
If you were considering various photos do-it-yourself Christmas toys made of paper, you probably noticed that mostly Christmas tree decorations are made voluminous. The thing is that such toys are much easier to make, because they are made according to special patterns. Such patterns of Christmas paper toys are easy to find on the Internet, they even sold in stores.
To make a toy according to such a pattern, you need to print a pattern on a color printer, cut it out and glue it along the indicated lines.
It is better to print such templates on thick paper, a simple office will not work. From the glue, it will get wet, and the toy will look sloppy, or even completely fall apart.
Finished products look very original. They can be presented as small gift , after putting a small treat inside, for example, a few sweets or a chocolate egg.
Do not think that handmade Christmas tree decorations will look unnatural and ugly on holiday tree. It's not like that at all. You can’t buy such jewelry in a store, and the time that was spent with the family for creativity will be for a long time put a smile on your face. Especially the smallest members of the family will like this activity.
September 27, 2017, 22:12


