Do-it-yourself artificial Christmas tree made of paper. How to make a Christmas tree out of paper. Below is a video instruction
What is New Year can be imagined without the main symbol - the Christmas tree. Green beauties on the eve of the holiday are sold on every corner. However, for such a holiday, it is not necessary to buy live spruce... Try to do it yourself. Therefore, in this article we will talk about what you can make a Christmas tree for the New Year's holiday. It is worth saying what to create main character new year can be completely different materials... And today we will tell you more about this.
Mini Christmas trees made of cones.
If your children also like to make crafts, then they can also participate in the creation of such crafts. The next craft, a Christmas tree, consists of cones and plasticine. All your child needs is to learn how to roll small balls from plasticine. At the same time, for this purpose, you can use plasticine of the most bright shades... As a base for a Christmas tree, you can use ordinary thread spools. But you must wrap them in foil. The cones are attached to the coil with super glue.

If you liked the next tree, then take acrylic paints and paint the pine cone with it. Remember, the smartest thing here is to use green paint... In this case, the tips of the tree are painted in White color paint. Make from plasticine Brown color base for the tree. Use an asterisk for decoration.

The next craft is a little more difficult to do. It is worth using beads here. Therefore, if your child is small, then control this process yourself. Use a glue gun to glue the beads to the bump.

All of the above-described cones crafts can not only decorate your home. It will be pleasant to present such Christmas trees as a gift to your loved one.
The next craft looks more voluminous. And it will take a few bumps to create it. You should use a cone from thick cardboard... After that, the cone is pasted over with cones from all sides. In this work, it is customary to use a cool pistol. Once the glue is dry, cover the tree with large beads.

Simple tinsel Christmas trees.
If you read this article, you can learn how to do artificial tree at home. Above, we offered you ideas for Christmas trees that were made from cones. Now we suggest using tinsel for this job. Naturally, for such a craft, you must purchase the tinsel itself. For the trees, make cardboard cones. Then, glue the tinsel to them. In this case, the tinsel should be glued to the cone in a spiral. Arm yourself with a glue gun while working.

Christmas tree made of sweets.
The next tree may be not only beautiful decoration but also very nice gift... To make such a craft, make a cone. Fix the candies on it with tape, and then wrap the Christmas tree with tinsel.


Simple and volumetric tree from paper.

The next craft is also very simple to make. She can be an excellent decoration for a children's room in new year holidays... For manufacturing, prepare:
- thick green cardboard,
- markers, glitters, paints,
- scissors and glue,
- Scotch.
Progress:
- We bend a sheet of cardboard in half and use scissors to cut along the fold.
- We put the two parts that you got together and bend in half again.
- Opposite the fold with a marker, draw a half of the Christmas tree.
- Now we cut along the drawn line. As a result, you will get 2 Christmas trees, which will not differ in any way from each other.
- Use gentle movements to fold each tree in half. Mark the center.
- Next, make an incision on one of the trees. The incision should be long from the very top to midline... The other tree should have a cut from the bottom to the middle.
- Now we connect the trees by inserting them into the resulting cuts.
- And to make the tree more stable, use scotch tape.
- That's all now start decorating your Christmas tree. Use your imagination and handy materials here.

And here is another version of the Christmas tree, which you can make in the same way from old box made of cardboard.

Elegant Christmas tree made of paper.

If you want to know how to make a beautiful Christmas tree, then the following idea was created especially for you. For such a tree, prepare:
- colored paper,
- Scotch,
- glue and scissors.

 The hardest part is to cut the strips of colored paper that should have equal length and width. In this case, each strip must be glued with tape in order to get a loop. Then all the loops are glued to a strip of tape.
You should wrap a cone made of thick cardboard with similar garlands.
How to make a glowing Christmas tree.
If you decide to find out how to do christmas tree with your own hands, then you are on the right way... Above we have described some simple crafts... Now the turn has come to engage in serious creativity in order to do something original.
 For creative christmas tree prepare:
- Floral floristic sphere. For this case, we recommend buying more than one shade of green.
- Scissors, PVA glue.
- Thick cardboard for the cone.
- Cellophane, pins, garland, floral wire.
- Various decorations.
Progress:
- First, we make a cone from cardboard.
- We wrap the cone with cellophane.
- We dilute the glue with water in a container.
- We cut the floral mesh into pieces and put each piece in a container with glue and water.
- Now glue the pieces onto the cone. In this case, the joints are glued again for reliability.
- Use safety pins to keep your craft from coming apart at the seams.
- As a result, you have the first layer of the tree. Make the second layer in the same way. Remember that after gluing the second layer, the structure must dry well.
- If the glue is dry, remove your tree from the cone.
- A garland is placed inside the tree.
- Now just decorate the tree of your choice.
Christmas tree made of threads.
If you want to have something unusual for the New Year in your home, then, in addition to standard decorations, decorate your home various crafts on the New Year's theme.
Making the next tree is also fairly easy to handle. Take a sheet of Whatman paper and make a cone out of it. Coat the cone with glue and start wrapping it with green thread.
When the glue is dry, separate the cone from the paper.
Decorate the finished Christmas tree various accessories... Ornaments are also glued to the tree with glue.

Finally
Spend your New Year brightly! Make a variety of different Christmas trees that can make the atmosphere in your home truly magical.
Christmas tree - is one of the main attributes of such large-scale holiday like New Years. No one forgets about her, acquiring live or artificial Christmas trees to your home and decorating it with different outfits, souvenirs, garlands. We will make a Christmas tree out of paper, which can be placed somewhere in the apartment (for example, on a table), or it will not even be a shame to give such a craft to relatives or friends. Next, we'll look at several ways to create paper Christmas trees.
How to make a Christmas tree out of paper (1 way)
You will need green paper, a ruler, compasses, glue, scissors and a pencil (or a tube for juices, cocktails).

- Using a compass, draw several circles on the paper. Each next circle is 1-2 cm smaller than the previous one. Choose the number and size of circles yourself, depending on what size the Christmas tree you want to see in front of you as a result.
- Fold each circle in half once, a second time, and a third time (that is, you need to fold each circle in half three times). To make the fold lines clear - draw along the edges with scissors.
- We straighten the circles. Cut out a hole in the center of each that matches the diameter of the pencil or tube (whichever we are going to use). It is also worth saying that the circles are the tiers of our future Christmas tree.
- Glue the pencil or tube with green or brown paper.
- Now we begin to collect the tree. We string all the tiers on a pencil.
- We decorate the top of the Christmas tree beautiful bead or a star. You can decorate the tree, if you wish, with sparkles

How to make a Christmas tree out of paper (method 2)
You will need green paper, scissors, pencil, glue, compasses, ruler, needle, wire.
On green paper, draw a circle with a compass, the size of the lower tier of the future Christmas tree. Next, draw another circle inside the first circle, stepping back a little from the first more than a half radius.
- Using a ruler, divide the circle into 12 sectors.
- Along the lines of cases, an incision to the inner (second) circle.
- We fold each sector into a cone, which we fix with glue.
- Similarly, we create the rest of the blanks, gradually reducing their size.
- We make a hole in the center of each workpiece with a needle.
- We turn the bottom of the wire into a spiral.
- We collect all the tiers of our tree for wire. We fix a cone made of paper on top.

How to make a Christmas tree out of paper with your own hands using the quilling technique (3 way)
Need: green paper strips 5 mm wide and four stripes 1 cm each, red and yellow stripes 3-5 mm wide, toothpicks, glue (instant and PVA).

- We use four green strips having a length of 30, 20, 15 and 10 cm. Using a toothpick, we twist them. Remove the part from the toothpick and let it bloom a little. We fix the end of the strip with PVA glue. We give all the spirals a drop shape by holding and slightly pulling one of the ends of the spiral up.
- We wind wide green stripes tightly on a toothpick and glue the tip to them, without giving it the opportunity to bloom. This will constitute our tree trunk.
- For the top of the tree, we make a drop from a green strip with a length of 30 cm.
- We now begin to collect the Christmas tree, securing its elements with instant glue. We glue the details of the barrel and give the glue time to dry.
- We insert a toothpick inside the trunk and glue our droplets-twigs. We start glueing with the smallest ones, which we glue to the top of the tree.
- We make toys from yellow and pink stripes by twisting the paper without using a toothpick. You can fasten the ends until the paper is unwound, or you can make the toys a little looser and shape them into small droplets. Glue the balls to the branches you like.
- We glue the drop at the very top (do not forget about it), and the decoration on it.
- You can make a stand, if desired. To do this, you will need to make nine curls from white paper strips. Glue the curls tightly together. Now we fix the tree on a snowy white stand with glue.
How to make a Christmas tree out of paper with your own hands (4 way)
You will need: green cardboard, glue, scissors, scotch tape, colored paints, pencils, felt-tip pens. Stickers, sequins, etc. can be used as additional decorations.
- Bend a sheet of cardboard in half and cut it along the fold line.

- Fold the parts in half again.
- Draw a half of the tree on one of the cardboard halves opposite the fold (see picture).

- Fold the sheets together and cut with scissors along the drawn line. As a result, you will end up with two trees of the same size.
- Subtly mark the middle of each tree using a ruler.
- Make an incision in one tree from the top to the middle, and on the other from the bottom (base) to the middle.

- Insert the trees into the cuts so that you end up with one voluminous tree.
- To give the tree more stability, use scotch tape - use it to glue the lower and upper halves.

- Use pencils, markers, glitter, and other materials to decorate the tree. You can use a hole punch to make small multi-colored circles, which are then glued to the Christmas tree. An asterisk can be glued to the top of the head with tape.

How to make a Christmas tree out of paper (5 way)
You will need: colored cardboard, glue, scissors, a hole punch, a small stick with a diameter approximately equal to the diameter of the holes that are obtained from a hole punch, ornaments to taste. 
Take cardboard rectangular, folds several times as shown in the picture above, and then pierces in the center with a hole punch. Then this cardboard is cut at an angle so that the craft does not end up looking like a Christmas tree (see picture). We drag our stick into the hole, and if it does not hold firmly, then it can be fixed with glue. Decorating the Christmas tree. Decorations can be attached with glue. Such a Christmas tree can be put somewhere (if you make a basis for it), or you can hang it somewhere. 
How to make an origami Christmas tree (method 6)
The material for such a tree will be one large magazine or several small magazines. If the magazine has a hard cover, you can simply remove it.
For each page, do the following procedure:
- Beginning at the top-right corner, fold the page to a 45-degree angle.
- Bend the sheet diagonally in half again.
- The corner that goes beyond the boundaries of the magazine at the bottom must be tucked up.
- We also do with the rest of the pages this procedure and in the end we get a beautiful origami tree.


How to make a Christmas tree out of paper using the origami technique (method 7)
First you need to do triangular modules, from which the herringbone will begin to fold. It's easy to make them. You just need to know how to do them and be careful when creating them.

Modular craft
1. Add the module
2. We collect twigs
3. We begin to collect the Christmas tree
How to make a Christmas tree out of corrugated paper (method 8)


How to make a Christmas tree from paper strips with your own hands (9 method)

You will need:
- colored cardboard or green colored / wrapping paper
- tape (in this example its width is 6 mm and length is 25 cm)
- thin brush
- 1 bead bright color(in this example, golden)
- several beads of a different color (in this example, 12 brown beads)
- scissors
- ruler
- pencil
1. Draw and cut strips 4 cm wide and 8, 10, 12, 14, 16 and 18 cm long from colored cardboard.


2. Use the tip of scissors or a needle to make 3 holes in each strip: 1 on the right, 1 on the left, and 1 in the middle.


3. Take a thin brush and make a small loop at one end.


4. Start threading a thin brush through all the holes in the paper strips. Start with the longest strip and add the next one in descending order. Add 2 beads between each strip.
5. When all the paper strips are used, add 1 bright bead to the top of the tree.


6. At the end of the brush, make a loop to hang the craft. Cut off the excess part of the brush.
7. Pass the ribbon through the loop and tie the ends into a knot.

How to make a Christmas tree out of colored paper (10 way)
You will need:
- thick cardboard or fiberboard
- skewer
- PVA glue, super glue or hot glue
- colored cardboard (possible with patterns and ornaments)
1. Cut a rectangle out of cardboard, which should be slightly more basics future tree.
2. Stick the skewer into the cardboard and secure it with glue.


3. Cut a few circles out of colored cardboard different sizes and colors, 3 circles in each group. Make a small hole in the center of each circle.
4. Add a drop of glue to each hole and start stringing circles around the skewer, starting with the largest ones. The distance between the circles can be up to 1 cm.
5. Cut a star out of cardboard and glue it to the top of the tree.

How to make a beautiful Christmas tree out of paper with roses for the new year (11 way)


You will need:
- old newspaper or unnecessary book
- cone
- PVA glue
- scissors
- beads (optional)
1. Make a cone out of paper and make a lot of roses - a few large ones for the base of the cone, medium ones for the central part, and small ones for the top part.
* If you purchased a foam cone, then you need to glue it over with pieces of newspaper (see image).
To make roses (of any color), follow these simple instructions:

- Cut out 10x10 cm squares from thick paper.
- Draw spirals on the squares.
- Cut a circular strip along the marked spirals.
- Roll paper spirals from outer edge to the inner.
- Wrap the pink bud more tightly and fasten the tip with glue.


2. Begin glueing the paper roses to the cone, starting at the bottom of the cone and working your way up to the crown.

3. If you wish, you can glue 1 bead in the center of the roses - this way, you can decorate all the roses or only some.

4. You can add one more decoration to the crown - it can be a piece of tinsel, a bell or an asterisk.
* If you want to know how to make an asterisk, go.
How to make a Christmas tree out of paper (12th method)
You will need:
— colored paper, colored cardboard, old music book or unnecessary book
- PVA glue
- curly scissors and simple scissors
- thick cardboard
- skewer
- glue brush (optional)
- decorations (sequins, bows, beads, buttons, stars).
1. From cardboard, cut out a platform for the future tree.
2. Insert the skewer into the cardboard platform and secure with adhesive.
3. Start cutting squares out of the paper. It will be more beautiful if you cut with curly scissors (they can be found in stationery).
* You need to cut 9-10 squares - first 9 squares with a side of 20 cm, then 9 with a side of 18 cm, and so on, reducing each group of squares by 2 cm.
* Choose the total number of squares yourself. You can also choose the size of the squares yourself - if your tree is tall, you can reduce the size next group squares by more than 2 cm, and if it is short, then less - 1-0.5 cm.
4. Cut a few small squares out of the cardboard, which will be between the colored paper squares.
5. Start stringing 3-4 squares of colored paper, between which there will be a small cardboard square.
* If you use 3 squares between the cardboard pieces, then it is most convenient to cut out 9 squares of each size.
* You can attach the squares to the skewer with glue.
6. To decorate the tree, you can gently brush some glue onto the ends of the squares and then gently sprinkle glitter on them.
7. On the top of your head you can glue a button with a bow or something else - an asterisk or a bead, for example.
How to make an original Christmas tree from colored Japanese paper with your own hands (13 method)
You will need:
- colored cardboard
- thick paper with a pattern (can be replaced with colored cardboard)
- colored or brown paper (you can use a page from an old magazine)
— White list A4 paper
- 2 skewers
- pencil and ruler
- PVA glue or glue stick
- scissors
- darning needle (if necessary).
1. Cut 14 rectangles of 2 of the same size from colored cardboard. In this example, 2 rectangles are 21 x 28 cm, two more are 18 x 28 cm, then (also 2 each): 16 x 28 cm, 13.5 x 26 cm, 12 x 26 cm, 9 x 25 cm, and 6 x 22 cm.
2. Preparing the base for the Christmas tree:
Cut plain A4 paper into strips 2 cm wide. Roll the strip into a circle, add a little glue at its end and glue the next strip (see image). Repeat the same action until you have glued all the strips into one big circle with a diameter of 3.5 cm.
* The larger the circle, the more stable the tree will stand.
3. Take a large rectangle made of colored cardboard and start folding it like an accordion, 1.5 cm wide. Cut the ends of the accordion in a rounded shape.
4. Fold the accordion in half and glue the sides - you have a semicircle.
5. Repeat the same with the second rectangle, then glue the two semicircles to form a circle - these will be the branches of the lower level of the tree.
* To secure the halves of one circle, you can thread a thin wire through them and twist its ends from the back.
6. Make similar images for 6 more levels of your tree.
7. Take a color or wrapping paper and cut off several small rectangles from it, about 2 cm wide, with which you will later cover the skewers.
The skewers will play the role of the tree trunk.
8. Pass the skewers through one large circle. Since you need to leave gaps of about 2 cm between the circles, these gaps need to be hidden, so we will wrap them in small rectangles made of colored paper.
9. After each circle, wrap the skewers with 2 cm wide colored paper and glue the ends together. Continue repeating this step until all the branches of the tree are on the skewers.
10. It remains to insert the skewers into the round base (see point 2) and fix them with glue.
* You can decorate the top of the tree to your liking - a paper star, bead or button.
See also other videos on how to make a Christmas tree out of paper:
Now you know about many ways to create a Christmas tree out of paper. Happy crafts!
For christmas decoration shelves, cabinets, consoles, dining, work or coffee tables are perfect for small decorative Christmas trees. Such a tabletop Christmas tree is easy to make with your own hands. In fact, it is a decorative topiary popular today. self made... We bring to your attention three master classes on making completely different Christmas trees-topiary: from cones, paper and exotic material - raffia fiber.
How to make a Christmas tree with your own hands?
Master class 1. A small Christmas tree made of cones with your own hands
The peculiarity of this tree is its economy and extravagance. We use natural materials that are available to everyone. A a small amount of tinsel and Christmas toys give the tree a festive elegance.
Pine cones should be harvested in the summer. This has come with experience. Once, before the New Year, I decided to make such a Christmas tree and with difficulty collected the required number of cones in the forest. Since then, going out in the mornings for a run, I have been picking up beautiful, even bumps in my pockets. Returning home, I put them in a box. Now, on the eve of the New Year, I have a sufficient amount of material. But if you wish, you can collect cones at any time of the year - they just, most likely, will not be so beautiful.
- Pine cones
- Whatman or A3 paperboard
- plastic pot
- scissors
- Christmas tinsel in blue and silver
- glue gun
- several sticks of glue for the gun
- brown acrylic paint
- paint brush
- a piece of fabric for pot decor
- Christmas balls in blue and silver
- small silver beads on a string

Progress
We make a cone from whatman paper.

From above, we begin to paint over the cone.
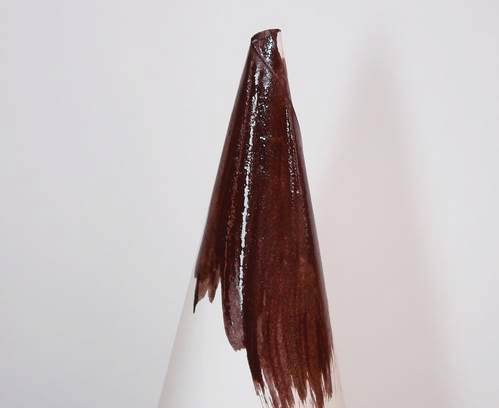
Paint over the cone completely.

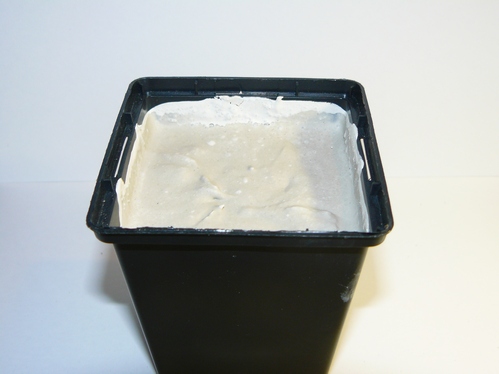
You need to wait a little for the acrylic paint to dry. At this time, we make the pot heavier by filling it with plaster.
After the gypsum has completely hardened, we glue the pot with a cloth.

Glue the cone to the pot.

We begin to glue the pine cones from the bottom of the cone. It is precisely the cones that are very convenient to glue with a glue gun.
The glue gun is powered by an outlet - a stick of glue is inserted into it, and the gun melts the glue. The glue at the exit is very hot, we drip it a little on the cone and glue it to the cone. The glue hardens instantly. There is no need to wait long, and the bumps do not slip anywhere in the process. This is what attracts me to the glue gun.

Glue the cones as tightly as possible to each other.

This is already a Christmas tree. As for me, very “fluffy”.

We decorate a Christmas tree made of cones with New Year's tinsel.

Then we glue Christmas decorations and decorate with beads on a string.

Our cone table tree is ready!


Master class 2. DIY raffia Christmas tree
I'll tell you a little, what is raffia and where to buy it... Because for many, and especially for those who are not involved in needlework, such a question will definitely arise. Raffia is a palm plant. She has enough big leaves, which are cut and separated into fibers. To keep the raffia flexible, it is wrapped around the grass during drying. When the raffia dries, it has a pleasant creamy color.
Raffia is used by florists to decorate bouquets and compositions. Raffia fibers are quite flexible and soft. It is often used instead of ribbons. Raffia can be bought at any florist store or ordered from an online florist store. Since it is painted in different colors, it will not be difficult to choose the shade that suits you.
So let's get started. For work we need:
- raffia (I used bright green)
- Whatman A4 or cardboard
- scissors
- stapler with staples
- glue gun and glue stick (can be replaced with Moment Crystal glue, Titanium silicone glue or regular Superglue)
- long skewers
- disposable cup 50g
- plaster of paris
- wire
- scraps of napkins or old newspapers (to fill the cone)
- red table napkin
- decorative santa claus
- red christmas balls
- beads red
- red pine cone
- small green decorative gift
The last six elements can be replaced at your discretion with similar ones.

Progress
Cut out a cone from whatman paper and a plug to the bottom of the cone. We fix the cone with a stapler.

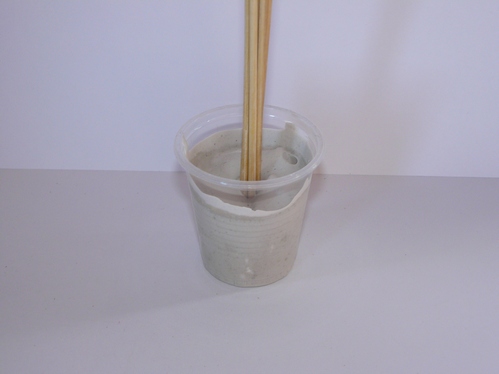
We dilute the plaster of paris with water to a state of thick sour cream and pour the mass into a glass, insert skewers into the plaster. There are more affordable option: An alternative to building plaster is building putty. Putty is available in almost every home.
In the center of the plug from the cone, we make a hole with scissors and put it on the skewers.

We bend one end of the wire and thread it through upper part cone.

We glue the cone blank with wire to the skewers and fill it with table napkins.

Glue the cone with the plug.
Take one raffia fiber. Glue the end to the wire and wrap the raffia around it.

When the raffia fiber runs out, secure the end with glue.

Then we take the next raffia fiber, fix the end and wrap the cone tightly.

We also wrap the plug of the cone and skewers with raffia.

We glue the pot with a table napkin.

Wrap the center of the pot with raffia.

On the top of the pot we glue a decorative gift and a pine cone.

We glue the decorative Santa Claus onto the raffia.

Now we decorate our Christmas tree with balls and beads.

That's it, the Christmas tree is ready with your own hands!


Master class 3. Table Christmas tree made of paper (from paper napkins)
Hooray, we know the cheapest and very original way making a Christmas tree with your own hands! To do this, you do not need to bother yourself too much. It is enough to come to any supermarket and stop at the stand with napkins. You yourself can choose what color your future Christmas tree will be. Maybe even the most unexpected! Why not? By the way, can be used like multicolored napkins, and monophonic - this is at your discretion.
So, we have decided on the color, we are buying napkins. Now the only thing left to do is to figure out how to decorate the Christmas tree. First, we remember what items we can find at home: from boring jewelry with beads to bright buttons. By the way, plain buttons can be coated with any nail polish. Some of the decor can be found in the store. Let's go home, pour hot tea or a glass of champagne to feel good New Year spirit, and get to work.
Preparing source materials. For work we need:
- table napkins that you bought or just took out of the kitchen cabinet (I used soft pink and white napkins)
- scissors
- decorations that you found for decorating the Christmas tree (I had a small Christmas tree garland silver)
- cardboard or whatman paper
- skewers, or a simple pencil, or a twig from a tree
- glue gun and glue stick (can be replaced with any glue available at home)
- stapler with staples
- disposable cup or something similar
- putty (if you didn't have it at home, you can replace it with a mixture of any cereal with PVA glue)
- simple pencil
- pattern in the form of a small circle (about 3-3.5 cm in diameter)
- satin ribbon (I have a pale pink color)

We transfer the circle pattern to the napkin, redraw the circles, how many will fit on the napkin.

We fasten the center of the circles with a stapler.

Cut out circles from napkins with scissors.

We lift the first layer of the napkin up, pinching it with our fingers at the staple.

We do the same separately with each layer of the napkin.

Gently straighten - it turns out a rose.

We repeat these actions with each of the circles. For a Christmas tree with a Whatman A4 size, you will need about 60 roses.

We fix the skewers in the cup with a putty.

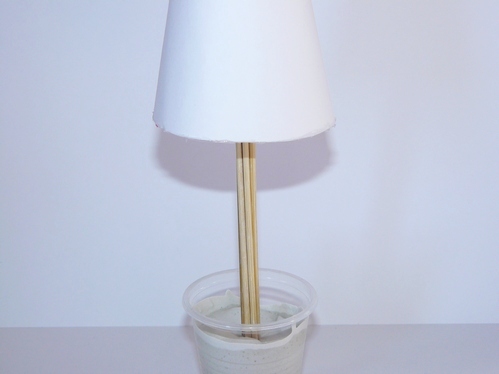
We create a cone from whatman paper or cardboard and cut out the bottom to it.

We install our "Christmas tree" on the skewers.

We begin to decorate the Christmas tree with roses from napkins from top to bottom, planting them on glue.

We glue the roses tightly to each other.

Since I have a two-color Christmas tree, I leave the bottom row for roses of a different color.

We glue in one row.

We glue the skewers with a satin ribbon. We cover the glass with a white napkin.

We tie the pot with a ribbon. We glue the roses.

We decorate the Christmas tree with beads.

That's all, our paper Christmas tree is ready!
This time I had a vanilla-marshmallow mood, which is why the Christmas tree turned out to be just as tender.

How to make New Year's with your own hands: voluminous, in the style of origami, from corrugated paper and cardboard, as well as stencils and diagrams for this craft on, read in our material.
Every day the New Year is getting closer and closer! Many have already begun preparations for this holiday: they are preparing to buy a Christmas tree, choosing and looking after outfits, deciding how to decorate the apartment, where and with whom they will celebrate, what they will give their relatives.
Today we propose to decorate the table and make colored paper crafts for the New Year. You can make wonderful paper trees. And in creating these, of course, children will help you!
Christmas tree made of paper
Origami Christmas tree: in order to do this, you will need a square sheet of colored paper, scissors and a diagram. Fold a sheet of paper as shown in the diagram, make cuts, wrap the corners and that's it, christmas tree made of paper is ready.


.jpg)

Christmas tree made of paper: crafts for the New Year
A simple New Year's craft that even children can handle. We print out the scheme of the Christmas tree, fold the sheet with the pattern in half, cut out the Christmas tree and make cuts from the center to the periphery.


Christmas craft: Christmas tree made of colored paper
An openwork Christmas tree made of paper will be great. It is very simple to make it. You will need a tree diagram, two sheets of paper, a stationery knife, and a needle and thread. First, print the template paper tree in duplicate, cut out the patterns with an end knife, then fold both trees together and sew them in the center from top to bottom. Then straighten the tree you have made.

 - image # 1 ">
Christmas tree made of paper: a simple craft
To do this New Year's craft, which can be used as a decoration on a Christmas tree, you will need cut paper circles of different diameters, a thread with a needle and a bead. Cut four circles from paper of different diameters (the difference will vary depending on the size of the tree), fold them as shown in the diagram. String all the details on a needle and thread one by one: from larger to smaller. Attach a bead on top of the paper tree.


Craft: corrugated paper tree
First, for a Christmas tree from corrugated paper, you need to make a cone out of cardboard. Then cut the corrugated paper ribbons and bend one end of the ribbon as shown in the diagram. Then place the tape around the cardboard cone from bottom to top with double-sided tape or glue.

Herringbone made of paper: scheme
In order to make such a Christmas tree with your own hands, you first need to cut circles from paper of different diameters. Then bend them as shown in the diagram. Bent parts - string on a wooden stick and fix with a glue gun.

Paper herringbone: master class
First, roll up a cardboard or Whatman paper cone and decide what parts you want to use to decorate your paper tree. These can be stars, circles, petals. Then cut these parts into enough and stick with a glue gun from top to bottom, as shown in the photo.


Volumetric Christmas tree made of paper for the New Year
To make a voluminous Christmas tree out of paper, print out a template. Then cut out the parts, fold the ends as shown in the diagram, and then place all the parts on the dense wire base: from larger to smaller.


Christmas tree made of paper and cardboard
This is a very simple master class. Even the smallest of children can make such a Christmas tree with their own hands. First, cut out a triangle from cardboard. Glue the child's stick to it with glue or tape. Cut strips out of colored paper and glue them on front side our future Christmas tree. When the glue dries a little, cut off the excess along the contour of the cardboard triangle.

How to make a Christmas tree out of paper: video
Now you have diagrams and templates on how to make Christmas trees for the New Year with your own hands from colored and corrugated paper, cardboard and whatman paper. With these paper trees you can decorate not only an apartment, but also a kindergarten or classroom school. And also use them as New Year's crafts for children.
Good day, friends!
Soon, soon the New Year!
He's in a hurry, he's coming!
Knock on the door to us:
"Hello, children, I'm here!"
We celebrate the holiday
We decorate the Christmas tree
We hang toys
Balls, crackers ...
This is how I decided to start today's article in an unusual way. Which will be dedicated to making at home. After all, we all traditionally love to give them on New Year's Eve. Namely, I propose to make a Christmas tree from what you have at hand. It can be anything, for example, paper, cotton pads, dry twigs, etc. After all, we all dream of surprising our loved ones with something special and unique. Therefore, if you are still thinking about what to give mom, dad, etc. then you have a ready-made solution).
Of course, in every house on New Year's days there is a brightly decorated living "forest beauty" that flickers and blinks with multi-colored lights. I propose to make a "little girlfriend" so that she is not bored. And behind one, your decor in the rooms will be transformed, or perhaps you will place it on the festive table.
Moreover, this creative work will deliver the mass positive emotions, and will delight children. Moreover, winter evenings long, and you can afford to create something beautiful and green).
Although not necessarily that particular color, white is also in vogue. There will be a tree as if in snow or frost.
Perhaps I'll start with the most grandiose and magical tree in my opinion. I propose to look and study this instruction in order to create such a funny and cheerful beauty for yourself or for someone else as a souvenir. The work is made of sisal, who does not know this coarse fiber one tropical plant.
On a note. A feature of this craft is the presence of funny legs instead of a stand. And if you remove them, you get a topiary, which can be made of any material, for example coffee beans or thread.
Well, take action by looking at these pictures and detailed description.

We need:
- sisal green - 25 g
- cases from kinder surprise
- thermal gun
- Styrofoam
- wire
- green pencil - 2 pcs.
- colored paper
- threads are green
- decorative braid
- any decorations, for example balls, beads, etc.
- cardboard
Stages:
1. Take the case from the kinder and cut the flap. For a small part, cut off a piece on one side with a semi-oval, so that you can glue it later.

2. Using a glue gun, glue the two pieces together. Here's a boot, top-top.

3. There should be two identical shoes. Punch a hole in the largest bottle opener. Guess what it is for?

4. Now let's decorate the shoes. To do this, take a red sheet and cut out two strips 19 cm long and 2 cm wide.

5. Glue on the longest strip by wrapping it around the shoe and shaping it to the desired shape.

6. Then glue decorative tape around the entire diameter of the sole for a beautiful look.

7. Then take your pencils.
8. Poke them into the prepared holes and drip a little glue to hold them tight. The legs are almost ready.

9. It remains to decorate them with tinsel, do as shown in this photo below.


11. This is what should come out. What does it remind you of already?

12. Now take the wire and insert it into the tip of the cone. Wrap it with sisal too and tie it with a thread.

13. The next step, we will make a skirt for the trample. To do this, you need to make pounds. Make rectangles of the fabric 10 cm x 9 cm in size, their number should be from 60-80 pieces. depending on the splendor of the skirt.

14. Then start gluing with a thermal gun. In this sequence. Fold the rectangle in half, but along an oblique line. Fix with glue.


16. Then lift the right edge and glue.

17. Funtik is ready. True funny name, even slightly funny.

18. Then start assembling the Christmas tree. Glue the blanks in a circle.

19. To get a skirt later.

20. Insert the legs into the base.

21. Then connect your imagination and create, glue on various kinds of decorations.

22. Glue a bow with beads on the top of the spruce, wrap the craft.

23. Here, snowflakes and rhinestones will be more appropriate. Place the resulting masterpiece on the stand. Good luck.

How to make a voluminous Christmas tree out of paper at home
I think that many have ever thought about this question. Indeed, often in schools and kindergartens, they give assignments in this topic. I propose to make, for example, a silhouette Christmas tree. To do this, take this sample and print it on office colored sheets.

Then cut out with a clerical knife and glue the blanks together. Use special clamps for this.

You can do whole forest such coniferous multi-colored beauties.

The next job will be done in 5 minutes. Don't believe me? It couldn't be easier, you need circles made of colored double-sided paper and a pencil on a stand. The diameter of the workpieces, you see below:

1. Fold the circle in half with your hands, like this to make a semicircle.
Do just that! Carefully iron the fold with your hands.

2. Now fold the semicircle in half again.


4. And in the same way twice.

6. And here's what happens. Gently cut the ends of each workpiece with scissors.

7. Begin assembling the product. Put all the blanks on a stick. From the largest circle to the smallest.


8. The only thing missing is a star or Santa Claus.

For you, I specially found such a video, so that if you need it, you can, in addition to everything, roll your grandfather out of paper. A new note will be released soon, in which you will find many works with this hero, but for now, watch the plot.
For those who found the first option rather easy and simple, you can take and fold the origami-style Christmas tree, see the instructions and description below in this film.
Christmas tree made of beads for beginners (diagram inside)
The next creation of nature, wow and cool and at the same time immediately elegant. And such a souvenir will last not a single decade. This is a spruce made of beads. I thought that such a tree could not be made by myself. But as it turned out, I was wrong. I am sure you will cope with such a job with a bang.

We need:
- green beads - 7 shades
- white beads or transparent
- plate from under the planter
- acrylic paint: white and brown
- wire 0.4 mm
- PVA glue
- ruler
- rod 4 mm and 2 cm long
- tape tape
- alabaster

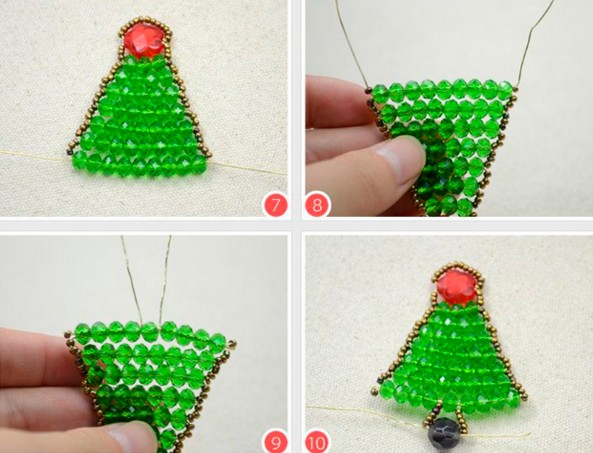
1. Place the beads in a cup, mix all the colors. Put the balls on the wire in different color order and measure with a ruler 2.5 cm.At the same time, leave the edge in the region of 5-7 cm without beads.

2. Make a loop in four circular turns.

3. From the loop, retreat 2 cm of wire, free and without beads, and again count 2.5 cm and make a loop.

4. For the smallest branch, wind 7 loops in this way. Then find the middle and fold in half and twist the elements together.


5. Thus, you should get this number of branches.


7. Now take a core and wind the tape tape, and then to it 4 branches, which have 7 loops. The first one is in the center, and the rest lay out below in a circle, twist the stick and wrap it with tape.

6. Next, take 6 branches of 9 stitches each. Tie them in a circle in two tiers of three branches, wrap in a circle. Then step back about 7 mm and take 5 branches of 11 loops and wind them into one tier.

7. Step back 7 mm again and wind 6 branches of 11 stitches each and divide them again into two tiers. Etc. The final stage - 5 branches of 7 loops.
Rewind the remaining barrel with brown tape. Spread the branches to make the tree lush.

8. Fold the table to 90 degrees and place in a planter cup. Pour the alabaster solution into it and let dry.

9. Wait until the tree grasps, you can also plant any symbol of the New Year. For example, a pig or a rat.
From PVA glue and alabaster, move a thick solution, dip a kitchen napkin and glue to the trunk. To get a natural look.

10. After complete hardening, start painting, but first remove the product from the cup. Color the trunk brown paint, and the site is white.

11. Decorate with large toy beads or something else.

Now a few more instructions that I found on the Internet.


But this model is somewhat similar to the first, suddenly someone will like this more.


And here's another look, how lovely.

Well, in conclusion, I would like to show one more example of a flat spruce, which you can use as a pendant or keychain.


Kanzashi style herringbone from satin ribbon
Well that friends now have gotten to one more smart option which looks pretty bright and smart. A green beauty turns out to be beautiful and lush. But, first, you must master the kanzashi technique, for this you need to learn how to make special blanks in the form of triangles. Take a look at the diagram, if it is not clear, you will find more detailed master class for the manufacture of such things.
You have to take a green satin ribbon, cut it into 5 cm x 5 cm pieces and repeat all these steps.

Or consider this tip.

Thus you will need:
- a cone made of thick paper or cardboard
- satin tape
- star
- scissors
- wire
- candle
- thermal gun

Stages:
1. Prepare everything you need for work. Put the gun on warm-up.

2. Carefully and slowly glue fabric blanks to the surface of the green cone in a circle and in a spiral.

3. Try to place all triangles fairly close to each other. After the product is ready, take a star or any bow and glue it to the wire.

4. Place the decoration on the top of the spruce. Decorate a souvenir with beads, they will act as a garland.

I met a more simplified version of the craft in this film, perhaps you will also like it and you and your children will master this technique. Good luck!
Spruce from cotton pads: a craft for kindergarten children
Now let's get acquainted with a rather simple craft that you can easily do with your child at home or in kindergarten in class. This option is so easy that it will work for any junior group or older.
For creativity, you will need to decorate cotton pads with green gouache. Let them dry completely. Then roll into such a petal, fix with glue.

Since the Christmas tree is usually made for the New Year, let's glue drifts on a sheet of blue background first of all from the disks. And then place and glue in the desired sequence green blanks in descending order.
You can also dream up and build a snowman or other character. Unleash your imagination and a souvenir or a postcard will be ready.


It is with such triangular blanks that you can build other options.


The next option, for which you need the materials that you see in this picture. Make a bag out of cardboard, glue the parts with double-sided tape, and the bottom so that it is even.

And then dilute the blue gouache in some water and dip in it cotton swab... Draw dots along the contour of the discs.

Then glue the round pieces onto the cone, layering one on top of the other.

Then decorate the craft to your taste. The winter beauty is ready. How do you like the idea? The truth is super-duper and fast and cool!

You can still go the other way, fold each disc in half three times, and fasten it with a stapler. Then glue such triangles on white cone... And then decorate the Christmas tree with beads and a star.

And you can still go the other way, fulfill voluminous craft by cutting cotton pad into four equal parts. See it all for yourself below:

The youngest helpers can be asked to do this kind of work.

Forest beauty made of fir and pine cones
Of course not one New Year's celebration not without tangerines and, of course, cones. So why not use that too. After all, such natural material easy to pick up in the forest or park, and then sit down and craft.
We need:
- gun
- scissors
- cardboard
- bumps
- balloon varnish

Stages:
1. Make a cone from a sheet of A4 paper, glue the ends. Let me remind you how to do this. Draw a circle, and then cut it in half, grease the walls with glue and let dry.


2. After start assembling the product, glue the cones to the workpiece in a spiral. So until the product takes on a finished look.


3. Cover shiny varnish for durability.

4. Cut a sprocket out of a shiny cover or any other material.

5. Decorate the top with it.

You can go another way and make such a forest charm from the husk. Also glue the cone out of paper.

And it is on it with a glue gun that you glue the particles in a spiral one after another.

For completeness, decorate with beads or other decorations that are inherent in this holiday. For example tinsel and stars.

Christmas tree made of sweets (step-by-step instructions)
Do you like sweets? Oh, and I just love them. I propose to lay out the symbol of the New Year from them, and take a bottle of champagne as the base.
1. Glue the green fluffy tinsel on the champagne in a spiral using a glue gun.

2. As soon as the first row of tinsel is glued, glue the candy wrappers (tips) at one distance.

3. And then add something else, like a bow.

4. Well, how do you like this wonderful idea? Cool, bravo to the author! It's not a shame to go to visit with such a souvenir).

DIY sisal tree
The preparations for the New Year are in full swing, so let's do something fun with a material like coarse fiber. Now they often began to use it due to the fact that it is not very expensive, but everyone wants to create from it.
We need:
- sisal fiber green and white
- filler
- bamboo stick
- plastic cup
- cardboard
- satin tape
- scissors
- decor elements: bows
1. From a piece of cardboard, fold the cone and glue. Put the filler in it and insert the stick. The stick will need to be decorated satin ribbon... Secure the ends of the tape with glue.

2. Put some filler into the cup, and put something heavy on the bottom, such as coins. Use corrugated paper or other material to arrange the glass, it will act as a stand. You can also put a piece of foam rubber on top, for strength, and make a hole in it for a stick.
Insert the prepared cone on a stick into the stand.

3. Roll the sisal into balls by hand.

4. Glue them to the workpiece in different combinations, I mean color. Alternate as you see fit.

5. Now dress up the beauty and sprinkle a little with shiny varnish. It remains to admire or give this masterpiece to someone.

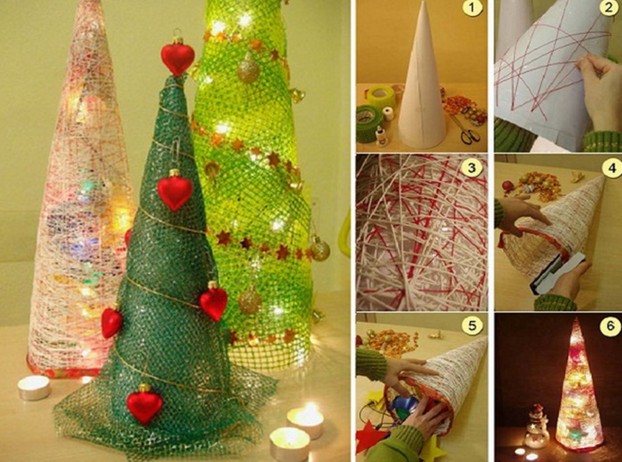
Video on how to make a decorative Christmas tree from threads and PVA glue
And one more little beauty that will fit very coolly into any interior or become great gift that a miracle of thread. Watch this story and follow all the steps for the author.
The next option, I decided to prescribe for you, please read.
We need:
- PVA glue
- threads
- foil tape
- disposable cup
- cardboard or old box
- plastic bag
- battery-powered candle

Stages:
1. Form a cone out of cardboard, glue it with foil tape. Dry it. Then put on geometric shape bag, fix it even inside, otherwise it will fidget around the workpiece.

2. Place the threads in PVA glue diluted with water (50 to 50). But before that, make a hole in the glass right at the base and thread a thread through it.

3. Fill the glass with the glue solution so that the entire thread is in the glue.

4. Now start winding the thread around the cone in a spiral fashion.
Important! The thread should not be too tight, it should lie easily on the surface of the cone.

3. Thus, in the end you will receive new souvenir, cut the thread. Leave to dry.

4. After drying, remove the tree from the workpiece, the PVA will dry and become transparent.

5. Decorate the present with sequins and then turn on the battery-powered candle and put it in the very base.

6. The herringbone will flicker and will act as a mini-lamp or garland.

Craft for the competition to the school "Christmas tree made of tinsel for the New Year 2019"
Now we move on and execute the symbol next year using the usual tinsel. All the same, such material is also an irreplaceable attribute. Do you agree? In addition, it comes out really beautiful and charming. Take a look for yourself.
We need:
- tinsel of different colors
- cardboard - 2 pcs.
- cup or pot
- foil sleeve
- glue gun and PVA glue
- scissors
- thread with a needle
- wire
- any decorations, lace fabric, bell, balls, etc

1. From cardboard make a cone, take it green.

2. Then, from another sheet, cut out a circle that is 1.5-2 cm larger than the diameter of the geometric figure.

3. Then make these slots on it.

4. On a round workpiece, trace around the middle of the bushing so that a suitable hole can be cut.

5. Glue the circle with the cone. Here's what you end up with.

6.Wrap the sleeve decorative ribbon and insert it into a plaster of paris glass.

7. Make a skirt out of lace, collect with a needle and thread to make it airy and fluffy.

8. Glue in two tiers to the green blank. Cut the tip at the cone and insert the wire with the bell into it.

9. Now take a glue gun and use it to fix the tinsel in a spiral.

10. Then glue balls and other decorations such as beads. Your magic miracle is ready. Be healthy!

Video master class on making a New Year tree from foamiran
If you want something unusual, then I am glad to present you one more green joy. It will be needle-like, and the material will be foamiran. It is quite unpretentious, it is easy to work with it and the main advantage is that it does not crumble. So, go for it.
Do not forget to use for decoration artificial snow that will give ate well, unprecedented beauty and brightness.
Vintage corrugated paper herringbone
Now, one more craft that you can also take and perform at the exhibition in kindergarten or school. The technique of execution will be facing. Are you familiar with this method? Hope very good. And if not, then you will find out now. For work you will need corrugated paper, PVA glue, scissors, and a cardboard cone. And of course a good mood.
1. So, take a cone for work. This is what we are going to process now.

2. But, before doing this, cut squares from the corrugation: 1 cm x 1 cm, 2.5 cm x 2.5 cm, 3 cm x 3 cm, 4 cm x 4 cm, 5 cm x 5 cm, 6 cm x 6 cm.
You can replace corrugated paper with regular paper napkins.

3. Take a small square and wrap it around the stick, then dip it in the glue and glue it onto the cone.

4. In this way, fill in the entire geometric shape, move in a circle.

5. First take the smallest squares, then more and more in size.

6. You can also make a star on top of the head out of paper. Or take already ready-made version from the store.


This is such a wonderful green souvenir you should eventually get. Don't forget to decorate with any beads or rhinestones.

Creative spruce from plastic bottles
I think that in any house there is plastic bottle... Take it light green in color. The steps are quite simple, do it together with the children to take your family leisure time.
Stages:
1. Cut the center out of the bottles, and then cut it into pieces.

2. You should get these rectangles. From which branches for the Christmas tree will be made. Their sizes are as follows:
- 8.5 cm x 6 cm - 6 pcs.
- 7 cm x 6cm - 6 pcs.
- 6.5 cm x 6cm - 5 pcs.
- 6 cm x 6 cm - 5 pieces
- 5.5 cm x 6 cm - 4 pcs.
- 5 cm x 6 cm - 4 pieces
- 4.5 cm x 5 cm - 3 pcs.
- 4 cm x 5 cm - 3 pcs.
- 3 cm x 3 cm - 3 pcs.

3. Round each rectangle, bend the tip, and cut after the edge, as shown below.

4. For curliness, singe the fringe with a candle.

5. And then color the fringes acrylic paint or nail polish. Dust with glitter.

6. Thus, you should make this number of branches, and make a hole on each branch.

7. Then take the stick and stick it into lower part bottles. This will be a souvenir stand. Make the hole using a drill.

8. Well, now it remains to collect the Christmas tree, thread the twigs on the stick.

9. Looks chic and attractive.

10. Decorate with a bow and beads. Give such a masterpiece to your friends or keep yourself for New Year's table... Product height 20-25 cm. Class!

Christmas tree for the New Year 2019 from scrap materials (100 ideas)
The time for miracles has come, and therefore let's have your apartment today. Which each of you can create yourself. For example, you can use this idea and decorate the walls in any room. Such a nice craft will cheer everyone up. You can make such a drawing in the classroom and even in the hall. kindergarten... In principle, anywhere, even in the office.


Such hanging Christmas trees look elegant, and they can be made of anything, as in these pictures. It can be chopsticks or even utensils, take a look:

Or decorate the figure with any lamps or Christmas garlands.

A souvenir that contains your photos and looks great.

And also do the illumination. Wow, it takes your breath away especially in dark time days when it's already evening or night.

You can add spruce twigs or from them to do the job.


Even from ordinary magazine sheets, you can also create an elegant composition.

From ordinary leaves for notes, you can also make a craft in the form of a Christmas tree, both voluminous and on the door.

It has become fashionable now to make compositions on doors or walls. Here's an example from old books:

But even in the stores they make such wonderful decorations from the books themselves.

Again, depending on where you work, if a clothing and footwear store, then you can disguise a mannequin like this.

Apart from everything, you can also take from waste materials regular wine corks and voila, a new masterpiece.


Or use the simplest idea - draw a Christmas tree.

Or make the desired shape from the template.


Well, if you are a completely creative person, then you can even do the work from car tires or plywood.

If you work in a hospital or specialty related to medicine. Then you can lay out this way:

And from ordinary wooden dies it is also possible to create something beautiful, as shown in this picture.

You can also turn an ordinary stepladder into something very cool, take a look, what does it look like?


They even make you imagine Christmas trees made of plastic or paper pipes.


And here's another souvenir made from disposable plates.

Or lay out with fabric and modern glass beads.


Or use bows.

For those who are fond of needlework (for example, you can take foamiran or felt) or knitting:


From New Year's toys, they also lay out such cool little things that resemble a forest beauty in a suspended state.


This is where the wire was involved.

And here they made a cardboard frame.


Crafts are also made from ordinary napkins and newspapers.


Or use scrapbooking paper.

Once I even saw a gorgeous creation from egg molds.

You can also make a masterpiece from pillows.


The most original crafts you can designate these, from the bottles.


And here's another idea from jars of jelly or take any containers.

With the kids, you can easily make a plasticine Christmas tree.

By the way, you can create sweet masterpieces that are also edible. You will need waffle cones and cream.


And here is another beauty, which is made of sweets or cookies.


You can create unusual souvenirs from fruits and berries. I think that the kids will not resist such beauty and will immediately want to try on the tongue.


And here's another pasta idea.

And do not even believe they create products from disposable spoons and forks.

And here is another piece of woolen balls and buttons in the shape of a cone.


And here, look, shells were used.

This masterpiece looks rather unusual; it is made of feathers.

Or from a material such as floral mesh or sisal.
Here are a couple more ideas.


On this friends, I have everything. The post is pretty long, but I hope you found what you were looking for. Create on your own or together with the children so weird decorative Christmas trees and be happy. After all, such a souvenir always exists and will be the main attribute of the New Year.
I wish all your dreams and expectations to come true in the near future. Good luck to everyone and have a great day! Bye.