DIY paper mallow. Corrugated paper craft ideas. How to make paper flowers: making bouquets
Bouquets are not only given, they are used for interior decoration and decoration festive tables... Often for the design of different celebrations required a large number of flowers. You can create inexpensive and beautiful flowers from corrugated paper do it yourself. This decor does not fade over time and can be stored for a long time.
Read in the article
Advantages and properties of corrugated paper
For execution original jewelry corrugated paper is used, which has certain advantages:
- this material is available and offered in stores;
- such material is packed in rolls, which makes it possible to store it for a long time;
- it is easy to use, to create a composition you only need glue and scissors;
- blanks are interchangeable, parts are easy to connect and prepare again;
- the material is distinguished by a variety of textures and shades.
How to make beautiful flowers from corrugated paper with your own hands
Do-it-yourself corrugated paper flowers are quite simple to assemble. In this case, different manufacturing methods are used. Various blanks from cut paper strips are used. There are special instructions to help you create original compositions.

Stages of creating a rose with your own hands from corrugated paper: step by step
Roses from of this material are carried out different ways... This produces a variety of compositions or simple flowers that are placed in a vase.
To make a flower from corrugated paper, you need to prepare the paper you need color palette, pieces of wire, scissors, sheets of cardboard, pencil and special glue. Step-by-step process painted in the table:
| Image | Step by step process |
 | Separate petals are drawn on the cardboard, which should be of different sizes. Using different flower will look better. |
 | The material is folded in the form of an accordion. Petals are cut out from the attached blanks. Rose leaves are also made. In the blanks, a small indentation is made with your fingers for the bud. |
 | Separate segments are cut from the wire. In this case, one end is bent with pliers for the core of the bud. Then the middle of the wire is wrapped in a petal small size... The lower part is glued to the stem blank. |
 | A bud is gradually formed. In this case, the petals are glued from small sizes to large ones. |
 | Use a ribbon, corrugated strip or green thread to wrap the base of the bud. Then the stem is wrapped and harvested leaves are glued from it. Finally, the material is fixed with glue. |
 | The petals and leaves are spread. |
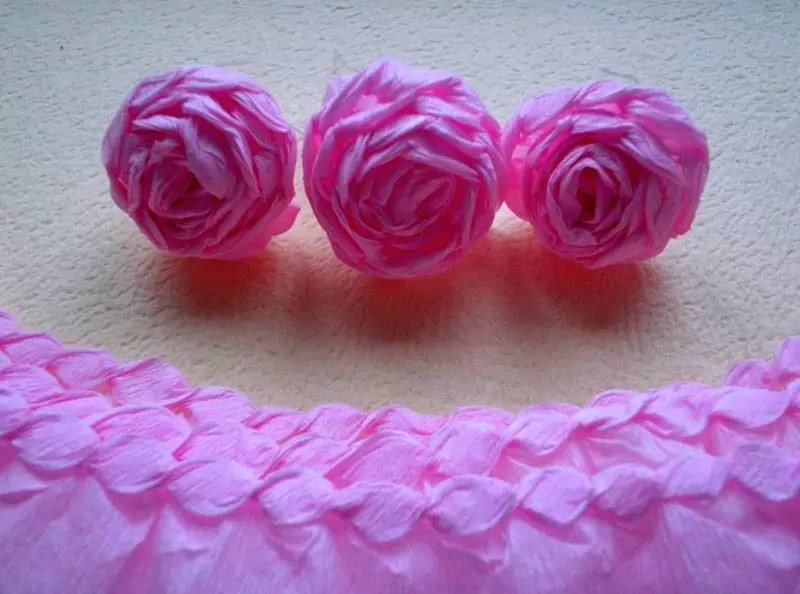
Several colors are made, which are set in a vase or in a variety of wicker baskets. If only buds are needed for decoration, then the stem part is cut off.
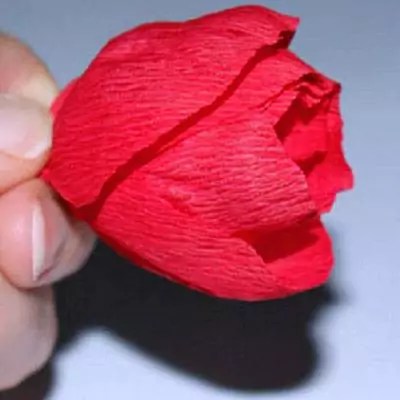
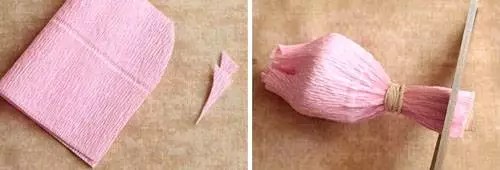
You can make a rose in another way, in which the product is completed in a few minutes. It is necessary to cut a long strip of corrugated paper. Its width should be 8-10 cm. One edge is processed like a pie edging. The edges of the strip are pinched with fingers along the entire length. Then the strip is rolled into a bud, and the edge is glued to the made product. The made bud is wrapped in a green thread. The finished elements are pushed onto a wire workpiece. At the same time, a whole bouquet is made in one and a half to two hours.
Related article:
The correct application of this technology, described in the article, will come in handy for creating with my own hands products with unique aesthetic and functional characteristics.
An interesting option is to create a topiary from corrugated paper with your own hands. This design can be made from scrap materials in a couple of hours. They are made for decorating interiors and for decorating banquets.
Technique for making a peony out of paper
From this material you can create beautiful peony... This will require paper different shades, paper clips for fastening, wire, thread and scissors.
The table shows the sequence of work.
| Image | Process of creation |
 | Cut from multi-colored rolls on a sheet of the same size. |
 | The elements are folded into an accordion, but the width should not differ. |
 | The accordion clings with a paper clip. The edging of the individual elements is trimmed in the form of petals. You can also simply cut the corners to create triangles. |
 | The middle parts of all blanks are connected and stacked according to size. All sheets are collected in one assembled element and rewound in the middle. |

A comment
Designer of the studio "Uyutny Dom"
Ask a Question“When creating a peony, you can use 5-7 shades. In this case, an even transition from pale to rich tones is created. "
Related article:
It will be easier to show talents if you carefully study decoupage for beginners step by step. This article provides detailed instructions to help you reproduce the technology at home without errors.
How to make a sunflower?
When deciding how to make flowers from corrugated paper, it is worth trying to make a sunflower. In this case, you need to prepare a material of black, brown and yellow colors, a PVA solution, pieces of wire and scissors.
The petals should be oblong and with sharp tips... The leaves should be the same. Then all actions are performed according to the instructions:
| Image | Stages |
 | A strip is cut from a sheet of a dark shade. The longer it is, the more magnificent the flower will be. |
 | Minor cuts are made on the larger side. In this case, the width between them should not be more than 4 mm, and the length of the cut should be about 1 mm. To speed up the procedure, the strip can be laid in several layers. |
 | The created blank must be twisted into a tube and wrapped with a dark thread. You need to straighten one edge to create the core. |
 | Then the petals are fixed with glue. The core is turned upward and the petals are attached to it in a circle. Several rows of yellow petals are made, and then green petals are formed. |
 | A rectangle is made of the material of green tones, which covers the wrapped core. The rectangle is glued in one piece to the green petals, and then twisted around the wire blank. |
You can prepare in advance the leaves, which are best made wide. They are attached to the wire along with the stem winding.
Original tulips
From tulips you can create original bouquet from corrugated paper. For work, you need to prepare corrugated paper, pencil, cardboard, scissors, wire, thread and PVA glue.
The creation of tulips includes the following steps:
| Image | Work |
 | A petal is depicted on cardboard and cut out. About 5-8 petals are required from paper. |
 | The petals are laid out individually. For all elements, you need to twist the tips. |
 | The edges of the petals need to be stretched a little and the base should be cupped. |
 | All parts are distributed in a circle. In this case, a bud is formed. At the bottom, all the petals are curled and fixed with an adhesive. |
 | The flower is attached to the end of a wire that is used as a stem. |
 | A strip is cut out of green paper, which is wrapped around the stem. The cut leaf is folded slightly and glued to the stem. |
Useful information! You can try making tulips out of paper and candy. For this, candies in foil are selected, they are attached to the wire, and then the petals are attached on top.
Lily making
Lilies are also created in a bud-harvesting manner. Their master class of corrugated paper flowers is complex.
The process includes certain stages:
| Image | Stages |
 | Preparing paper in yellow, green and lilac shades. You will also need paint, glue, a piece of wire, a brush, and scissors. |
 | From blanks rectangular petals are cut out. |
 | The ends of the parts are stretched and then curled with a pencil. |
 | At the base of the petals watercolor paint dark spots are applied. In this case, you should stir the dark blue and brown colors. |
 | The stem is made from the wire. The corrugated paper is then straightened and wrapped around the wire. |
 | A pistil is made on the stem |
 | The stamens are made from yellowish paper. In this case, the workpiece is cut off and cuts are made along its entire length. The resulting elements are twisted. |
 | Anthers are made from glue and semolina. A drop of glue is applied to the tip of the stamen, and then dipped into semolina. Completed details are painted brown. |
 | Leaves are made from thin blanks of green paper. They are given a curved shape. |
 | Stamens are glued to the pistil. Then three petals are attached, and then the rest. |
 | Is being done smooth transition to the flower stalk. Leaf blanks are attached with glue. |
Sweets attached instead of pistils look unusual. They are wrapped in foil and attached to the stem blank.
Corrugated paper candy color options
Using beautiful flowers from corrugated paper, you can make a bouquet with sweets with your own hands. This will require candy, flower and stem corrugated paper, wire, scissors, and glue.
| Image | Stages of work | |
 | A rectangle is cut out of paper, which folds in half and rounds off the side. This piece is wrapped around the candy. To give the product beautiful shape, the paper in the center is stretched slightly. One edge is secured with an elastic band. | |
 | To make the stem, the wire must be attached to the base of the flower. For this, a silicone gun is used. The stems are cut for the flower. They can be made larger, then the product will turn out to be more magnificent. The central part of the element also needs to be stretched, and the edges must be twisted. | To complete the look, the base can be wrapped in green corrugated paper. |
Chocolates can be placed in the middle of paper pieces. Crepe is twisted around the sweets, and a piece of wire is wrapped in a green corrugation. Each candy can be tied over beautiful bow... All buds are attached to specially prepared skewers. These flowers can be put in decorative packaging and tied with a ribbon.

What can be made from corrugated paper: tips and tricks
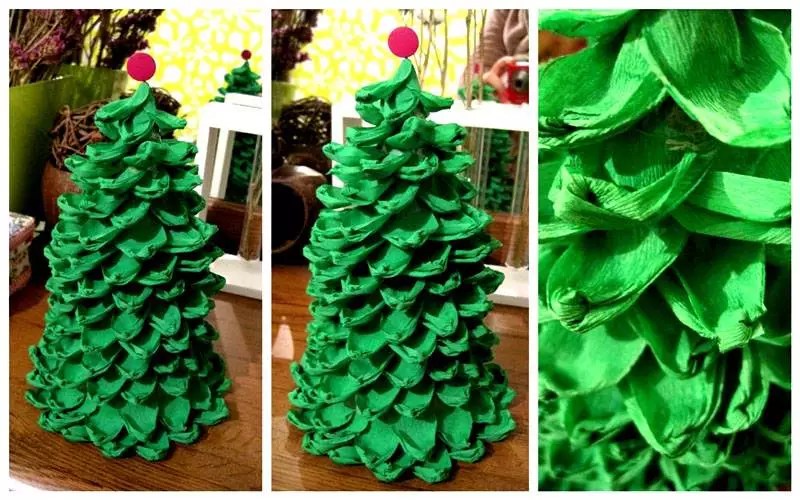
You can make a lot of corrugated paper interesting crafts... All kinds of Christmas tree toys are relevant. These can be clowns, snowmen, santas and rabbits.
TO simple toys refers christmas ball... For this, five sheets of paper are folded together. different color... Then an accordion is made of them, and the middle is wrapped with wire. The sheets need to be fluffed up, and the edges must be cut in a semicircular shape. The ribs are attached with glue. Finally, you need to attach a thread to the top of the product. These toys can be stitched together or hung on windows and other places.

How to make a rosebud from corrugated paper. Master class from Alla-Alushka


No matter how I resisted doing MK, I did it, although if I hadn't taken on one project, I would hardly have mastered it (MK) in the near future. Very often I am asked how I make such flowers. But I don't even know what to say. I came to this "recipe" through long attempts and training, although the features that I came to, I will show today. I will show "autumn waltz" as an example of candy, although you can, of course, take any other candy. I indicate the dimensions here by the ruler, but I do not use it, I do everything by eye. So, I cut off 2 strips of corrugation with a width of 10 cm and 5 cm, respectively, and divide them into blanks with a height of about 8.5 cm. Each strip should have 5 rectangles + leftovers (we will not need them).

We take 1 wide blank, fold it in three and cut it. We also do with another wide blank, but we take only one rectangle, put the rest aside, we will not need them. These are our future narrow petals. We also fold two more wide blanks in half and cut. As a result, we get one large rectangle, 4 narrow and nine wide blanks for the petals.

We start cutting out the petals. First, we take the largest workpiece, fold it in half and round the top. It turns out to be almost a semicircle. Then we take the blank of the petal, fold it in half, round off the corners from above, and from the bottom, on the contrary, cut off these corners. We do this with all the petals, both narrow and wide.

We start to form the petals. At first thumbs both hands make a depression for the candy, but only in the center of the petal, do not stretch the edges. Then we take a skewer and start winding the petal around it. Here in this place is the "trick" of my recipe for roses - you need to wind up strongly, practically by 1.5-2 turns of a skewer. Then I just pull the skewer. Thus, we are left with a STRONGLY twisted half of the petal. We do the same on the other side. The photo shows how strongly the edges of the petal are bent. We do this sequence of actions with all the petals, both narrow and wide.

Let's start assembling the flower. We take our large blank and put the candy on it. As you can see, in this blank, I DO NOT make grooves for the candy, but begin to wrap it very tightly, stretching the corrugation along the way. First I wrap it on one side, then on the other, at the bottom I tie it with a thread. After that, you can give the finished look to the bud by slightly bending the edges with your fingers.

Then everything is simple: we first work with narrow petals. Drop a drop of glue onto the very tip and glue it to the bud (all four petals). Next, we glue four wide petals, trying to place them in a checkerboard pattern with respect to narrow petals. The last row distribute the last five petals. However, you do not need to make a row of four wide petals, but immediately after the narrow ones, distribute five wide ones. We ALWAYS make sepals, we are not lazy! After the sepals have been glued, you can draw a skewer over each one, placing the skewer between the sepal and the flower. In this case, the sepals, as it were, will press against the flower and will flow around it, and not stick out in different directions.

In general, we made a flower, now you can carefully glue a toothpick, skewer, wire into it and use it at your discretion. But we will continue to work and make a souvenir single rose. My problem with assembling these flowers has always been that they have a fairly wide base, and when using drut it was almost impossible to beautifully tap the flower stem. And since you cannot hide an "ugly" transition in this rose, I do this: I take an extension cord for flowers. These are used when it is necessary, for example, to place an orchid in a bouquet. They have a fairly long water tank, which I cut off, leaving just a little bit. I cut the base of the rose obliquely, and pour plenty of hot glue into the remaining reservoir and practically "screw" the flower into it. And I leave it until it cools down and grabs.

We tap the extension cord, add bead leaves - any decor you like and admire our rose. You can add a bud (as in the first photo) or several buds.
Since we started talking about roses, then I will show how I make a bud, but there are a great many such MKs in SM. We take two small rectangles, literally one revolution of the candy. We put them together and in half. Cut out a semicircle. Outer petal Move it slightly down and to the side, literally by 2-3 mm.

We take the candy, squeeze the tails (so that the candy is not attached "tightly") and wrap the candy, first to the right, then to the left (or vice versa, whoever is more comfortable, it only depends on which direction to shift the outer petal, to the right or left, so that along of the whole bud, two petals were visible - see the photo) and we tie it with a thread. We glue the sepals and twist them with a skewer. Our bud is ready. Now, depending on what it is intended for, we glue in a toothpick, skewer, wire, etc.

Now a little more "boring" theory. The formation of any rose comes down to the fact that we have to form a bud, and then glue the petals. In any MC there are exactly these steps. In addition, even the petals in any MK are the same - semicircular. And then each master decides for himself what and how he will do with these petals - stretch, twist, twist, cut, or do nothing else at all. You can also make a rose from petals of only one width. Depending on these steps, you will get the most different result... Do not be afraid to experiment and do not strive to make an "exact copy" of your wishlist. This is unlikely to work, since making a copy is boring. Bring in something of your own, kind, unique, and then you will succeed. I wish you good luck in your work !!!
A source stranamasterov.ru/user/198397
Today we will talk about how to make chic and unique flowers from corrugated paper. And what to give loved ones for a birthday or any other holiday? The age-old question which is confusing. What could be better than a gift made with love with your own hands? Many of you believe that creating a masterpiece with your own hands is incredibly difficult. But this is not the case!
You will see for yourself that there is nothing complicated here. All that is required of you is necessary tools and materials at hand, as well as a little patience. So let's get started.
Why is corrugated paper needed?
It so happened that this delicate, multi-colored, crumpled paper attracts many designers and fans of the "Crazy Pens" mug.

Indeed, "corrugation" is suitable for the implementation of various design solutions.

For example, this material can be used to make unique lampshades for sconces, wall and floor lamps, interesting elements of wall decoration, and so on.

Plus, corrugated is incredibly easy to work with. Elements made of crumpled paper can be easily shaped into any shape, such as flower petals.

They are easy to influence and bend in any direction. "Corrugation" can also be repainted in a different color without damage to the manufactured product.

Another argument in favor of choosing crumpled paper is the expensive and smart look. They look really rich and festive.

Well, before starting the review detailed instructions, how to make gorgeous compositions out of harvested, let's unleash the full potential of this topic.

Ideas for original gifts
And so, what can they be useful for and where to use them. Actually practical solutions a lot, here are some of the most original ones:
Any gift that you buy for your family and friends, you wrap it in a gift wrap. This is common decision, which eventually became commonplace.

But, if you decorate it with homemade compositions, you will not only emphasize the uniqueness, but also focus on the talent of the donor. Such a gift will be unique and one of a kind, because you made it yourself.

You can just give it to your dear and to a loved one delicious sweets that he will gladly eat over a cup of aromatic tea.

And you can do otherwise. Imagine delight and sincere surprise if you wrap each candy in a "corrugation". It will not only look beautiful, it will show how dear a person is to you.

Postcard decoration... You can make one large or several small corrugated flowers and attach them to a regular postcard.

This simple, and at the same time unique solution will make a loved one happy.

Heart... This decoration is relevant for a wedding procession and for the holiday of all lovers.

Cut the heart out of cardboard of the size you want, and then glue over its surface. The jewelry can be presented to a loved one as a symbol of unity and devotion.

Present your loved one "HEART"
The original heart can also become part of the interior decoration, which is chosen for the celebration of the wedding.

Candy ladybug... Highly actual gift for those with a sweet tooth and children. All you need to do is shape the ladybug layout.

Little tricks
Decorate the back with bright red crumpled compositions, and place chocolates in the center instead of the famous black dots. Simple and original.

You can also limit yourself to simple bouquet made of crumpled paper with his own hand. Remember from your creative solution the result depends.

Perhaps you can come up with your own corrugation application that will become a general trend.

Let's move on to today's master class as soon as possible, because, for sure, you can't wait to get down to needlework as soon as possible.
![]()
Someone likes roses, someone likes daisies. What can you do here, everyone different tastes... In this regard, we will not be limited to an example of making a particular flower.

Tips will help you learn how to make different compositions and crafts from them.

Sweet rose
First of all, you need to stock up on the following materials: corrugation (for the stem we choose green, and for the bud the one that your fantasy approves), small chocolate candy, thread, scissors, duct tape, wire.

So, let's start creating a "chocolate" masterpiece:
- cut out 10 rectangular blanks: 5 petals measuring 6x7 cm and 5 blanks measuring 4x7 cm, slightly twist the edges on one side;
- try to give the cut out petals 4x7 cm in shape, pulling out their middle, this will be the core;

- wrap five wide blanks around the formed core;
- you can fix the petals at the base with threads, wrapping them around the bottom of the leaves several times;
- carefully place the candy in the center of your product;
- take a wire of the required length (preferably aluminum) and wrap it with green paper, this will be your stalk;
- also take care of the leaves by cutting them out and securing them to the stem.

You can cut the buds in your own sizes. If you want to do big rose, accordingly, prepare large petals first.
Sunflowers - the sun in the hands
We need: yellow, brown and green corrugation, a small piece of wire, glue, threads and scissors, tape. Let's start making:
- First of all, we need to start in the middle of the sunflower. Cut off several strips 6-7 cm wide from the brown roll. Cut one side of the strips into a fringe, let the other remain flat. Roll both strips into a roll, fixing them at the bottom with threads.
- From yellow paper you need to cut the petals. Do not limit yourself to 5-6 petals, the more there are, the more natural and beautiful it will be. Therefore, cut out the sepals on the same principle. Glue yellow and then green blanks in several rows to the base of the middle.
- Attach the sunflower head to a wire wrapped in a green corrugation.

Crocuses and tulips - harbingers of spring
Tulips and crocuses can please only with one-day flowering, but I would like to enjoy this wonderful phenomenon for a longer time. Well, you can extend the life of these plants by making them yourself.

You will need to stock up on the following tools and materials: corrugation green and a different shade of your choice, glue, aluminum wire, scissors and glue. First, let's take a look at how to make tulips:

- cut a long strip of 4x19 cm;
- smooth this strip in half until you get the size of a real tulip petal;
- to get the petals of the same size, you need to fold the strip very carefully, take this process responsibly;
- cut on both edges of the folded sheet along a small triangle, trim the bottom with an oval;
- all that remains to be done is to separate the resulting petals from each other, fold the oval bottom a little and tighten it with a flagellum;
- Bend the top of each petal slightly to give them a more natural shape. To achieve this, stretch;
- form a bud, for this you need to fold the blanks and give them a natural shape;
- attach the lower part of the tulip to the wire previously wrapped in green corrugation;
- do not forget to attach a couple of green leaves to the stem.

It will be interesting to you:
Home decor is a constant and never-ending work. In the process, new techniques and types of work are being mastered. In this article, we will talk about how to make flowers from corrugated paper. This paper can be found in flower shops. But in a larger assortment, it is in specialized establishments that sell everything for needlework. For work, you will also need wire or thin sticks (bamboo skewers are also suitable), glue and scissors.
General principles and rules
Despite the fact that corrugated paper flowers are made different, the principles of work are the same. Here is a brief general rules, which will help you make paper flowers with your own hands, very similar to real ones.
These are, in fact, all the rules. And one more thing: the stem is prepared first. For it, wire or sticks of different thicknesses are used, which is wrapped in a long thin strip of green corrugated paper. The tape can be coated with glue, and then wound onto the base. You can roll it dry, and fix the edge with a drop of glue. Another point: if you are going to collect a composition from flowers, leave the lower 1/3 of the stem without finishing - it will be easier to make a bouquet.
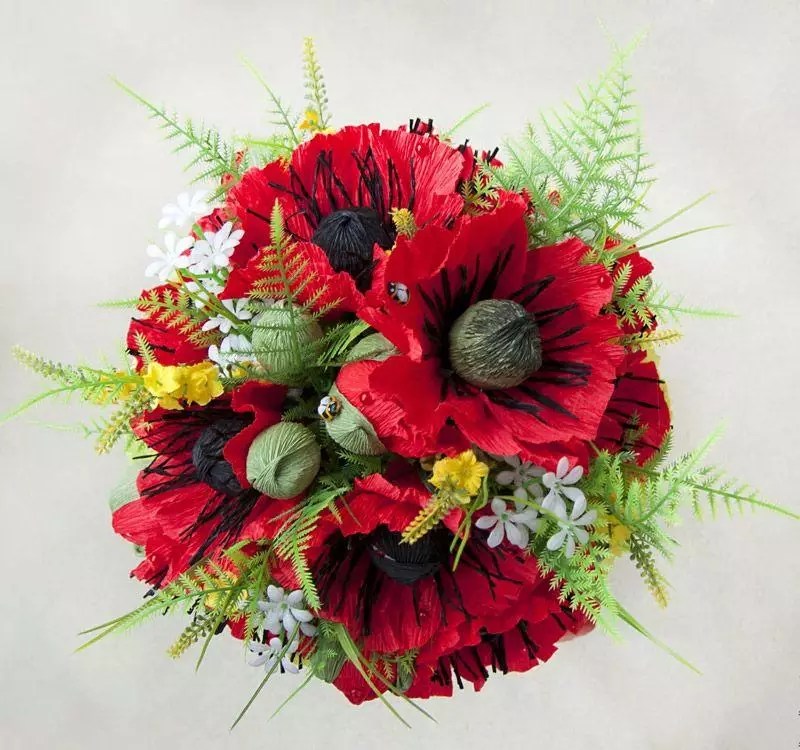
Poppies
Corrugated paper poppies are very easy to make. It is important to find the desired shade scarlet... You will also need small piece black - for the core. But, if it is not there, you can use any dark one, then paint it black.
We do corrugated paper poppy like this:
- From paper napkins add a small square of any color. We wrap it with black corrugated paper. If there is no black, take any dark one, then paint it.

- Cut out two or three petals from scarlet paper different sizes: small, medium and large.
- We collect the petals all together (do not put them in a neat pile) and crush them into a ball.
- We disassemble the ball into petals.

- We take the core, wrap the first small petal around it from left to right.
- The second small petal partially overlaps the first, followed by the middle one, too.

- The second middle and two large petals form the second row. They are located so that their central part overlaps the junction of the previous row.

- Gathering everything together, we insert the wire into the base, wrap the base with thread, glue it. We wrap it in green paper.

Mac is one of the most simple colors for self-made from corrugated paper. It looks, at the same time, very good. You can use them in a campaign with other flowers, or make a bouquet with only poppies.
Even such a simple flower can be made in different ways. First of all, you can change the middle. In the master class described above, the core of the flower is very simple. It can be made more like natural. Using the same technology, we make the middle, but from white paper. And from black (can be painted) we cut out a strip about 1 cm wide and 4-5 cm long. On one side we cut it into thin stripes (a couple of millimeters wide). We twist the resulting "noodles", getting thin stamens. We wrap the stamens around the core, and then we act according to the same algorithm.
How to make paper and candy crocuses
An unusual gift can be made by using candies as the core of flowers. It turns out original sweet gift... Such a core can be made in flowers with a large hollow bud inside - a tulip or crocus, for example. Moreover, corrugated paper crocuses are very easy to make. Everything will take 5-10 minutes. Not more.

A bouquet of corrugated paper with sweets is a nice surprise
- Cut out a square with a side of 15 cm from paper.
- We divide it into three parts, making a cut to a depth of 7.5 cm.Three petals are obtained.

- Each petal, measuring 5 cm from the top, scroll around its axis and upper part bend down.
- Use your fingers to give them a concave shape.

- We take the formed petals, wrap them around the stem so that each petal takes its place - about 1/3 of the entire diameter. To do this, the bottom edge will have to be crushed well.

- We make leaves from green paper. Cut out a rectangle with sides 5 * 8 cm.
- We divide it into three parts, making incisions to a depth of 8 cm.
- Having stepped back from the edge of 3 cm, we twist the strip of paper around its axis, bend the upper part down, straighten it and give it a rounded shape.

- We wrap the leaves around the bud. They should fall at the junction of the petals.

- We take a narrow strip of green paper, twisting it around the wire, form the stem.
That's all, the crocus made of corrugated paper and sweets is ready. Having made 7-9 pieces of these colors, you can put them in the basket. For more variety, you can make some small flowers.
Chrysanthemum
Chrysanthemums can be made using the technology described above. The difference is that there will be many petals and they will be narrow. And the principle is the same: we twist the upper part of the petal, lower it down. Only in the case of chrysanthemums, it is necessary to give the entire petal a curved shape.

For these paper chrysanthemums, candies are also used as a core. These corrugated paper flowers are best made from a material that is not too bright. The tones are softer, softer. For foliage, muted greens are also chosen. For more believability, take paper of two close shades and make petals in two shades.
So, do it yourself chrysanthemum from corrugated paper:

This chrysanthemum variant looks pretty good. But for greater believability, petals of different sizes can be made. You need at least three grades: small, medium and large. They will differ more in length than in width. Such a flower will look more magnificent, it will look richer in a bouquet. Try it.
Asters - simple and original
For simple yet eye-catching corrugated paper flowers, try making asters. They are made from corrugation of bright and pastel shades... They look best in a bouquet, and the colors can be different.

Corrugated paper asters can also be made from petals of different sizes - shorter ones closer to the center of the flower (there should be fewer of them), and longer ones at the periphery (there are more of them). You can bend them in one direction, or in the opposite direction. As you like best.
Corrugated paper roses: a step-by-step manufacturing algorithm (2 ways)
The good thing about corrugated paper flowers is that they can be made in different ways. The material is very plastic, it easily changes shape, because there are several ways. Someone wants to achieve more "naturalness", and someone is important about speed.
1 way (natural look)
For roses made of corrugated paper, it is better to choose paper of two or three very similar shades. This will make the flower look more natural. For example, for the flower in the photo, white and crepe paper... Number of petals different shades arbitrary, as well as their placement in the bud.

The manufacturing procedure is as follows:

As a result, we get beautiful rose from corrugated paper. In this version, she looks like real flower... There is also a simpler and quick way(pictured below).
Method 2 (simple and fast)
Cut out a strip of paper 7-8 cm wide. You can make it uneven - narrower on one side, wider on the other. We fold it starting from the narrow edge with an "accordion". The width of the "accordion" is 3.5 -4.5 cm. From the resulting stack, cut out the petals by 2/3 of the height.
We wind the petals onto the wire (you can not wrap it with a green ribbon for now), starting from the narrow edge. As we twist it, we shape it with our fingers - stretch it on one side, crush it against the stem. Having installed all the petals, we fix them with a thread (just by winding a few turns). We correct the petals, forming a bud.

From green paper, folding it like an accordion, cut out long and narrow petals. Please note that their ends will need to be twisted, so they should not be so narrow (noticeably 1 cm). We wrap the cut petals from below, under the petals, twist the leaves with our fingers, and then draw up the stem.
Corrugated paper peonies (with patterns)
Peonies need yellow corrugated paper - for the core, green - for the foliage, pink, cream, crimson - for the flower itself. A wire or thin stick is suitable for the stem. You will also need PVA glue.

Corrugated paper peony is a rather complicated flower to make. It has many different shapes petals. You can't do without a pattern. But there are many varieties of peonies, so there are several patterns. Here are two options. The first one can be printed, cut out and used as a template - it is given in full size image. The second option can be drawn with your own hands in the cells.
Step-by-step manufacturing process with a photo:
- Cut out a strip of yellow paper 4-5 cm wide and 10-12 cm long. Fold it several times, cut it into thin "noodles", leaving about 1 cm of uncut edge.
- We roll the resulting tape into a tight roll, using the whole edge for this. We grease it with glue and twist it. It turns out a shaggy yellow core around which the petals will be attached. We fix this center on a stick / wire, which will be the stem.

- Cut out the petals from paper. Minimal amount- 20 pieces (all types), but the more, the more fluffy the flower will be. On the second pattern, the number of petals is indicated on each; on the first, explanations are needed. There are also numbers there. This is the required number of petals.
- Stretch each petal in the middle without touching the edges, giving them convex shape... Don't try to make them the same. This is not required. In the process, you can still stretch or squeeze a little.
- We begin to fold the petals from the smallest ones. We place them around the existing center. Place the first small petals just slightly overlapping their edges. We coat the base with glue.

- Next, take the middle petals. We lay them with a slight approach to one another.
- Then we put the big ones and the last - very big leaves... We coat each layer small amount glue at the base.
- Leaves are also required. We cut them out of green paper. On the one hand, we squeeze them, forming a petiole, on the other, we straighten them in the middle, giving them a curved shape (similar to a boat).

- We attach the leaves under the bud, bend them down.
- You can also make leaves, like those of a peony, but this will also require a thin wire and several carved curly leaves. Streaks cannot be made on corrugated paper, but they can be marked with paint.

- We glue each leaf to the wire, wrap the petiole with a thin strip, then attach it to the stem.

The assembly process is a creative activity
- We take a long narrow strip of green corrugated paper (about 1 cm wide, 20-30 cm long - depending on the length of the stem). We wrap the base of the flower, then smoothly move to the stem. At the end, we fix the edge of the paper with a drop of glue.
The corrugated paper peony is ready. Usually they make up a bouquet. When you do the following, do not try to make them exactly the same. All flowers in nature are unique. Yours should be different too.

You can play with the size and number of petals, mixing petals of different shades, close in color. You can try to darken the petals at the base with paint. In general, there are a lot of options.
Corrugated paper flowers: photo ideas, patterns
Using the techniques described above, you can make any flower. The main snag is in the shape, number and size of the petals. The most important thing is still the form. It is characteristic of each petal. Sizes are arbitrary. Not only do flowers come in different sizes in nature, in recent times it has become fashionable to decorate the interior with giant growth flowers. The decoration is original, but specific. You have to increase many times basic patterns, it is difficult to work with large scales. It's better to practice flowers first. normal sizes and then proceed to the big ones.

A little about patterns. They can be found not only. If it happens in the summer, take the desired flower, disassemble it into petals. From the whole heap, select the most characteristic ones, attach them to a sheet of paper, circle them. Then the shape must be corrected taking into account the fact that these are still paper flowers. The pattern will finally take shape after a few trial and error. We will post several patterns and master classes in photos in this section.
Cornflowers
How easier flower, so more ways do it. Cornflower from corrugated paper can be made in different techniques... Examples are in the photo.


If you want to make it very similar to the real one (A - a pattern for a blossoming flower, B - for a bud)
Iris
Making iris out of paper takes some imagination. Very much custom flower... The photo shows several techniques that allow you to achieve different effect... Some flowers just resemble the original, some are very similar to it.


Anything different


Lilies ... Beautiful, but several techniques are applied


Pansies - a pattern for making from corrugated paper


For the "advanced". A very beautiful flower turns out


Cute daisies - an option for beginners
Products that will be discussed in this article have unique characteristics... Their great looks will come in handy for memorable gifts. Beautiful flowers DIY corrugated paper is not difficult to create without errors after studying the instructions below.
Experienced craftsmen hide delicious candies in tulip petals
Creativity helps to reveal your own talents and at the same time - to create products with truly exclusive characteristics. But some techniques are excessively complex, excessively lengthy. technological processes... Sometimes the high cost of component parts frightens off.
These and other disadvantages will be eliminated by using corrugated paper:
- Its cost is not great. Therefore, you can work without significant restrictions on large-scale projects. Repeated experiments and trials will not be expensive.
- Such materials are offered by many trade enterprises. They are purchased in classic stores, or on specialized sites, with convenient delivery to the desired address. A wide range of colors and textures is supported in the corresponding catalogs.
- To reproduce the technology correctly, you will need inexpensive adhesives and simple tools.
- If you make mistakes, you don't have to re-create products. Most algorithms provide for the attachment of individual parts, so the problem is eliminated quickly, without wasting time.

How to make flowers from corrugated paper with your own hands
In addition to the basic materials, the following products must be prepared in certain color options:
- Strong and resilient wire of the required length. A power frame of the stems is created from it, so it must correspond to the expected loads.
- Cutting pliers and pliers are needed to cut the wire into specific sections and bend it.
- Sharp scissors (large and manicure) are useful for cutting large and small workpieces.
- medium density create templates.
- The contours of the structural elements are marked with a simple pencil.
- For their fastening, they are used (such as PVA). It should be verified empirically that it does not change color when cured.

DIY corrugated paper roses: step by step instructions
This table shows a more complex method. It will need all the components listed above.
| Photo | Sequencing |
 | Petals in the form of "hearts" are drawn on cardboard. Change the value slightly to get 4-5 different patterns. |
 | Use scissors of a suitable size to neatly cut the workpieces. |
 | To simplify the subsequent assembly, the petals are stacked one on top of the other, taking into account the order of attachment to the stem. |
 | They create an optimal shape. To do this, the areas with rounding are slightly pulled to the sides and the middle part is made deepened. |
 | Next, you need to prepare the stem and leaves. They can be pre-formed, like petals, or by attaching them to structural elements. |
 | To obtain delicate rigidity, connect the two wires with a green ribbon. A small upper section (1–2 cm long) is folded. You will need pliers for this procedure. |
 | Formation begins by attaching the smallest petal. |
 | Further, larger elements are sequentially fixed. Instead of ribbon, you can use a thread of a suitable color. |
 | From the bottom of the bud, small leaves are attached. |
 | Large leaves are glued to the stem. |
 | After completing the assembly of the entire product, the petals and leaves are given the final shape. The rose is then placed vertically in the vase. |
Important! This technology of attaching leaves and petals is used to make different flowers from corrugated paper. It is complemented by special techniques creating stamens and other plant elements.
The next way is faster. In it, a bud is formed from one blank. First, the tape is cut to the required length (50-60 cm) and height (4-5 cm). One edge is folded inward. Further, this part, which is denser than the rest of the paper, is bent in the form of a flattened spiral. The corrugated material is fixed in the desired position without glue or other devices. The workpiece is formed in the form of a bud. Lower part attached to the stem. Leaves are attached below.

Features of creating tulips and other flowers
For manufacturing, you need to prepare similar components, tools and materials. Need paper different colors corresponding outward appearance tulip petals. You need to purchase three types of wire (with different diameters). It is used to create frame elements with different stiffness and thickness.
The sequence of actions is shown in the table:
| Photo | Description of technology |
 | Petals can be cut from blanks, as in the manufacture of roses. But to simplify the process, use such a blank. It is created from a strip 5-6 cm high.After folding, you should get a square 4-5 cm wide. |
 | All petals (8-10 pieces) are cut out of it at the same time. The lower part of the workpiece is made elongated. |
 | It is rolled up in the form of a cord. The petal itself is stretched over the edges and a depression is formed in the center, as in the first method for making a rose. |
 | The created petals are set aside and the production of stamens begins. They are created from wire of small diameter. The upper parts are made of corrugated paper. |
 | Individual elements are attached to the stem with tape or thread. |
 | The leaves are cut according to the pattern. These parts will turn out to be long, so they will need to be strengthened with a wire of medium thickness. |

Do-it-yourself corrugated paper is complemented with pearl beads, fabrics and others decorative items for creating beautiful compositions... The following examples highlight the features of the manufacturing processes of other artificial plants. In lilies, the stamens are large. They are made from thick wire wrapped in white paper. To simulate pollen, the upper curved parts are coated with an adhesive solution. Next, they are dipped in semolina. For drying, such blanks are inserted vertically into a piece of plasticine.


Sunflower leaves and petals are cut, shaped and attached using the techniques discussed.

In chamomile, you will also have to pay sufficient attention to the core:
| Photo | Actions |
 | You will need thick yarn. |
 | Such a knot is created from it and fastened with a thin yellow thread. |
 | Cutting from the top, you get the necessary workpiece. |
 | It is placed on a wire. |
 | For a strong connection, use a green tape. |
Making flowers from corrugated paper with candies
Delicious treats inside the buds are a nice addition to the wonderful appearance of the products. This technique can be studied using the example of making poppies:
| Photo | Description of actions |
 | Petals are cut from blanks with or without use. |
 | There are many stamens in the poppies. Therefore, the preparation of such a corrugated paper product is useful. |
 | Candy is wrapped in it. |
 | The finished block is installed on a thick wire and secured with a strong green thread. |
 | Candy can be hidden in partially opened buds. |
What else can be made from corrugated paper?
They form from flowers. Such elements are used to create paintings and original design compositions. The following are the features of DIY corrugated paper:
| Photo | Description of actions |
 | For large product will need enough Supplies... Rose buds are created in the required quantity using one of the above technologies. |
 | A ball base is created from crumpled paper that is held together in the desired form using thick, strong thread. You can purchase a ready-made foam ball of suitable size. |
 | A styrofoam cube with a rod is placed in the pots. It is wrapped with corrugated paper tape, which is attached with an adhesive in several places. |
 | Roses are fixed on the ball (with PVA glue). It is advisable to create a hole in it in advance for subsequent mounting on the rod. |

Corrugated paper is a lightweight and well-shaped material. These properties are used to implement various creative plans.


If necessary, a fantastic background with the necessary parameters will be created quickly and inexpensively. The only significant limitation is the suitable weather conditions. At strong wind, during the rain, openwork compositions will not withstand the destructive external influences... For this reason, they are more often used indoors.

Bright unusual products corrugated paper is popular with babies. They joyfully perceive the amazing transformations of the surrounding space.

You can use other instructions to figure out how to make corrugated paper flowers. Tips come in handy experienced craftsmen, study of current market offers in the relevant product groups. But in any case, the following facts and recommendations must be taken into account:
- The cost of a standard roll of paper is from 60 to 120 rubles. Several bouquets of flowers can be made from it. To save more, find direct suppliers.
- The first experiments are performed on relatively simple structures. They choose products with large constituent parts, the manufacture of which does not require special care. As they acquire skills, they move on to complex compositions.
- This hobby is not only suitable for adults. Creation of functional and beautiful items used for harmonious development children. It improves fine motor skills fingers formed good taste, brought up respect to things.
Corrugated paper products are unique. They will be used to solve various household and commercial tasks with minimal cost time, financial resources and labor resources. The video of the master class of flowers from corrugated paper is presented below:
MAYBE YOU WILL ALSO BE INTERESTED IN: